 BERNINA Corporate Blog -
 I just love the idea of this instantly-up play house. How simple! You just throw it on over your table and there you have a ready made super-cute den.
I first saw the idea on Pinterest and couldn’t resist it. I made this version for baby Harriet for her first birthday. She’s a little bit small for it now but I am hoping it will last her for years. It would make an amazing Christmas gift that would be good as family present as several children can play in it together. It’s also a great space saver for smaller spaces.

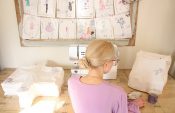
I thought I would give you a run down of how I made it and have included some of the stencils I used. The beauty of it is that every den can be different. I was going for a Home Sweet Home feel. But how great would a post office or a fire station be? Here is my initial plan below, done on the computer. It was very useful to have a diagram that I could just scale up rather than keeping it all in my head and wondering how big I needed to make each element.


The basic shape is pretty simple, but you can’t be haphazard about it. Each den has to be made to a specific table. Don’t try to guess your table size – it doesn’t work unless it fits exactly! Measure your table: you will need 5 rectangles: 2 end pieces, 2 side pieces and a top. I have used a heavy weight curtain fabric to make it dark inside – it’s all part of the fun! I bought my fabrics but you could make it out of an old sheet, duvet cover or a mishmash of whatever fabric you have lying around.
The key to making this easy is to do all the appliqué on the separate panels FIRST. You don’t want to put the 5 panels together until the very end otherwise the whole thing just become hugely cumbersome and difficult to handle through your sewing machine.
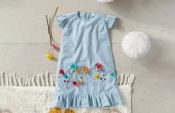
 The door is just attached at the top like a flap and is slightly larger than the hole I cut (just to cover the gaps around the edges). The windows I made from a heavy net so you can actually see through them. They are surrounded by a satin ribbon frame. I sewed the net onto the backing fabric BEFORE I cut out the hole to maintain the shape of the fabric.
When I was doing the leaves and flowers, I backed the shapes with Bondaweb first. If you haven’t come across Bondaweb before, it’s brilliant stuff used by appliqéists everywhere. It’s just like an iron-on facing, but it’s adhesive on both sides. You just cut out your shape from Bondaweb, iron it on to the fabric you want to appliqué and cut it out. Then peel off the backing paper and iron your fabric shape on to the backing fabric. It is very helpful in stabilising the fabric and just makes the whole appliqué process very easy.
 Even though my leaves did seem stuck fast, I went around each shape with a zigzag to hold it on place. I have heard that Bondaweb’s stick lessens after a few washes and I wanted this to last a long time. You can actually get away without using it for the small and simple shapes but it really comes into its own with the curly cat’s tail.
For the zigzag stitching I used the open embroidery foot (number 20) which is great for applique.
It has an open front so you can see exactly what you’re doing on the fabric as you go along. I set my machine to the zigzagfunction on number 5, which gives you the widest possible zigzag, and the stitch length to about 1.5 so that your zigzags are close together but not touching. See the screen settings here. I have a digital display on my machine (a Bernina B350) but you can set them the same on a manual machine.
 The flower centres were some iron-on patches that I found very cheap on a market stall. They are lovely but not really big enough alone so I drew about a cup to make a bigger outer circle for each one. There are so many option with the flowers. You could use oversize buttons to create flowers like these pretty felt ones.

Linked here (above) are the stencils for the cat and all the other components (including the dog that I didn’t use in the end.) As you can see there are several things I changed from the initial plan. The curtains just seemed too fussy in the end. What I would have like to have done, but ran out of time for, was a letterbox with some fabric letters that she could post through. Look at the American style mailbox on the outside of the den below.
 The bunting is such a pretty little extra touch and is a great way to use up your fabric scraps. As for the round window, well, I would just recommend steering clear of that altogether. It was SO fiddly pleating the ribbon round the curve and the square ones are just a million times easier.

If you’d like more inspiration, here are a couple of the other fabric dens I have seen on Pinterest and there are EVEN MORE ideas for fabric dens and play tents here on my Pinterest page. I love the teepees – maybe that’s the next project!

Did you do anything on the inside? I made one of these for my grandson. It looks like a cabin in the woods. I made it from wood looking fabric, with trees on the corners, a hammock on one side, a barbecue grill and picnic table on one side, a bush and a deer on one side and the front door on one side with windows on two sides. However I thought the whole fun of it was crawling under the table and playing on the inside so I made inside walls-one with a fire place and a deer picture over it, one wall is the kitchen with a sink, stove, oven that opens, a refrigerator/freezer that open, and cabinets that are pocket ts he can put things in, then a bedroom on one wall with a bed and another “cabinet” that is a pocket, and inside the front door side is an overstuffed chair and coat rack. Everything is appliqués on. I also included a stick-on battery operated light that can be stuck to the underside of the table so he can have light to play. It is one awesome playhouse!
Dear Vicki,
Wow, your playhouse sounds like a dream for a child to play in! I love how you decorated the insides of your house. This must have been a lot of work and is surely looking amazing. I would love to see some pictures of your beautiful playhouse. Why not post it in the community section of the blog?
OMG, my girls would love this. It’s a lot of work but hours of enjoyment for little ones.