 BERNINA Corporate Blog -
Dear Reader
Part of my job as educator for overlockers/sergers at BERNINA International includes writing of tips and tricks on how to use our products. Many of these instructions are only developed after a product has been launched as the time prior to launch is not sufficient to try all the possibilities. But some of these tips develop due to an inquiry of a user not getting the results by following the instructions in the manual.
This is one of these examples: How to get a successful and nice result in using the Binder attachement on the bernette FUNLOCK b42 or b48?

But from the beginning: Dear Agnes from South Africa – you found an error in the instruction manual.
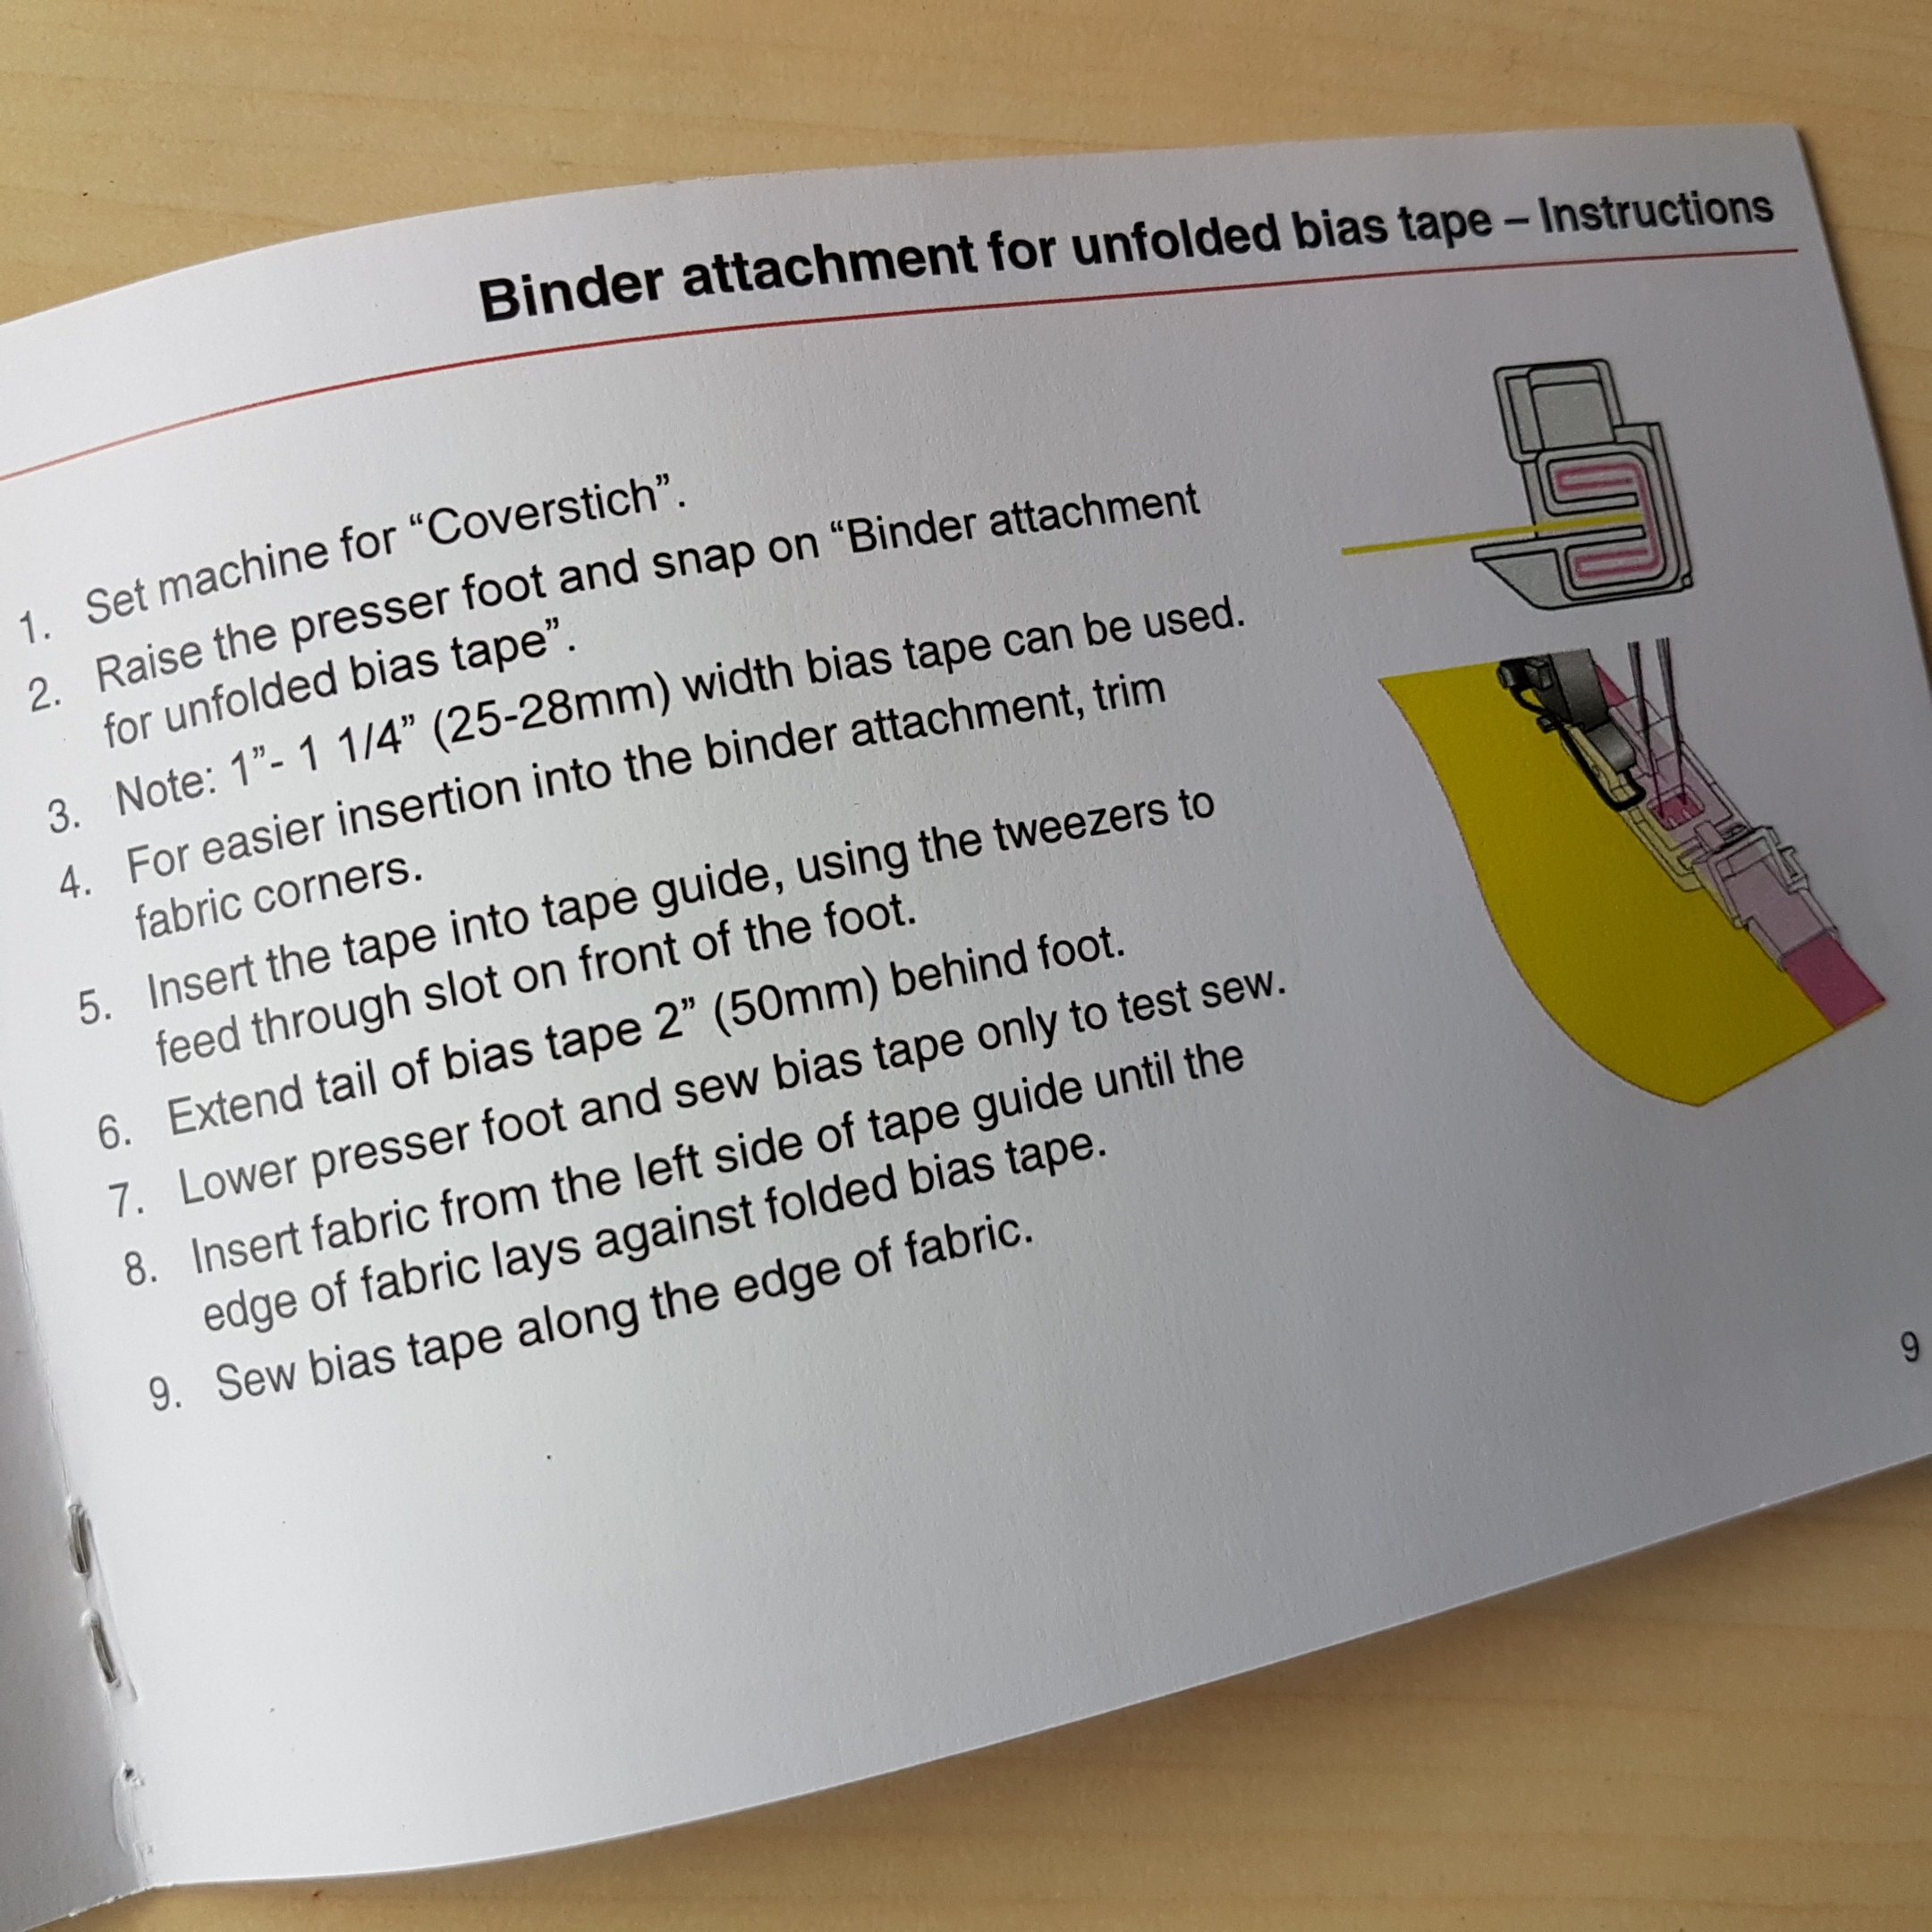 Two possible errors can be located:
… the graph of the folding of the binding fabric…
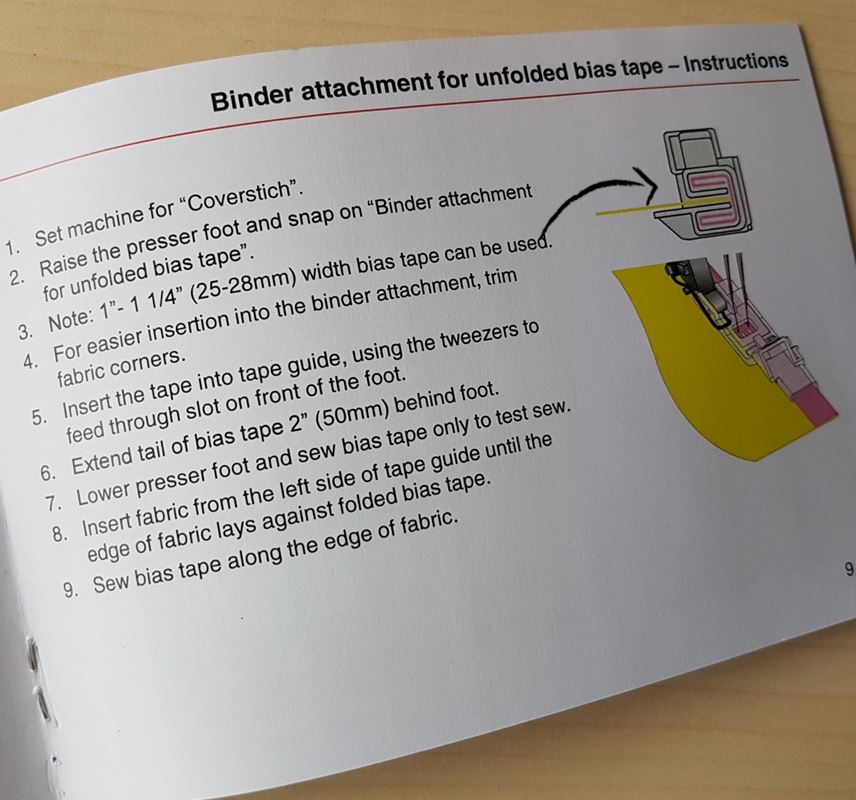
… or the recommended width of the tape.
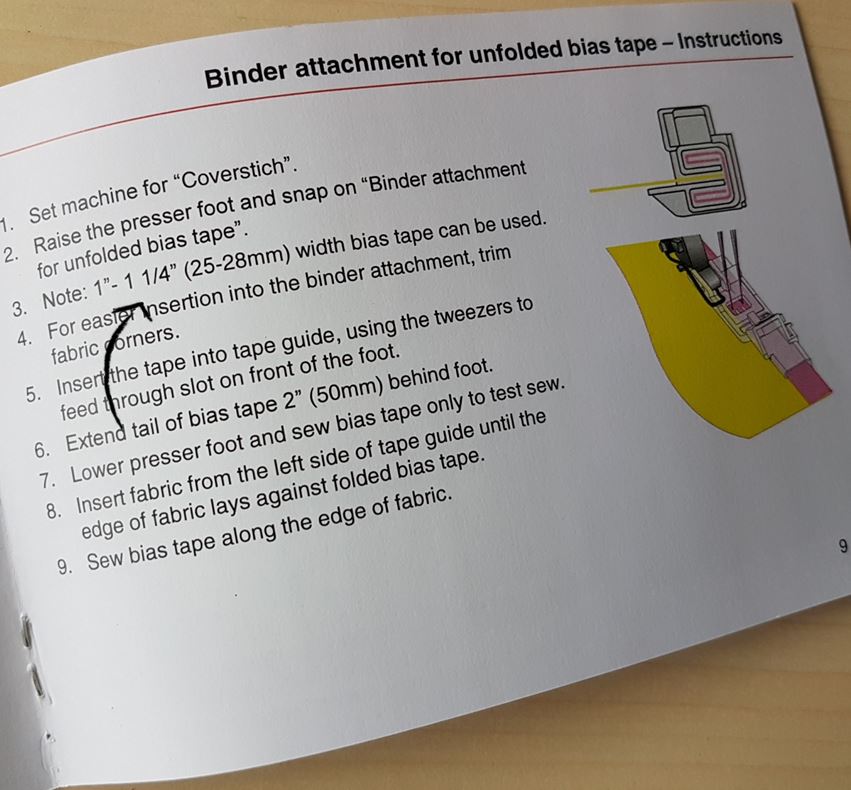
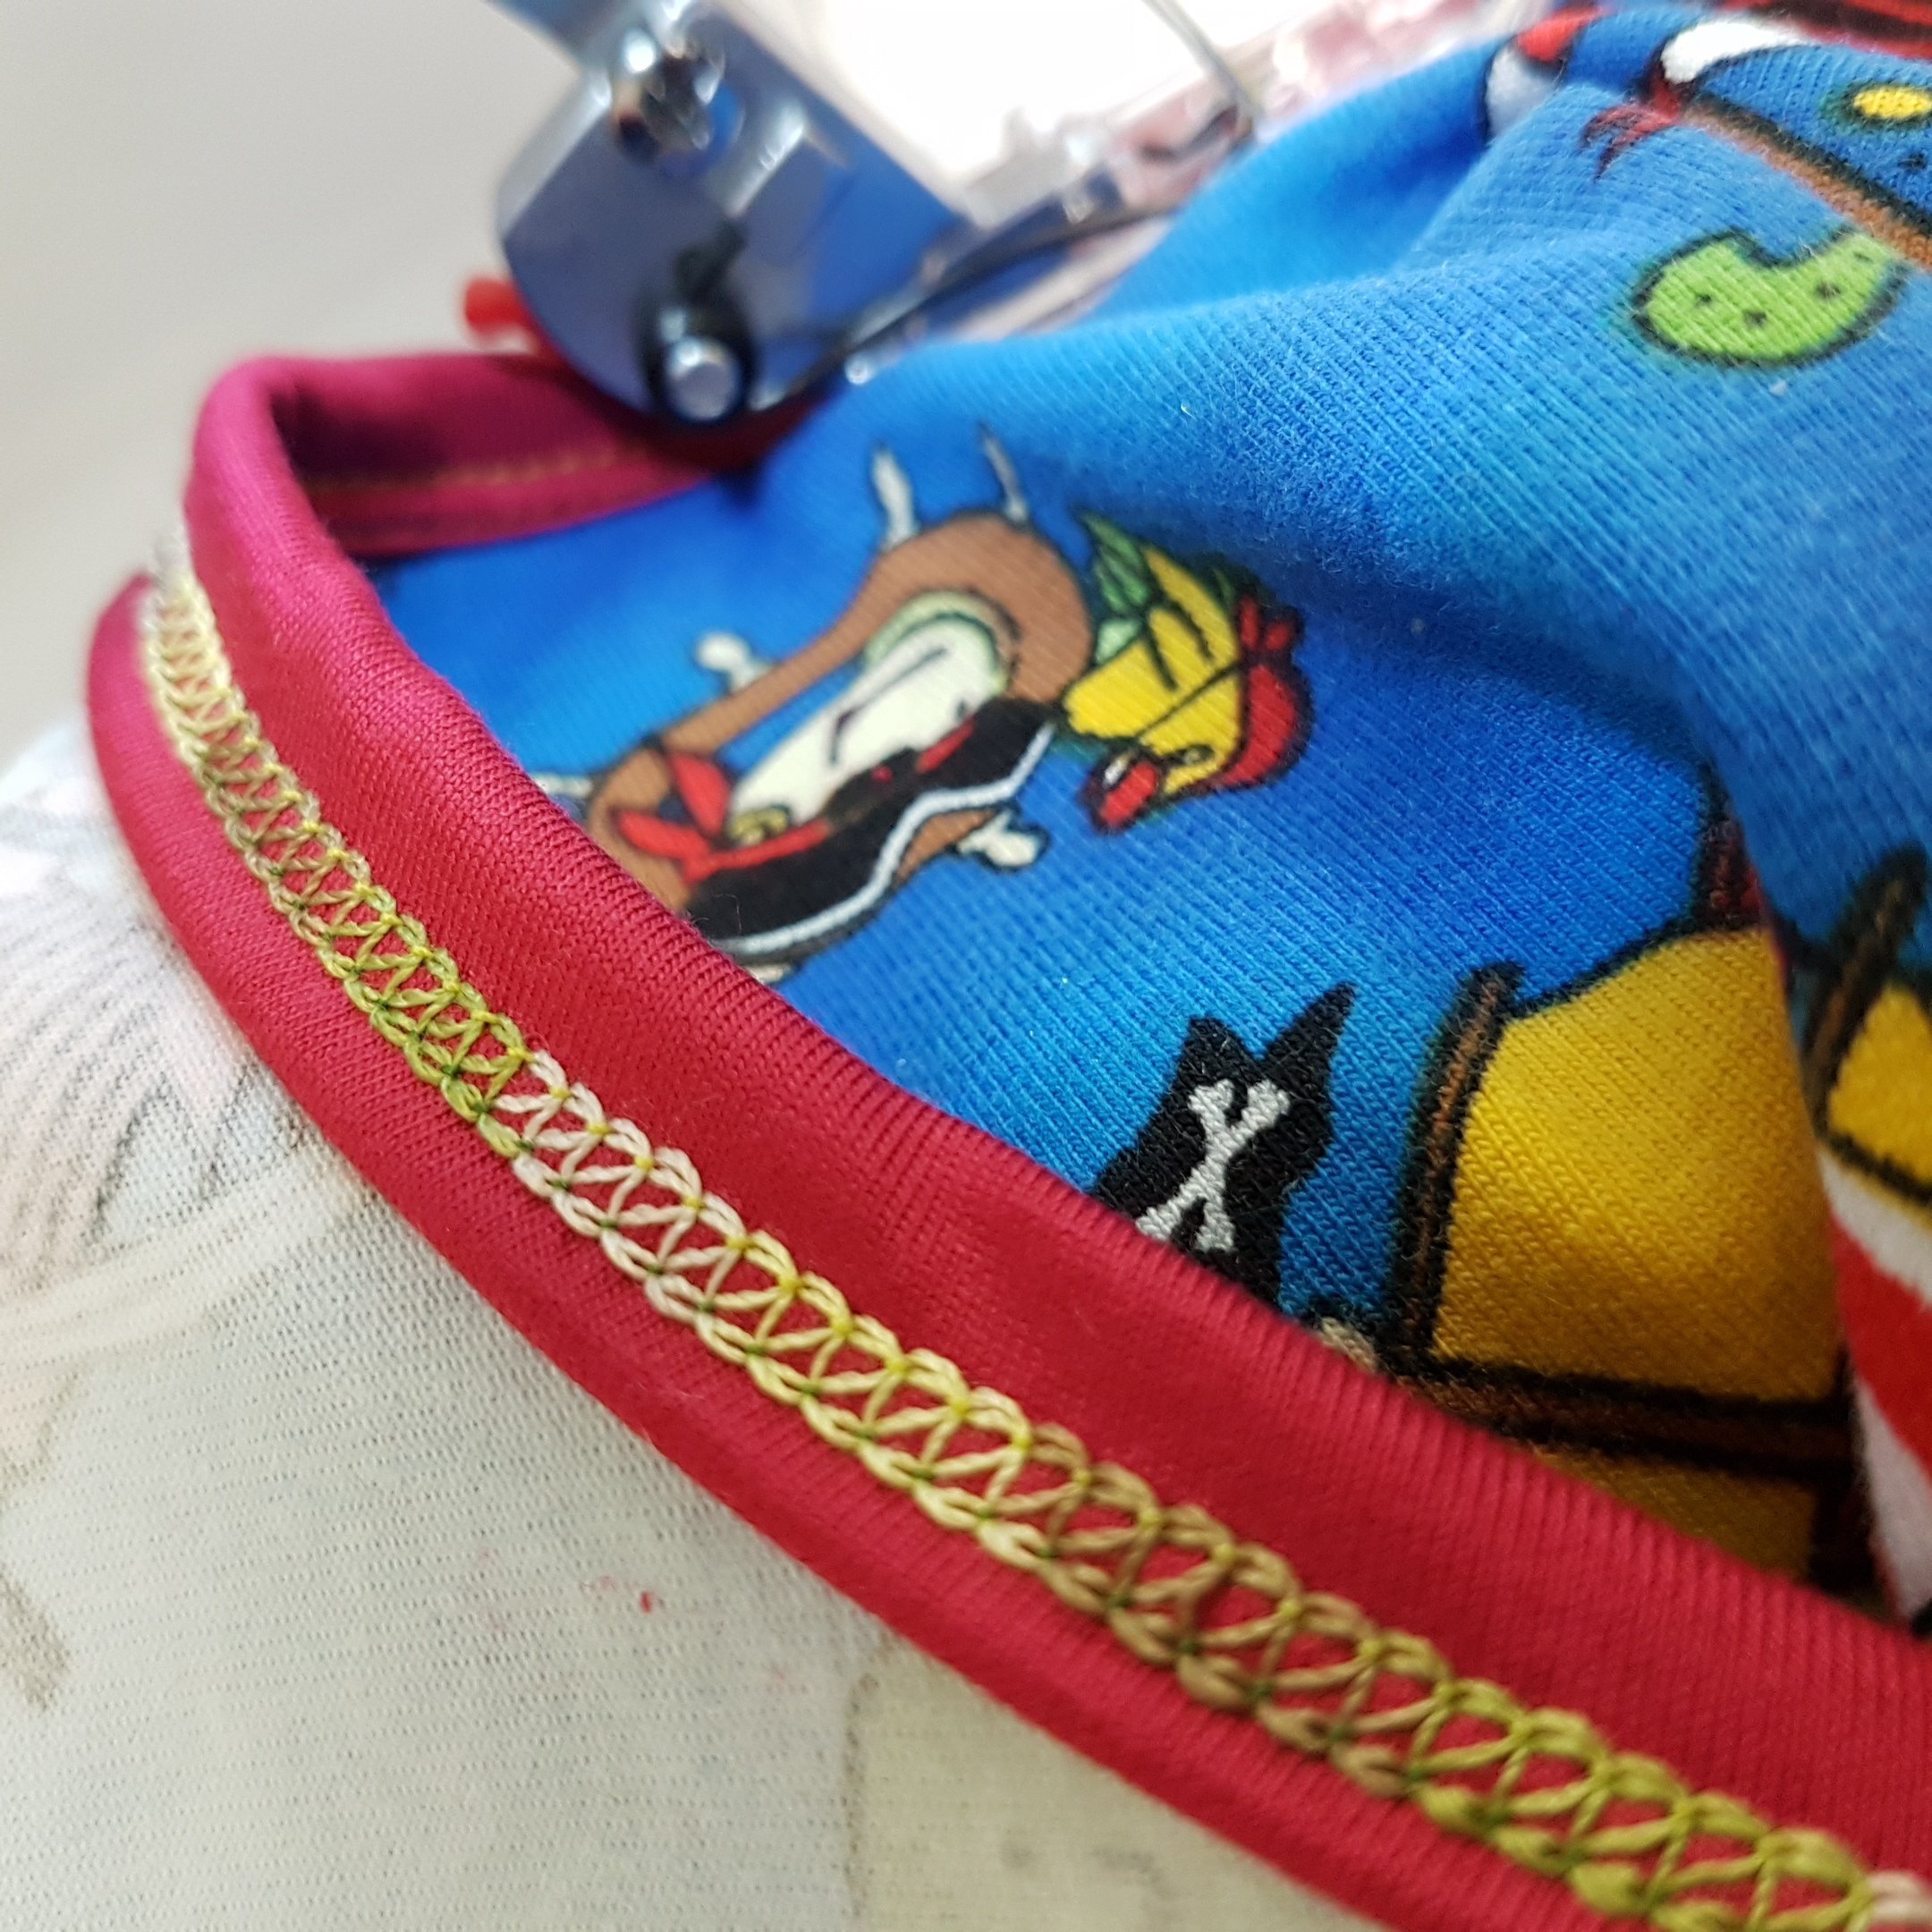
I recommend to cut bias tape, or actually cross grain knit, at a width of 40 to 45 mm, depending on the stretchability of the fabric.
Then I find it easier to insert the gut binding fabric into the foot before attaching it to the machine. I.e. my procedure would be as per following description.
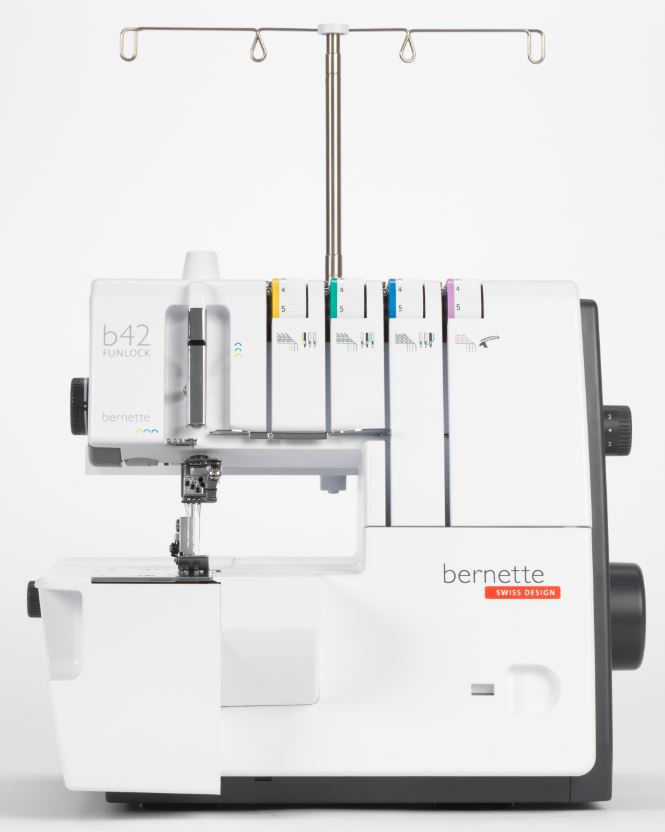
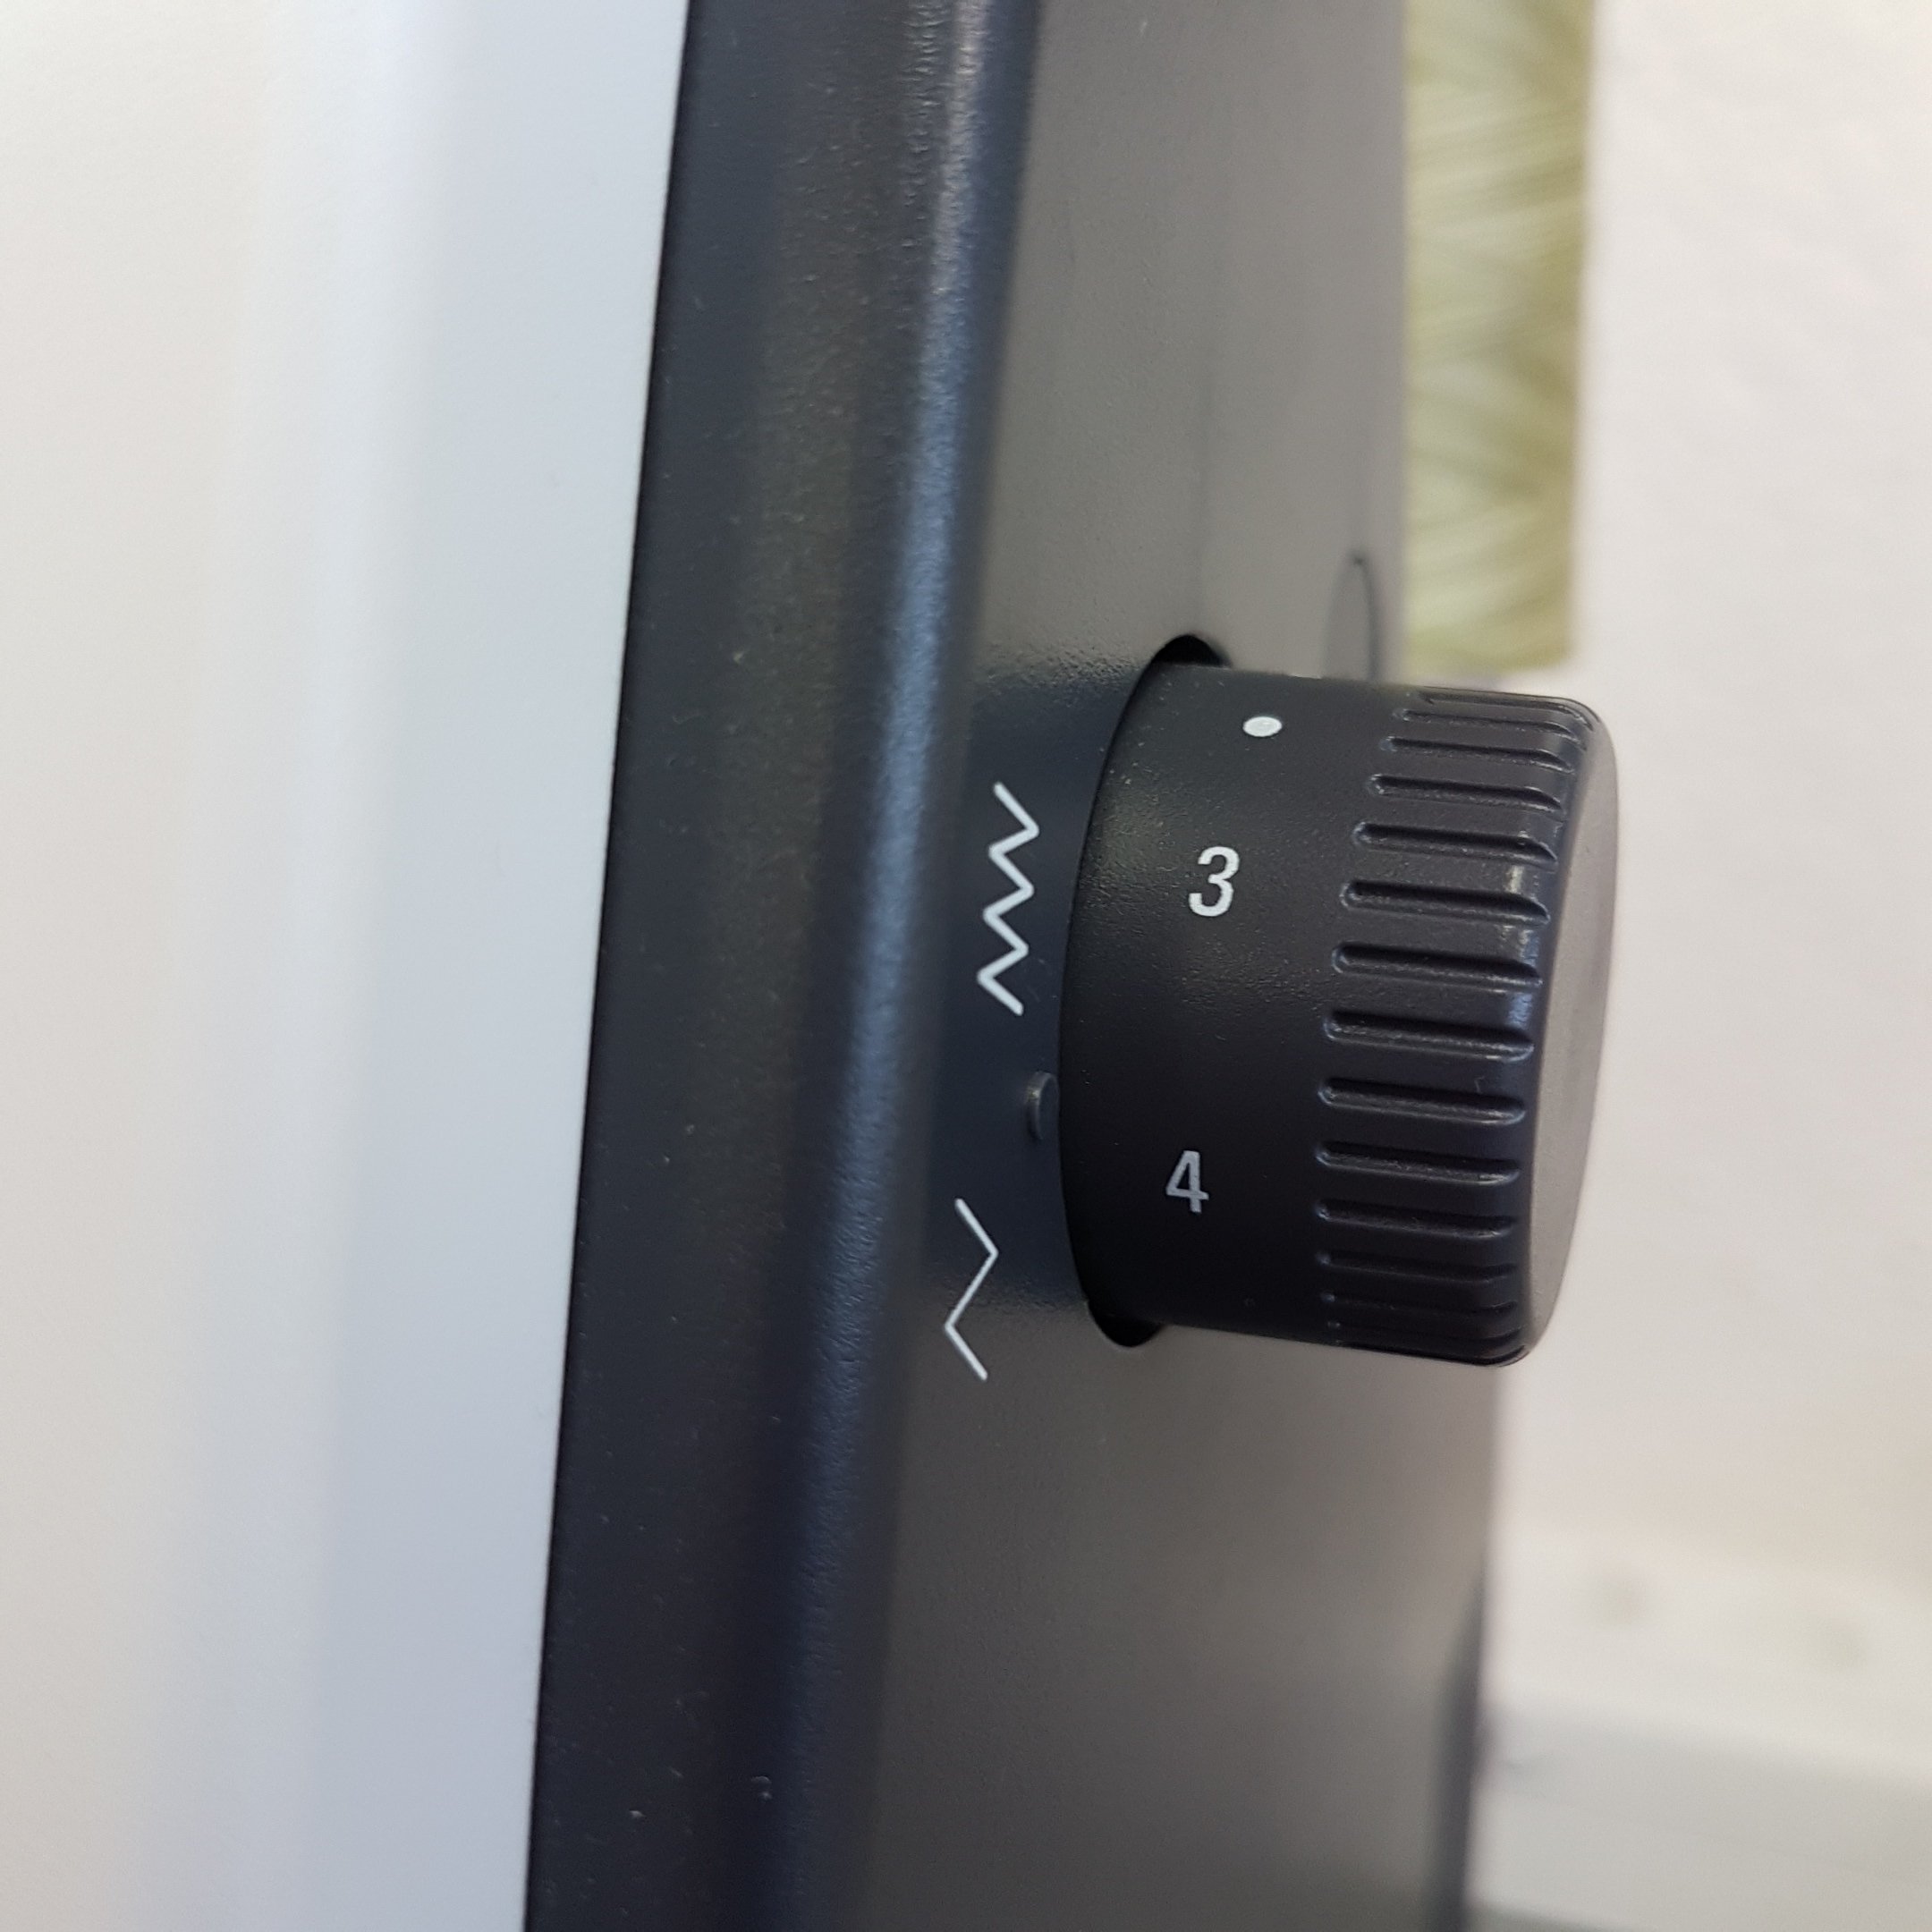
The machine I used is a b42 Coverstitch machine (but the same applies to the b48).
Set the machine for coverstitch narrow or wide, as you prefer. I used a narrow one with left and center needle.

Set a stitch length between 3 and 4.
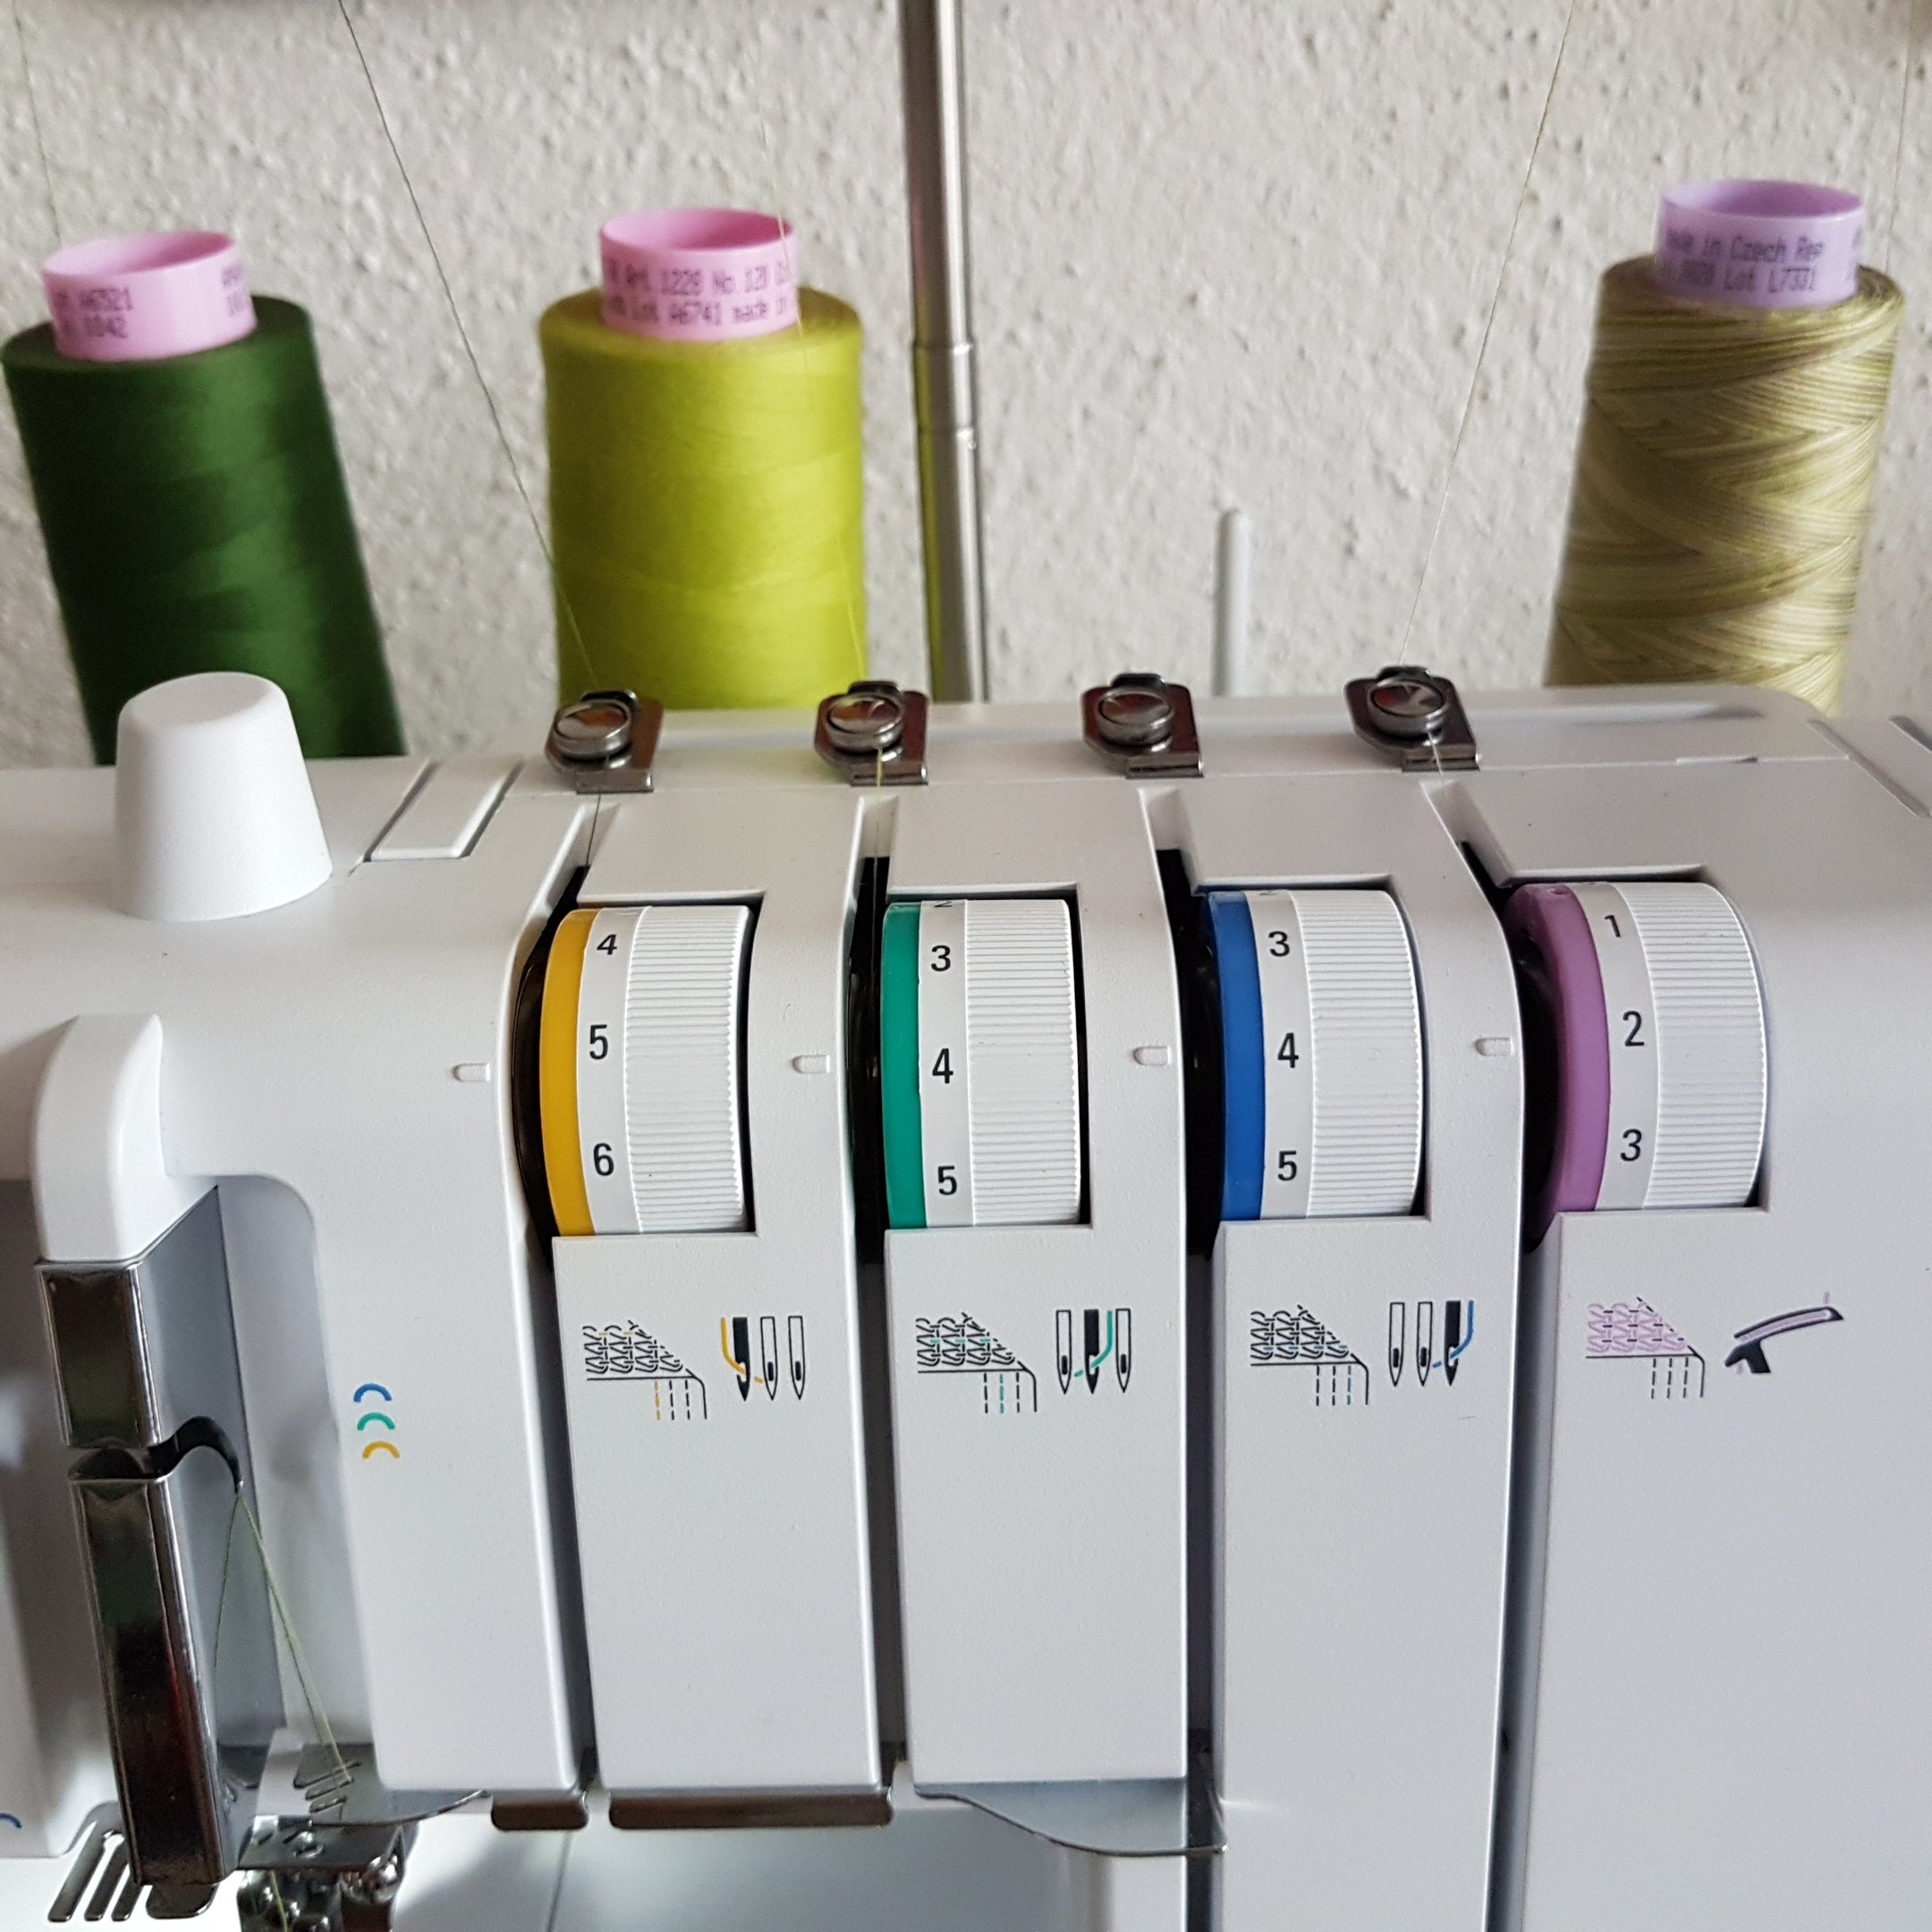
Testsew to see if the stitch is to your liking. Tip: playing with thread colors adds a personal touch.
Raise the (standard) presser foot and remove it, refer to the manual – or the how to video on mybernette.com.
It is for example shown in the “Maintenance” Video:

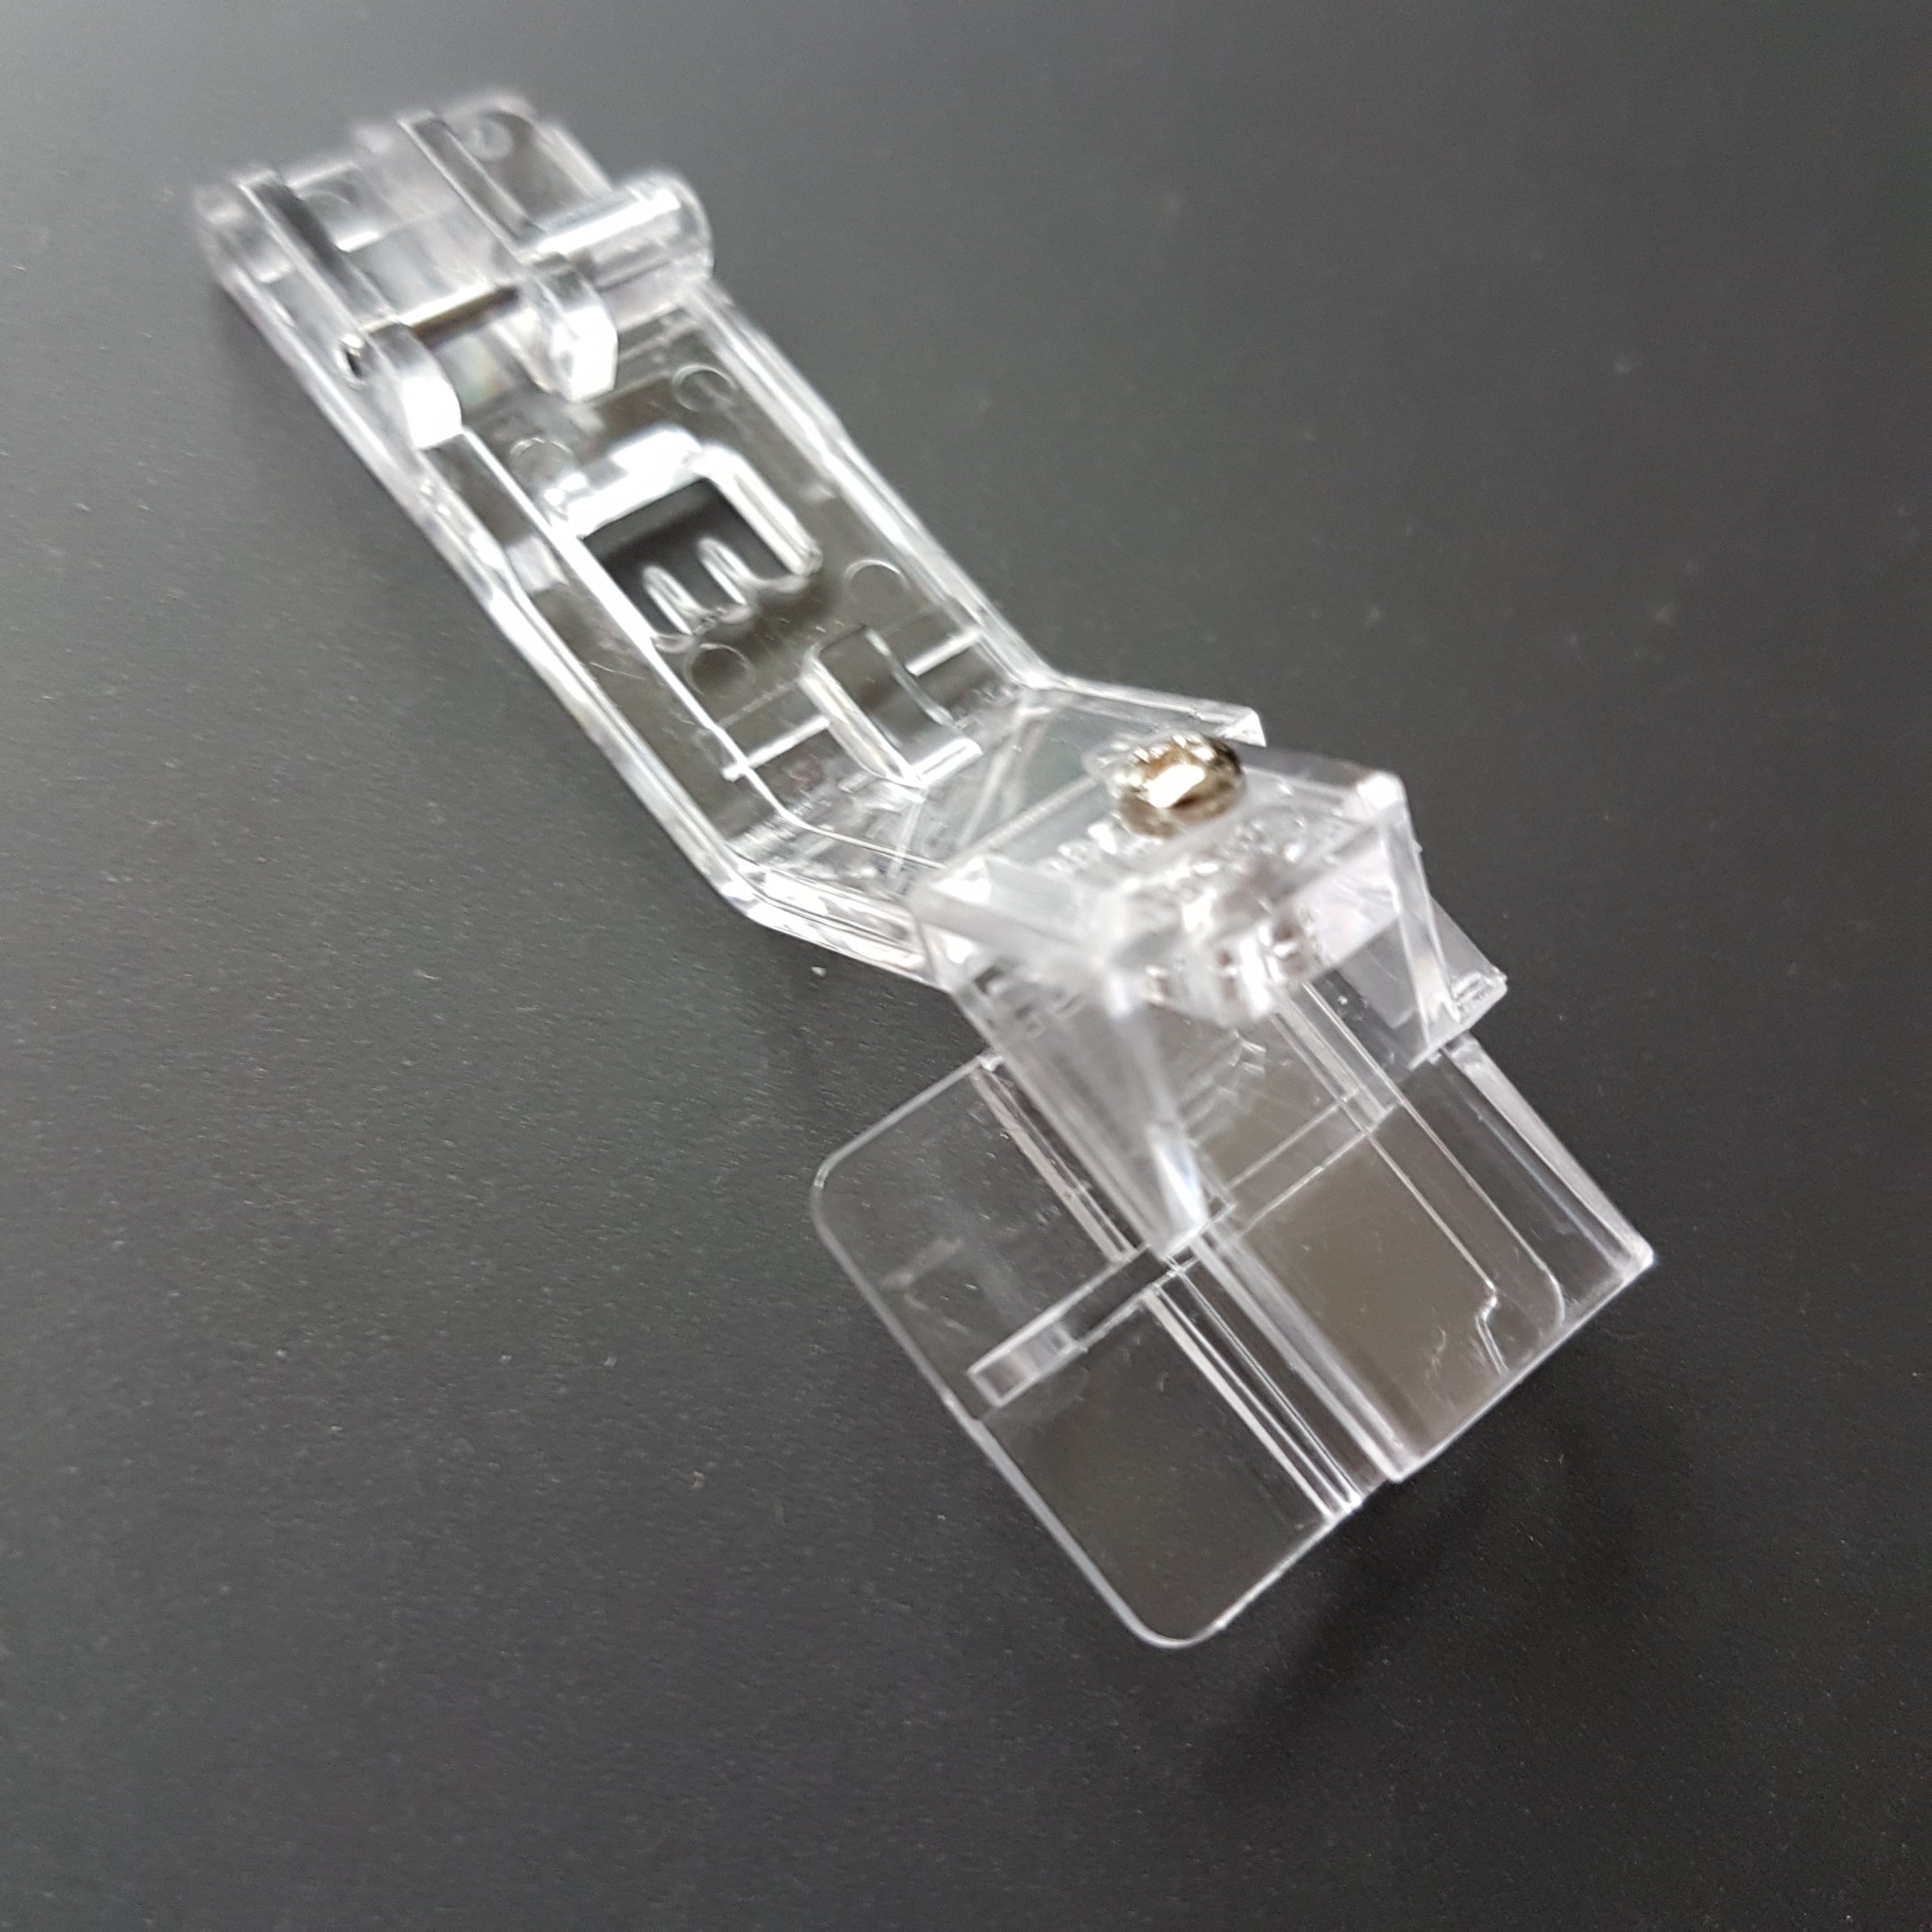
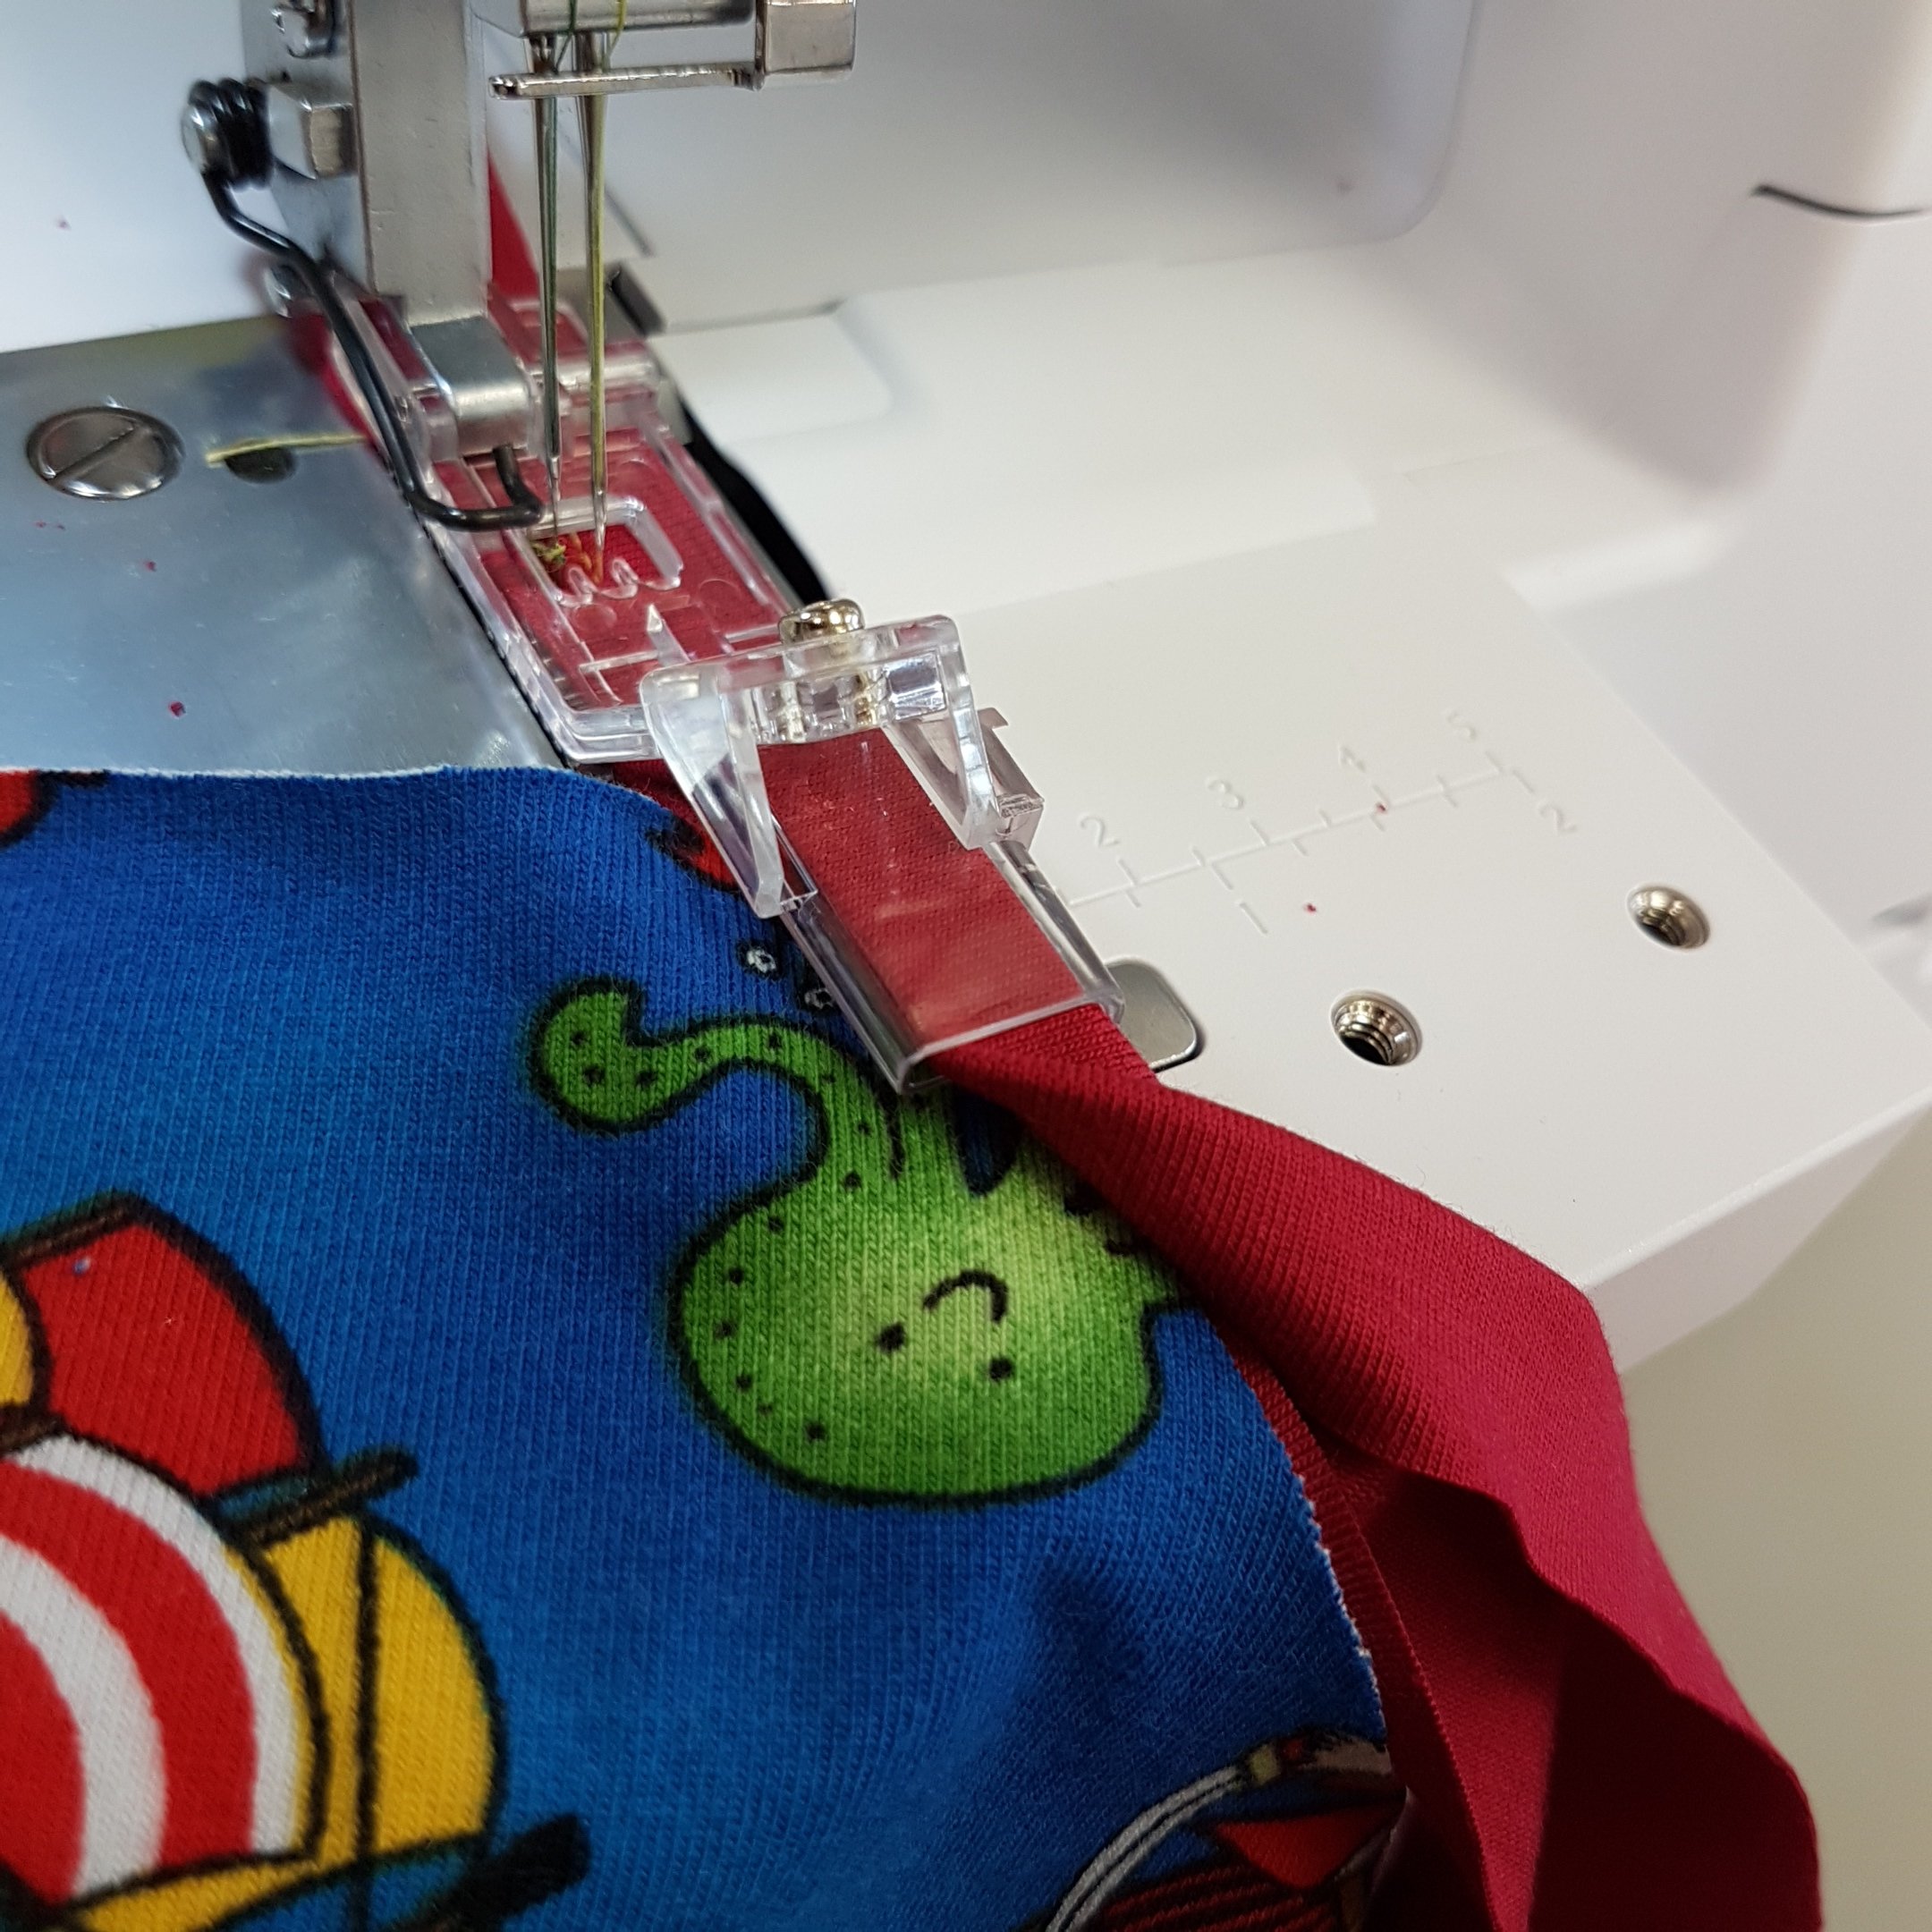
Take the Binding attachment presser foot.
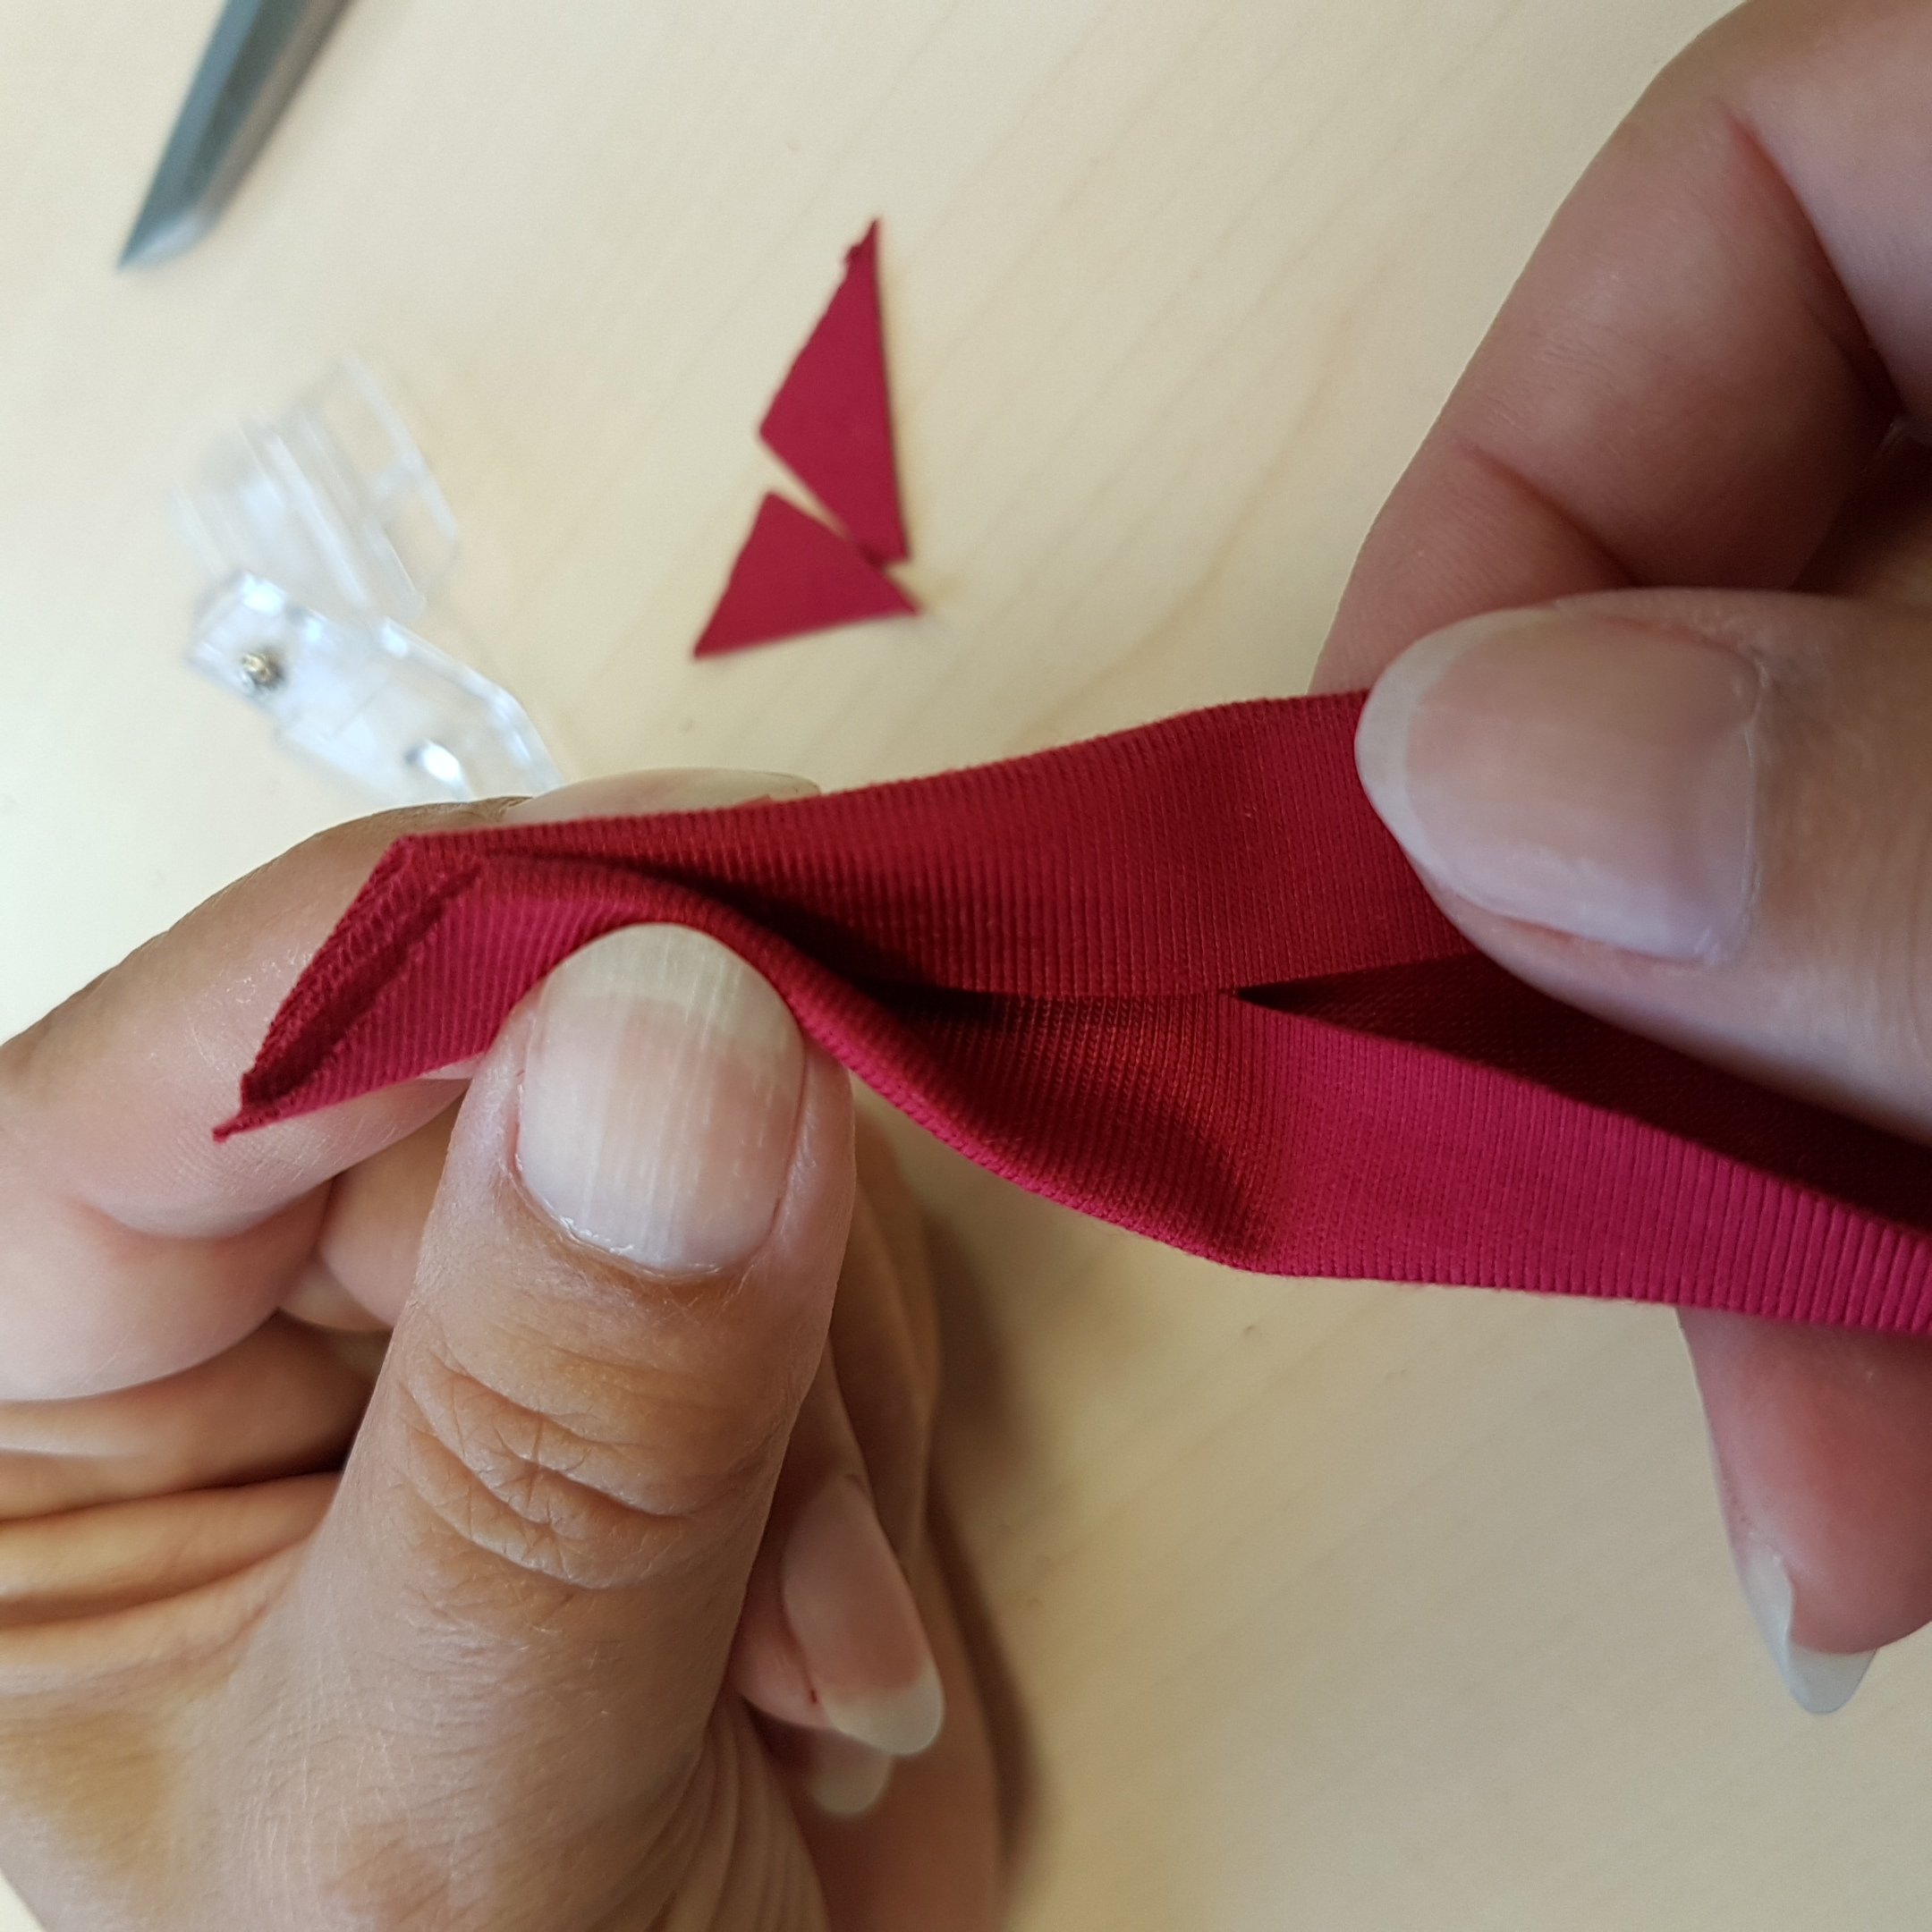
Take your cut bias tape, in my case I use cross-cut lightweight knit fabric which is not too soft to prevent unnessessary rolling.
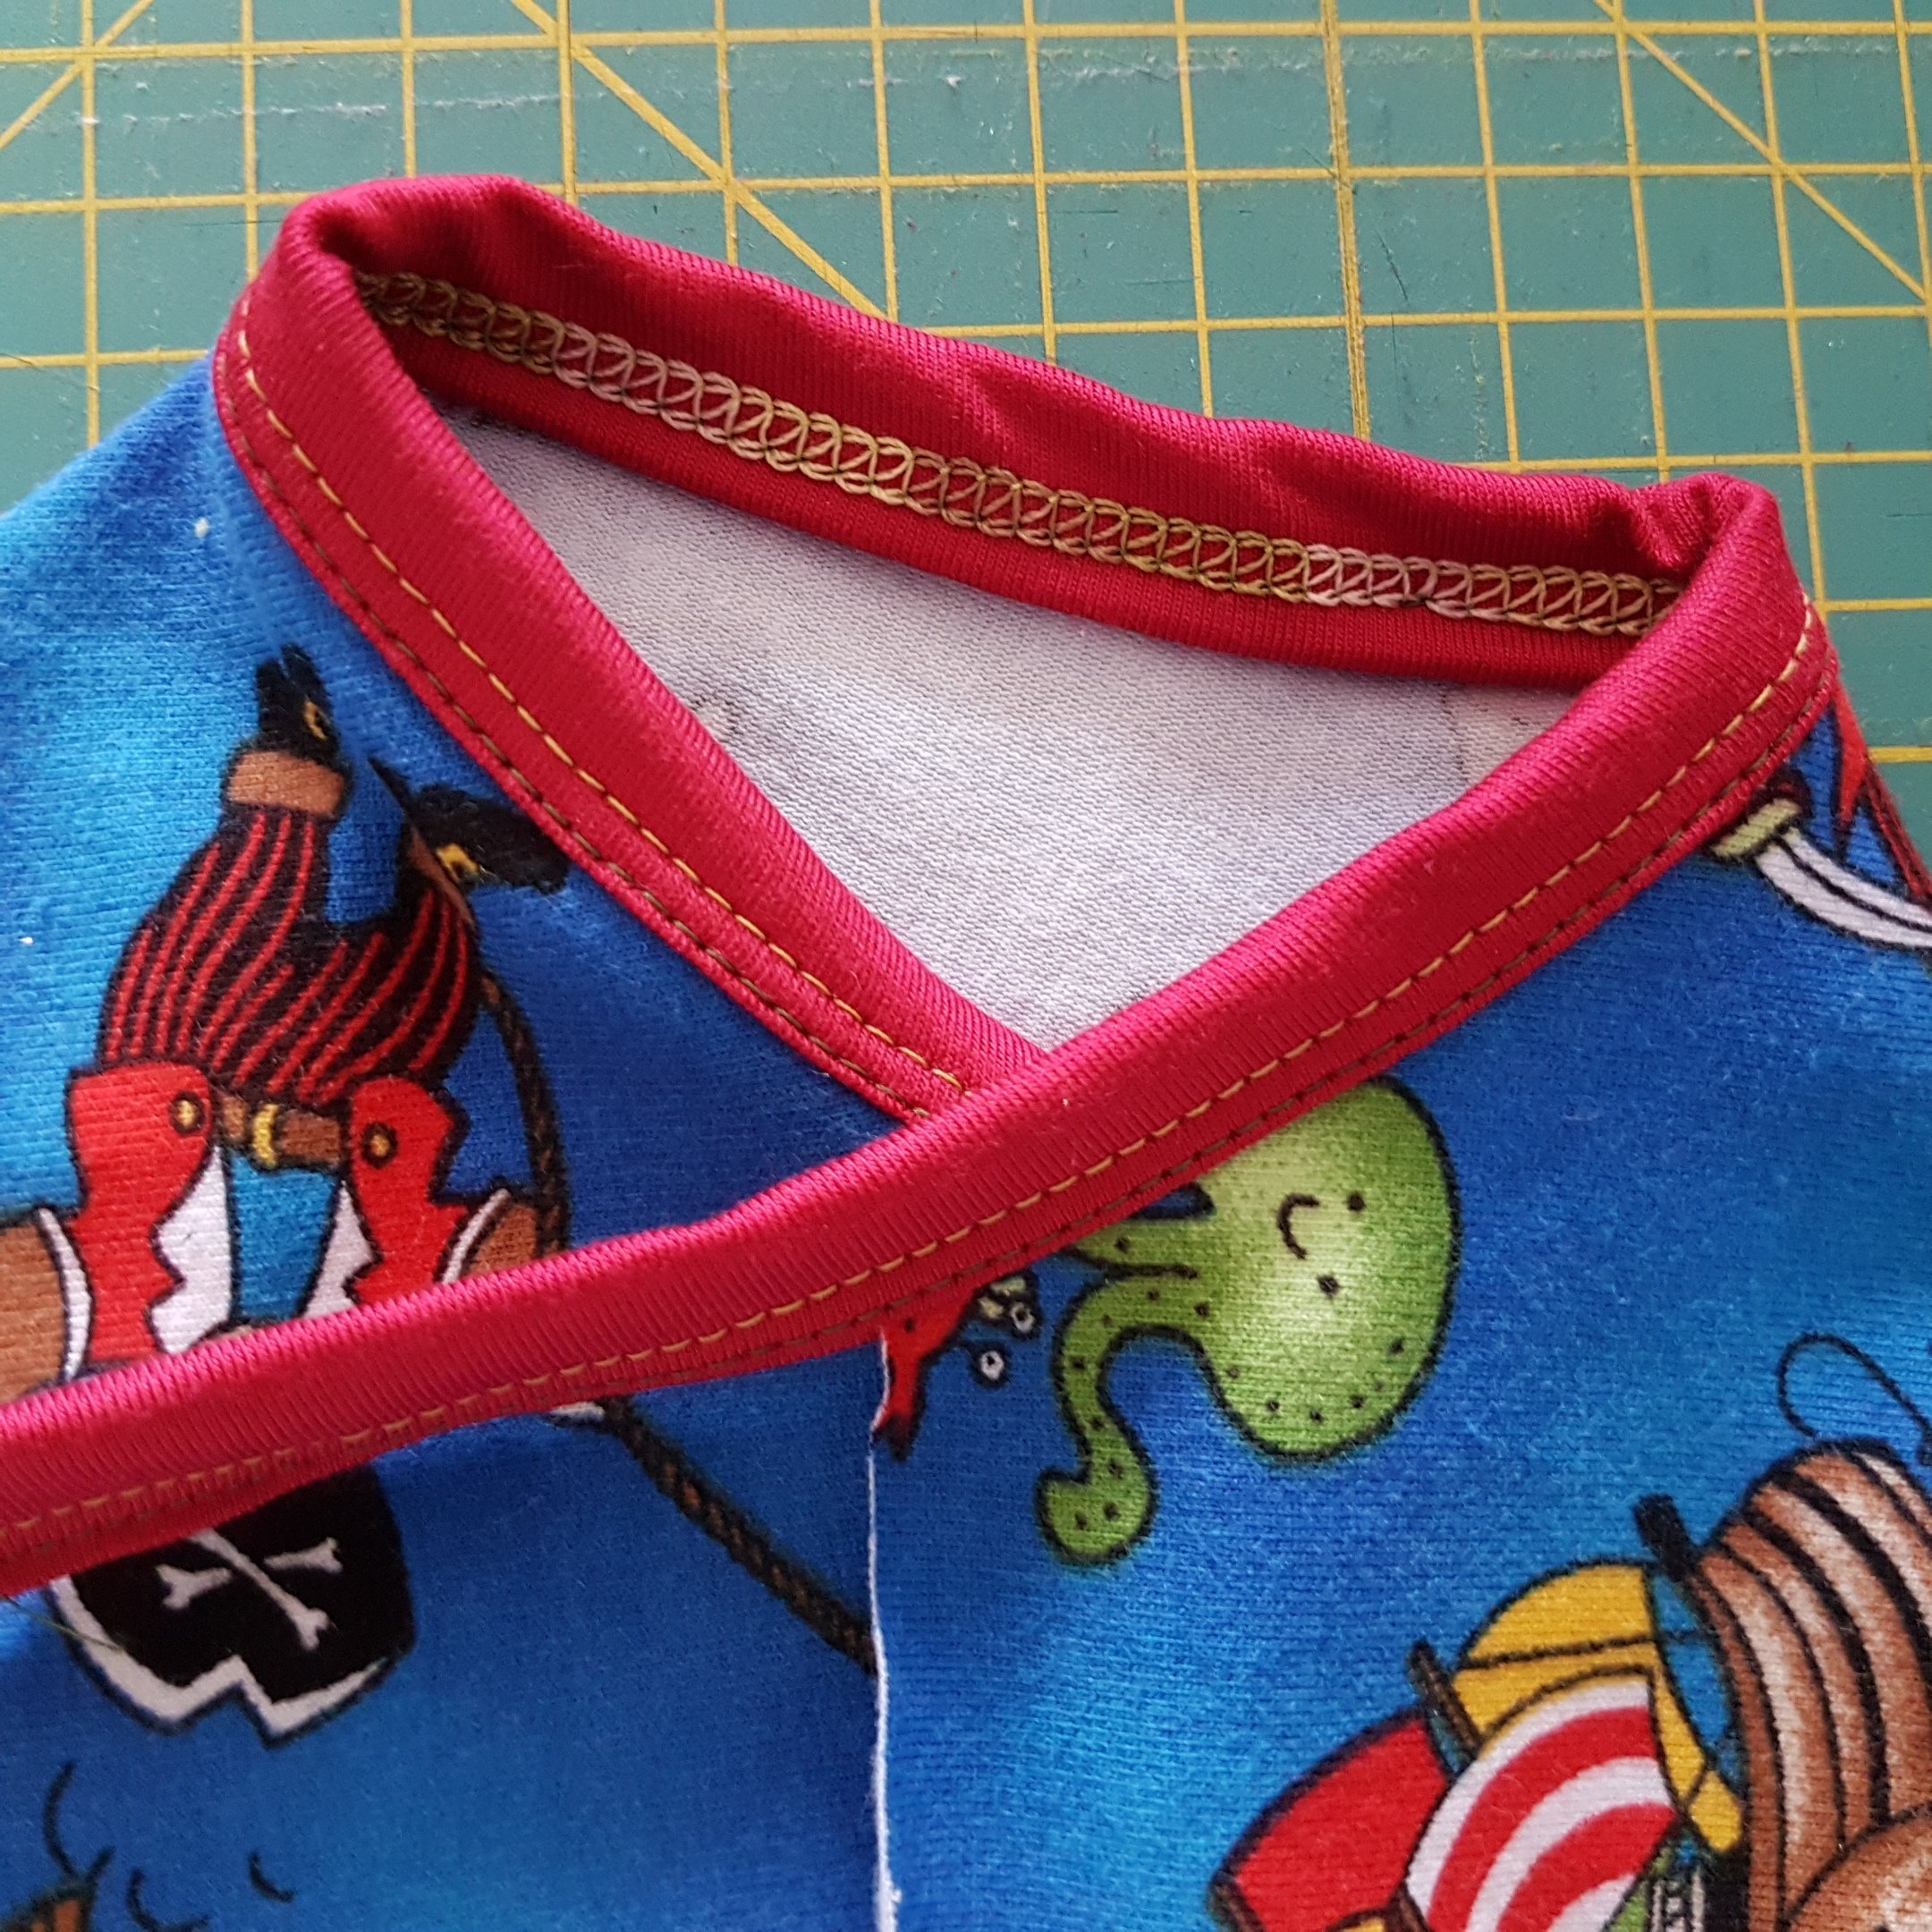
Prefold the binding and cut corners off.
Thread the binding into the guide.
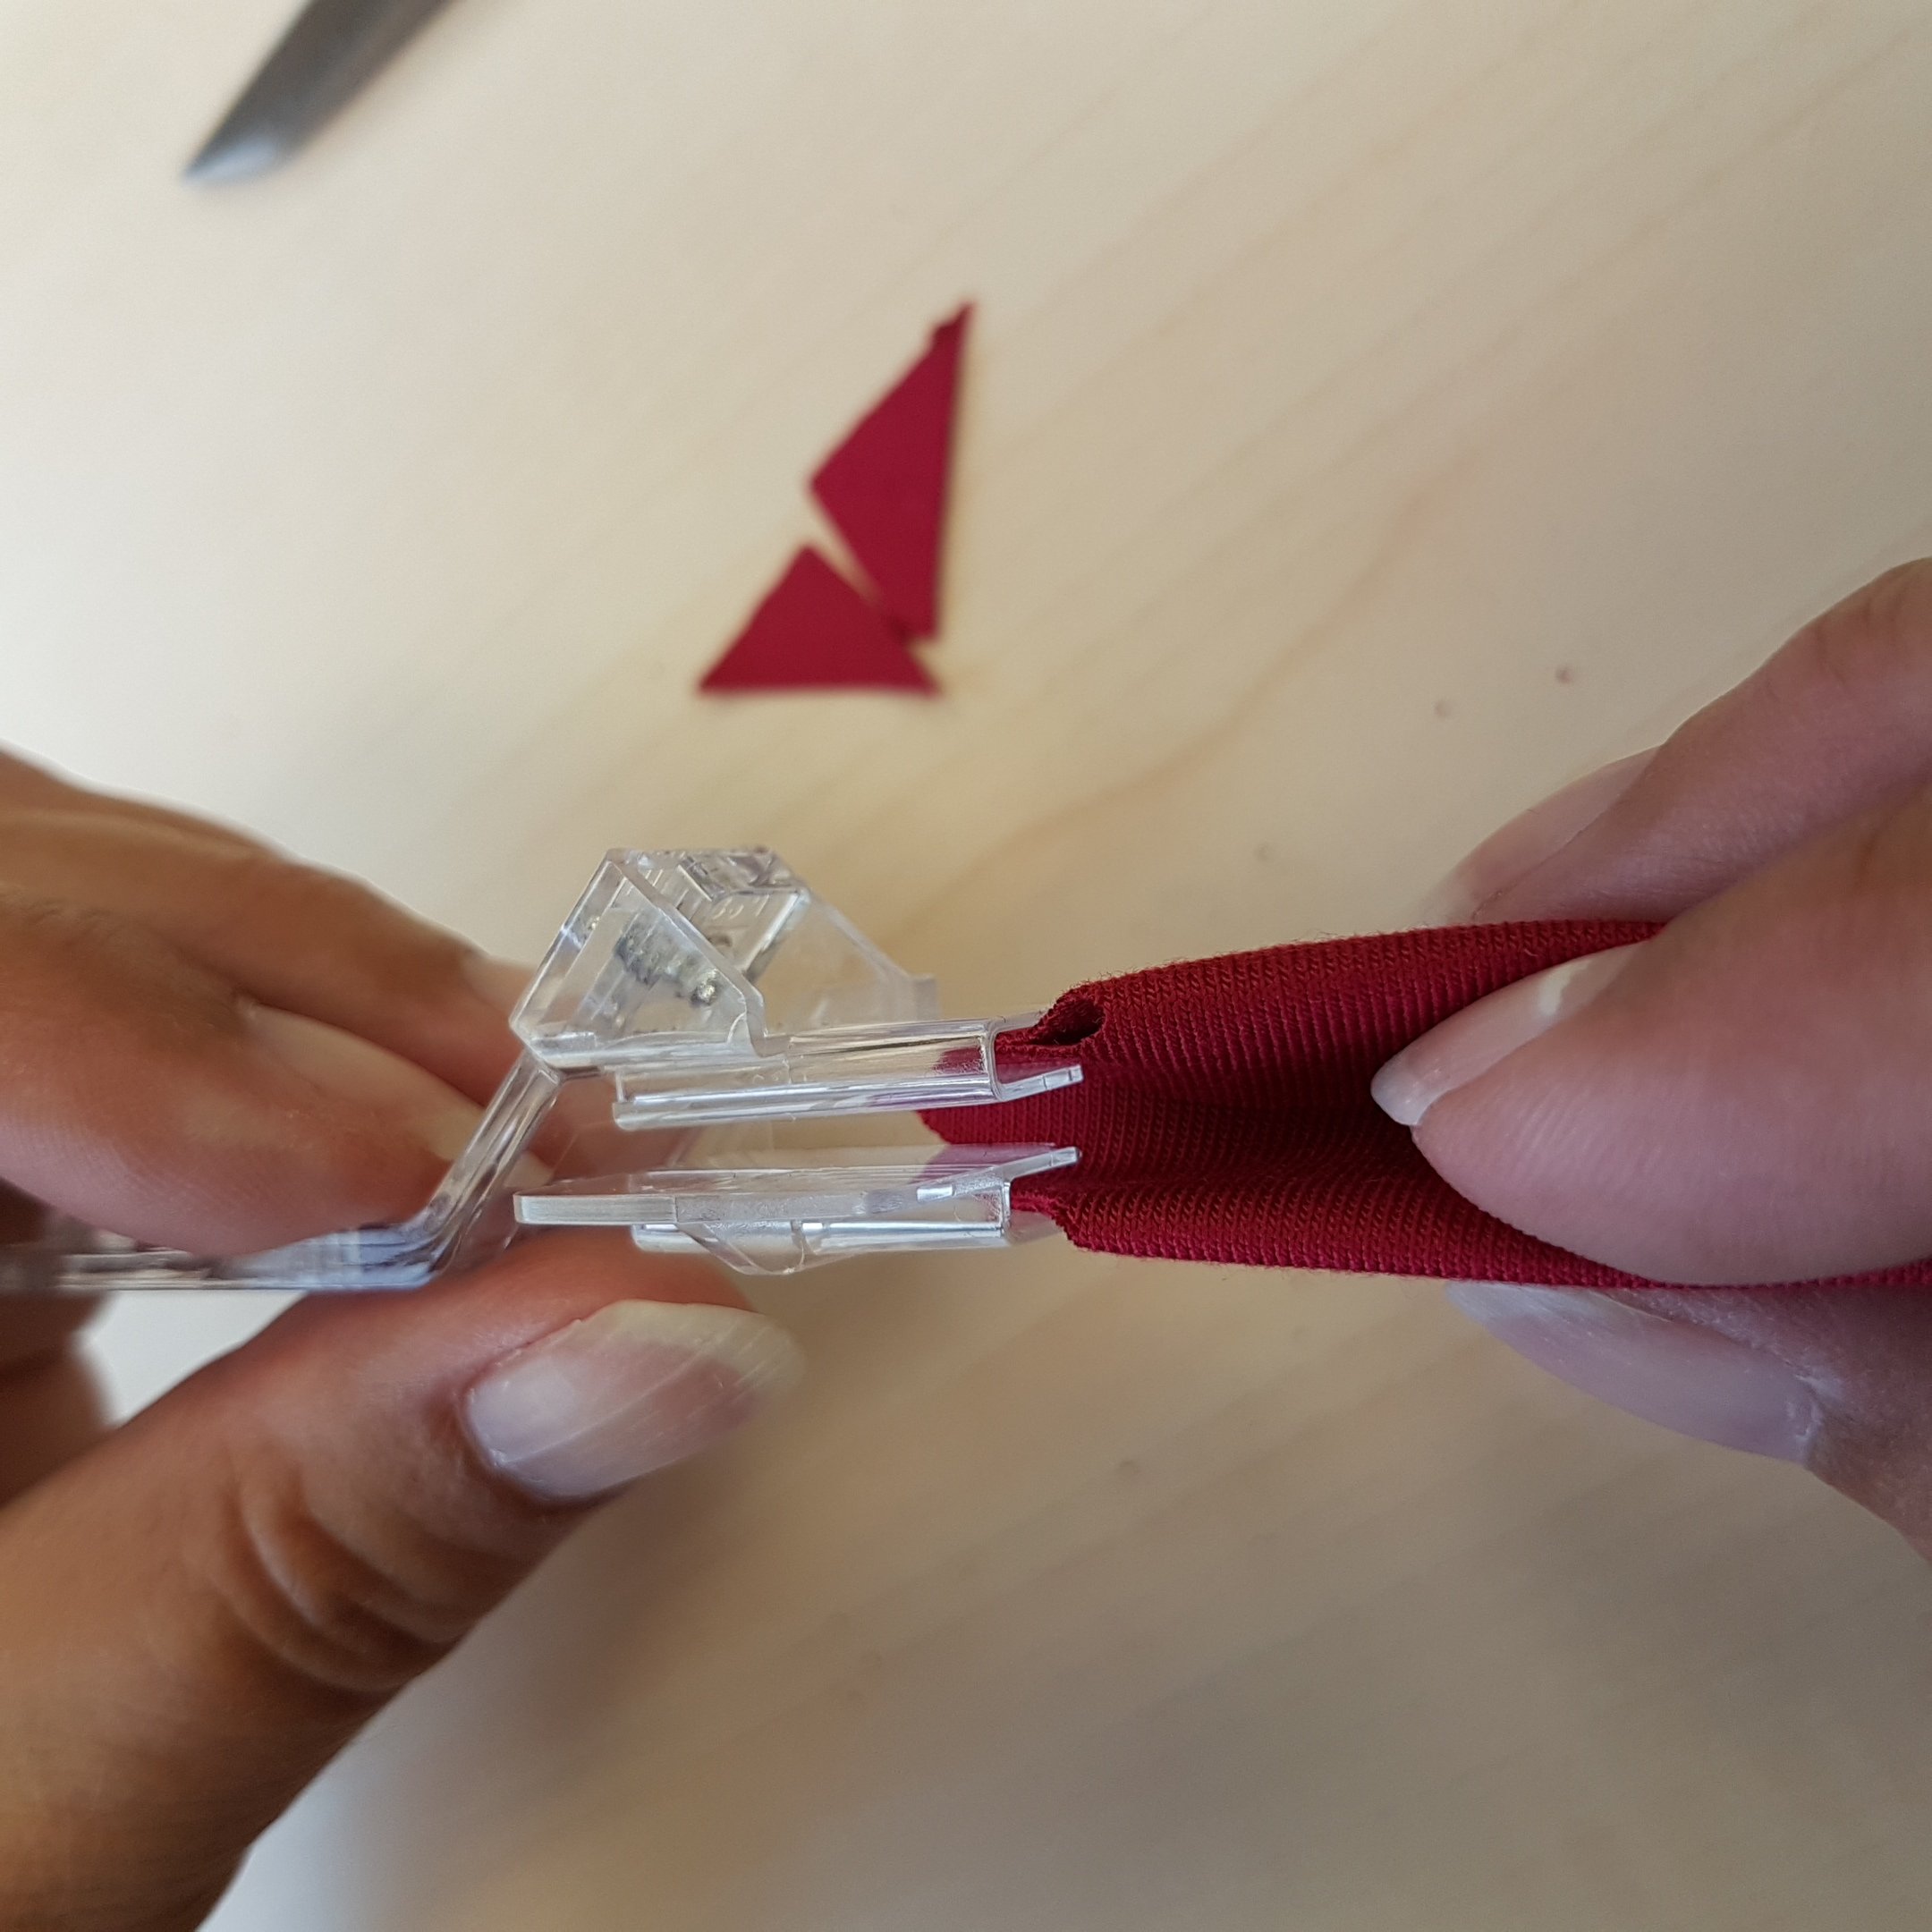
Use the tweezers to pull the binding into the guide…

… making sure the folding remains the way it should.

Pull until having enough binding “under” the whole foot.
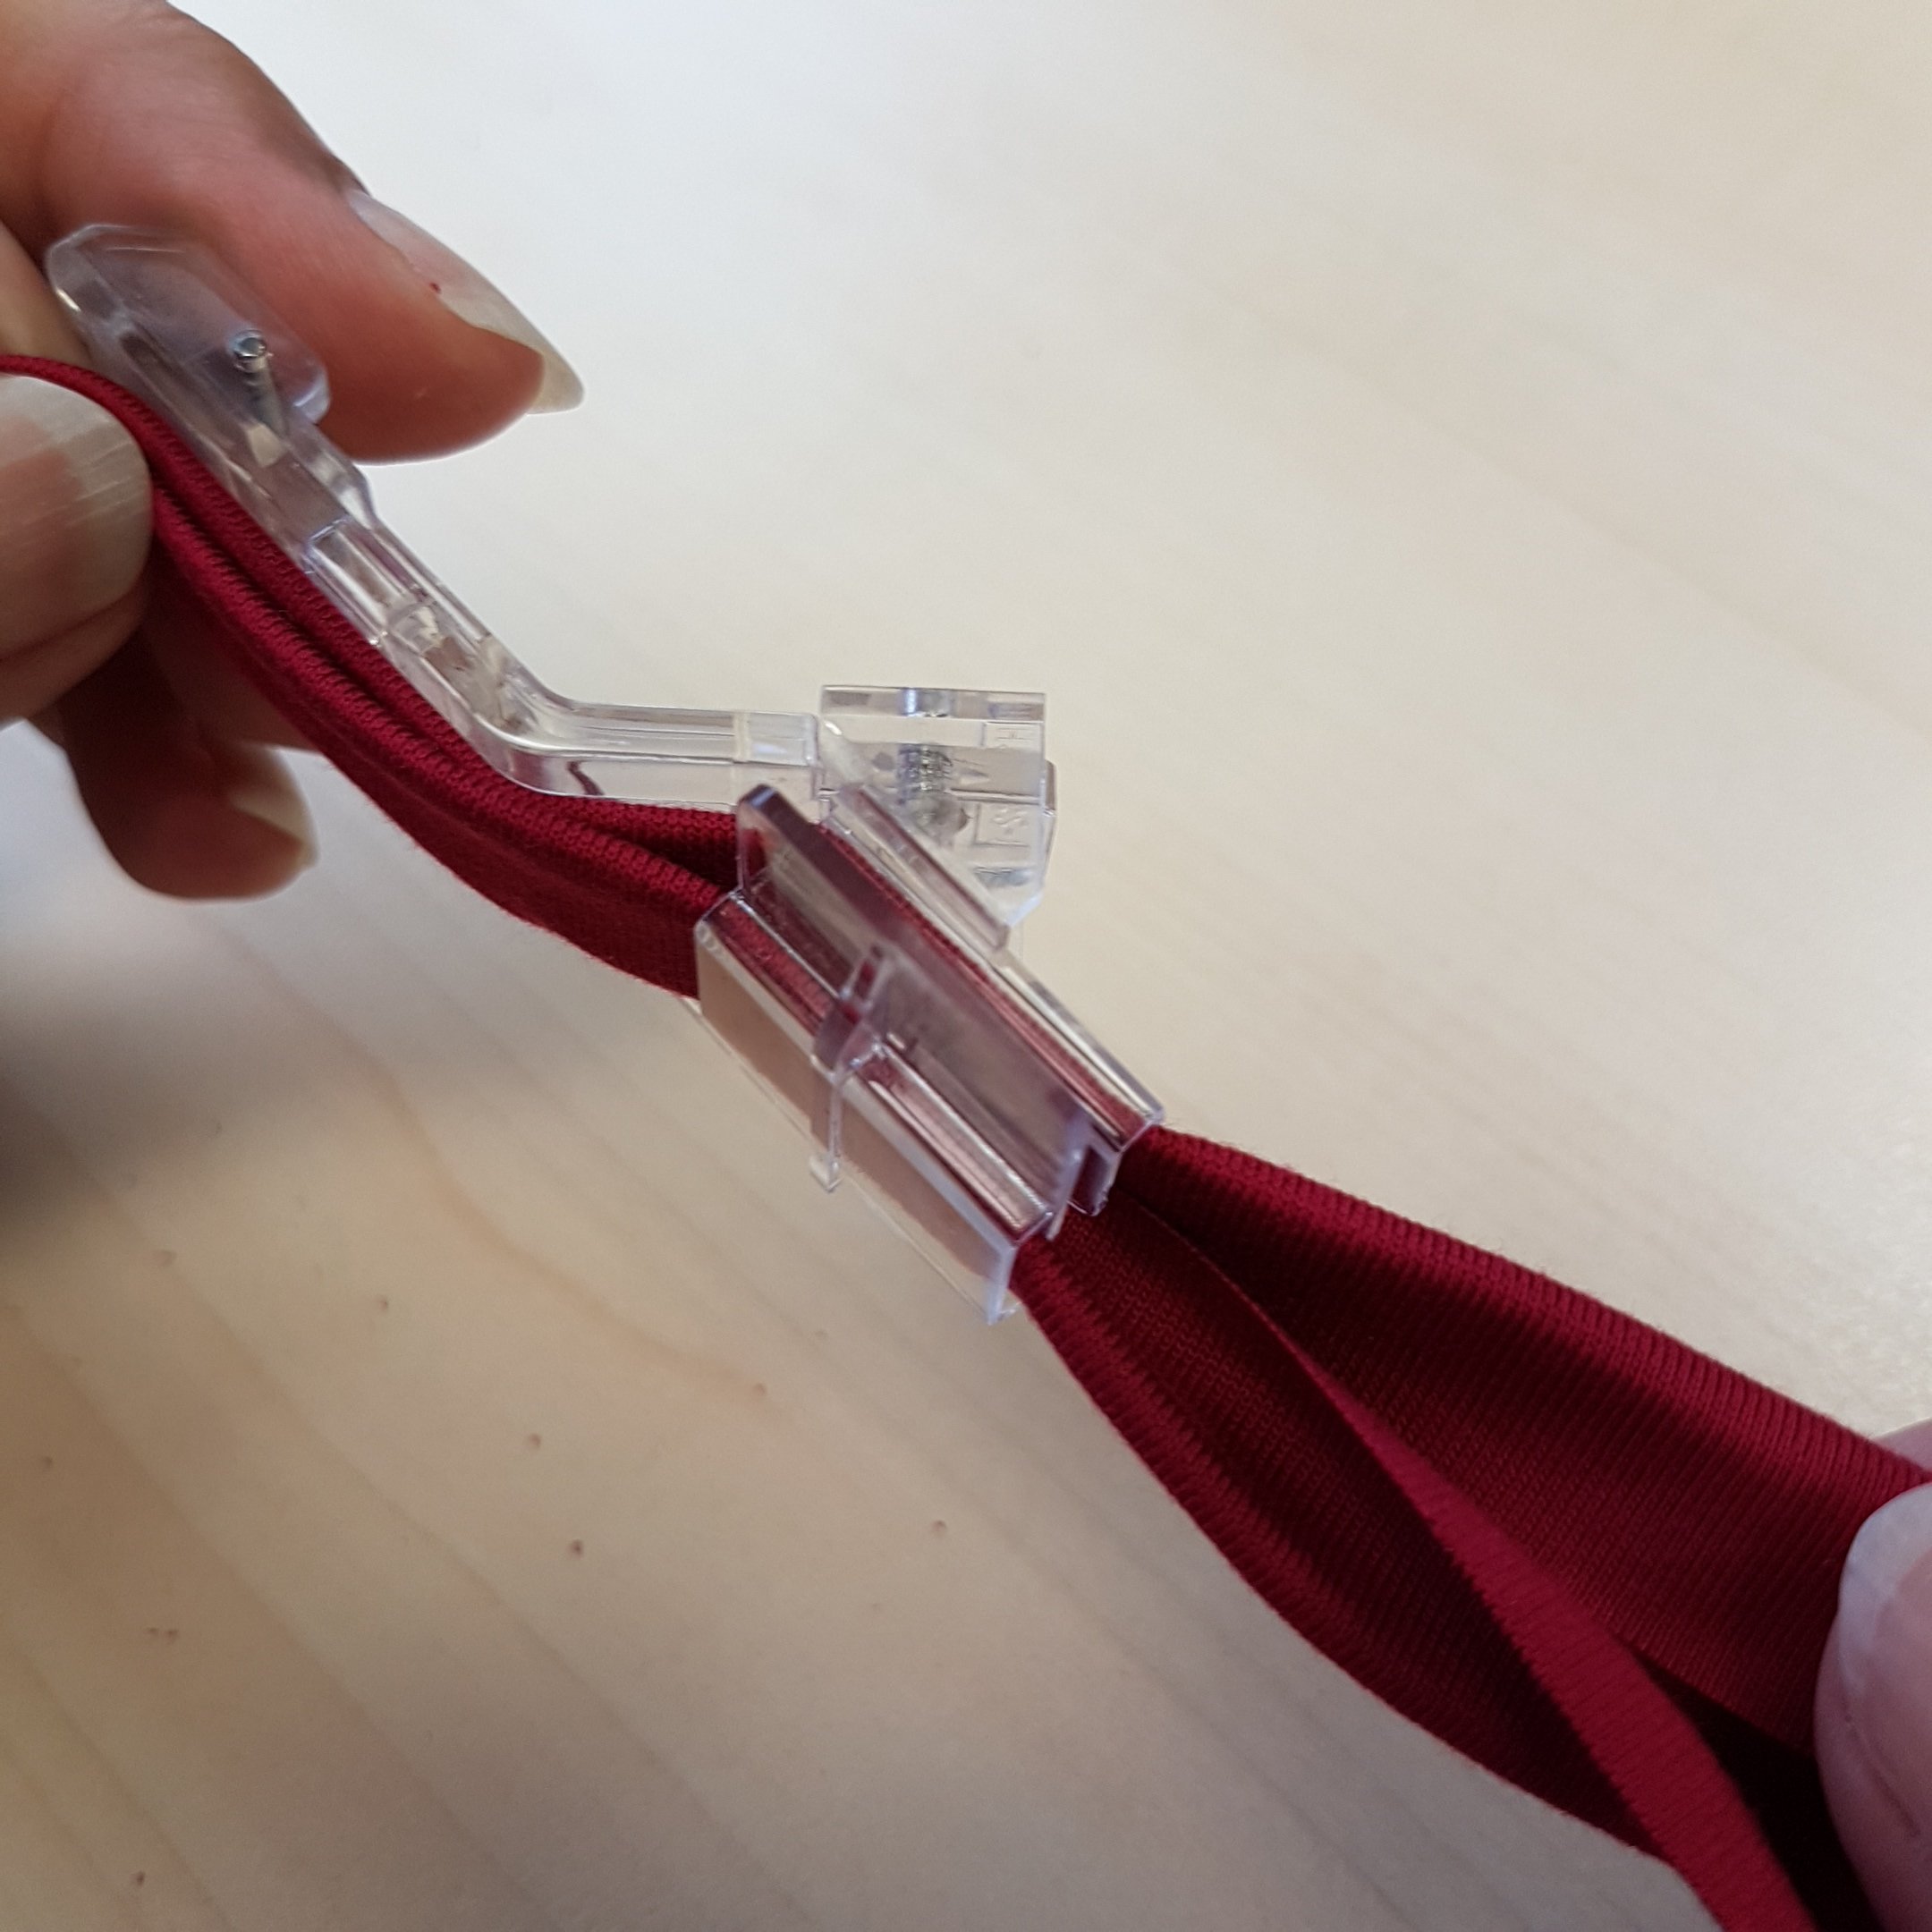
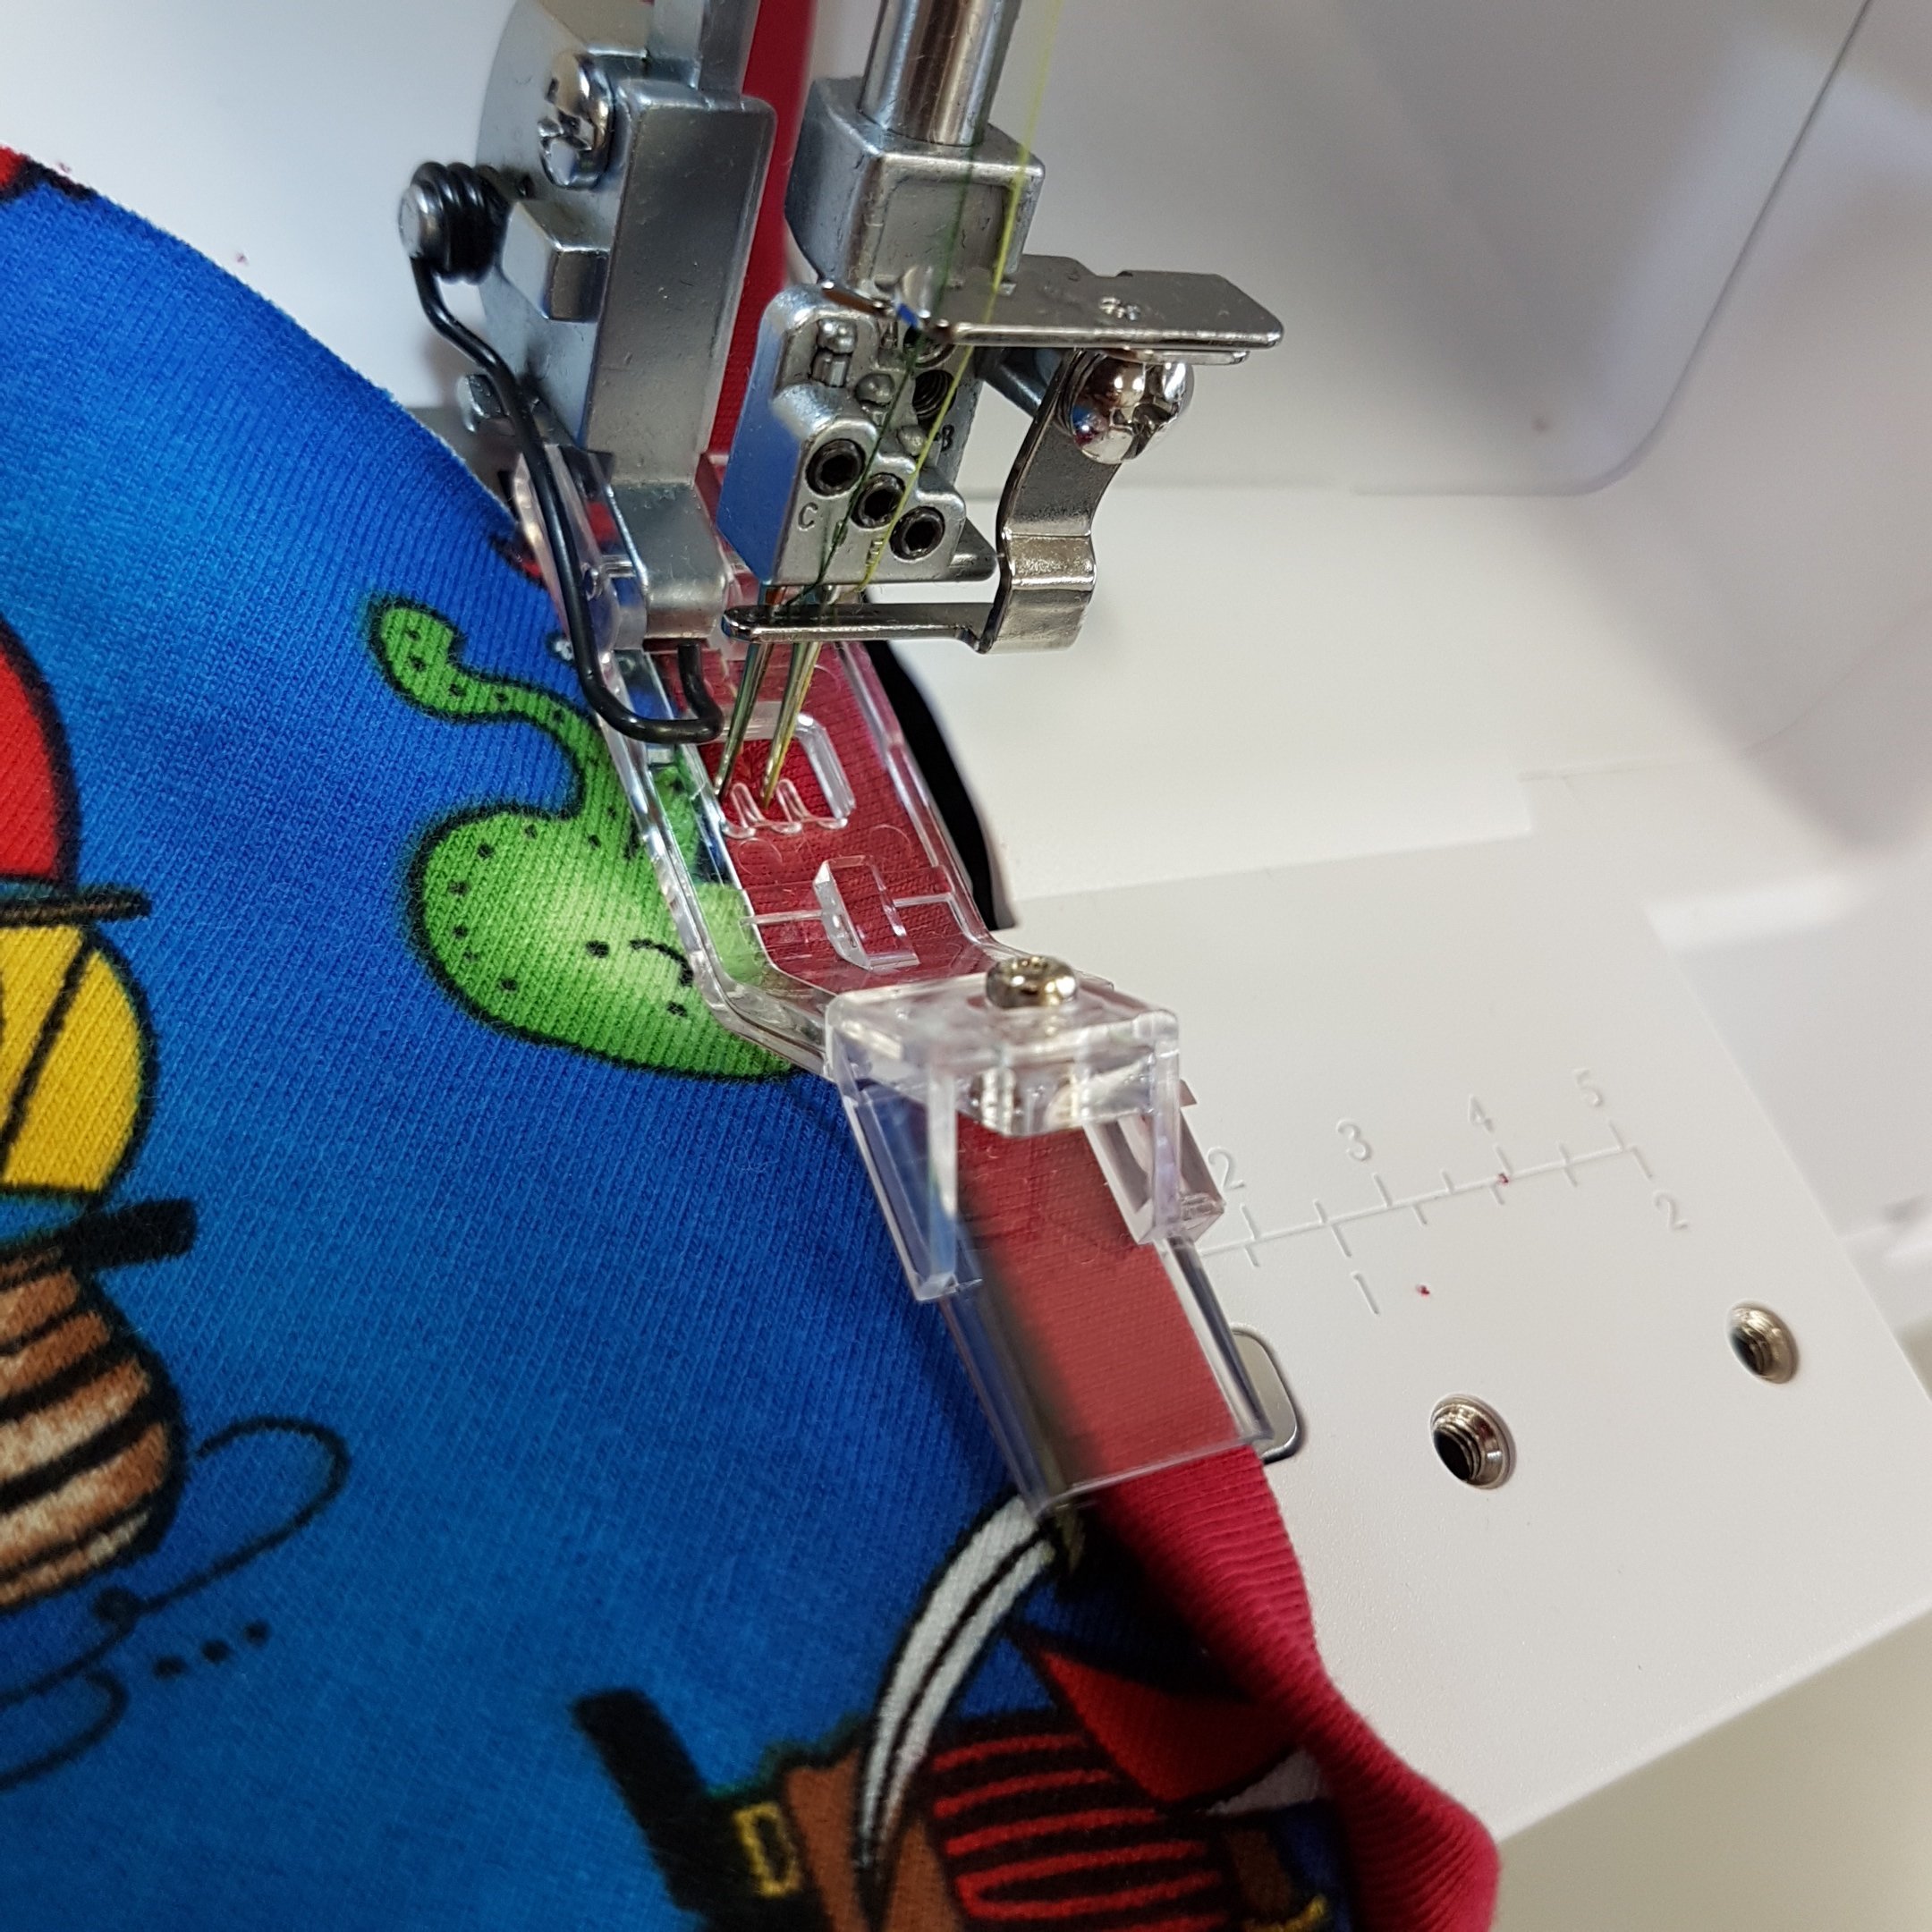
Attach the presser foot to the machine. Make sure to have the bias tape all the way under the foot at rear.
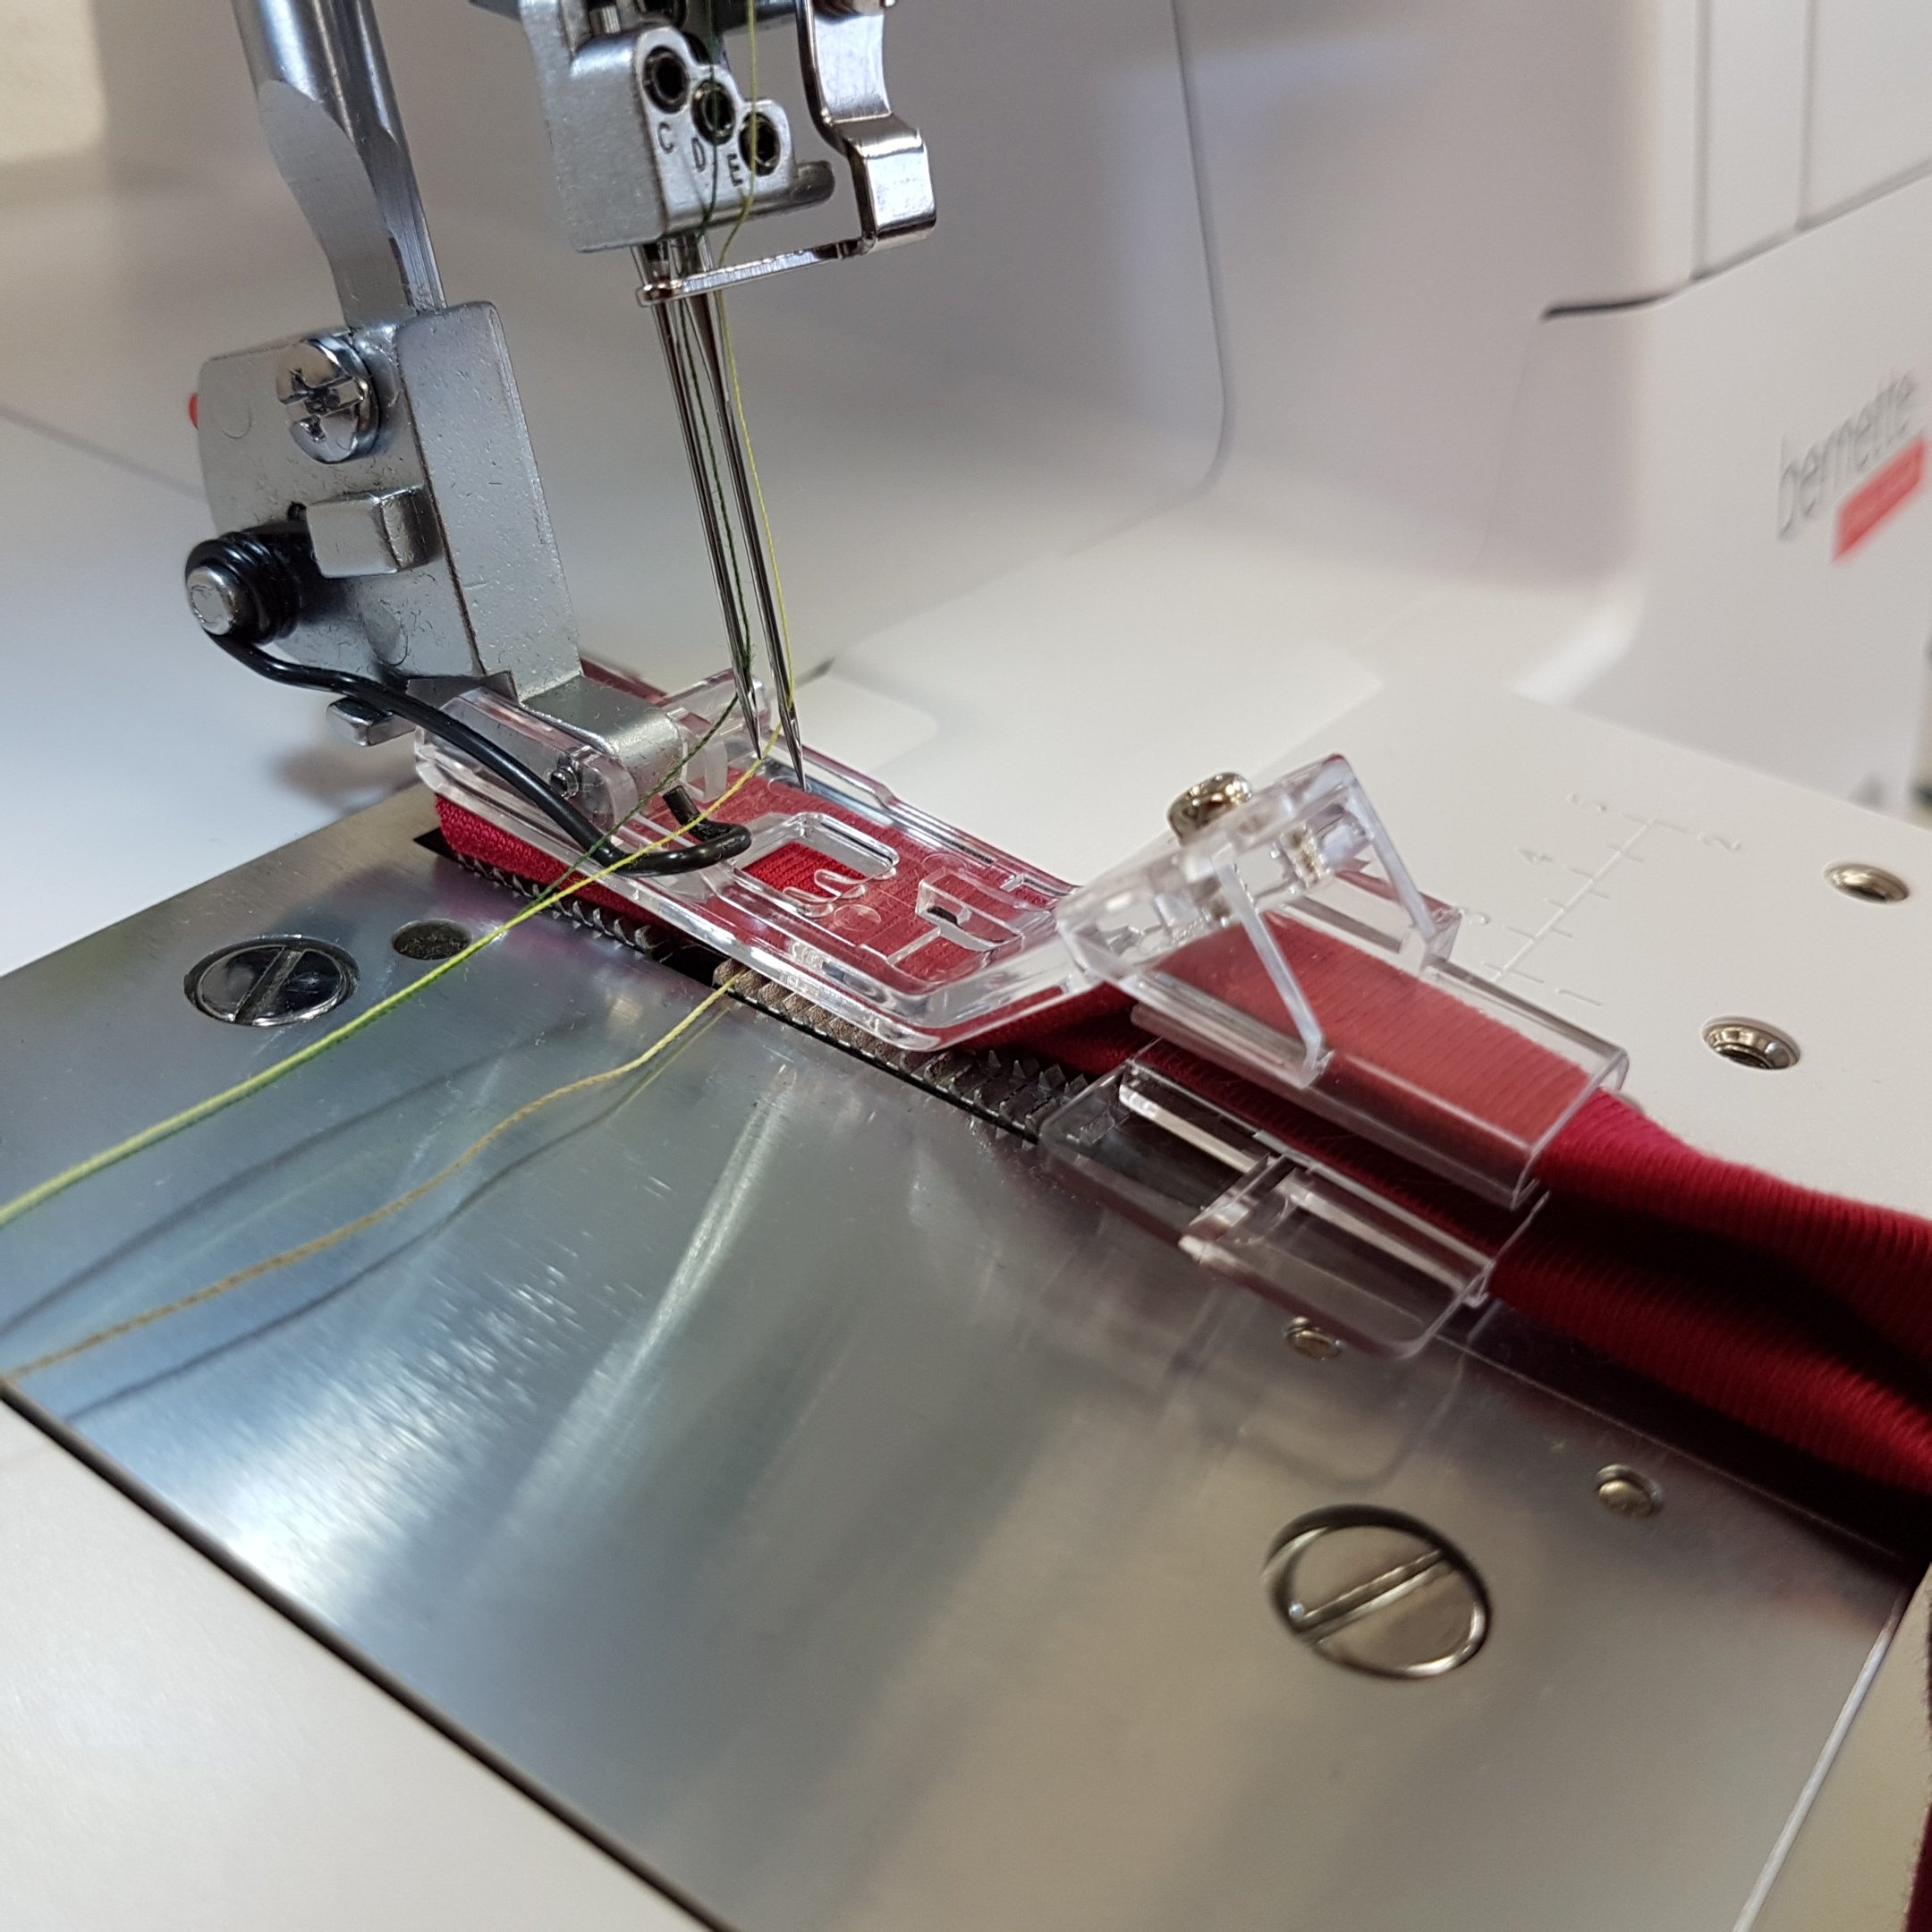
Lower the foot and sew a few stitches to stabilize the binding.
Cut the needle thread tails (if they are hanging loosely over the foot) to prevent fabric puckering.
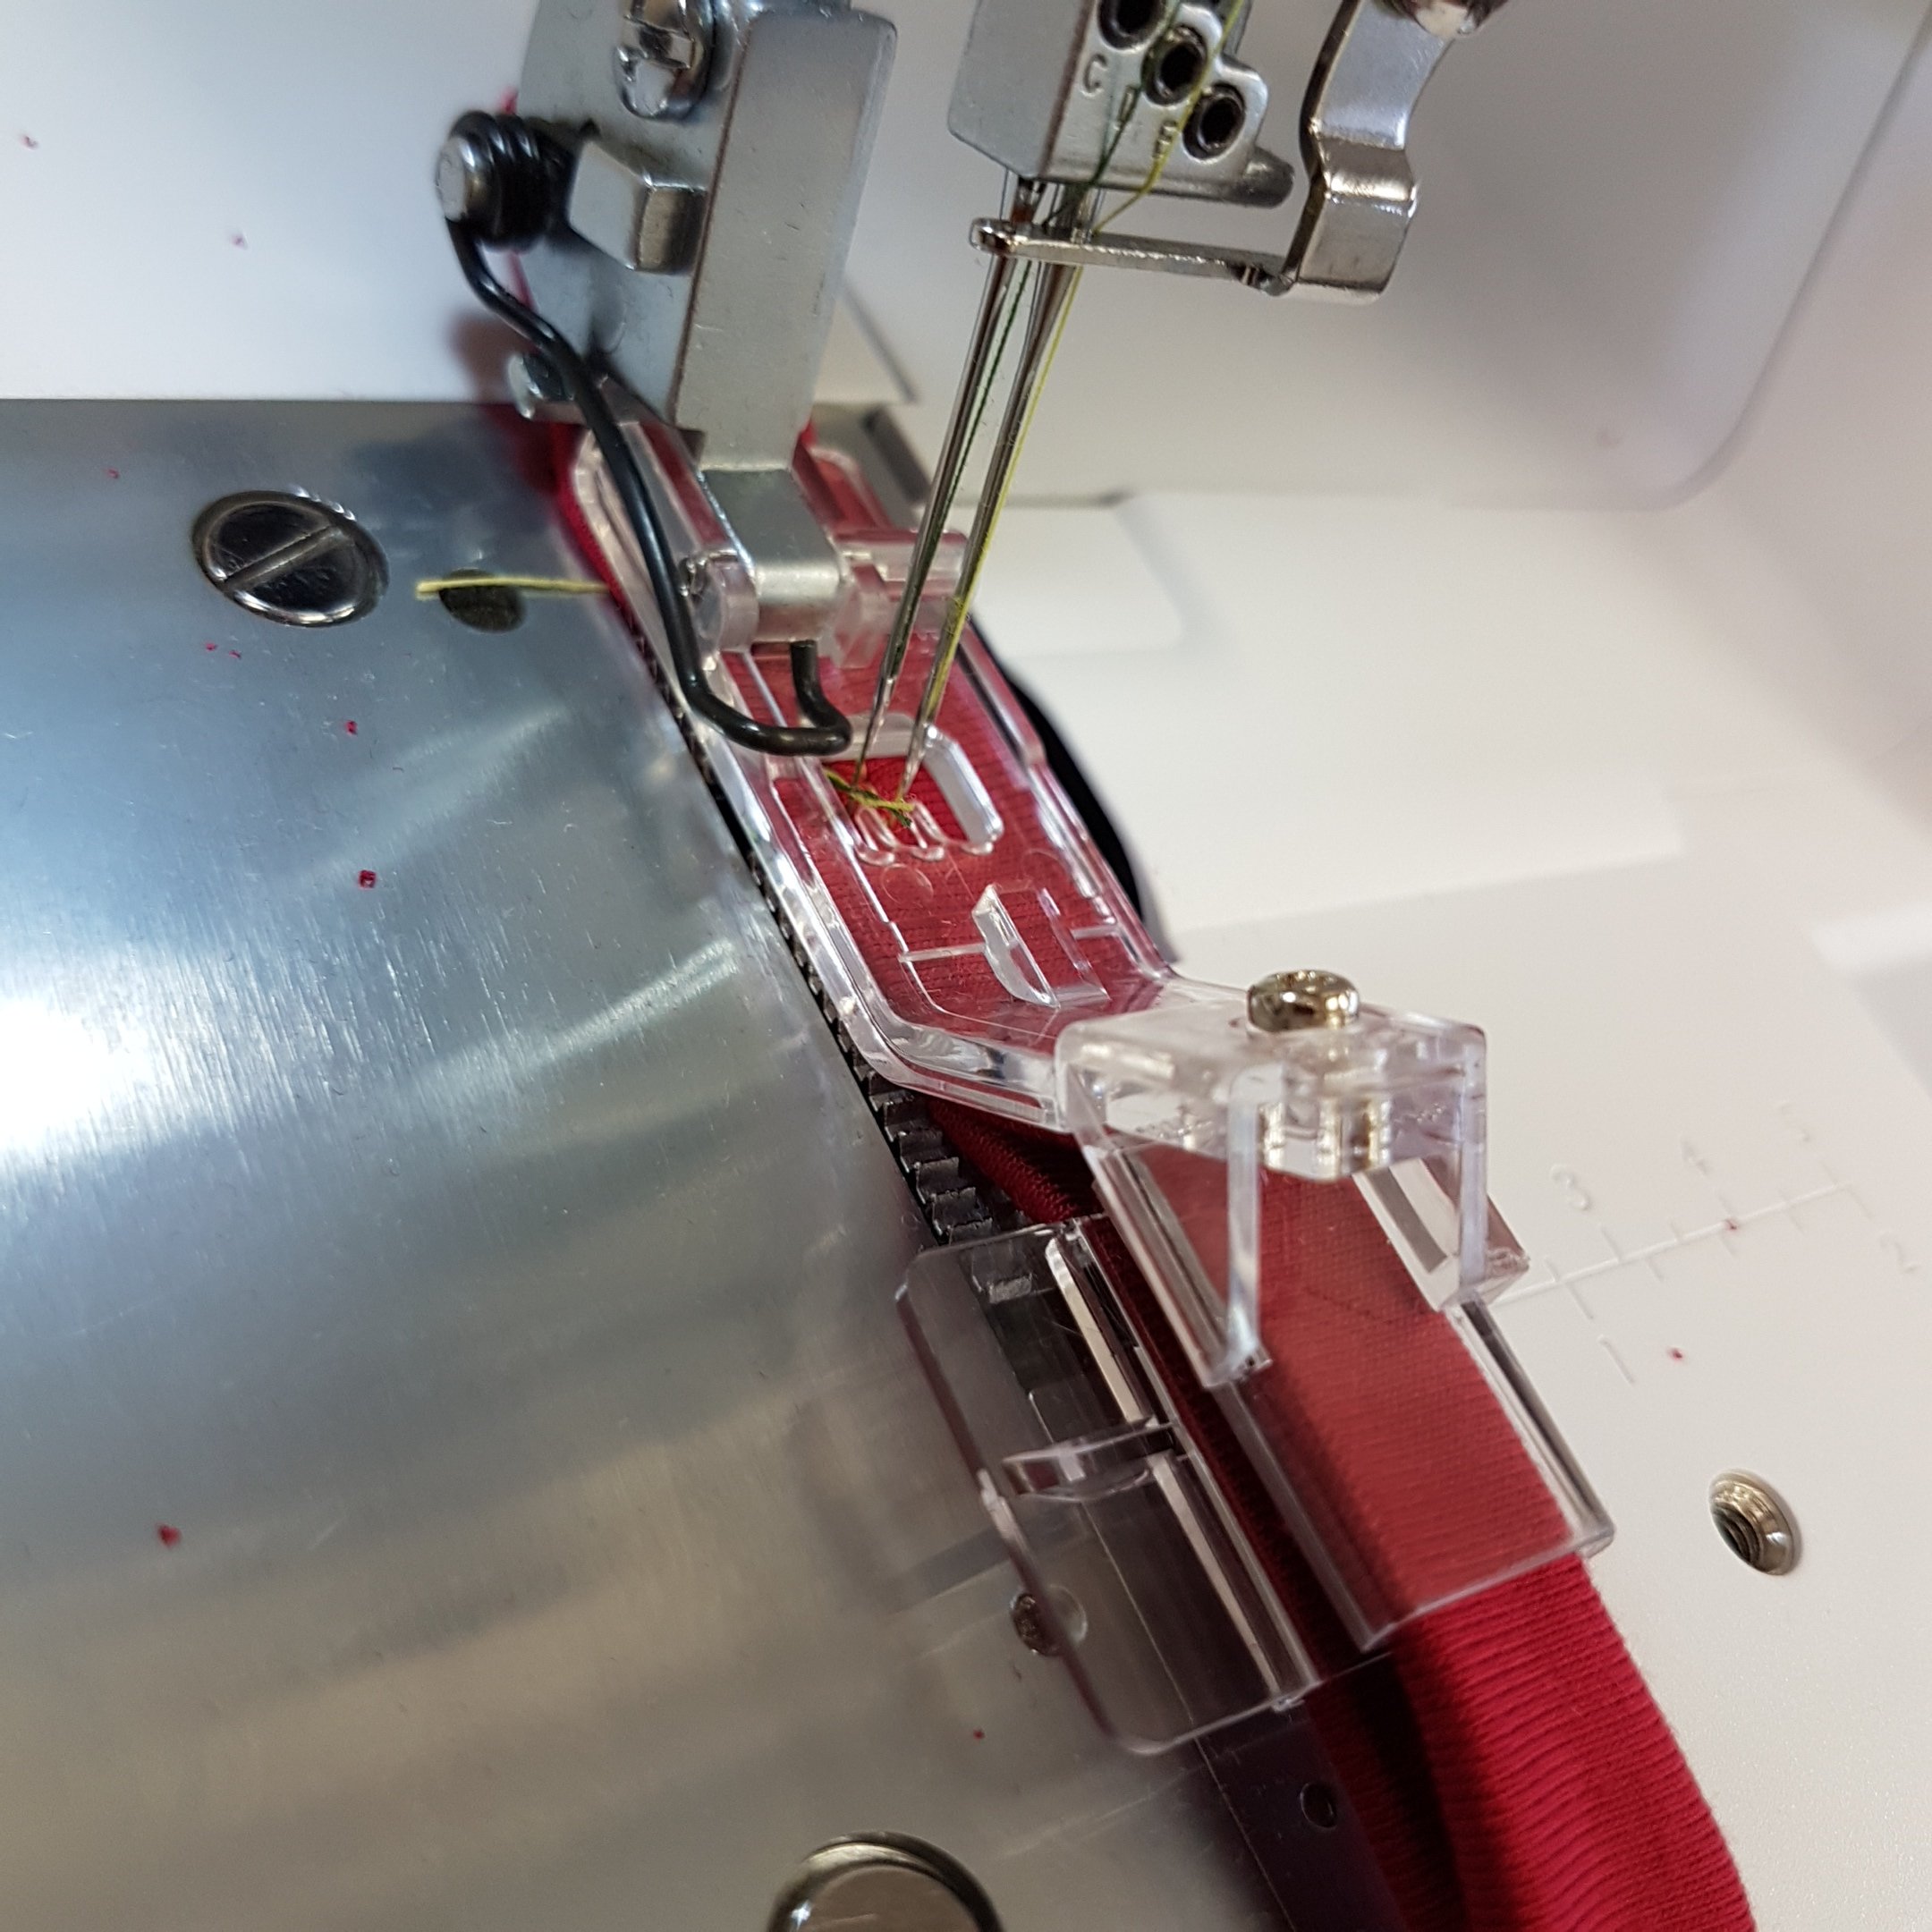
Insert the fabric to be bound, making sure its edge is all the way in between the bias. In my case it is a lightweight sweatshirt material… don’t go too thick!
Sew slowly until it reaches the needles.
Continue sewing, making sure that: The binding fabric on the upper side always reaches the left edge of the guide. Don’t stretch it too much.
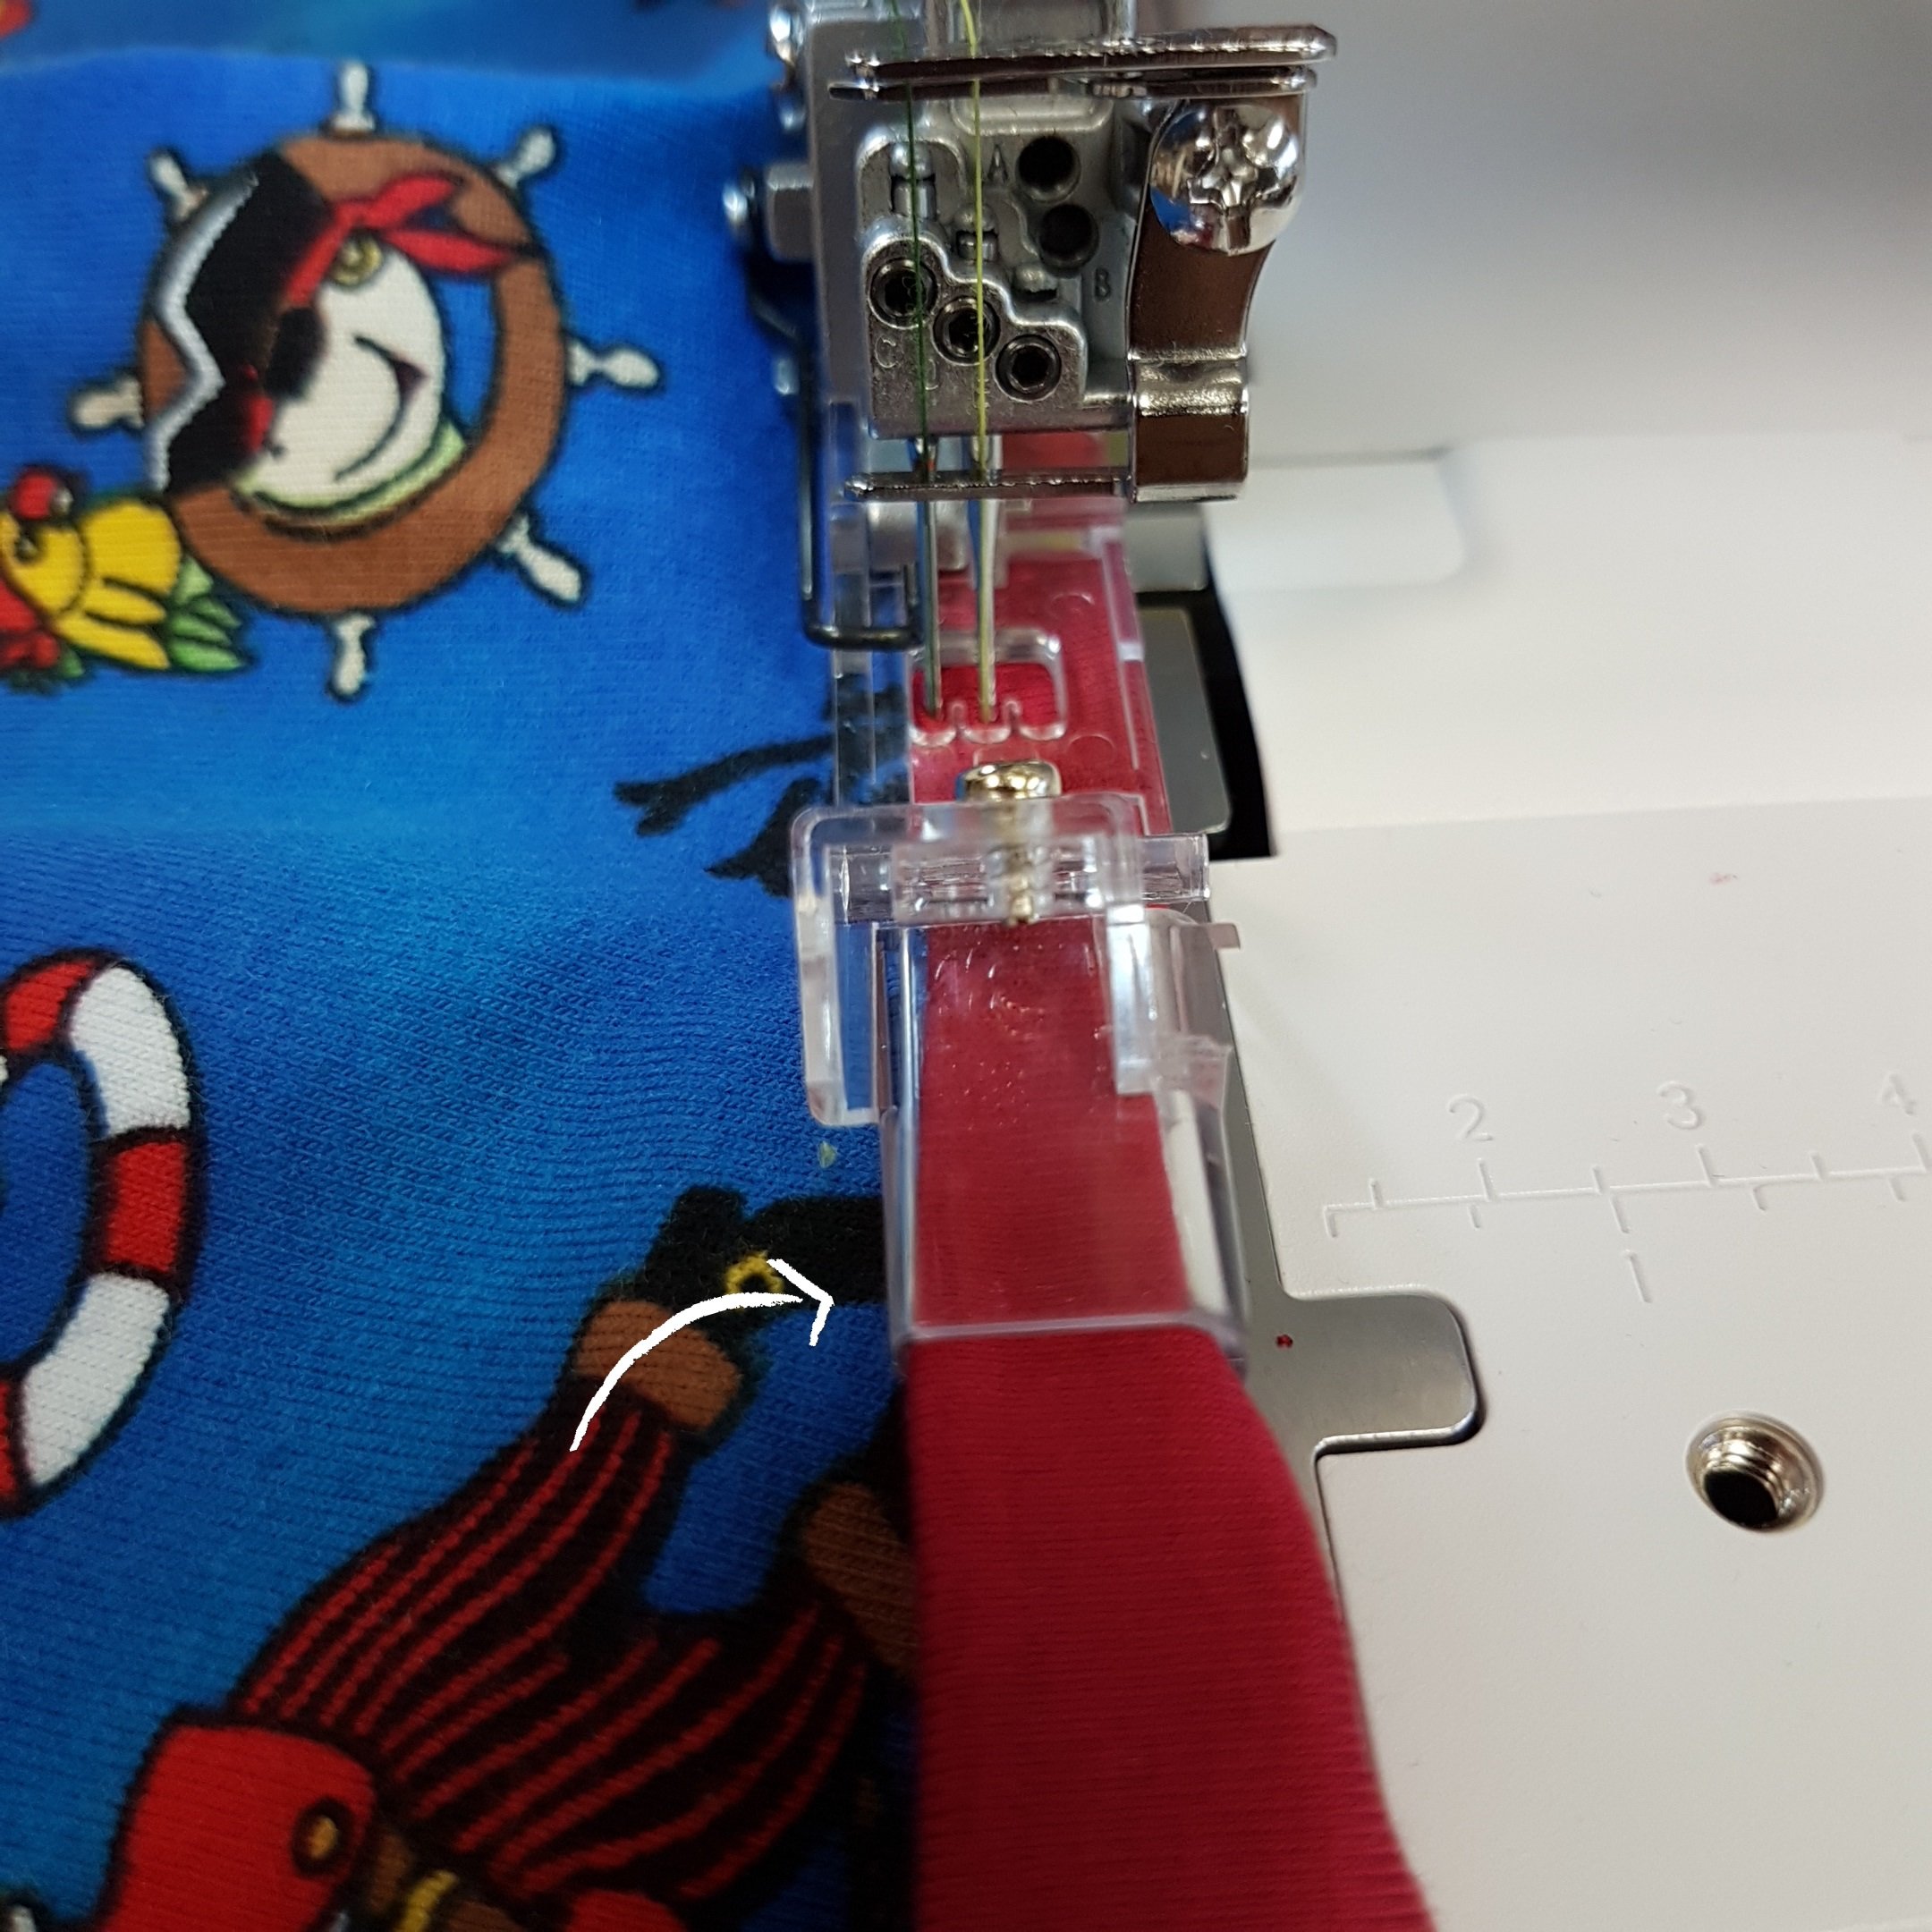
The to be bound fabric should always be to the right as much as possible, in between the binding. Don’t stretch it at all.

Frequently check the result behind the foot.
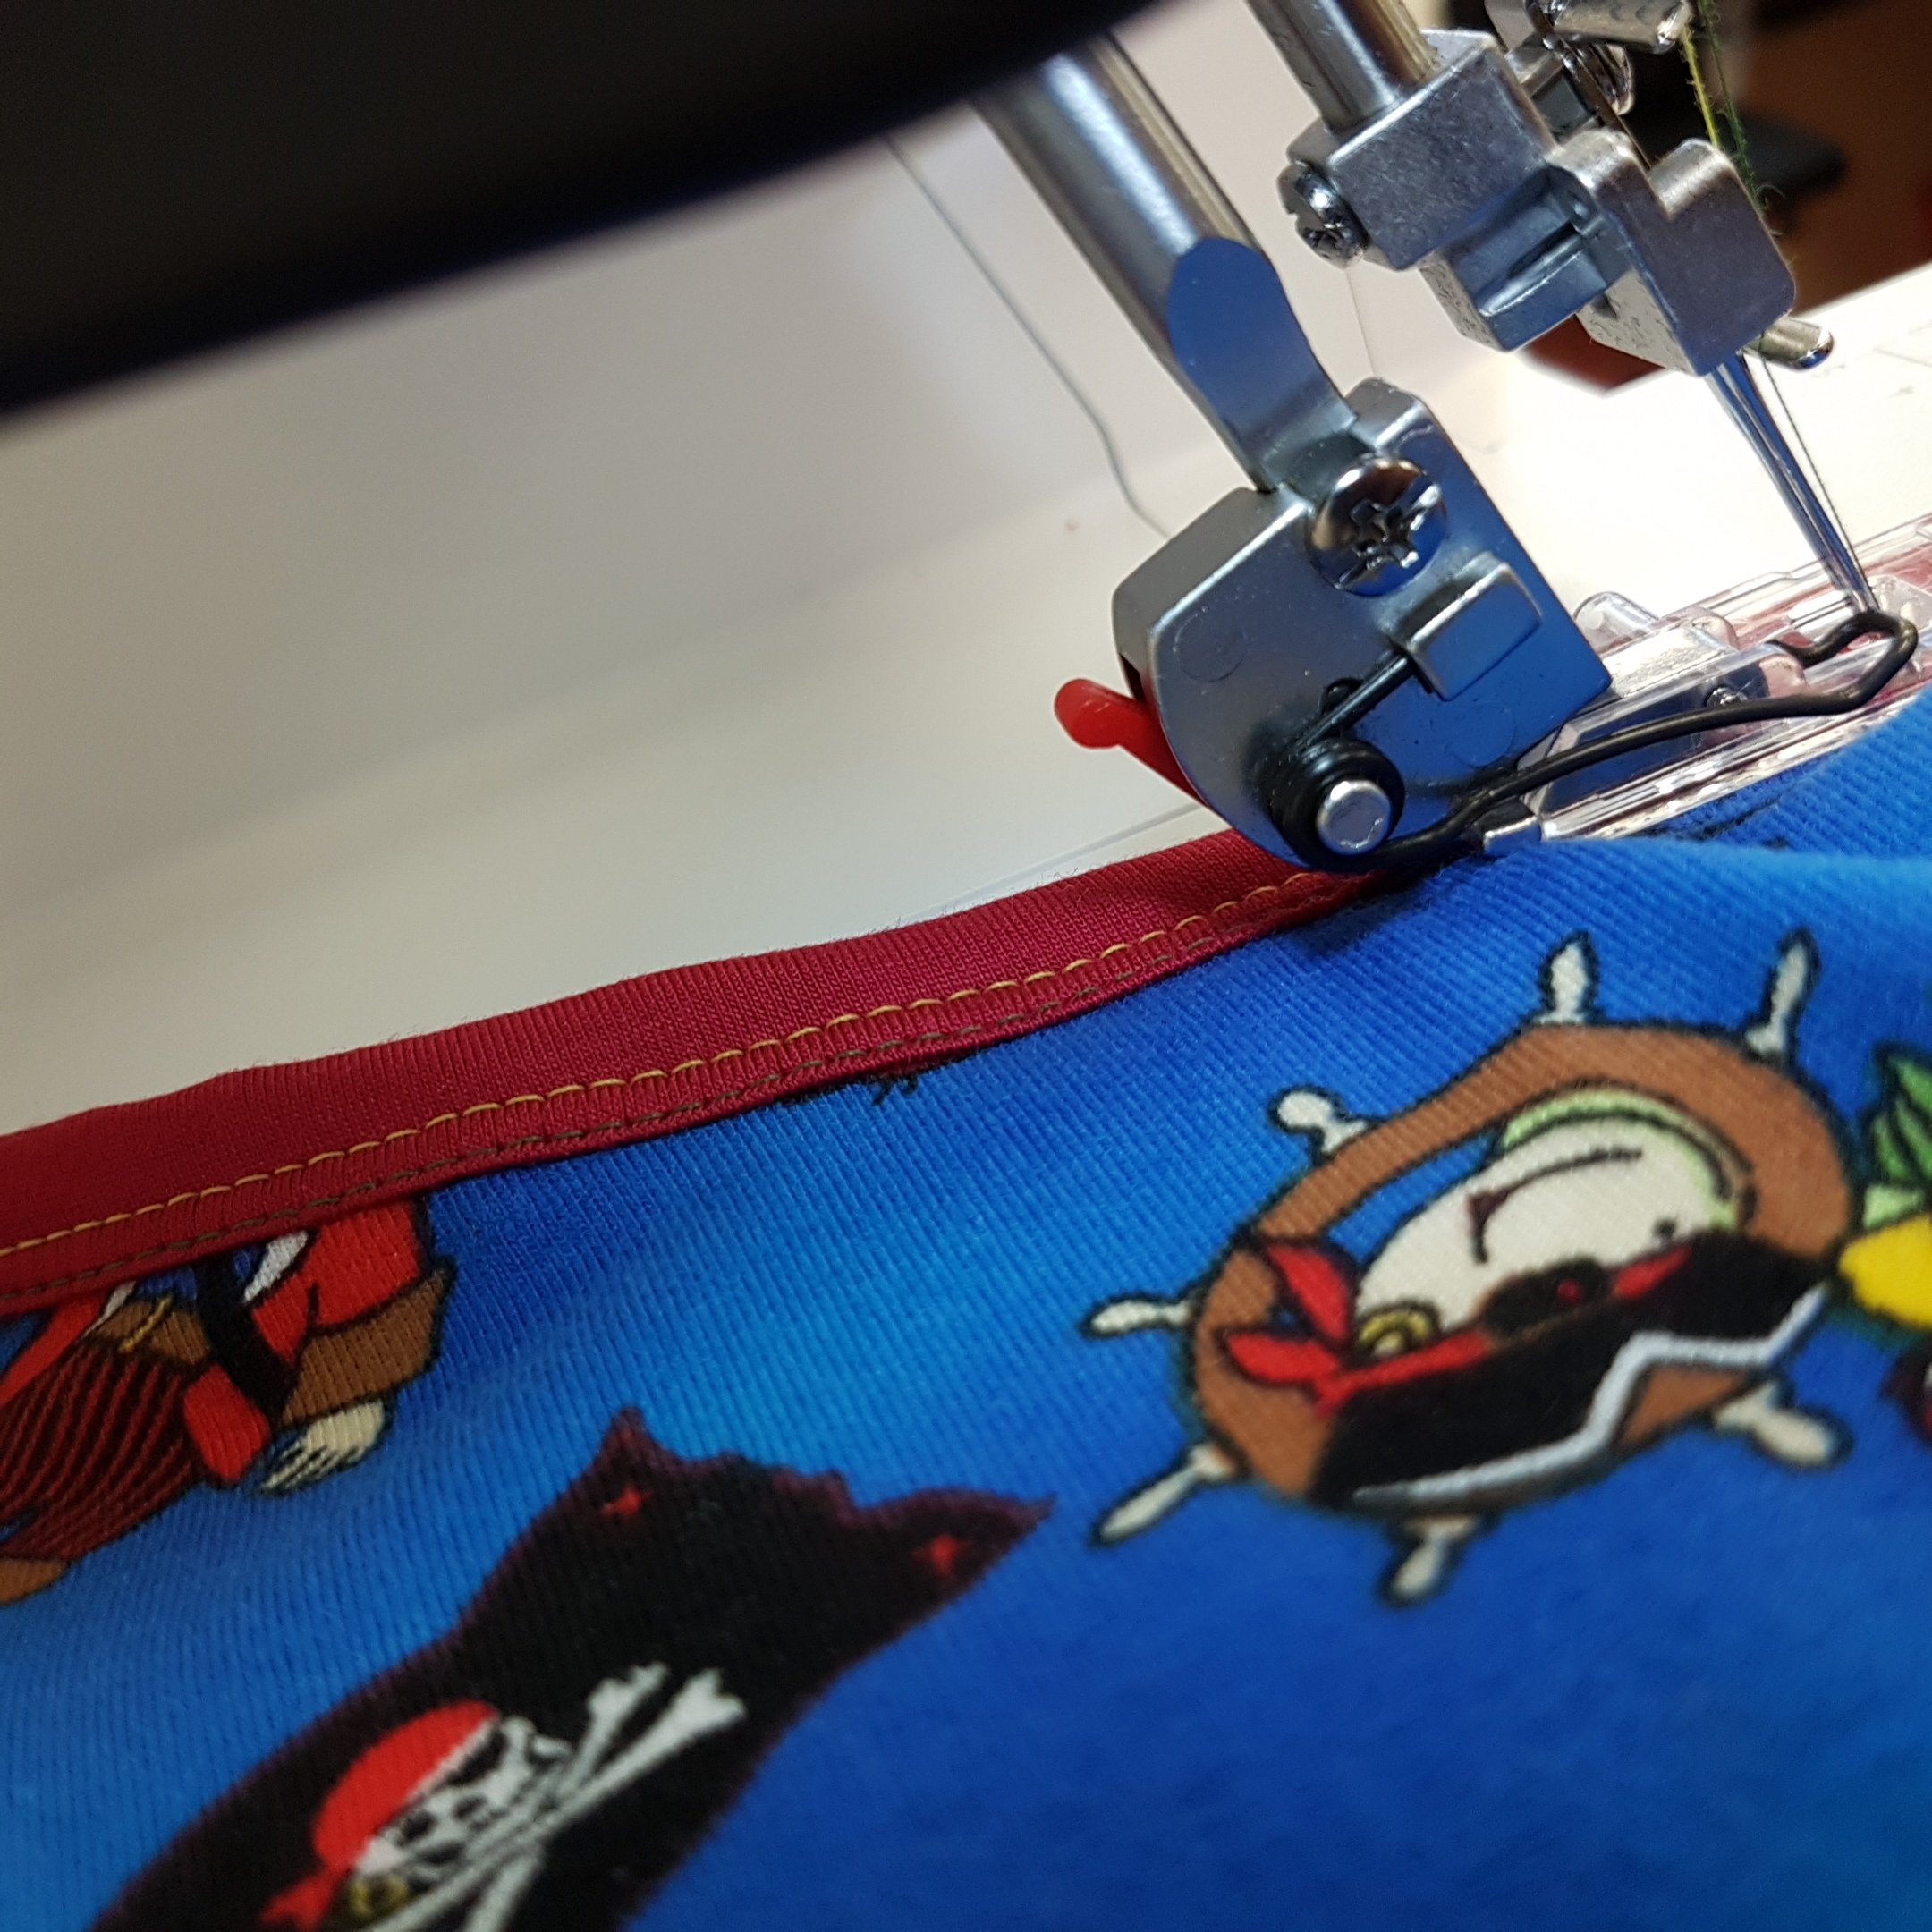
Also check the underside…
… so that you could adjust your guiding if needed.
Tips:
Depending on the stretchability of the fabric used for the binding, cut it 45 to 50 mm wide.
Avoid too thick materials for the binding and fabrics being bound. Too thick fabrics are not working with this small foot.
Got you – no picture of the finished shirt – that is another story and not written yet.
… and don’t forget, practice makes perfect – enjoy using the bernette binding attachment!
Kind regards, Doris


Acabo de comprar una Bernette funlock b48, y un kit de prensatelas que incluye este ,creo que no le funciona a nadie ,y no entiendo por qué no lo rediseñan ; y además que no hayan otros prensatelas compatibles; tampoco entiendo por qué no hay vídeos de Bernina con estos prensatelas; solo veo la bernina L 860 ( serie L) y es frustrante cuando una empresa con tanto prestigio no presta atención a tantas personas amante de la costura y no soluciona los problemas; siendo una inversión importante la que hacemos al comprar estás máquinas; espero estimada Doris que plantee nuestras sugerencias a su equipo y agradezco su esfuerzo en publicar estos vídeos de ayuda a todo@s los amantes de la costura,saludos .Y piensen en que, en cada continente de este mundo, hay unas personas que compran sus máquinas esperando sacar el máximo provecho de las mismas ; gracias .
Dear Aracelis, thanks for your feedback. It is unfortunate, yes, that this binder foot is very difficult to use and success is very dependent on the fabrics used. I am struggling myself on finding tipps on the binder foot, all other feet in this set of coverstitch feet are so easy to use and you can get a perfect result in no time. However, at this moment the only advice I have is, use the binders C21 or C22 also on your b48. Or use the technique of a two-step binding in your projects, although this is not supported by an optional accessory. But with binding in two steps, I admit, I get faster and more satisfying results than with multiple sewing tests and trying to be successful with the binder foot. Please let me assure you, our product management knows about the issue, we are working on it. Kind regards, Doris
Thanks for sharing! I’ve got the same binding foot, and also the B42, but I’m not happy with my bindings. I usually do it by hand, since the results are then much prettier. with my binding foot the binding looks like your foto: the front nearly over the edge and the back halfway on the binding. I’d like it to be the other way around. So, the backstitch on the edge and the front not so much. Doing bindings by hand is a time consuming process. So I’d like to know if there’s another binderfoot that works on the B42. Do you have any suggestions? Thank you so much in advance:)
Dear Bertine, thanks for your inquiry. You are right and as you have seen it photos, the top stitching is closer to the edge than the underside where from the folded edge to the chain looper thread is a wider distance. But now, there is no adjustment possibility to that foot. I know that two-step handmade bindings can be more customized and personalized – I myself prefer that too when it comes to small projects and challenging patterns. From the bernette side, no, there is currently no other binding accessory available fitting on the b42 (or b48). Kind regards, Doris.
Thank you!
Can a generic binder such as the Janome type with a rake that attaches to the side of the machine work for the B42 if I would tape it or blue tack the binder to the bed of the machine. I would like to try buying a cheaper generic one and see if this might work better than the plastic one?
Dear Linda. Thanks for your question. I have not tried it myself but know from other users that a binder such as the one you mentioned could work on the b42. If you do use a non-bernette binder attachment, I recommend that you buy or use it with a corresponding attachment base or “adapter” with suitable screws that will make it properly fit and work on the coverstitch extension plate. Any feedback after trying it is appreciated! Kind regards, Doris.
Please can you post a tutorial with the hemmer foot next.
Dear Samantha, thanks for your inquiry. I would love to, but time is always short and passing so fast. I have inquired with my colleagues also, and as soon as someone writes an article that is more detailed than the instructions that are coming with the foot, we will post it. Meanwhile, I hope the instruction manual that came with your foot will support you in its use. If it got lost and you need a copy, please contact me again. Thanks. Enjoy sewing with your bernette! Regards, Doris.
Please can you tell me where to buy this binder attachment for the b42 coverstitch. I have looked everywhere. Thank you.
Hi Linda. Thanks for your inquiry. You should get the b42 coverstitch binder foot from your authorized bernette dealer. I am sure they will ship to you if you can not pick it up personally. If you want to let me know where you are, I might be able to check with our local representative to where to direct you… Kind regards, Doris
Hello, thank you for this tutorial. However I too have misgivings about such a flimsy looking binder. I have the #88 Bernina binder and I have been able to attach it to my Bernette 42 minus the back fabric guide. I figure as it just folds and guides the fabric through to the sewing foot, it is not interfering with the sewing mechanisms. There is a Bernina article saying the binder foot works with the Bernina cover lock machine. I need practise ( lots) but I think this may help others – also spraying aerosol hairspray on slippery bindings and allow it to dry completely, stiffens them up.
Hello Margaret. Thanks for the tips and tricks you are sharing with all of us! Kind regards, Doris Brechbuehl.
Hello Margaret,
I’m also finding the b42 binder foot inadequate, which is unfortunate as it is the only official accessory that is supposed to do the job. I am considering buying the #88 too. Have you cracked it? Is it just the back fabric guide that won’t work? Will it work with the classic b42 foot?
Any help with this is highly appreciated!
Best regards,
Rebecca
Hi Rebecca, The #88 Bernina Binder does fit on the b42. Sometimes it works really well – other times it has been hard to get it’s sweet’ spot! Fabric thickness, type of thread also make it inconsistent. I keep looking at the Erika’s binders , which are probably cheaper and come out at a right angle, so you can get closer to the feed dogs. Think it’s mainly perseverance and practise!
Can this foot only be used on a serger? Or can it be used on a bernina sewing machine? I have an Activa 130 and an Activa 230. Thanks for any help.
Hi Alicia. This foot is designed for the serger, fitting the design of needles, knives and feed dogs. If you want to try the bernette serger binder on your Activas, it is at your own risk… I would recommend to use Binder 88 on your sewing machines. In the accessories catalogue you find the binder / article number compatible for your machines. Kind regards, Doris
Hi, I am not finding it easy to use this attachment. The binding keeps slipping to the right, especially the upper edge. When I look at other binding attachments, including the Bernina attachment for its sewing machine, they do such a better job. I think that a redesign is in order, not really what I expect from Bernina.
Hi Heidi Jungwirth, thanks for your feedback. As different fabrics behave differently, there is no universal solution. With this foot and by the case you describe, I would roughly guess, that may be setting differential feed towards 0.8 or 0.7 could be useful… but no guarantee, just worth a try. However, I take your feedback on proposing a re-design to the people in charge. Kind regards, Doris.
Please can you upload a video of your process. This is not working for me,
Dear Rugaya Sadan, thanks for your feedback and inquiry. There is currently no video available showing the use of the bernette binding foot, but I have added your inquiry to the wishlist and see what I can do. But don’t get me wrong, it will take some time. Kind regards. Doris
Hi Doris
Thank you for your reply. I am still finding that this foot is just not working. Even the educator at the Bernina store could not get it to work correctly, and she has decades of experience. I find it very disappointing that Bernina have chosen not to address this problem, given that the binder foot is only sold as part of an extremely expensive box set here. This is also the first time I’ve ever been disappointed by a Bernina product!
Please add my feedback to your list, as I echo Ms Jungwirth’s recent recommendation that a redesign is in order.
kind regards
Rugaya
Dear Rugaya Sadan. Thanks for your feedback, which has been forwarded to the people in charge for optional accessories. The foot itself is available as a single part, not only in the set, but may be in your country representative decided on selling the kits only. On the use itself, as you see in my blog article, there are a few tips, but still no video available. Kind regards. Doris
Hvor kan jeg få kjøpe denne binding fot for Bernette Funlock 42? mvh Anne
Hello,
Thank you so much for this tutorial…. I looked for about 2 hours to find one with this foot!! So far yours is the only one out there. It is a bit of a shame that Bernette has not done one.
regards, Nara