 BERNINA Corporate Blog -
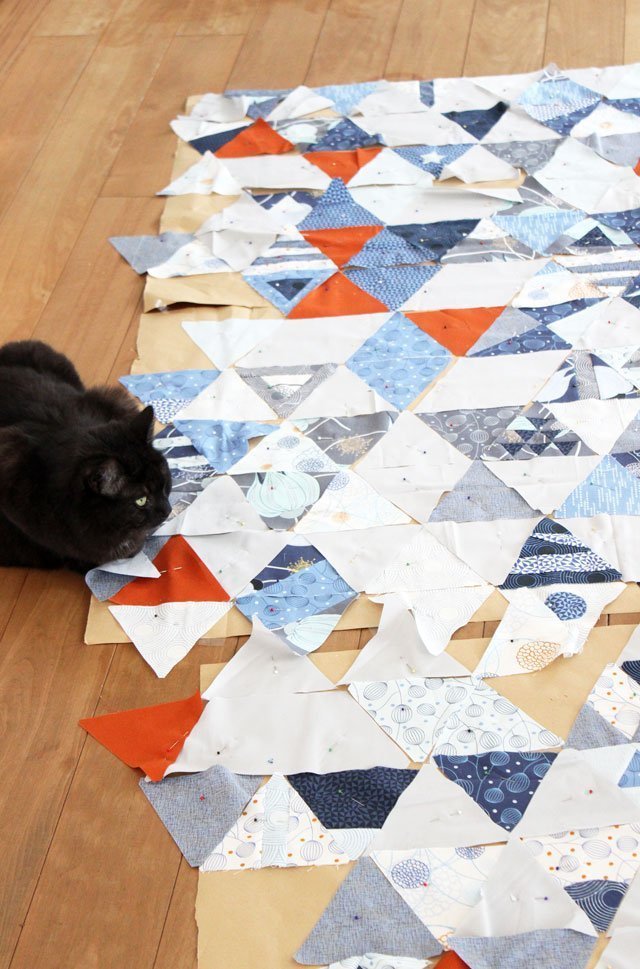
Now that blocks 1 through 12 of the BERNINA Triangle Quilt Along have been sewn, it’s time to cut out the remaining pieces. For this, we will cut the remaining triangles out of printed, contrast, and background fabrics.
How many triangles will we need from which materials in order to complete the Triangle Quilt Along?
Contrast Fabric
Contrast fabric is the easiest to determine – we will need 17 pieces from this material.
Printed Fabric
The amount that you need to cut out from the remaining printed fabrics for the triangles depends on what you have already sewn. It was up to you if you wanted to just sew a single sample of a block, if you did not want to do more. The number of “special blocks” and simple blocks should come to a total of 167.
If you have sewn the number of triangles that was suggested, the computation should look like this
| Block 1 | 15 |
| Block 2 | 6 |
| Block 3 | 8 |
| Block 4 | 4 |
| Block 5 | 7 |
| Block 6 | 4 |
| Block 7 | 6 |
| Block 8 | 5 |
| Block 9 | 2 |
| Block 10 | 4 |
| Block 11 | 3 |
| Block 12 | 2 |
| Total | 66 |
| still to be cut out | 101 |
Background Fabric
Before cutting out the triangles of the background fabric, first secure the edge strips.
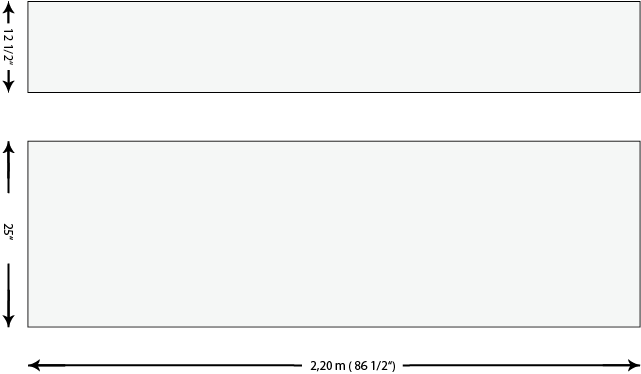
Cut out the following strips and put them aside: Cut a piece measuring 2.20 m from the fabric length. It is a little bit longer than you need, so that you can adjust the edge strips to the actual length of your midsection. Split this piece into two edge strips parallel to the selvage: the left edge strip is 12 ½” wide, the right edge strip is 25″ wide.
Set this edge strip aside until it is time for the next entry.
Next, we cut out the background triangles. The easiest way to do this is to cut strips measuring 4 ¾” times from the fabric width. You can then cut out the individual triangles from these strips.
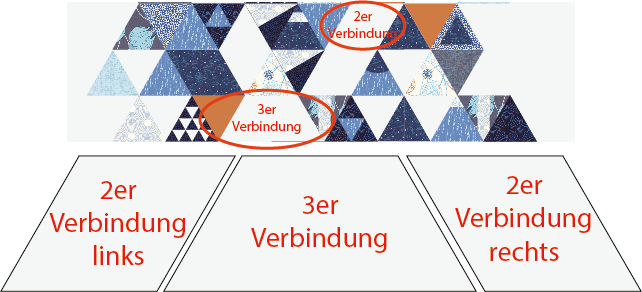
In the layout there are places in which several (sometimes two, sometimes three) background triangles are adjacent to each other. For these adjacent triangles, you cut out only one complete piece. This avoids waste, saves time and looks smooth.
If you have a background fabric that has a front or back side (i.e. marble fabric or a similar pattern), then you must also make sure that the pattern follows the same direction in the area where the triangles join. This does not apply to solid patterns, as these fabrics can be turned as required.
Aside from that, only cut out the background fabric triangles that are located between the patterned and contrast fabrics. All the background fabric triangles that lead to the edge are initially omitted. As a result, there will be a “fringed” edge on the left and right sides (see figure).
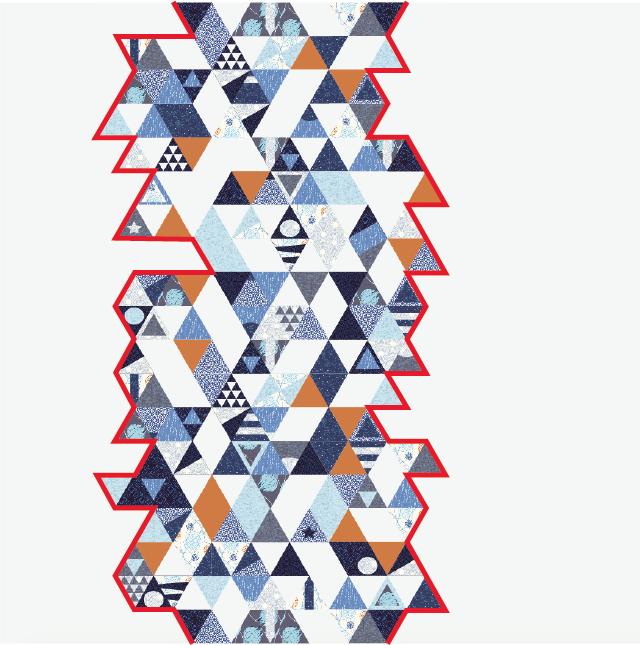
You will find out how this edge is straightened in the next entry. It will be taken care of when the pieces are sewn together. A note on this in the entry below.
Templates for two or three connecting sides
In order to perfectly cut the triangles with two and three connecting sides, I have again provided you with a template. Print them out (please set the print dialog to “Actual Size”). First, cut out the ones with three connecting sides. Then simply trim the template to look like a triangle with two connecting sides so you can continue to use it.
Download: Templates for connections
You will need
| 3-sided connection | 3 pieces |
| 2-sided left connection | 7 pieces |
| 2-sided right connection | 9 pieces |
| Individual background triangles | 42 pieces |
(Please don’t crucify me if I have miscalculated these).
When all the pieces have been cut out, they go to the layout.
Reminder: The raffle will include all the quilts that contain
- at least 1 of each of the twelve special blocks and
- for which the midsection layout is identical with regard to the contrast fabric, the printed fabric, and the background fabric. i.e. if there is contrast fabric in the pattern, you should also have a contrast fabric. If the pattern has background fabric, you should also have a background fabric. You can fill in the gaps that logically arise from this using your special blocks and cut out printed fabrics, as desired. Please forgive me for not implementing my original template exactly in the fabrics. Where I used dark blue fabric in the picture, a light blue can be used in the sewn quilt, and where there is a star block in the graphic, a circle block can be used in the sewn quilt. The picture is essentially a guide that you can use to find your own way. You will also notice that my number of special blocks in the picture does not quite match the number of sewn blocks. This is because I initially inadvertently designed the picture with only 11 special blocks, and then spontaneously added block 12 when composing the Quilt Along.
So, just as a reminder, it does not matter where each particular printed fabric or the special blocks are placed, as long as the contrast fabric and background fabric are identical.
Tips for assembling the layout of the Triangle Quilt Along:
Firstly, this is very important: If you are in a hurry and say to yourself: “As soon as I’ve laid everything out, I’ll go ahead and sew it together” – then please wait to lay everything out until the next entry. Because you can’t just sew together the frayed right and left edges. This is because the extensions must first be attached to the edges. In the next entry I will explain how they are calculated and cut, and I will also offer some tips on matching points. So it would be better to wait.
A design wall is, of course, ideal for arranging all the triangles neatly. Some of you have a practical piece of equipment, e.g. chipboard with molleton attached. I don’t have anything like that (indeed, although I do more than 20 quilts a year and work professionally with this, I have so far not wanted to have something so bulky lying around).
I propose the following alternatives: a large bed sheet (not a fitted sheet, obviously), onto which the triangles can be pinned; two adjoining tablecloths, or – and this is how I made it – pieces of a packaging paper roll glued together (see photo above).
All of these options allow you to lay out all parts piece by piece and to pack them away again when you’re not working with them.
Start row by row: look exactly where the contrast fabrics are, where the background fabrics are, and then fill in the gaps with the printed fabrics and special blocks. It takes a while. I sat all afternoon piecing together this puzzle. And it also requires concentration. When it is finished, you will have a nearly completed sewn top.
In the next entry, I will explain how the extensions of the frayed edge can be made into a smooth edge and how to precisely sew the rows together.
March 23, 2018 – Sewing together the individual rows, the midsection, and attaching the edge strips
April 27, 2018 – Ideas and thoughts about quilting
Good luck and show us your progress in the Community or on Instagram .


Is there a print friendly option for this pattern? I really need a paper version that I can read and refer to.
Thank you for the tutorial!
Hi Talia,
I’m sorry, we don’t provide a compiled pattern, but you will find every detail in the single blog posts, which are all linked in the last one. Or type in the keywords in the search dialog box.
Do you have a copy of the entire pattern and instructions, for those of us who missed the community event? Thanks!
We don’t have a printed copy. However, every single step is laid out in detail during the linked blog post above.