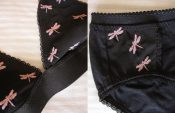
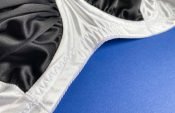
This month (or should I say for September, since I am a little late) I am going to teach you how you can sew some panties to your liking to match all your beautiful bras you can now make. If you want to check out, how to make your own bras you can find my intros here.
Which panties patterns to chose?
Let’s start shall we? If you don’t know how to draft your own panties (and I don’t expect you to) we need a pattern first. I chose the Acacia panties from Megan Nielsen for two reasons. Firstly it fits me perfectly right out of the package – I mean PERFECTLY. And secondly because you can get it for free if you sign up for the newsletter of the Australian indie designer.
But you can customize any panties pattern you would like. You may also copy your favourite pair and make these customizable.
Hack it to pieces
Customize you say? Yes! Panties need to be stretchy, bras or most parts of a bra are not meant to be stretchy. You can already see the problem: You may need different fabric for bras and panties. But since we want to make a matching pair this is something we need to think about. There are several ways how you can accomplish this.
- Work with foam in the bracups and cover them with stretchy fabric (but use powernet for the band and lining for the bridge). You can then use this stretchy fabric to make your matching panties.
- If you don’t like foam, stabilize the cups and the bridge with lining then use the lace or the lycra etc. for the panties.
- If you are using rigid fabric for the cups or a very firm knit (like scuba) you will not be able to make the whole panties out of this fabric for obvious reasons. They will be uncomfortable as hell, I promise you. For this option you will definitely need to adjust your panties pattern (hack it to pieces really).
If you are unsure about fabrics or elastics head on over to my intro to bramaking and you will get a nice overview that will also help you with making panties. You do not need a serger/overlocker to sew your own panties (use a zigzag).

All the materials you will need. (The green one is for the gusset).
Gather your material needed (consult your pattern instructions for this and let’s dive right in, shall we?
Let’s start
If you decide to hack your pattern to accomodate the different properties of your fabric choices (of for visual effect of course) lay it flat on a surface and decide on your design.

All the necessary pattern pieces for the Acacia
Next either cut directly into your pattern (if you have a pdf you can simply print it again) or trace it off first and then cut into it to your liking. I really wanted some lace added to my panties even though the bra did not have any. I made two pairs. One with the lace in the front and one with lace on the sides. It really does not matter too much where you cut but bear in mind: Wherever you cut your pieces apart you will have a seam against your skin while wearing panties. And if you are using rigid lace or very firm knits (some scubas are quite stable) you need to take those properties into account when making the decision. The rigid parts should not be too large and you might want to add juuuuust a little bit to the other parts to compensate for the loss of ease.

This is where I “drew the line”. The middle piece would also be good to make in scuba or in a rigid lace. Don’t go any bigger for more stable fabrics.
After cutting you need to add the corresponding seamallowance to all the places where there will be a seam afterwards. I did not add these to the pattern pieces in the pictures but directly when cutting out the fabric. If you are unsure always add them beforehand to the pieces themselves or you might forget to add them whilst cutting out.


Cut out all the pieces. Here you can see some of my bra pieces (I usually cut out all at once).

Lay out all your pieces in the right order so you don’t confuse them while sewing.

I recommend sewing the “hacked” pieces first so you will have a complete front (or back) as soon as possible to avoid confusion.

Tadaaa… Completed front as promised. You might want to iron the seams so they stay flat. You could also topstitch them. If you want to do this use a walking foot and a stretchy stitch.

Then it’s time to sew the gusset. You do this by sandwiching the main fabric of the front piece between the two gusset pieces. I am holding the fabric of the front piece in this picture.

This is what it looks like when you are done.

You do the same on the opposite side. The front and back will be rolled in for this (looks like a burrito to which this method owes its name). It sounds very confusing but it works.

…now you can pull out the fabric from one of the sides and your panties should look like this.

Sew together the sides

These are my two pairs all done. Now it’s on to the elastics.

Use a regular zigzag to sew on the elastics. Either use fold over elastics…
The type of elastic used in this picture is a sort of hybrid (for a lack of a better word). You can fold it open like regular fold over elastic but it has a picot edge like picot elastic. You just put your fabric in and sew over it. Like a dream. This one is very stretchy which I like. Nothing more uncomfortable like pinching elastics in your undies, am I right?

… or regular underwear elastics. It does not matter whether you choose picot elastic (like the ones for your bras) or the common underwear elastic. But bear in mind the amount of stretch you feel comfortable with. Sew one row like this with a regular zigzag and then fold it over to the inside and topstitch with another row of zigzags.

This is what it looks like when folded to the inside and topstitched.

… and from the inside. The dark green part is the inside of the gusset.

And a different elastic (one with visible picot edges) for the second pair.

And you’re done!
Admire your own work and do a little happy dance.
Happy sewing!
Nadine
 BERNINA Corporate Blog -


Lovely fabric! Where can I buy it? ❤️