 BERNINA Corporate Blog -
I’ve explained the basics with Multi-Hooping in Lesson 25, about icons and options. Because there are multiple ways to use these options, I will show them step-by-step in this lesson and the next, to the actual embroidery of a design.
You will need to practise in order to master Multi-Hooping: setting everything manually means you will have to be sure what options are at your disposal, the different colors that indicate what you are doing, overlaps, markings etc.
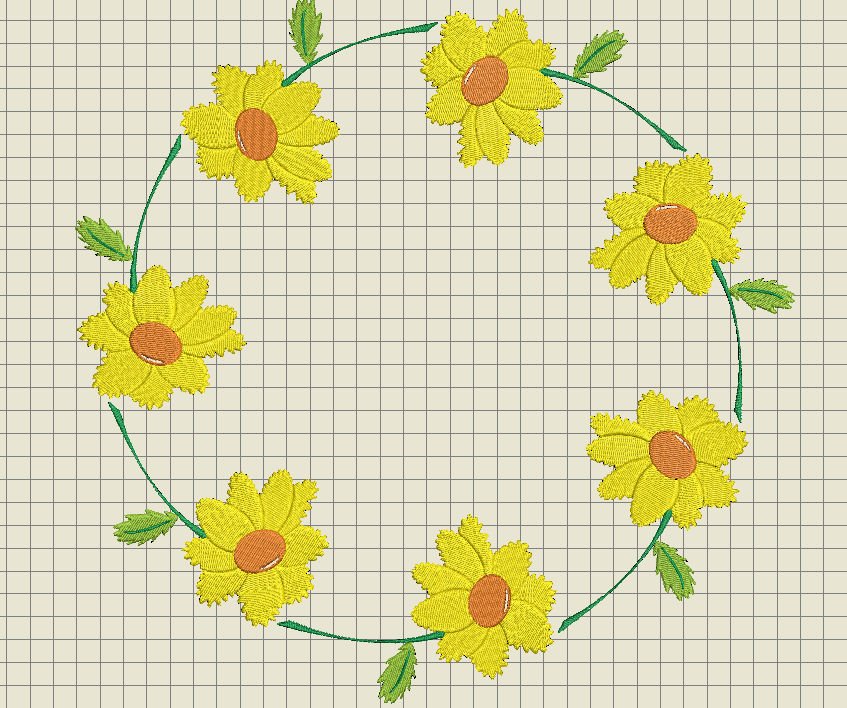
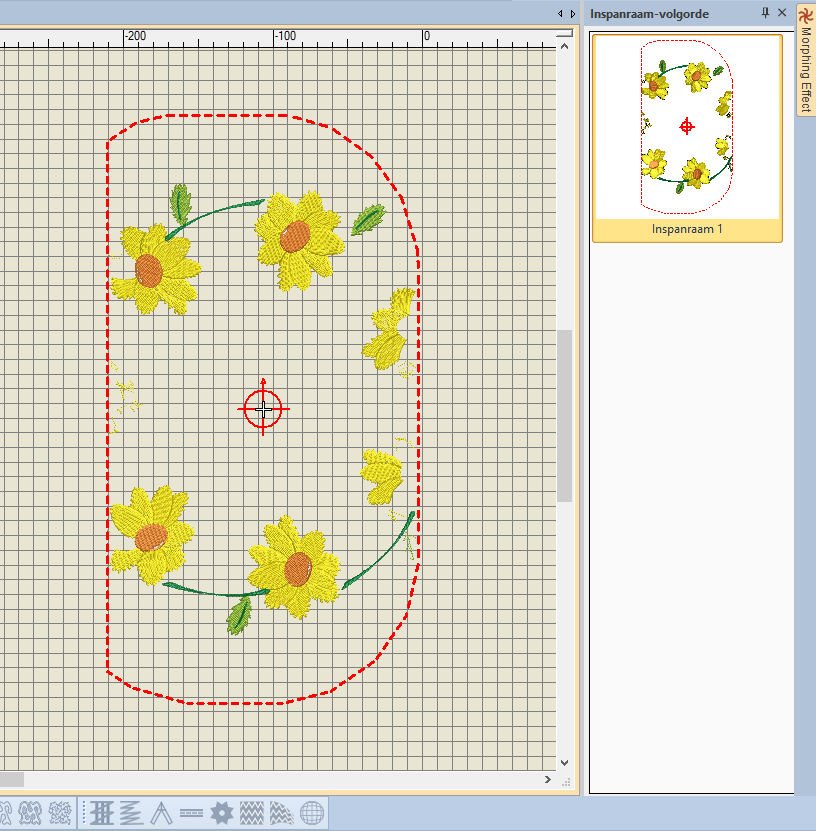
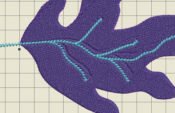
I have placed a large flower wreath/design on my Embroidery Canvas workspace. This design is too large to be made with one hooping, even with my Jumbo Hoop .

It will show when placing the largest hoop on top of the design: my B770QE has a blanc spot to the left: I cannot use that part due to the space between the needle and the machine. Via ‘Show Hoop’ the hoop you’ve used the last will show.
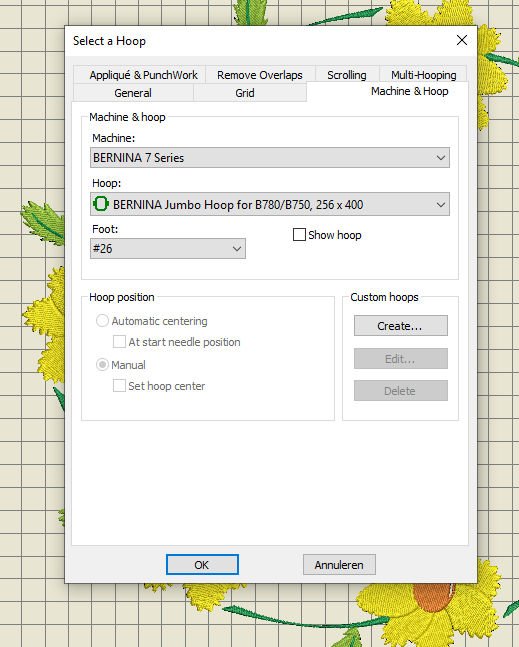
Right click on the icon to ‘Select a Hoop’ if you want to change hoops: the largest hoop for BERNINA machines is the Jumbo Hoop. If you don’t own a BERNINA machine, choose the largest hoop for your type of machine, to minimize the number of hoopings.
I have selected presser foot #26 (Embroidery Foot). You don’t have to check ‘Automatic Centering’ with Hoop position, because that will be disabled as soon as you use Multi-Hooping.

When clicking on ‘Multi-Hooping’ – left toolbar ‘Toolboxes’ – many functions with the upper toolbars are disabled. You are working in a special modus: you cannot change anything with the design at this point. So be sure editing the design is ready, before using Multi-Hooping.
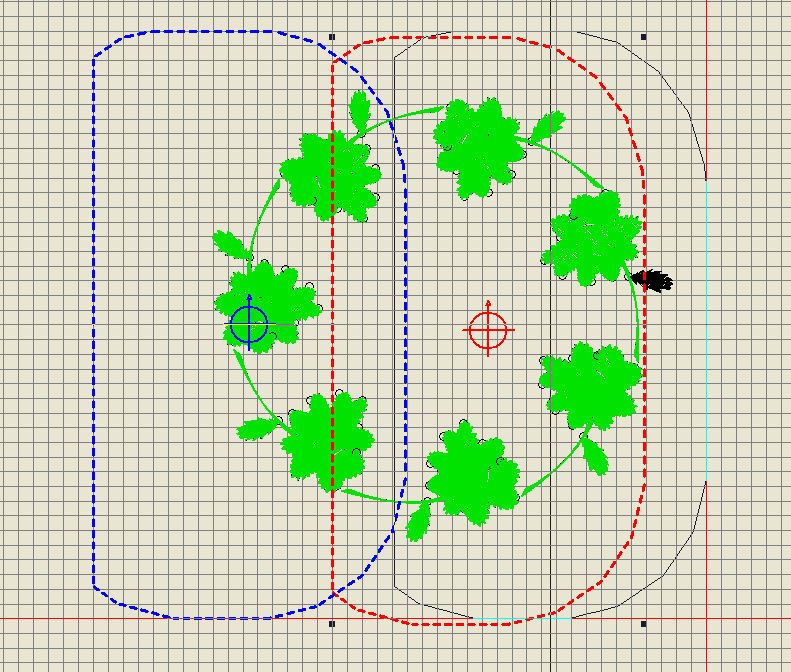
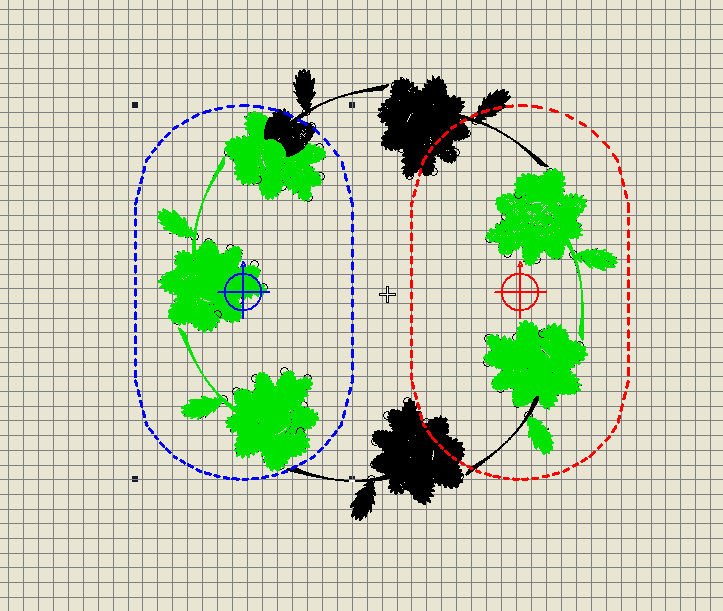
Immediately the design changes: there will be at least one ‘hoop’ showing as a dotted line, which is the maximum range of the Jumbo Hoop I have placed on top of my design. The flowers that are colored green are placed within the safety boundaries of the Jumbo Hoop. All objects of the design that are placed OUTSIDE the Jumbo Hoop are colored black.
Looking at my design, I will have to use 3 hoopings with the current setting if I leave it this way: the center part, and left and right of the current hooping.
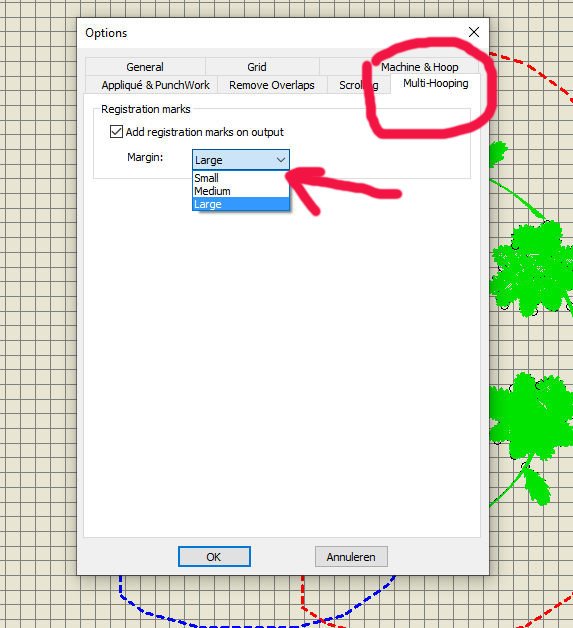
To be sure hoopings will be correctly aligned, I will have to add Registration Marks. Two sets of marks will be generated in overlapping areas: one set appears after stitching the first objects of the design with the first hooping, the next set will be made before the actual stitching on the second hooping. V8 will set them for me: I can set this by using ‘Settings’, then ‘Options’ with the Menu Bar. Using the Tab ‘Multi-Hoopng’, I can choose to have three different sizes of Registration Marks. ‘Large’ is set by default, which is the best option with most hoopings.
The larger the margin, the greater the distance between the Registration Mark and the maximum embroidery area of the hoop.
This makes it easier to align, but you will have to check if it is done right. Use ‘OK’ to confirm, and use ‘Preview Hoopings’ to see if any markings are added.
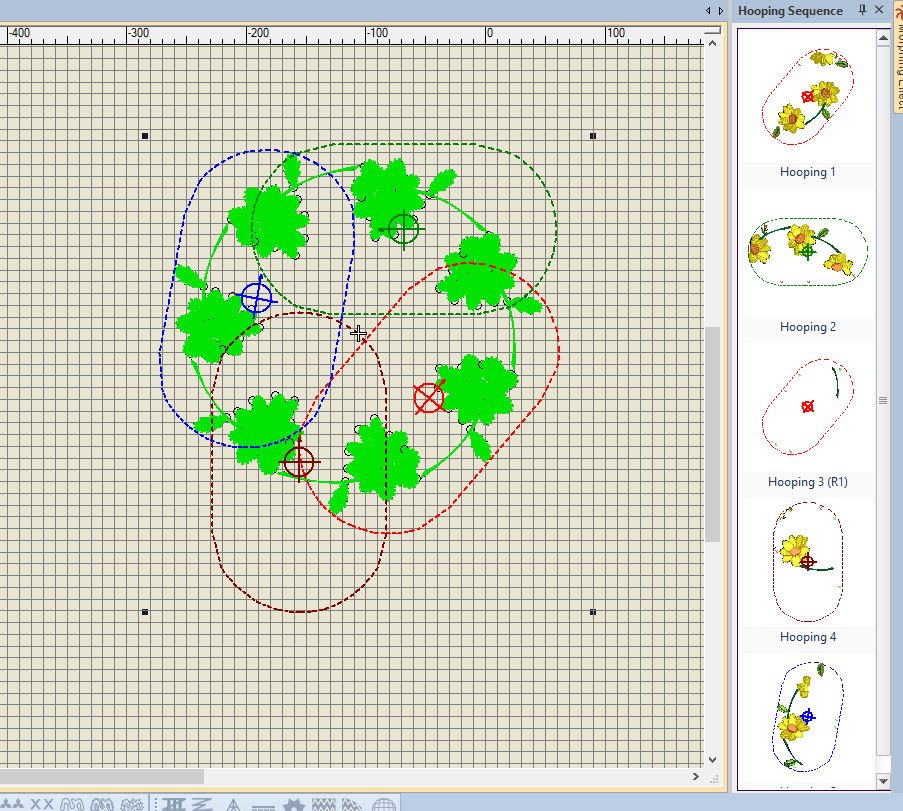
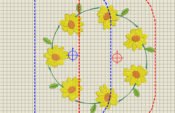
Click and hold the mouse button – hovering over Hooping 1 (when there are multiple hoopings visible in the docker ‘Hooping Sequence’, to see what will be embroidered within that hoop. The box you’ve clicked turns yellow and the actual embroidery is clearly visible. What is NOT visible belongs to a different hooping.
If you enlarge the docker ‘Hooping Sequence’ by pulling the left bar, you can clearly see the Registration Marks. If you don’t see any markings, your overlap could be too small. You can enlarge the overlap by moving one of the hoopings. The minimal overlap is 3 cm.
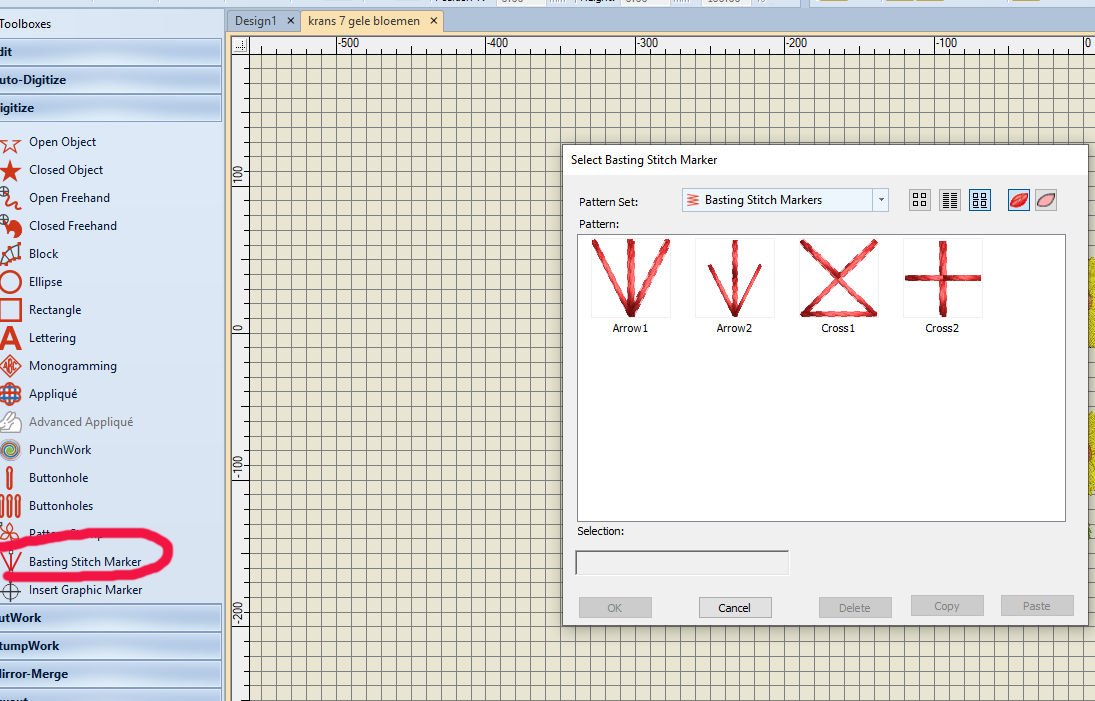
You can manually add markings: use the left toolbar ‘Toolboxes’, ‘Digitize’ and use ‘Basting Stitch Marker’. You can place this in any corner or position.
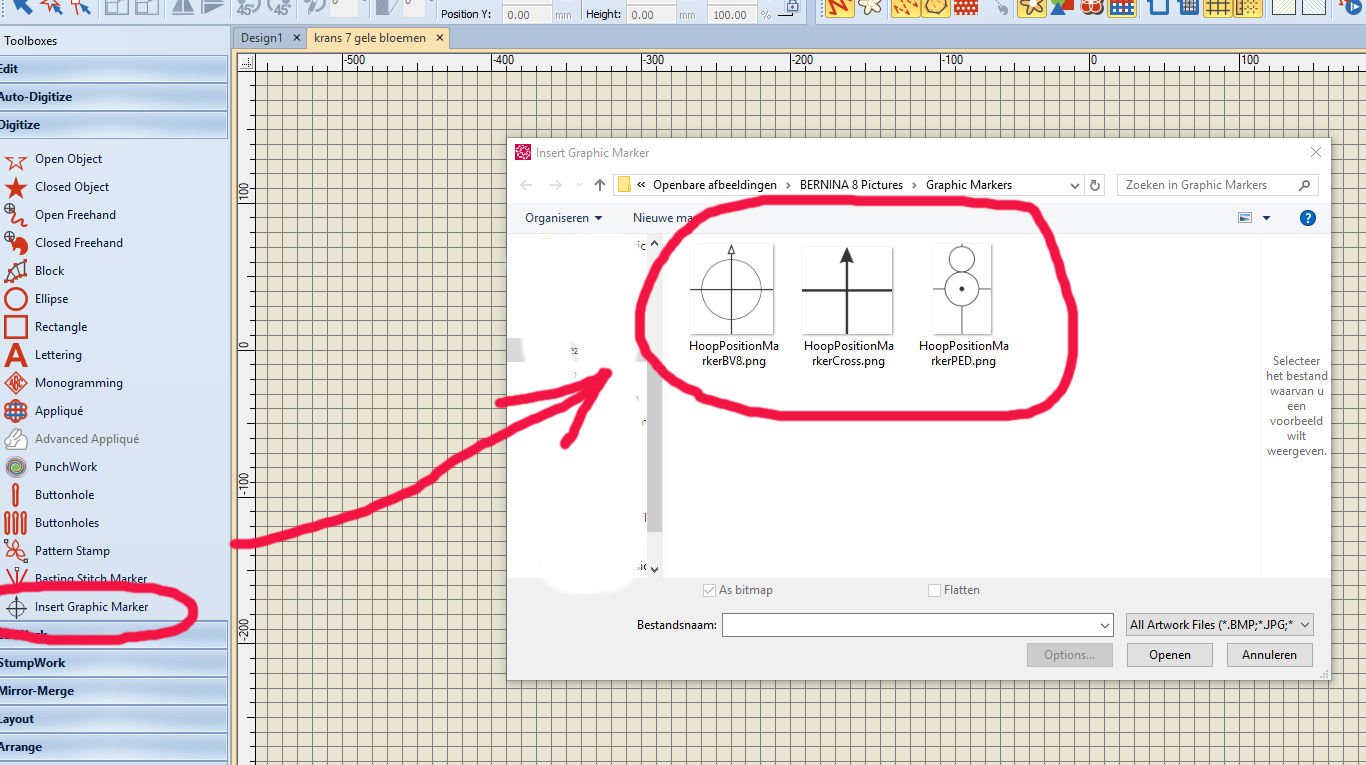
You can also use ‘Insert Graphic Marker’, by using the option ‘Insert Graphic Marker’. V8 has set 3 .png’s for you to choose from. It helps sometimes to have more markers for better placement. You can use stickers on top of these markings on your fabrics, or pins, for exact placement with the next hooping.
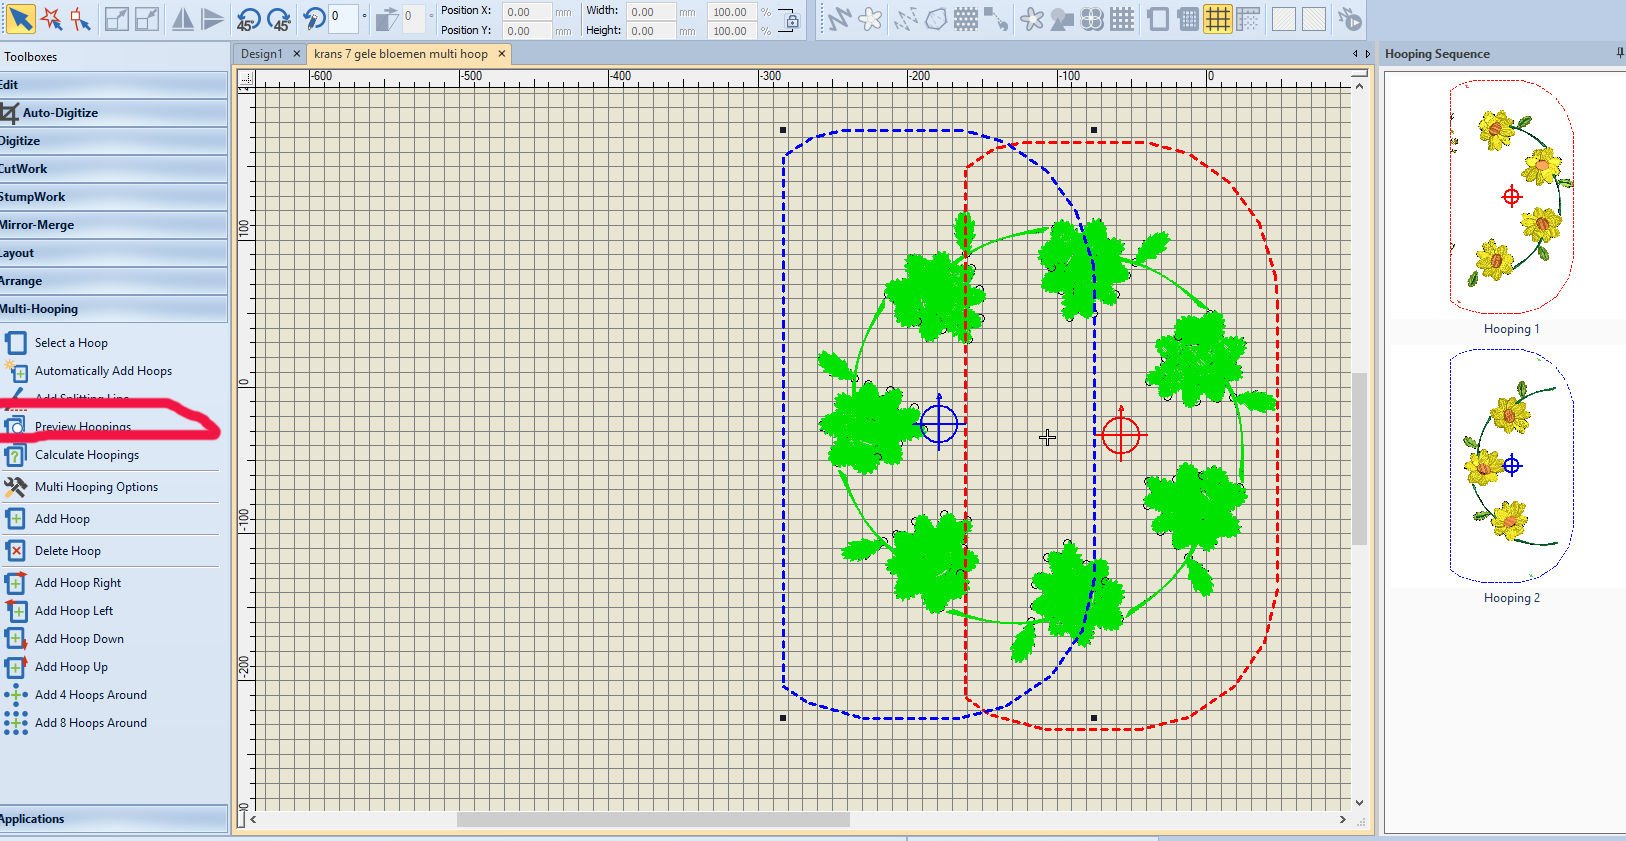
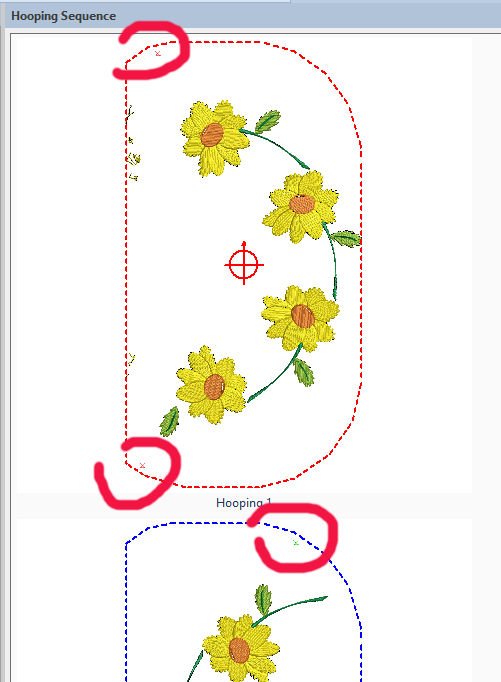
Did you see that V8 automatically chooses to make the embroidery with 2 hoopings? I didn’t select that, but will have to adjust it still, because not all is selected the right way. If you look closely, you can see parts of objects from different hoops with this setting. V8 chooses the best settings, but I still want to improve this – making complete flowers or leaves and stems, and not parts at one hooping and the next part on the another hooping.
You can add more hoopings, but it is important to have as few as possible, to save time and effort. To see if you can make the current (2) hoopings more efficient, click and drag the center marking of a hoop to a new position. The moment you are shifting the hoop you are ‘holding’, a new line appears, showing you where the new position will be. Click and drag, then release and the hoop is set.
The black leaf that shows indicate that – even after moving the hoop to a new position – not all objects are included. So placing the hoop as it is, still will need more adjustment.
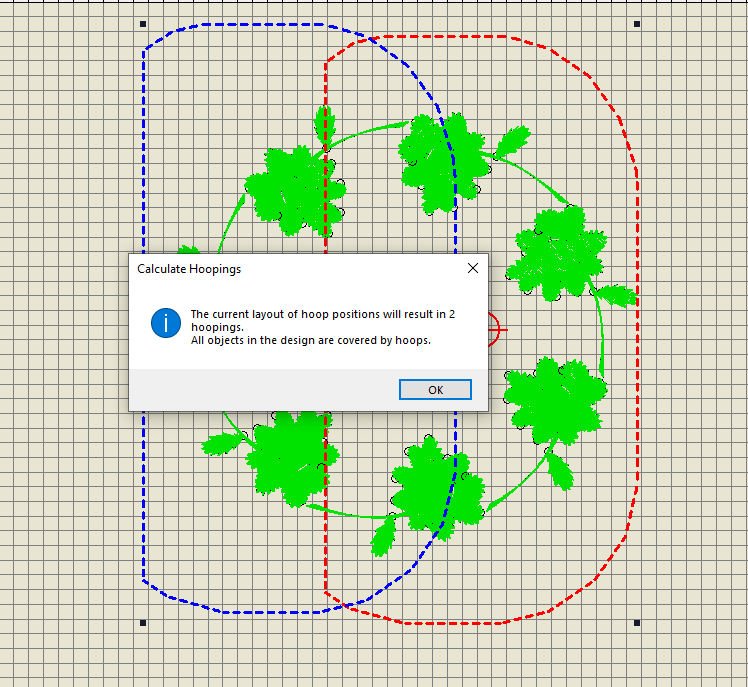
Using ‘Automatically Add Hoops’, V8 places just two hoops: different dotted colored lines to see the difference between hooping 1 and hooping 2. Calculations are done automatically, which means that all objects are covered within 2 hoopings (with my example), but not all is done properly, as you can see the red and blue lines are breaking through objects, which will result in partially embroidered flowers with the first hooping, and finishing them with the other.
Also a dialog ‘Calculate Hoopings’ opens, which tells me at this time, it all will result in 2 hoopings, and that all objects are covered within these hoopings. Use ‘OK’ to set.
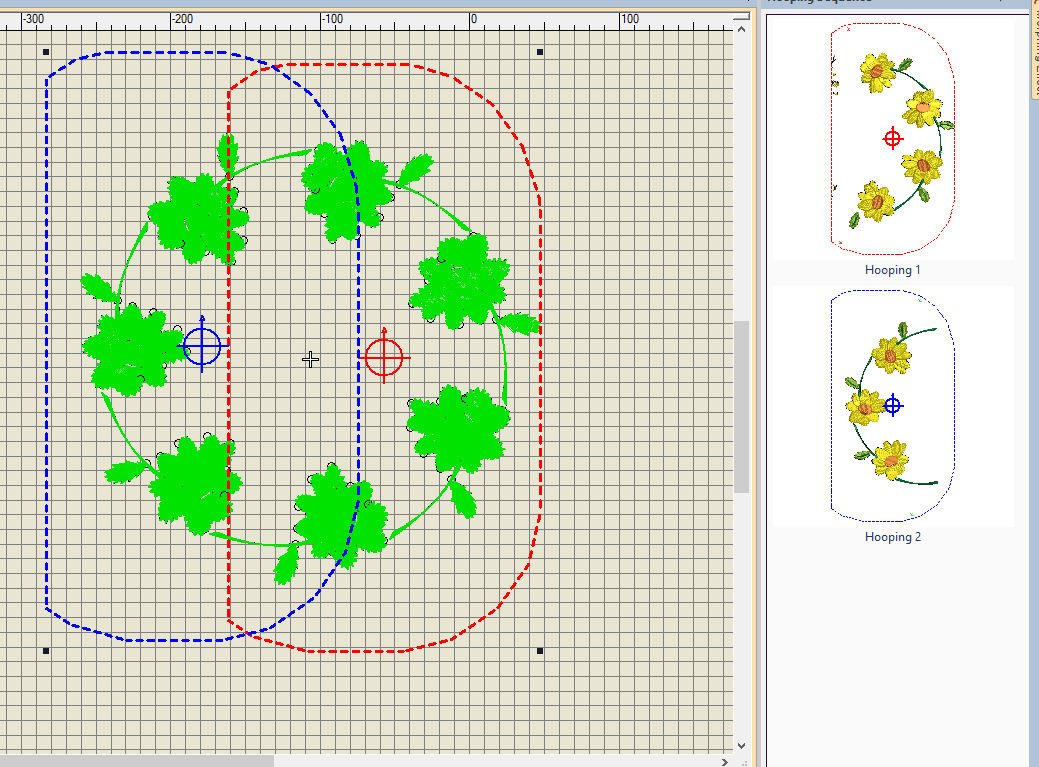
Check that by using ‘Preview Hoopings’ again: Hooping 1 and Hooping 2 are showing.
Enlarging the docker ‘Preview Hoopings’ shows that – with Hooping 1 – there are still parts/objects of flowers with this first hooping, that will be largely made with hooping 2. It is good to remember that V8 doesn’t split parts of objects, but whole objects, so if you see parts of a flower it is still a whole object.
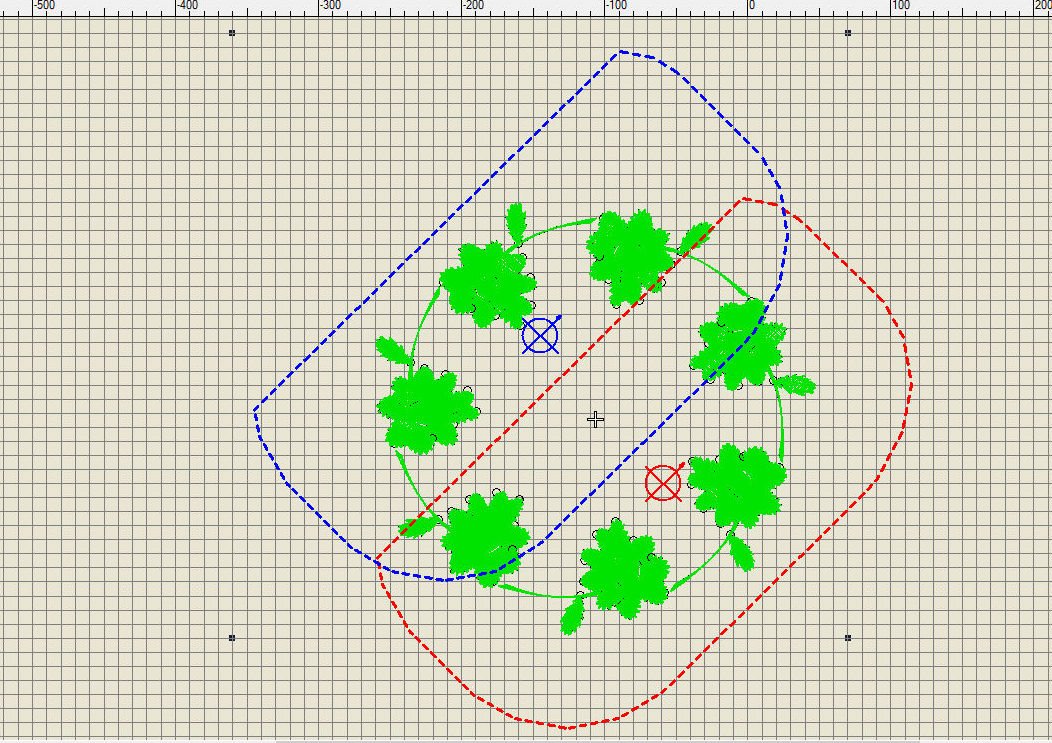
Another option is to change the position of both hoopings, to prevent objects being partially embroidered on both hoops: change the direction/setting of the hoops. You can select a hoop and rotate via 45° or via ‘Rotate’. I have used the last option, adding a – (minus) with the number of rotation to rotate to the right. This will only work if a hoop is selected!
With the actual embroidery, you just have to place the fabrics in the right position, and 2 hoopings are sufficient.

If you don’t own such a large (Jumbo) hoop, choose the largest available, and select that hoop in V8. First, leave the option ‘Multi-Hooping’, by choosing ‘Edit’ with the left toolbar. Now all icons on the top toolbars are available again. Return to ‘Multi-Hooping’.
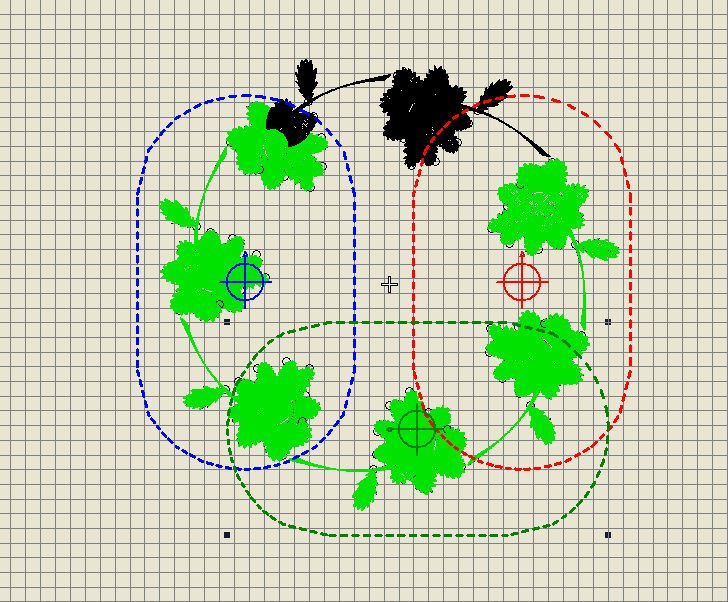
The first thing to do is to move both hoops outwards: the red to the right and the blue to the left, to ‘catch’ all objects on the edge of the wreath with these hoops. The objects within the hoops turned green – the black objects will need to be covered in extra hoopings.
I can choose to add hoopings with ‘Automatically Add Hoops’: V8 has given me 5 hoopings. Now all objects turned green = covered by the hoopings. Can you see that Hooping 3 (R1) just catches a single object (stem of a flower)? This is not the best option, but that’s what you get if you don’t manually add hoopings. So… Undo and try again.

Using ‘Add Hoop’, a 3rd hooping is added, to the right of it all, with a different colored dotted line (green). It is placed randomly, so I can move it to a new position.

Selecting this 3rd hoop, rotating it 45° with two clicks to place this hoop horizontally, is the first step to improvement.
Still selected, click and drag the 3rd hoop to the bottom of the wreath. Make sure it covers all objects: they will turn green.
Add a 4th hoop, place this horizontally (2x 45°), and move it to the top of the design, to include all remaining objects. Move the hoops to their best position and use ‘Preview Hoopings’ until you are ok with the placement. Save it under a different filename for future use.
![]()
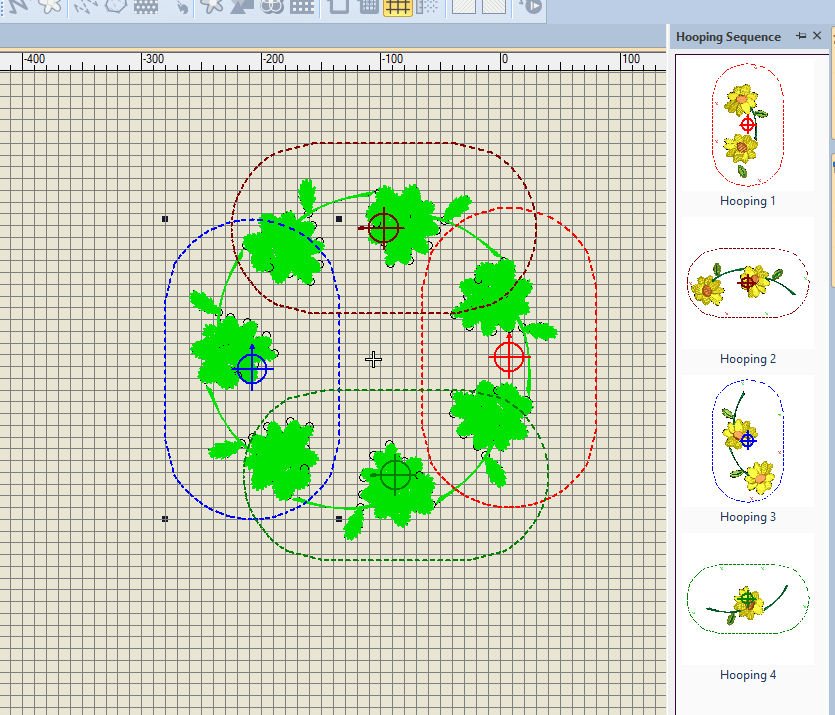
The design is finished if you are satisfied with placement. I have changed it all back to using my Jumbo Hoop, 2 hoopings, placing them at an angle of 45°. To be sure it will be transferred in the right way to your machine, use ‘Writ to Card’ – a new screen appears ‘Hooping sequence – to machine’.
The two hoopings are placed separate: the 1st box – upper left – has a blue background = selected. The right hooping, which will be done first (red colored lines) is selected.
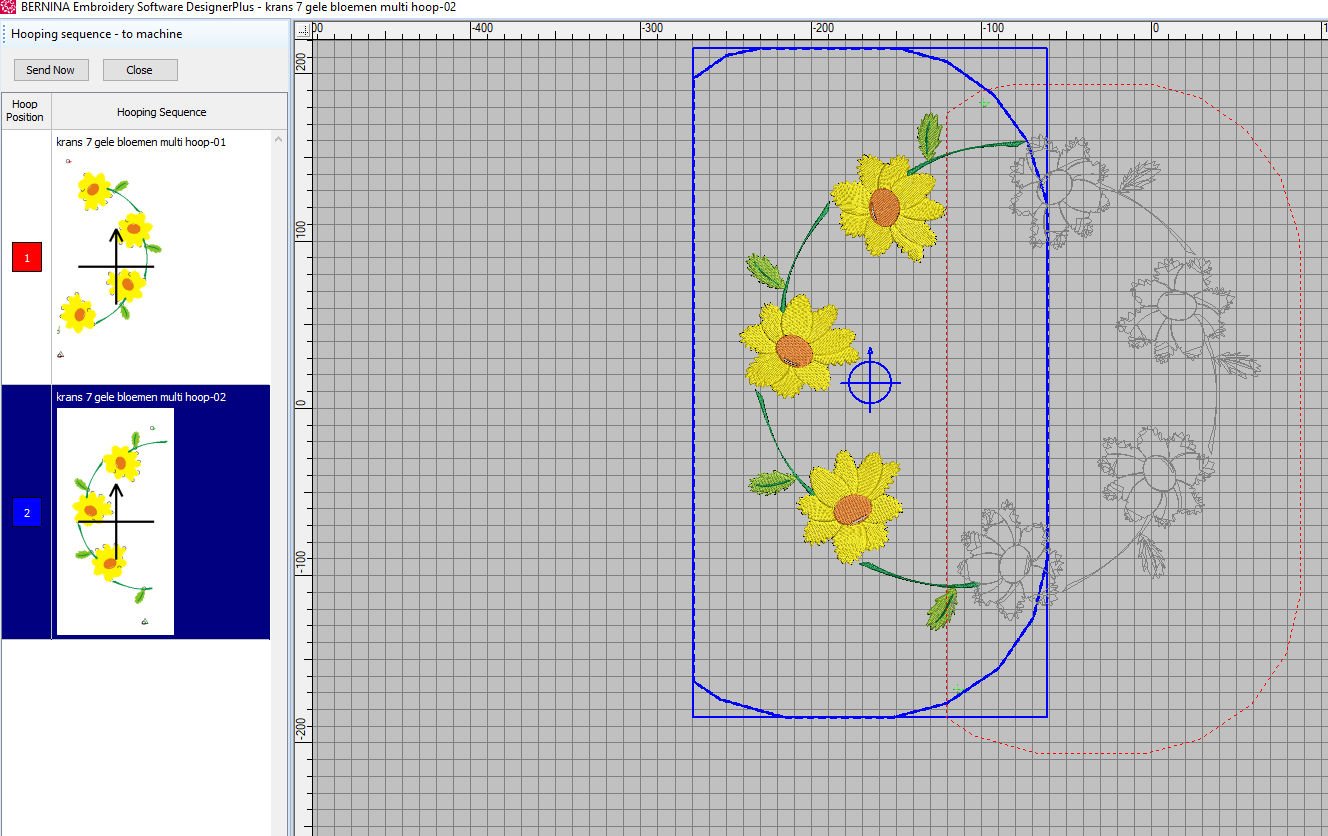
If you want to check the 2nd hooping, just click on the box below the 1st: the 2nd hooping is showing, with details to the right.

When using ‘Send Now’, the box ‘Device Selection’ appears, so you can send the file to your USB stick. I am using ‘EXP’: both hoopings must be sent separate.
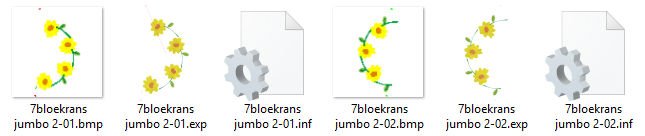
Just to check: yes: they are both on my USB stick: a.BMP, .EXP and .INF: 1st hooping as 2-01, 2nd hooping 2-02. Now I can take the USB stick to my machine and embroider.

Via Print Preview I can print it all on a reduced size (25%, the first setting I have chosen), but for the right placement, I will need printouts on the ACTUAL size = 100%. So after setting this via ‘Options’, I’ve also checked the box ‘Hooping Sequence’, to help with the hooping sequence.

Before the actual printout, I’ve received a WARNING: V8 notifies me that there are 18 pages to be printed. The software tells me that I can use fewer pages, but I WANT these numbers – I can tape them together to have a life-size example of my embroidery. I will use that for placement on the actual fabric.
TIP: Check with all objects how to place them with a minimum amount of hoopings, before choosing Multi-Hooping. Sometimes it is worth your effort, to see if a complete design can be altered: even with the slightest changes it can improve Multi-Hooping. Combined objects can be broken/set apart, or be split.
EXTRA BY POPULAIR DEMAND: How about Appliqúe, which is too large for one hooping?

When making a large appliqué, V8 did add more hoopings, via ‘Automatically Add Hoops’, but still only 2 were visible = 1st red, 2nd blue,. In practice, it meant THREE hoopings.
That’s because appliqué workt differently from regular embroidery, with placement lines, cutting lines, tack line and the Statin Stitches for the final edges. All actions – up to the placement of fabric and the tack line for setting the fabric onto the stabilizer – are done first, last the Satin Stitches. That means a 3rd hooping needs to be done for the final stitches.
These Satin Stitches have to cover the entire design at once, so that’s the 3rd placement. The design has been given a SPLIT LINE: pink line, which divides the embroidery. If you look closely, you can see a tack line with Hooping 1 (Inspanraam 1 with the picture), so at that point you have placed the fabric already – cut this to the right size. (If you are using a printout (Print Preview), set your numbers at 100%, to get an actual size template). It will cover the first hooping, but should also cover the second hooping as well, as you are cutting the fabric (for the star above) in one piece.
With multiple applications=fabrics, it all depends if a particular fabric fits in one hooping, and the next in the other, or if a piece is covered by 2 hoopings. Just cut the fabric at the complete size of the template, and let the 2nd (or 3rd etc) hooping catch the fabric with the tack line. Finally a last hooping will make the final stitches.
Keep in mind that your embroidery machine actually will make the Reference Markers. Last with the 1st hooping, first with the 2nd hooping but also at the end of that, if there is a 3rd hooping. You will not find this information with your printout, but it shows on your machine. You can use a contrasting thread for the markings, to make them stand out.
Next time, I will embroider my wreath, because the actual embroidery is important too. See you then!
Happy stitching!
Sylvia Kaptein
www.sylviasartquilts.nl

I always struggle with multi hooping using V8 software, so appreciate these very informative lessons. My dilema is in regard to sequencing the design before even getting to the hooping stage. i.e. do I group/ungroup the design. Should I use “Lock” to hold parts of the design together? so on and so forth. I am not close to a dealer, though pre covid I was able to attend classes once a month with my dealer, who has now retired. I learnt a lot from him, but never quite “got” the sequencing bit. Do you know of a resource that can help me with this issue? Again thank you for lessons 25 and 26.
Dear Peggy,
I do not know what classes would be close to you, but I did see that BERNINA USA has a recorded Webinar about Multi Hooping with the V8 on their Website. Maybe that would already answer a few questions:
– https://www.bernina.com/en-US/Learn-Create-US/Classes-Webinars-and-Events/Webinars/Recorded-webinars/Recorded-Embroidery-and-Software-Webinars/Multi-hooping-and-Pinpoint-Placement
They also offer online courses, one is called “Advanced Software”. It takes place on the 28-30 September and registrations are already closed, but maybe it will take place again another day. But I do not know if Multi-Hooping will be a topic in that class.
– Online Classes BERNINA USA
Hope this helps a bit!
Kind regards, Ramona from BERNINA International