 BERNINA Corporate Blog -
When you’ve found an embroidery design, you want to be able to bring it to your machine and start with the actual embroidery as soon as possible. Finding the right colors of machine (embroidery) threads can be quick, but sometimes the spools have been already used, and not a lot of thread is left. How do you know if the remaining quantity is sufficient for your next embroidery?
Let’s see how you can check the amount of required threads with your design. Open the BERNINA Embroidery Software V8: choose a design from the BERNINA Library and place it on your workspace.

Let’s look at design BE1009015: a butterfly. At this stage you can edit the design if you want to, choose different colors etc. But I will use it as it is: designed with a Satin Fill.
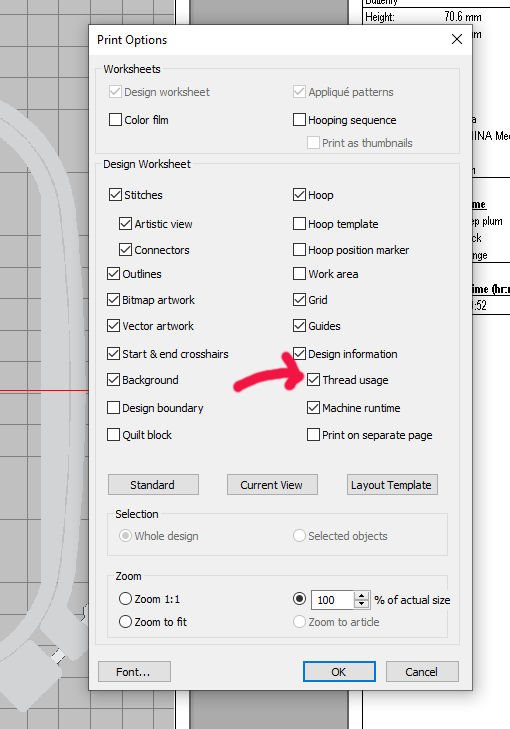
Go to ‘Print Preview’ to see the information on the Design Worksheet with threads etc. Go to ‘Options’ and check the box ‘Thread Usage’ for additional information.
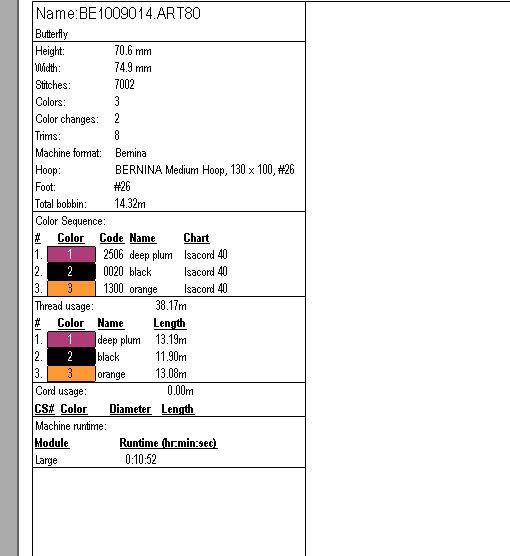
The extra information with Thread Usage gives you not only the color, code, name and chart = brand of thread, but also the Length of the used threads. It is an estimate, in decimals (metric system of you have selected ‘metric’ as you measurements. It will be displayed in ft (feet) if you have selected ‘US’ as your measurements). This design has 7002 stitches, height 70.6mm and width 74.9mm. You can see the amount of thread that you will need to embroidery this butterfly.

To see how the required amount of thread changes if the butterfly design is enlarged, I have resized it to 213.3mm x 201.0mm, which will give you 20.980 stitches. Because this design doesn’t fit in the first hoop, I have changed that into the Jumbo Hoop and rotated the butterfly to fit.
Use ‘Print Preview’ again, but changed the size of the printout to 50% (to be able to see it on one screen) it tells me that the amount of threads used is much more, and it’s almost 3 x the size of the previous butterfly.
It is safe to say that you will need 3 x the amount to thread comparing to the first/smaller butterfly? The answer is NO, because much more determines the usage of thread. Let me give you a calculation for the first and the second butterfly:
1st Design, color 1 13.19 meters 2nd Design, color 1 68.28 meters = 5,2 x as much
1st Design, color 2 11.90 meters 2nd Design, color 2 61.38 meters = 5,15 x as much
1st Design, color 3 13.08 meter s 2nd Design, color 3 70.88 meters = 5.4 x as much
A total of 38.17 meters for the 1st design, and a total of 200.54 meters for the 2nd design.
What makes the difference with thread usage?
Using a Step Fill, increases the amount of stitches: the needle will penetrate the fabric and stabilizer(s) much more, compared to a Satin Fill. If you want to embroider a design – which is small – with Satin Fill, the distance from one side of the object to the other side of the object determines if it is done in ONE STEP (side to side), or if there are needle penetrations needed in between. With a large object, V8 will add needle penetrations, which will increase the thread usage: the needle will pass through the materials more often. You could always delete needle penetrations, but beware of the fact that – if the distance from one side to the other with an object is too large – the fabric will shine through, and the threads will distort.
Working with a Satin Fill, there are normally just 2 needle penetrations: one on each side of the object, if it is small enough.
Working with a Step Fill, V8 adds more needle penetrations because of the appearance of the embroidery. This means more thread usage.
The total amount of the larger (second) butterfly changed from 20.908 stitches (Satin Fill) to 37.953 stitches.
That increased the thread usage too: color 1 – 75.43meters, color 2 – 68.37meters and color 3 – 78.12meters*.
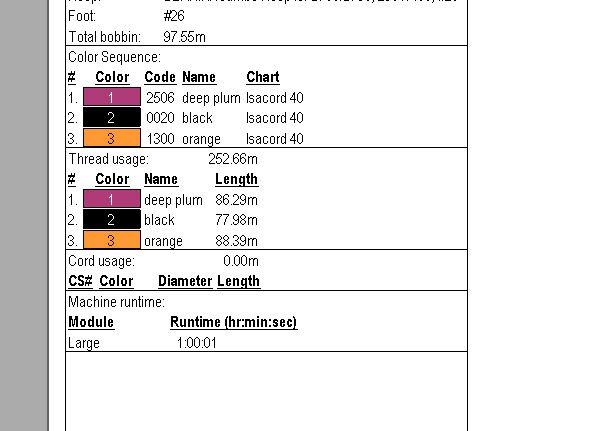
Changing the butterfly design into Candlewicking Fill, makes it even more laborious (48.643 stitches), but also much more thread is needed: color 1 – 86.29meters, color 2 – 77.98meters and color 3 – 88.39 meters. Almost half a spool, if you are using 200m spools (Sulky Rayon 40).
Also the total amount of thread used for this size/design is now 252.66meters.
In summary, embroidery designs are mostly digitized with Satin Fills (simple designs, letters, numbers and different characters) or Step Fills. With Satin stiches you will need less thread, compared to Step Fills, generally speaking. When using Fantasy Fills, Candlewicking Fills etc. you will need much more thread, because of the intricated patterns that are made.

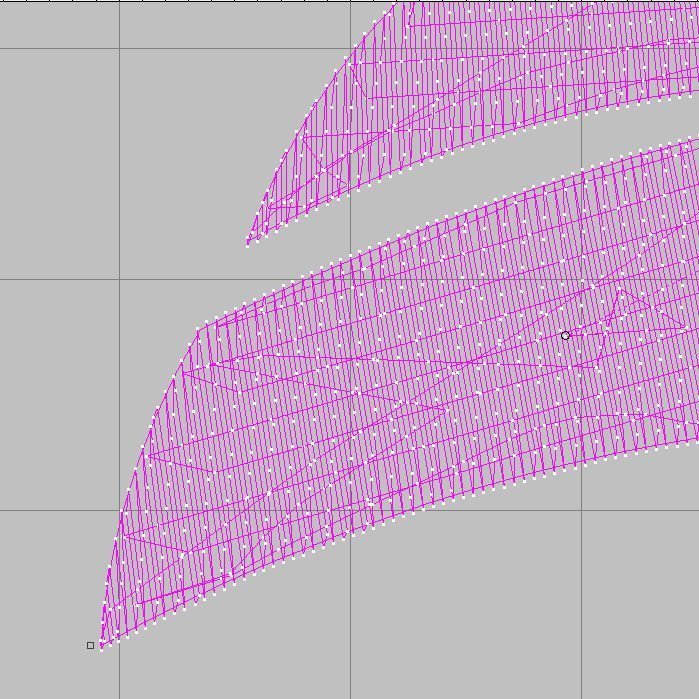
The picture above shows part of the butterfly, made with Satin Fill: the underlay seems to be just one path, and not many needle penetrations are showing (white dots).

The picture above shows the same butterfly, but made with Step Fill: much more needle penetrations, more thread usage. But also the density of the stitches determines how much thread is used. Also the amount of stitches as Underlay will change it all.
Applying a different Underlay changes the thread usage much further: the total amount of stitches has increased with 5.000. Just so you know!
What else can affect thread usage?
The numbers for thread usage are estimated, calculated for normal use. It all depends on the fabrics and stabilizer(s) that you’ll use. The thicker these materials, the more thread you will need.
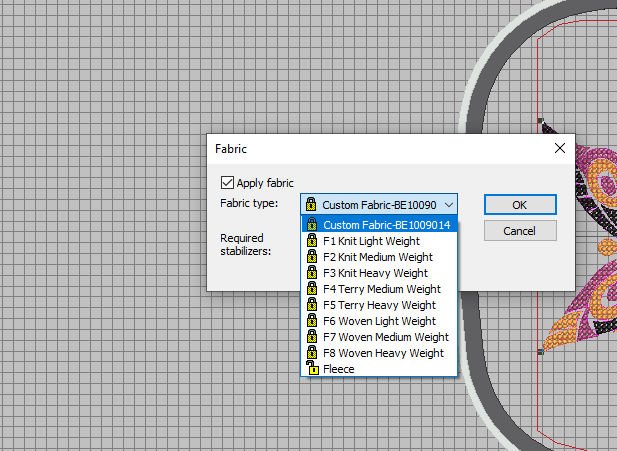
You can see the different if you use ‘Design’, ‘Fabric’, check ‘Apply Fabric’ and choose the thickness of your material. You can add required stabilizers too, which all will change the amount of thread you will use. With changing these settings, you will let V8 know what materials will be used, to get the right calculation for thread usage. The heavier and thicker the materials, the more the thread will have to travel over these materials to form stitches = more thread. With thin materials, stitches will lie flat and travel over less distances. After changing the setting to ‘F8 Woven Heavy Weight’, V8 didn’t gave me a different calculation, but it makes sense that it will. So that’s something for you to find out.
Also the thead ends with start and finish will increase or decrease the length of threads used in your design. That’s not included with the calculation V8 makes (at least that’s what I understand), especially if you like to have long ends. So remember to add up some thread length with the calculation to be sure you will have enough to embroider. If V8 tells you there is 80.44meters required for the color of an object/embroidery, be sure to add up 2 to 5 meters for thread ends.
Will making single color designs change thread usage?

No change in meters was found, when changing the three-colored butterfly design into a monochrome design: I’ve changed the butterfly in all-black, which gave me almost the same amount of thread usage (0.02m difference, which is negligible). Perhaps with some designs that will give you a different amount of thread usage, if the design will be stitched as one color, all objects directly linked, because V8 has found a better path to embroider in that case.
How about ready-made/purchased and downloaded embroidery designs?
They don’t always give you detailed information about thread usage. With reliable digitizing companies, you will be able to download a list with colors, sequence of usage, but not often the amount of thread you will need for embroidery is available. And that’s when V8 comes in: upload the design in the Embroidery Canvas and see via ‘Print Preview’ what information you can find. But again: that can be different with your design(s).
But still there is so much difference between brands, for top and bobbin threads. How can you calculate in advance what you need, if no further information is available?

I have investigated a lot, searching for information with thread dealers, companies and brands. There are many spools and cones with different yardage (meters and/or feet/yards) available for machine embroidery. There are small spools with 150m or 200m, but also large spools/cones with 500m, 1000m, 2000m, and even 5000m (last quantity mostly used with professional embroidery machines).
Remember that most commercial embroidery designs for personal use = domestic embroidery machine, are digitized for Wt40 threads (Rayon or Polyester): generally you will need approx. 2/3 in length for top thread, relative to 1/3 bobbin thread**.
Example: per 1.000 stitches, approx. 4,6m top thread and 2,3m bobbin thread will be used**. This was a calculation given by a number of digitizing companies. Not a fixed fact, but something to use for your convenience.
Now I can make a calculation for different embroidery designs, taking into account that most stitch lengths are approx. 4mm and no special stitches/effects are made, or thicker top thread is used. ):
1.000 stitches Top thread 4.6 m Bobbin thread 2.3 m
10.000 stitches Top thread 40.6 m Bobbin thread 23 m
20.000 stitches Top thread 81,2 m Bobbin thread 46 m
40.000 stitches Top thread 162,4 m Bobbin thread 92 m etc.
-With a design up to 1.000 stitches, embroidered with multiple colors, you can use remnants/left over spools: top and bobbin. But remember: making notes of remaining threads on spools/cones will give you a better estimate of how much thread is left.
-With a design up to 1.000 stitches, embroidered with a single color: be sure to add up all original colors, and check if the quantity left on your spool will be sufficient.
-With a design of 40.000 stitches, making it monochrome, a spool of 200m should do, if it is a new one. But be sure to keep a second one at hand preferably with the same dye (it can be quite different when purchasing a second spool after a while)!
-With a design over 50.000 stitches? Well… you will need a lot of thread!

How about the bobbin thread?
Remember thread usage calculations are for top thread only: normally you can say that you will use the same amount for bobbin threads, but that is not always the case. It all depends on tension and selected stitches. Normally the top thread will be slightly visible at the underside of the embroidery, against the stabilizer. That means there is more usage of top thread than bobbin thread (2/3 top, 1/3 bobbin). But overall, if your design requires 252 metres top thread, be sure to have the same amount of bobbin thread ready when using just one color for the entire design, just to be on the safe side. With using matching colors = changing bobbin thread while also changing the top thread, you will need approximately the same amount for both.

When using prewounds, there is a lot more thread on that bobbin. But prewounds cannot be used in all machines: my BERNINA770QE has specially large spools (which can hold much more bobbin thread than other machines normally do), but my other (older) machine from a different brand likes these prewounds very much: they contain approx. 1.5x more bobbin thread (DecoBob/Wonderfil), which means they will last longer. This bobbin thread is 80wt, thin and is suitable to use in combination with many top threads.
Preparing for embroidery:
If you start with a new spool (top thread), for example a 200m spool, write down how much you have left after making an embroidery design. Let’s say you have used 80meters (indicated via the print preview), there will be approx. 120meters left. Place the spool with a note in a small bag or box, so the next time you need that color, you will know how much is left and if that amount will be sufficient for the design of your choice. Easy and time saving, but it will need some discipline to keep this up. Otherwise you will have to estimate every time you need that color…
Hope this helps with choosing threads and colors. See you next time!
Happy Stitching
Sylvia Kaptein
Sylvia’s Art Quilts Studio
www.sylviasartquilts.nl
[email protected]
*Your results could be different: it all depends on a lot of settings.
** Working with much thicker top thread, the number of meters you use increases considerably.

Underlay stitches can be added or removed, whatever you need for your design. Try adding underlay stitches on larger areas, and see if that works for you
I love to get into details, not just with V8, but with every BERNINA machine or software I am using to create projects. And what better way to share this then posting it on the BERNINA Blog so everyone can benefit….
But thanx again for your comment
That’s amazing. I’m so impressed with how deeply you research everything. This is fascinating.