 BERNINA Corporate Blog -
Dear community,
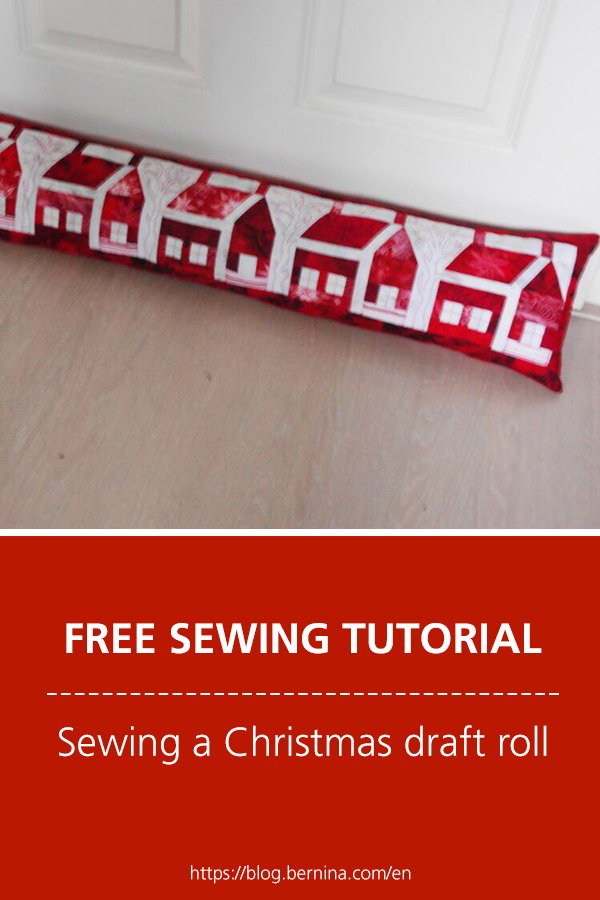
in this blog post you can find easy instructions for sewing a Christmas draft roll (with free paper-piecing template).
‘t Is the Holiday Season, with wind, rain, some snow and hail. What better way to keep the cold outside, then using this draft roll? It is a genuine Sustainable Christmas Gift, because it is made with large pieces of leftover quilting fabrics. You can use your stash, or purchase fabric scrap packs. Because I have made a large quilt with red and white fabrics before this project, I have large leftovers and will use them to make the five paper piecing* houses for this draft roll. For the background etc. I will use scraps, sewing them together, or even larger leftovers.
ATTENTION: if you are worried about bleeding fabrics, pre-wash them before cutting them for paper piecing. Reds and whites are a big contrast: you don’t want any red bleeding into the white after completing your project.

Which materials do you need to make this Christmas Draft Roll?
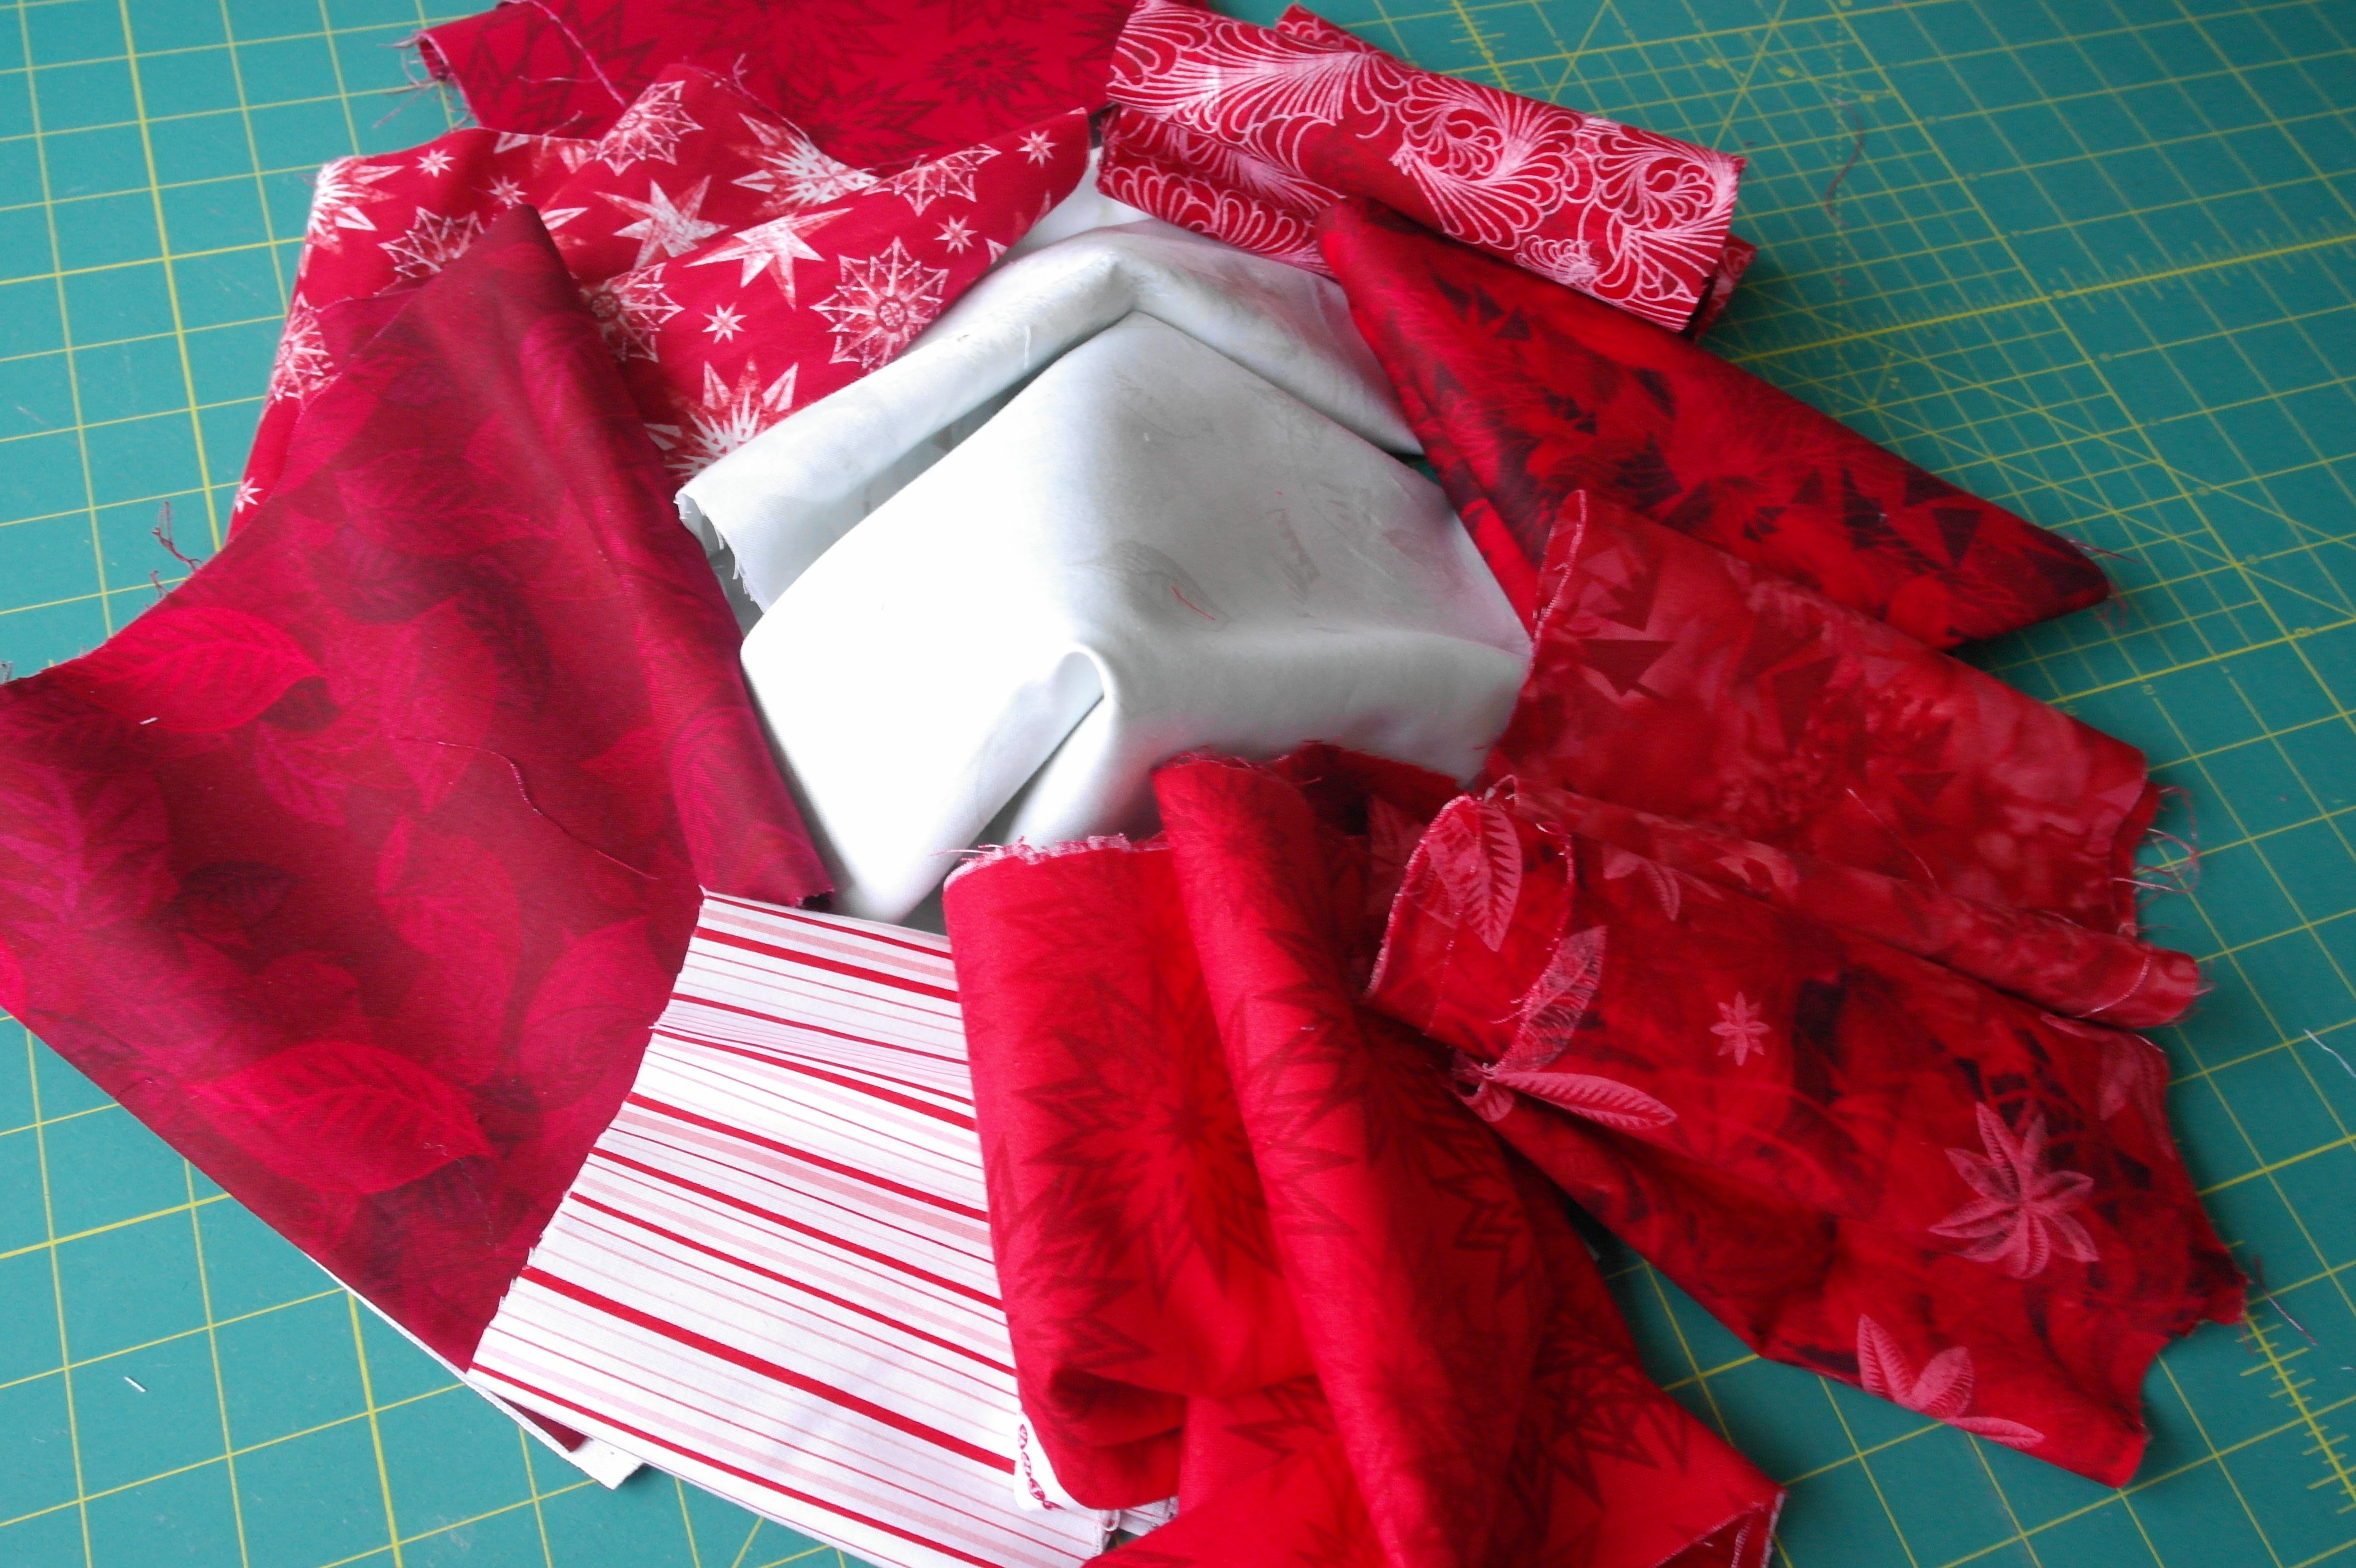
- Red and white quilting fabrics from your stash or via purchasing scrap fabric pack
- My FREE paper piecing pattern for making the five houses: you can download the .pdf HERE
- 5 Sheets of Papers for Foundation Piecing
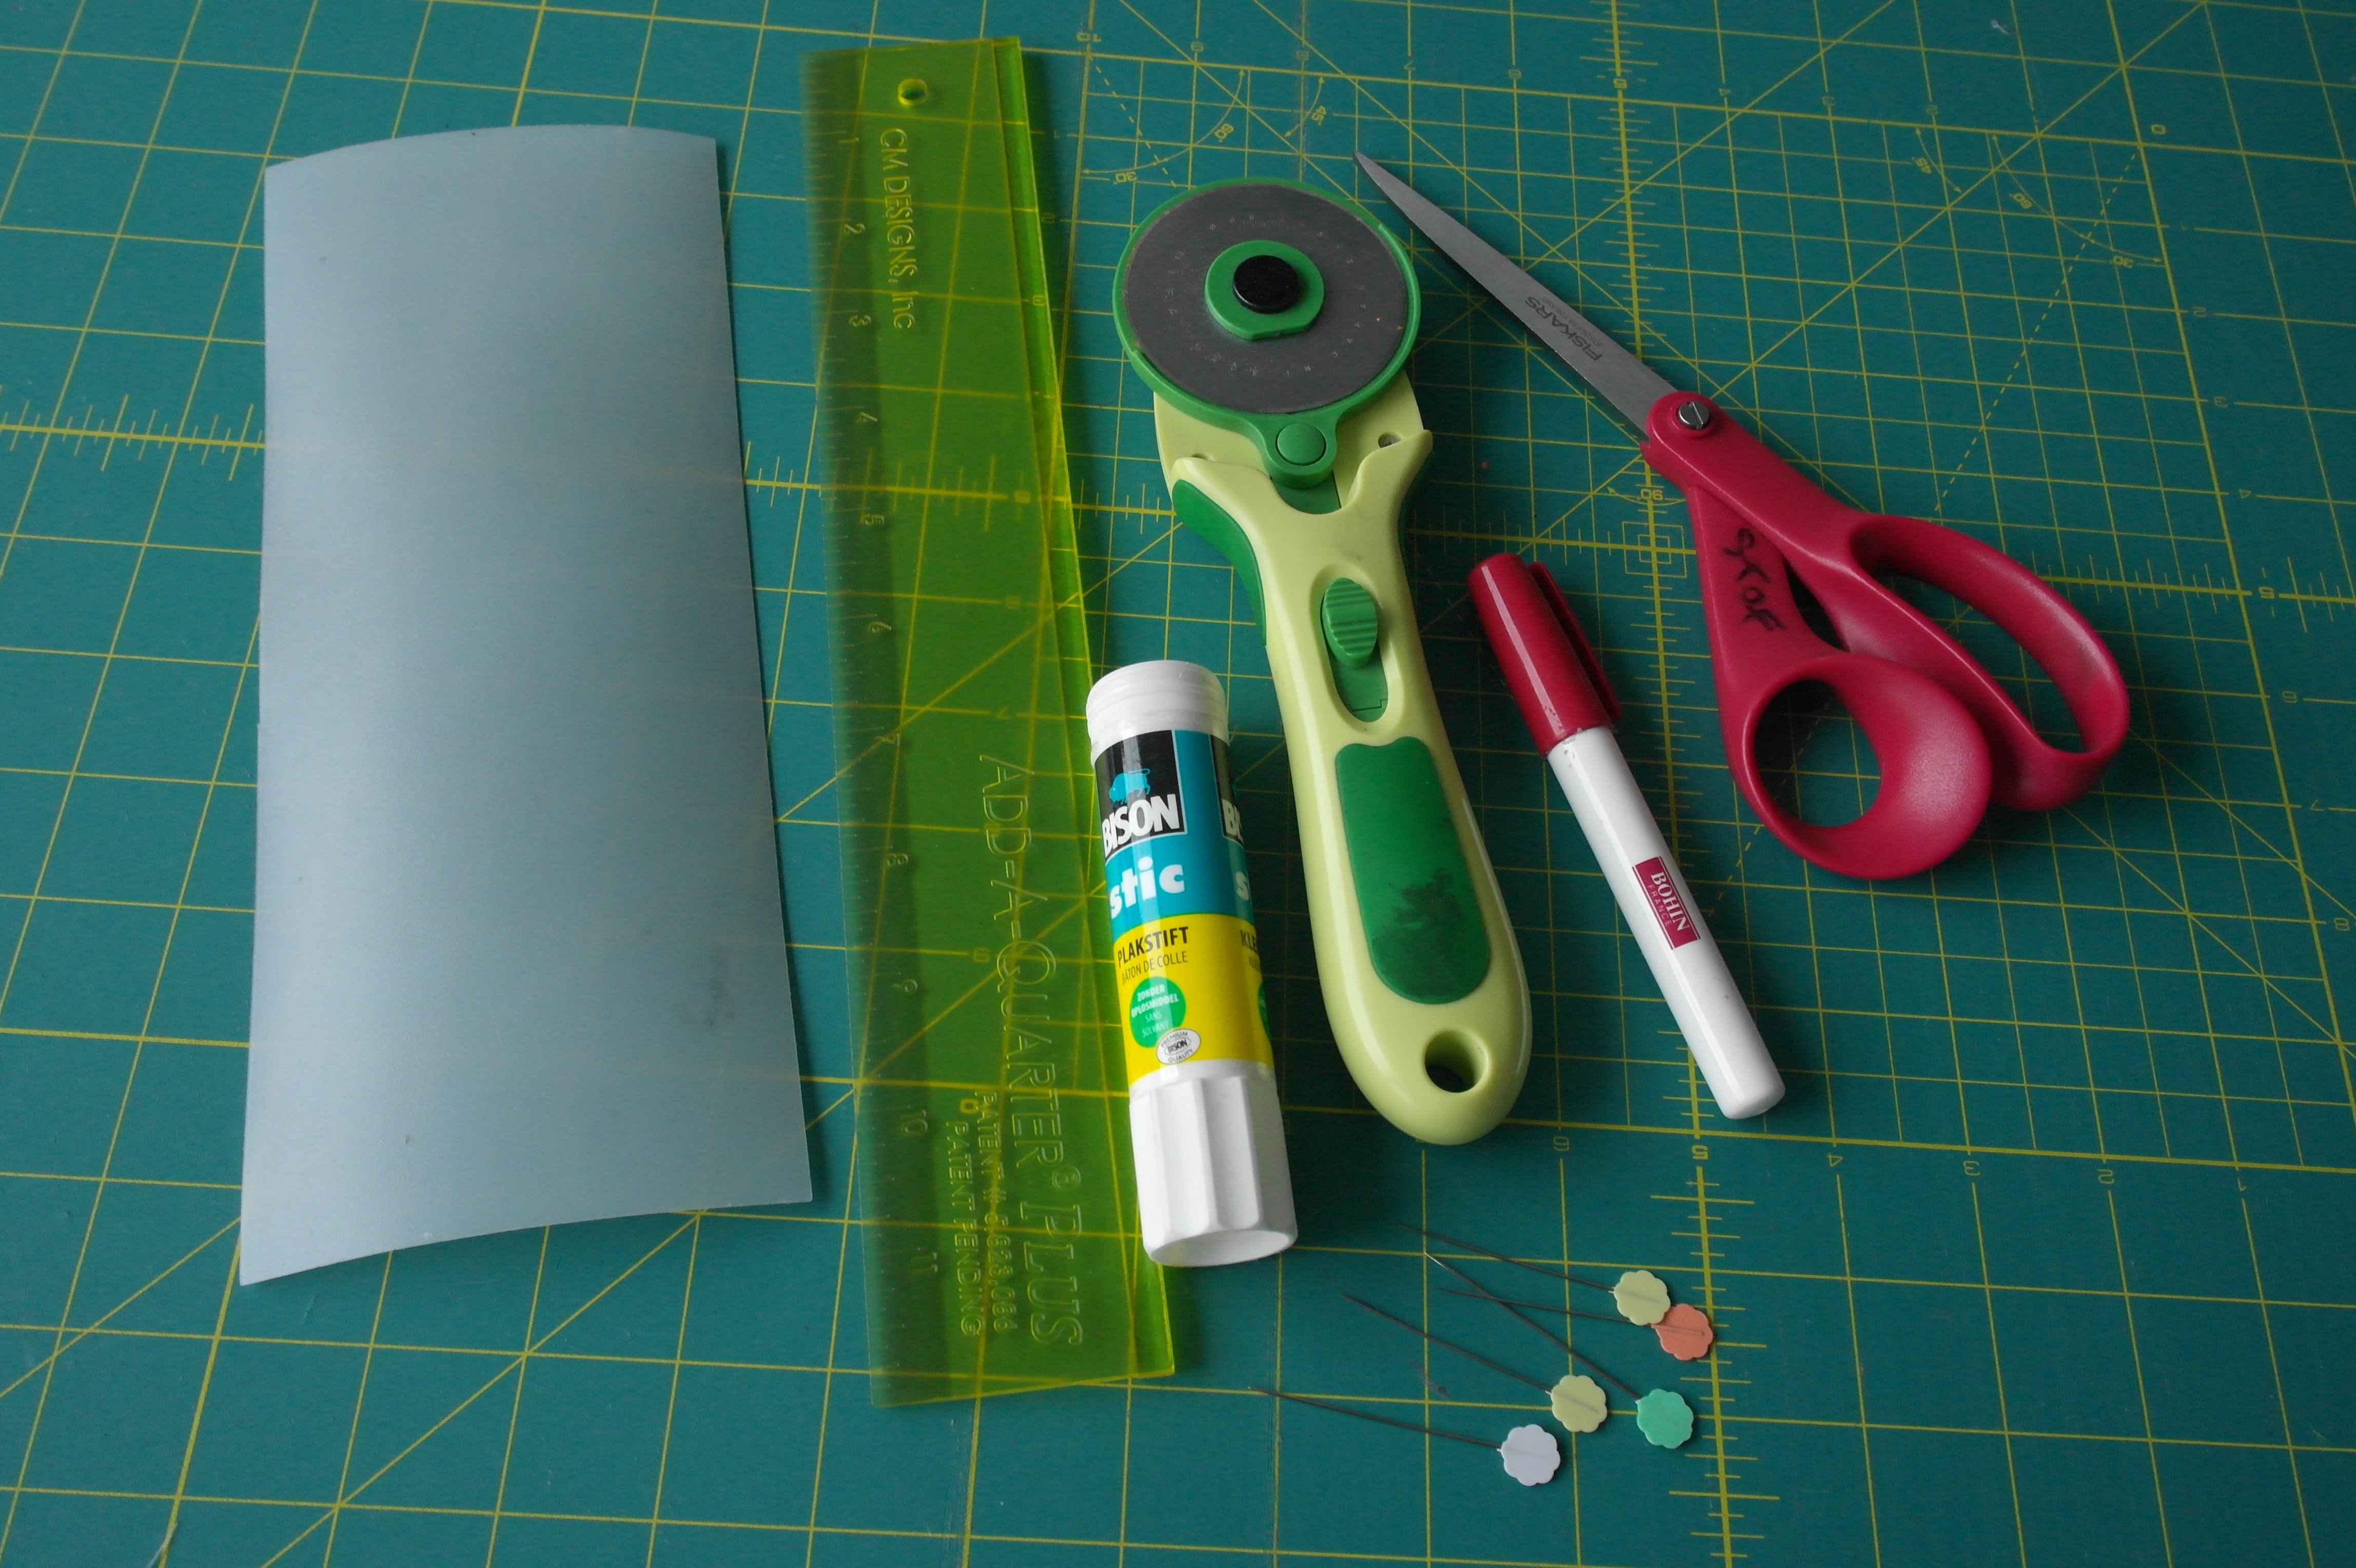
- Add-a-Quarter ruler 12 inch
- Folding template 4 x 13 inch
- Rotary Cutter
- Cutting mat
- Pritt, Bison or UHU glue, water soluble
- Machine thread 50wt to 80wt for top and bobbin (beige)
- Machine Quilting thread for free hand machine quilting (red)
- Matching bobbin thread (DecoBob/Wonderfil, red)
- Backing fabric and batting for quilting front of the draft roll
- Fabric for the back of the draft roll
- Filling flakes for the draft roll
What else do you need?
- Your sewing machine: I have used my BERNINA770QE
- Regular presser foot
- 1/4 Inch presser foot
- Free hand quilting foot
- BSR
- Iron
- Ironing board or mat
- Fabric scissors
- Paper scissors, for cutting the paper piecing Units
- Large quilting pins
- Seam ripper (just in case)
- Scotch Magic Tape (in case your paper foundations will tear after ripping seams)
Preparations.

Download the paper piecing pattern: be sure to set your printer on 100%/actual size.
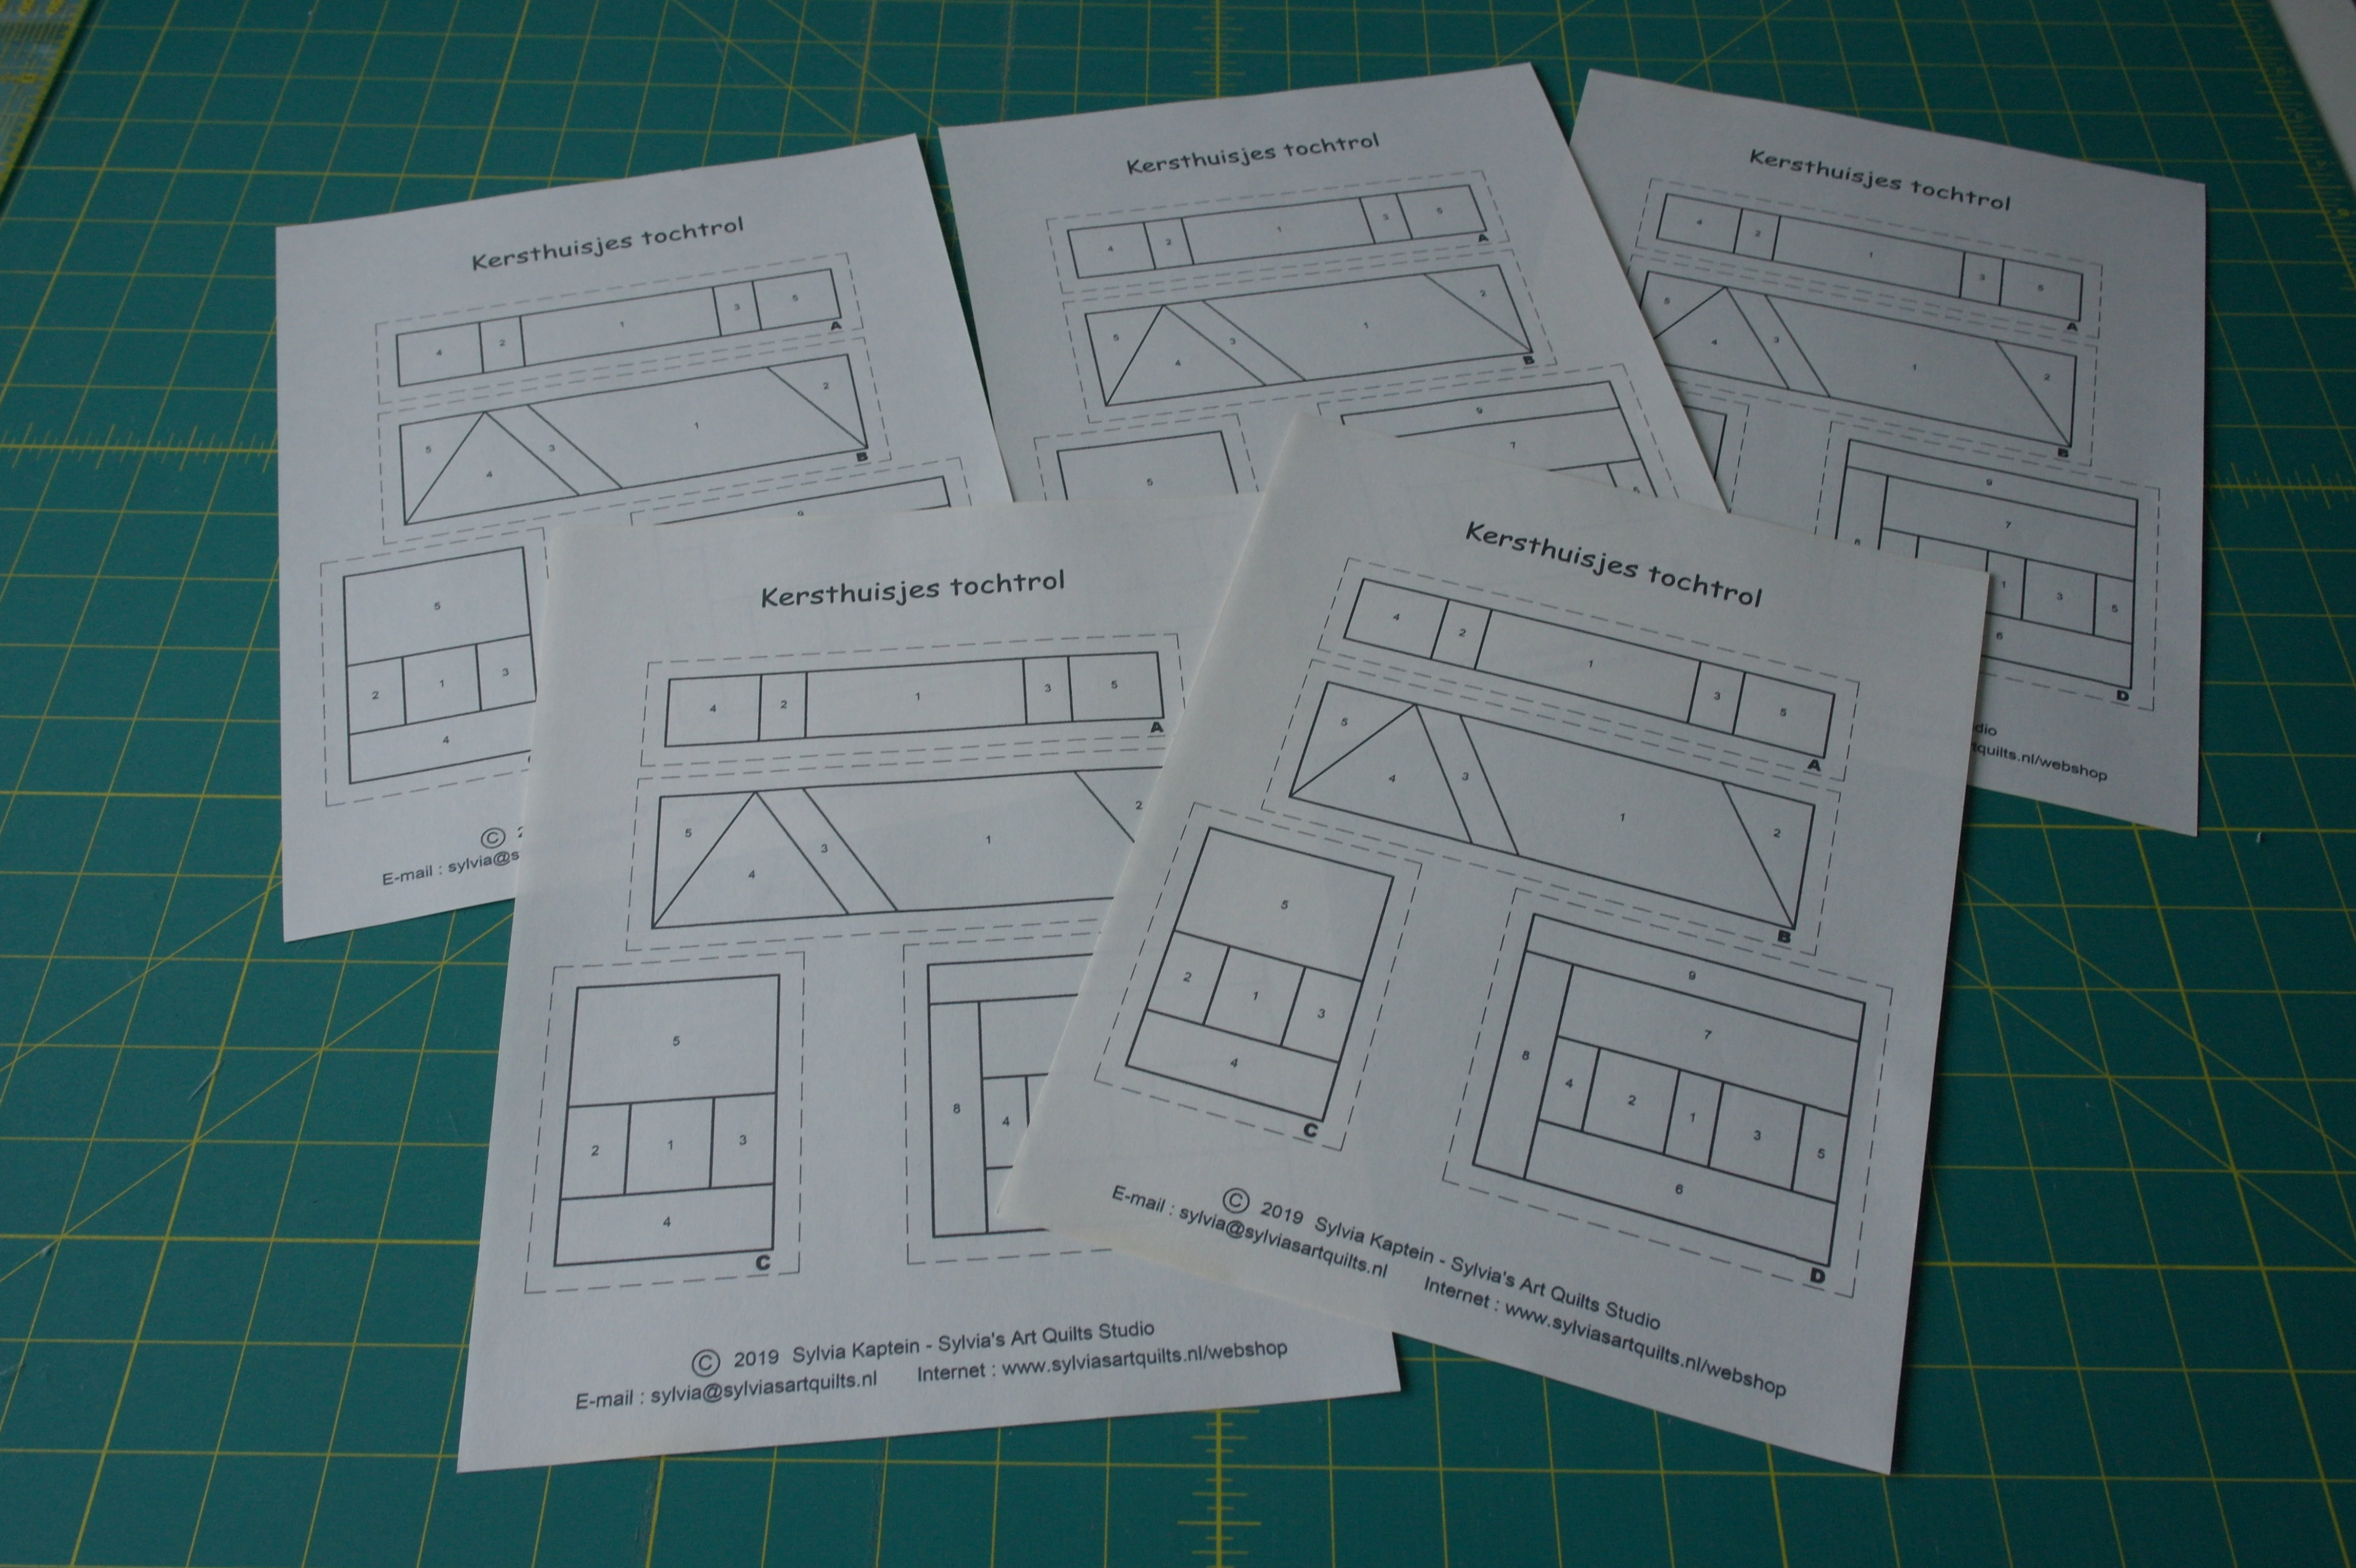
Print the paper piecing pattern 5 times: one for each house, because you will use a paper pattern only once. Preferably on Papers for Foundation Piecing: this paper is thin and tears away much easier than printer paper, which is often thicker.
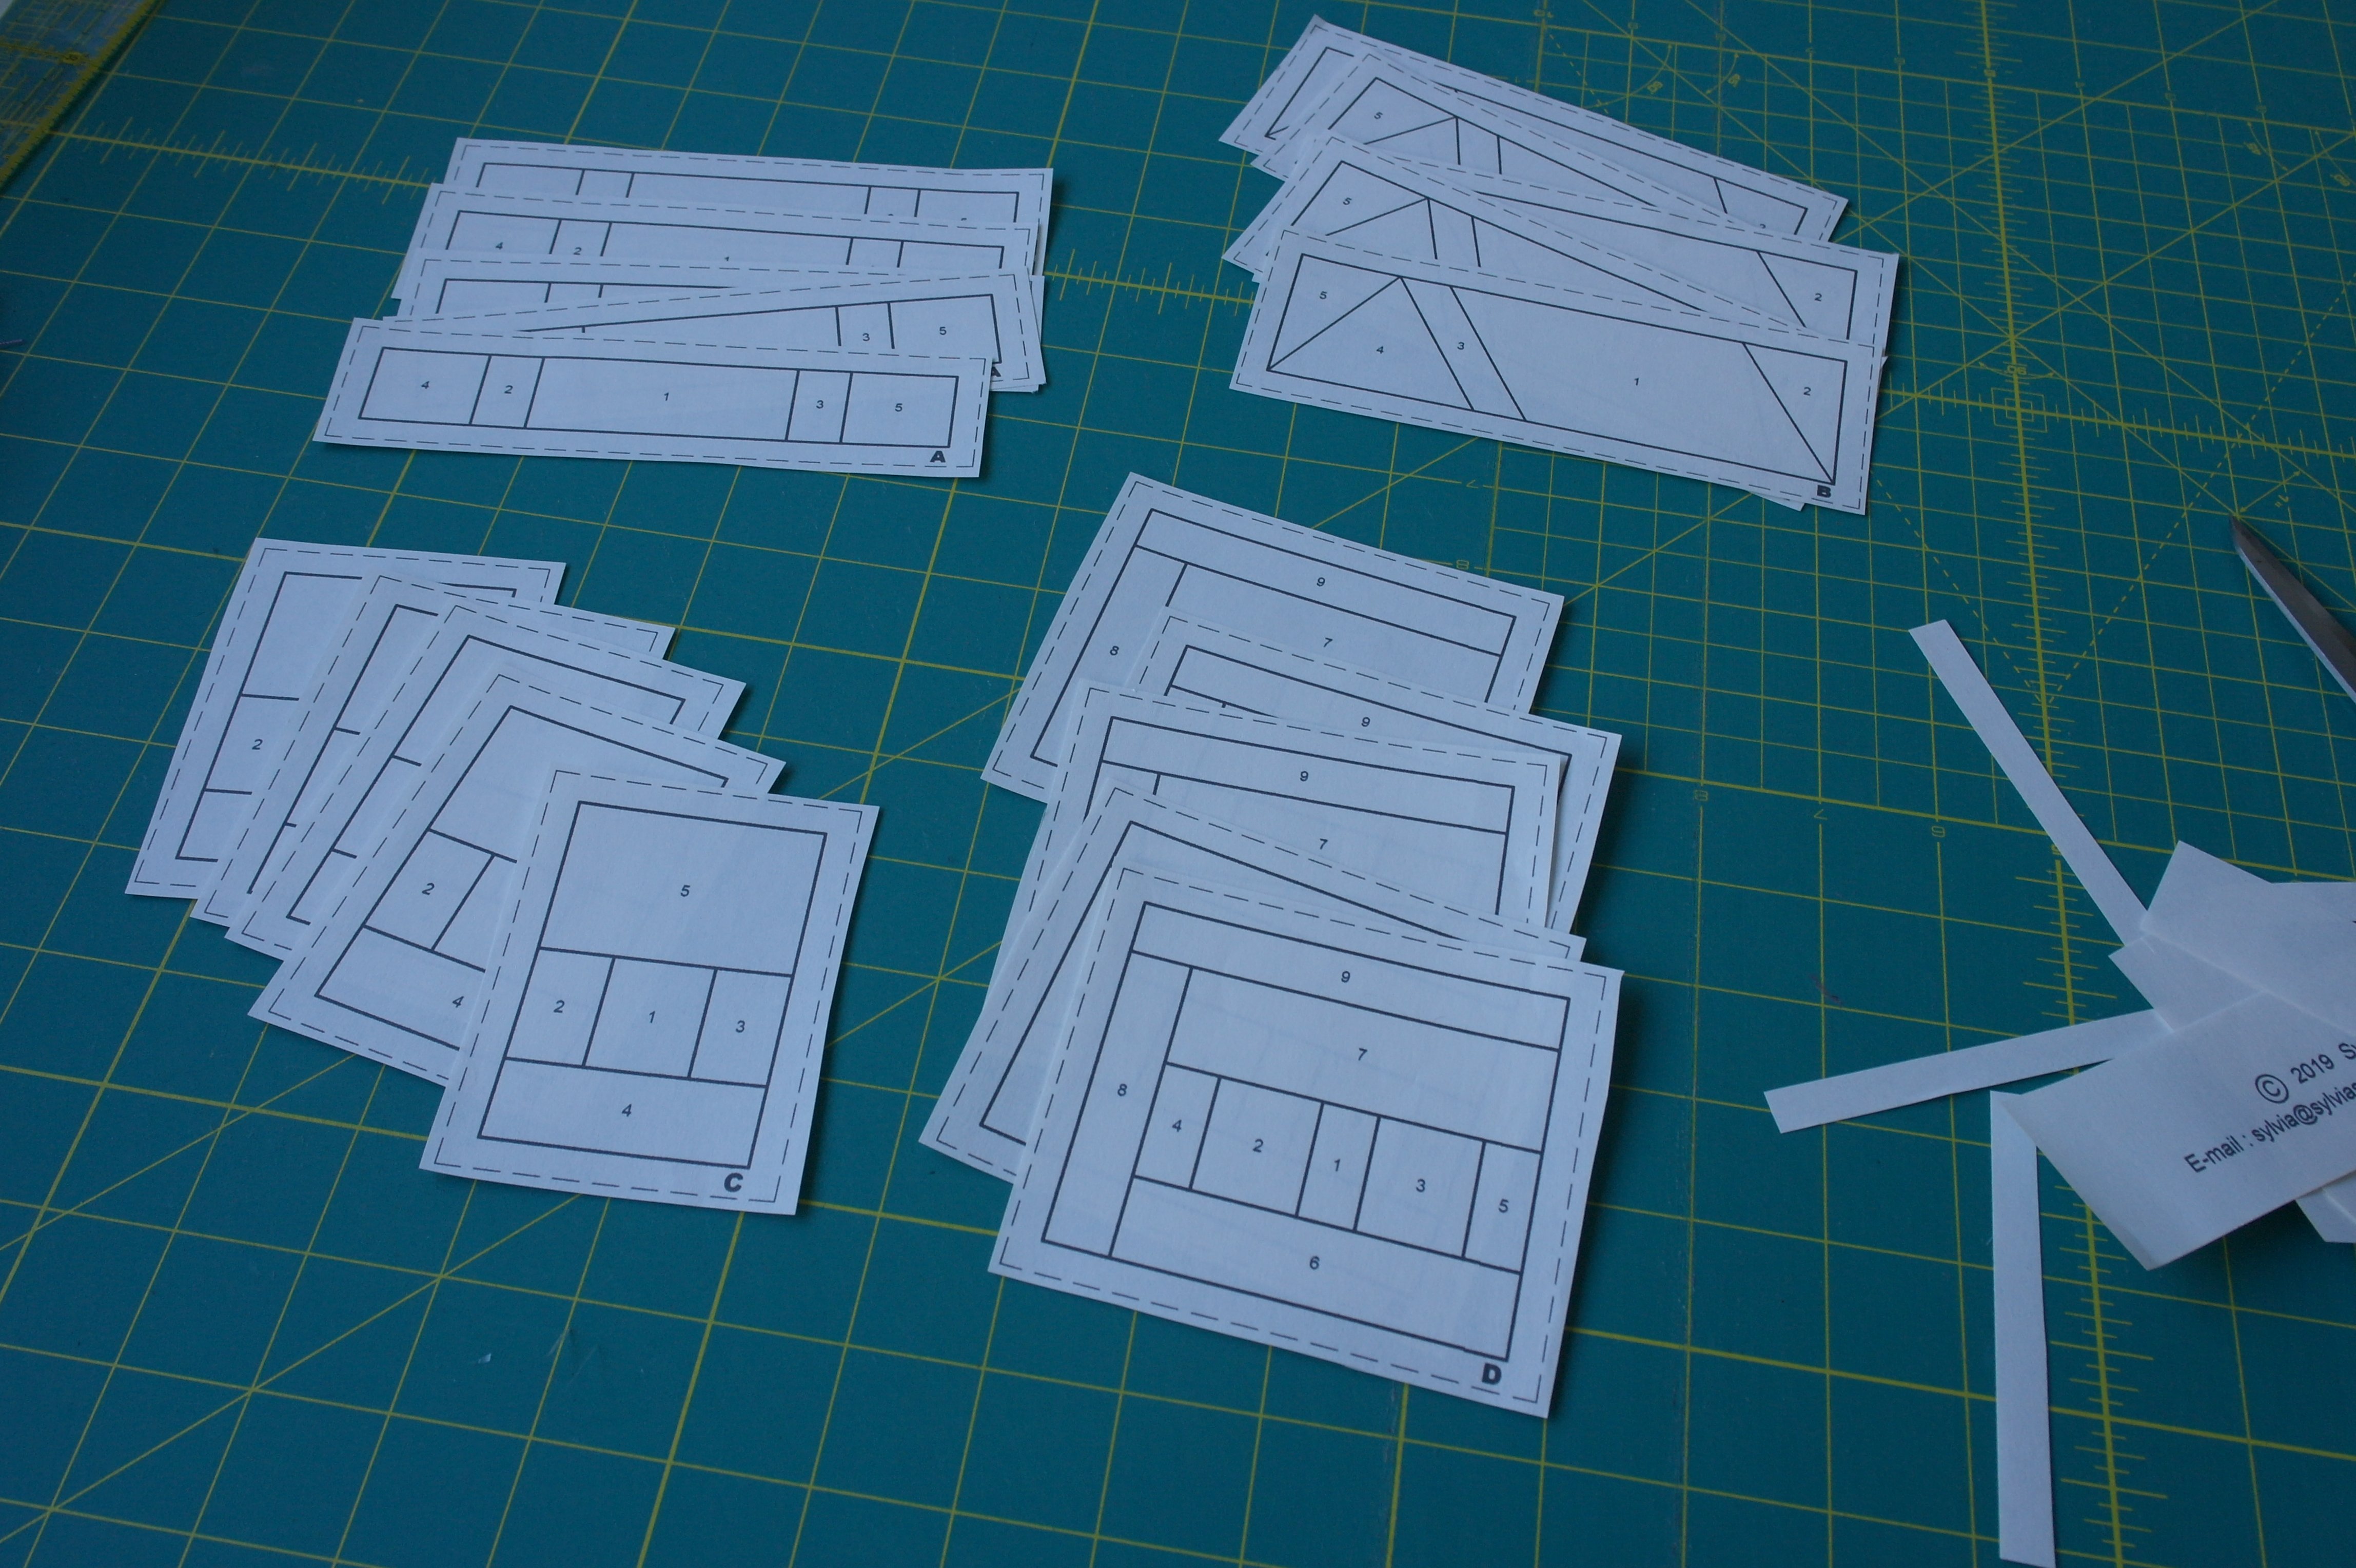
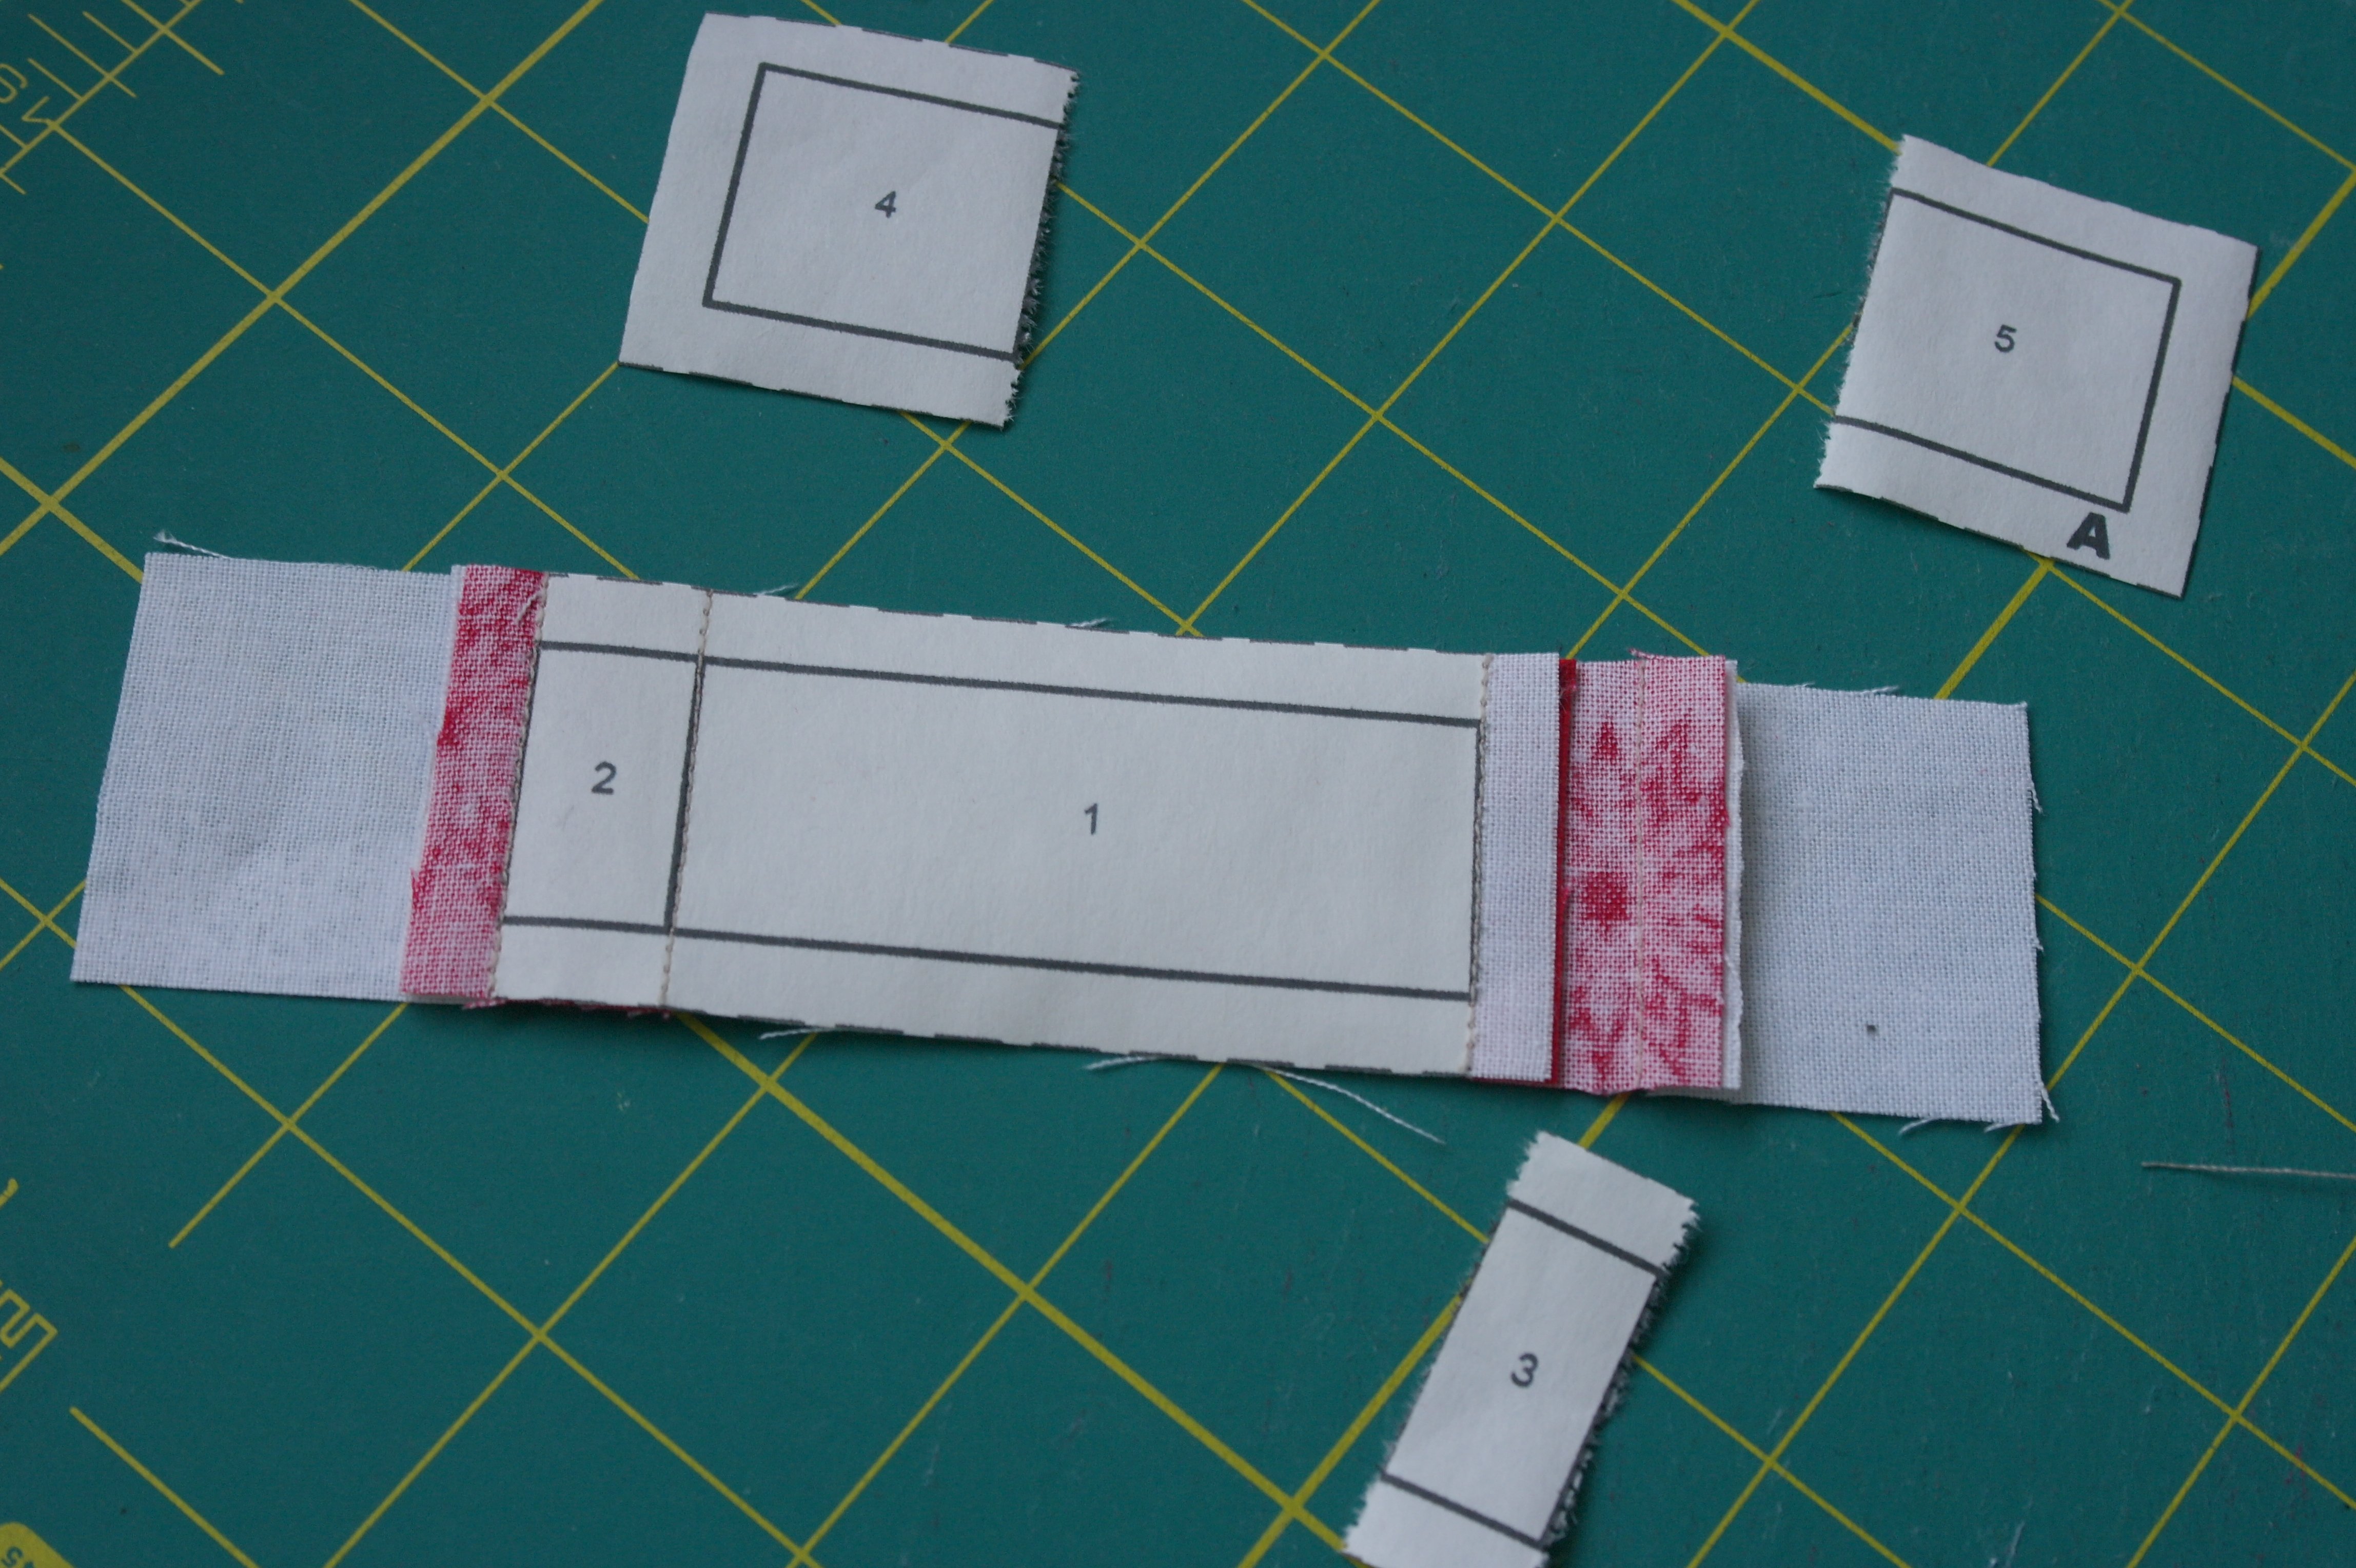
Cut all patterns at 1/8 inch beyond the dotted edges of the 1/4 inch seam allowances: you will need this bit of extra to be sure all fabrics will be sewn beyond this edge. You will need 5 of each unit: A, B, C and D.

Print a 6th paper piecing pattern to keep as Master pattern (you don’t cut this pattern, but keep as an example): to be sure to use the red fabrics for the houses, and the white fabrics for background, windows and parts of the house, color the sections on this Master pattern: use this to be sure the right fabrics are sewn onto certain sections of the Units. But remember: because this is a paper piecing pattern, it is a mirror image of the actual patchwork. That’s because you will sew on the printed side of the paper, and place your fabrics on the other side*
The use of Red and White fabrics.
Which sections should be red and which white? You can use the picture of my Master pattern, but I will make it easier for you by giving you the list below:
- Unit A – red: sections 2 and 3, white: sections 1, 4 and 5
- Unit B – red: sections 1 and 4, white: sections 2, 3 and 5
- Unit C – red: sections 2, 3, 4 and 5, white: section 1
- Unit D – red: section 1, 4, 5, 6 and 7, white: sections 2, 3, 8 and 9
Which red and white fabric to use is all up to you. Mix them up, use them randomly, or use one print red fabric for house 1, one for house 2 etc. I have mixed them up to make it more interesting, and to use the scraps I have. But be sure to use the reds and whites where they are planned, to get the required effect.
Working with Add-a-Quarter ruler and a folding template.
Cutting back the seam allowances to 1/4 inch for the ‘next’ fabric, makes this kind of paper piecing much easier. If you have made quilts with patterns by Judy Niemeyer, you are familiar with this technique. If this is new to you, just follow the next directions.
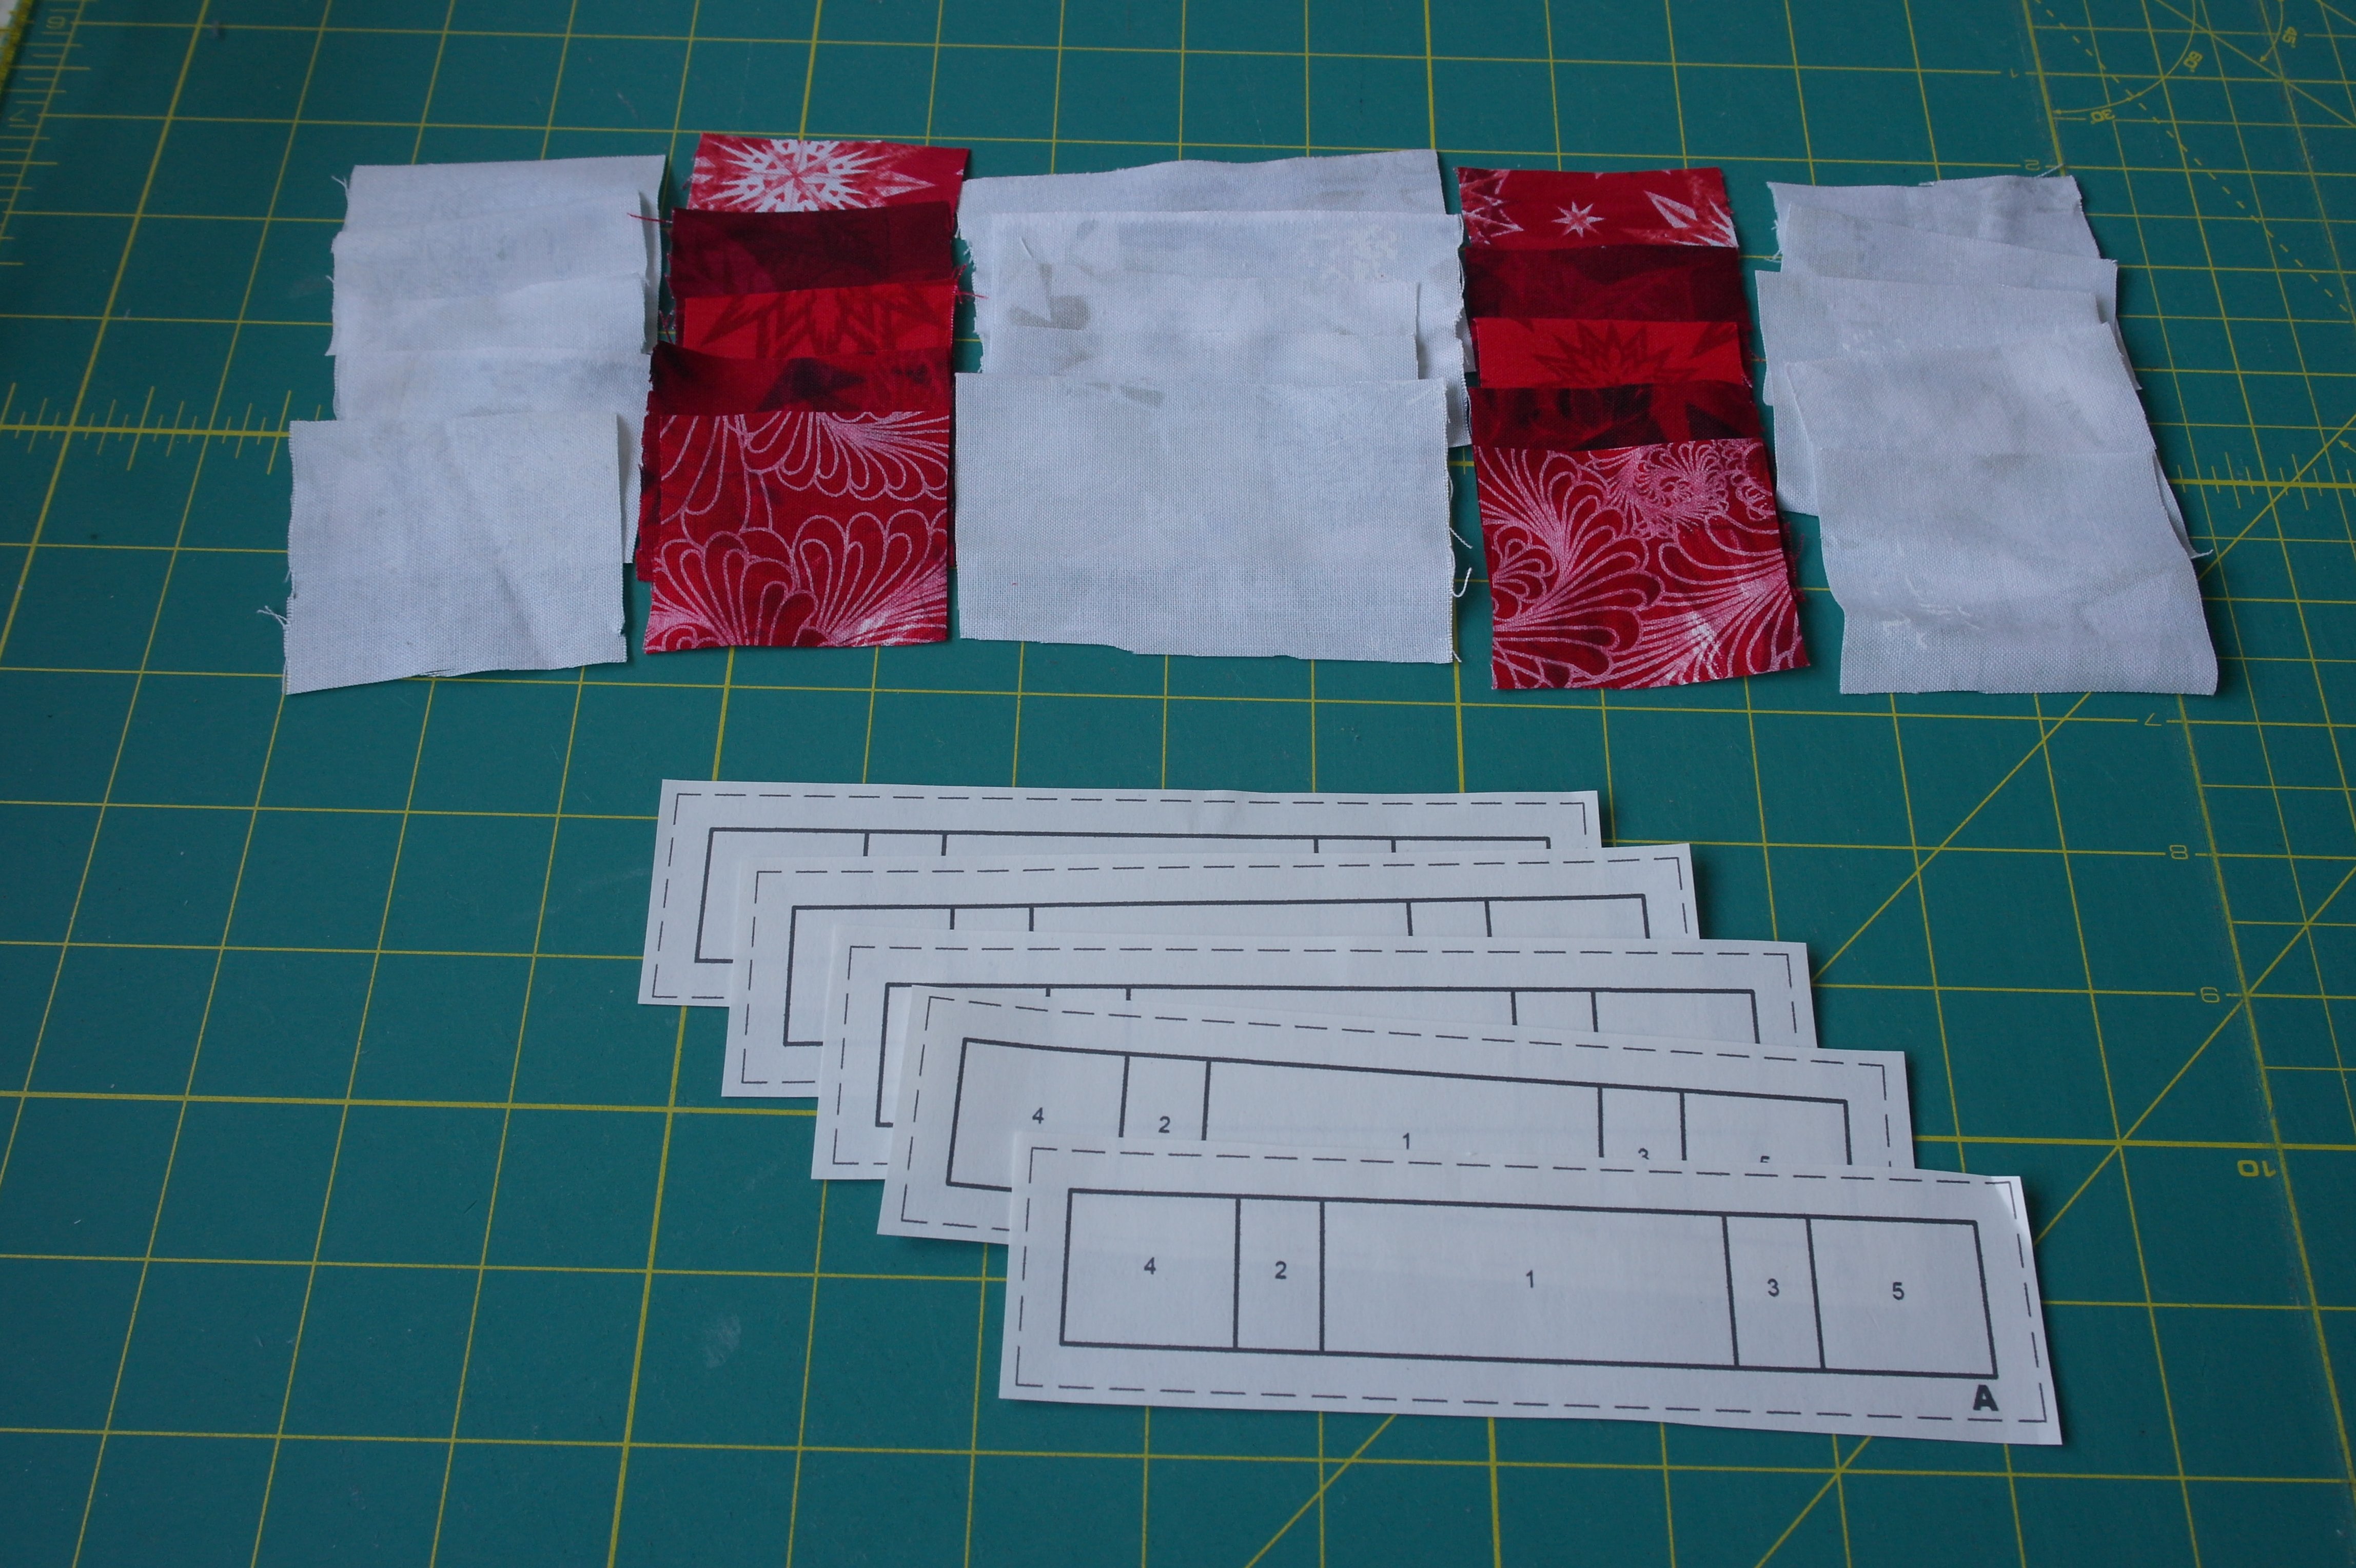
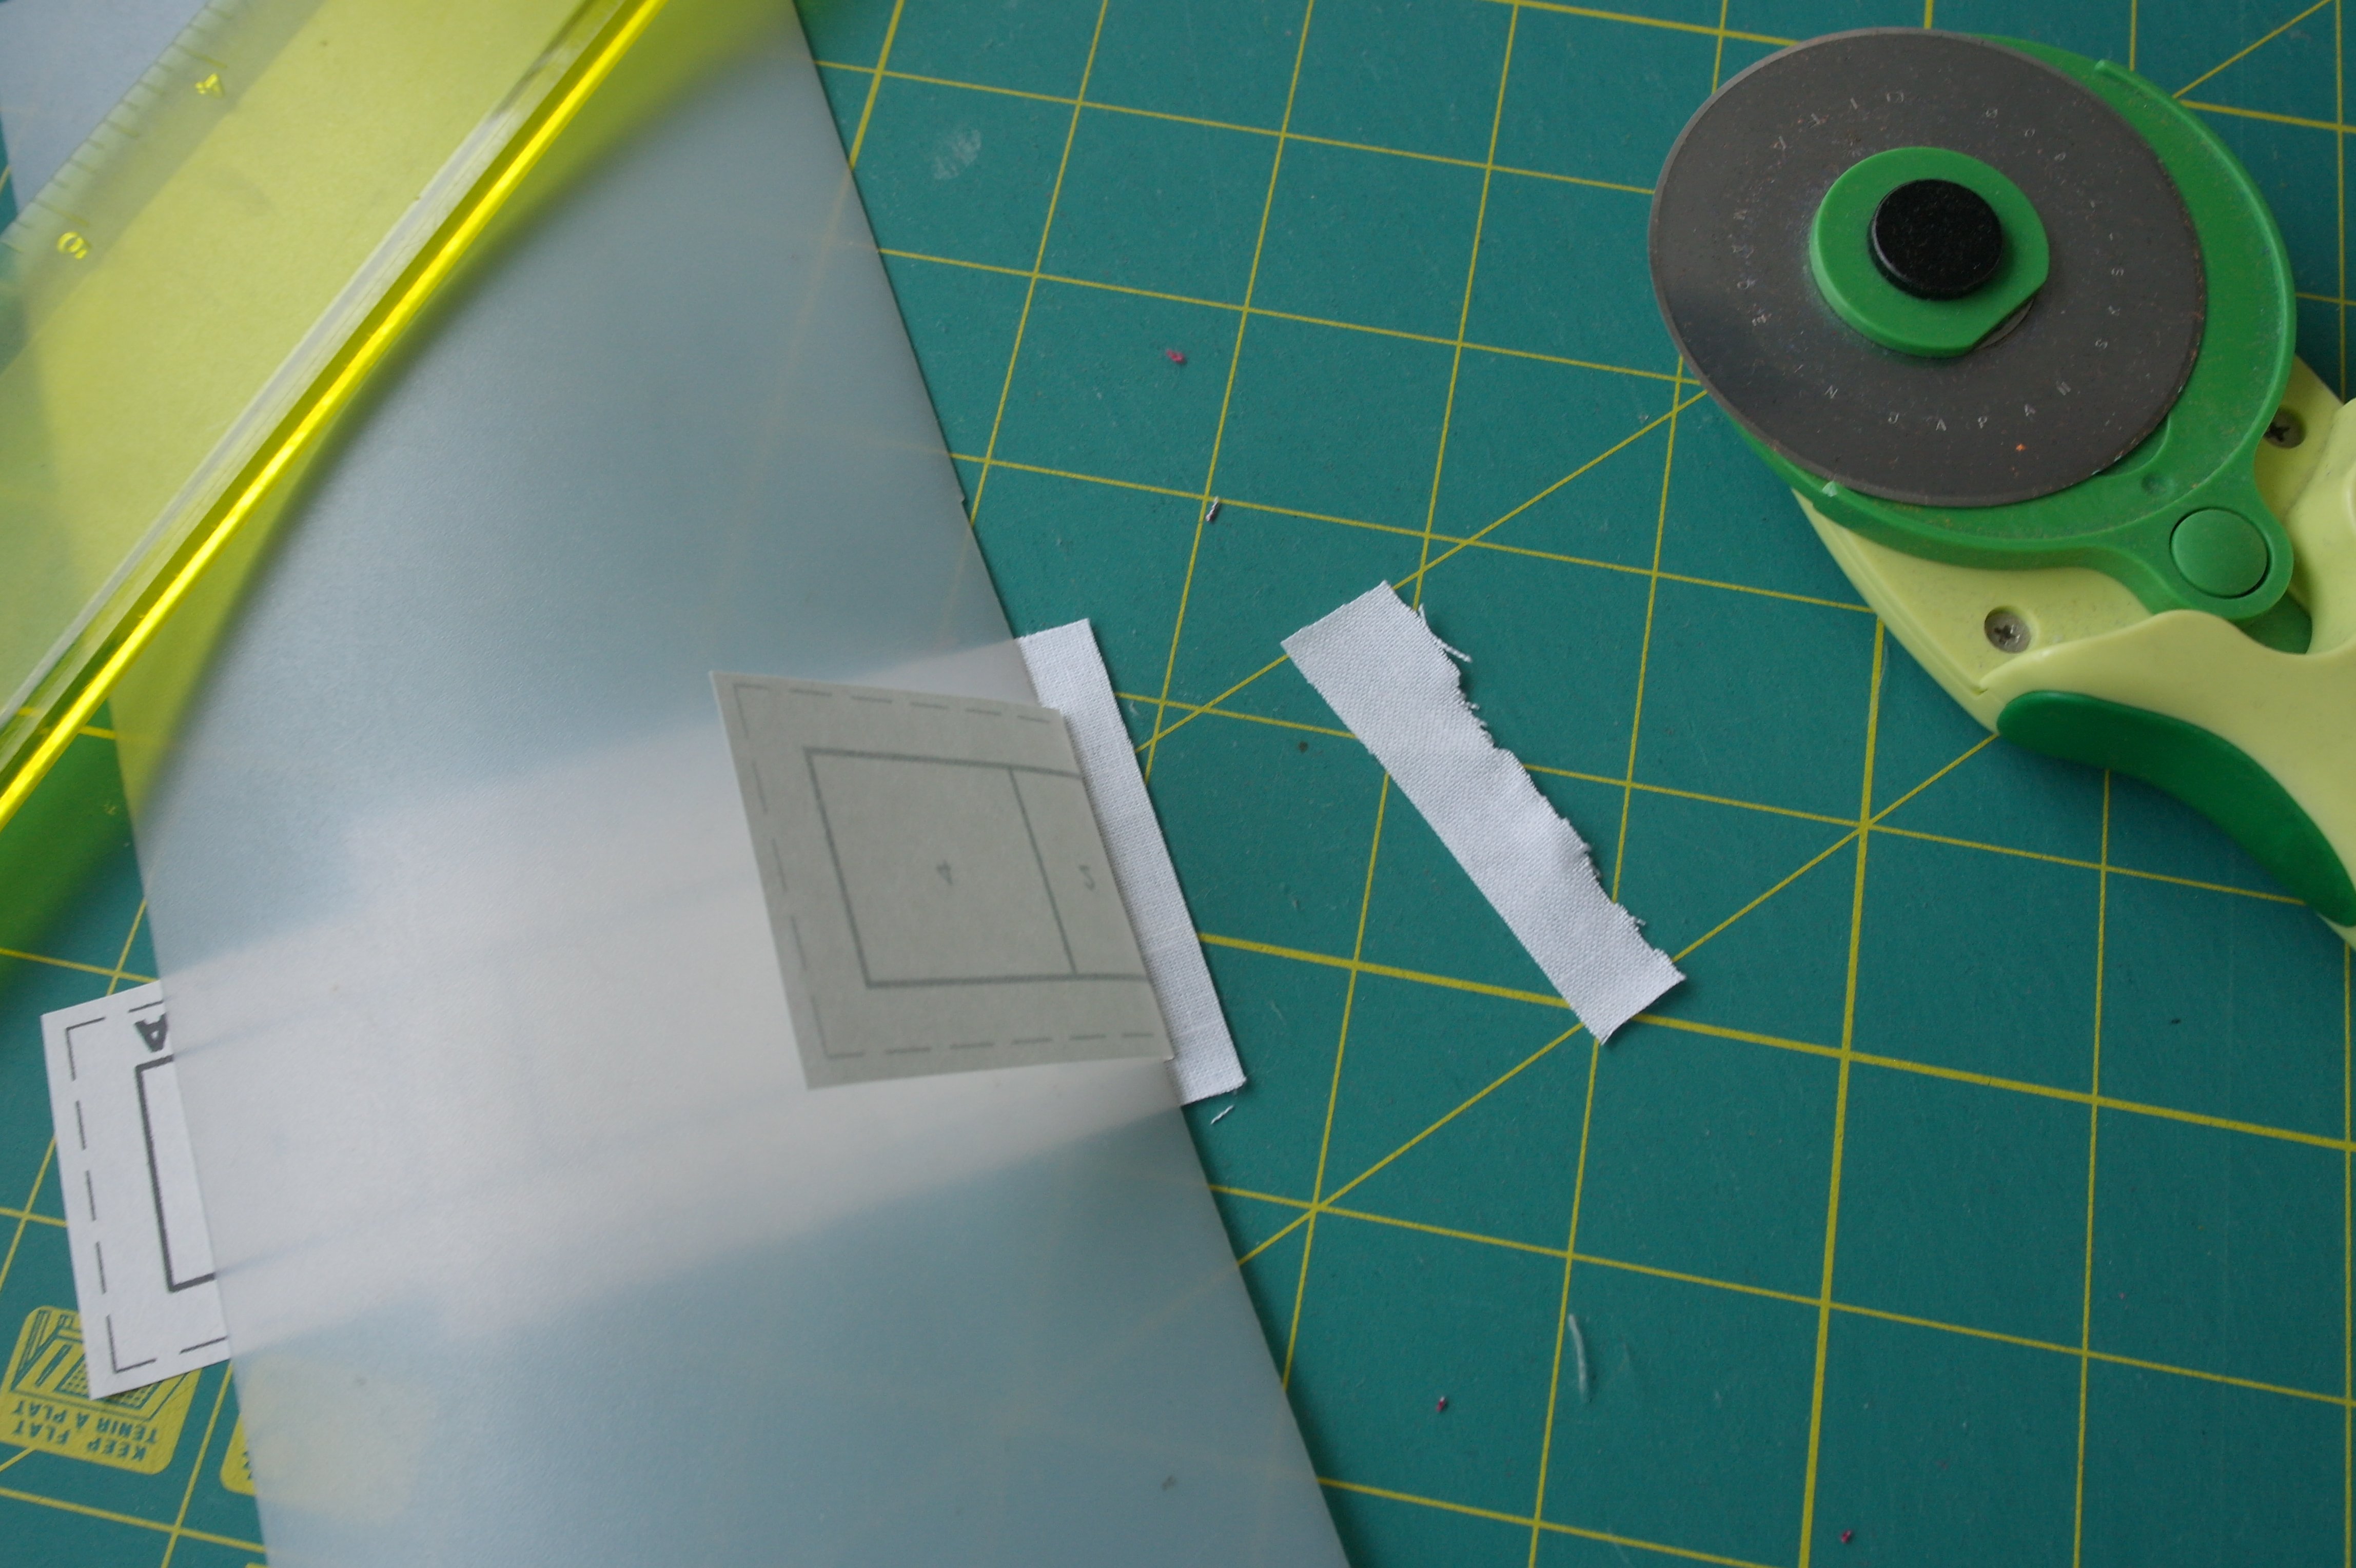
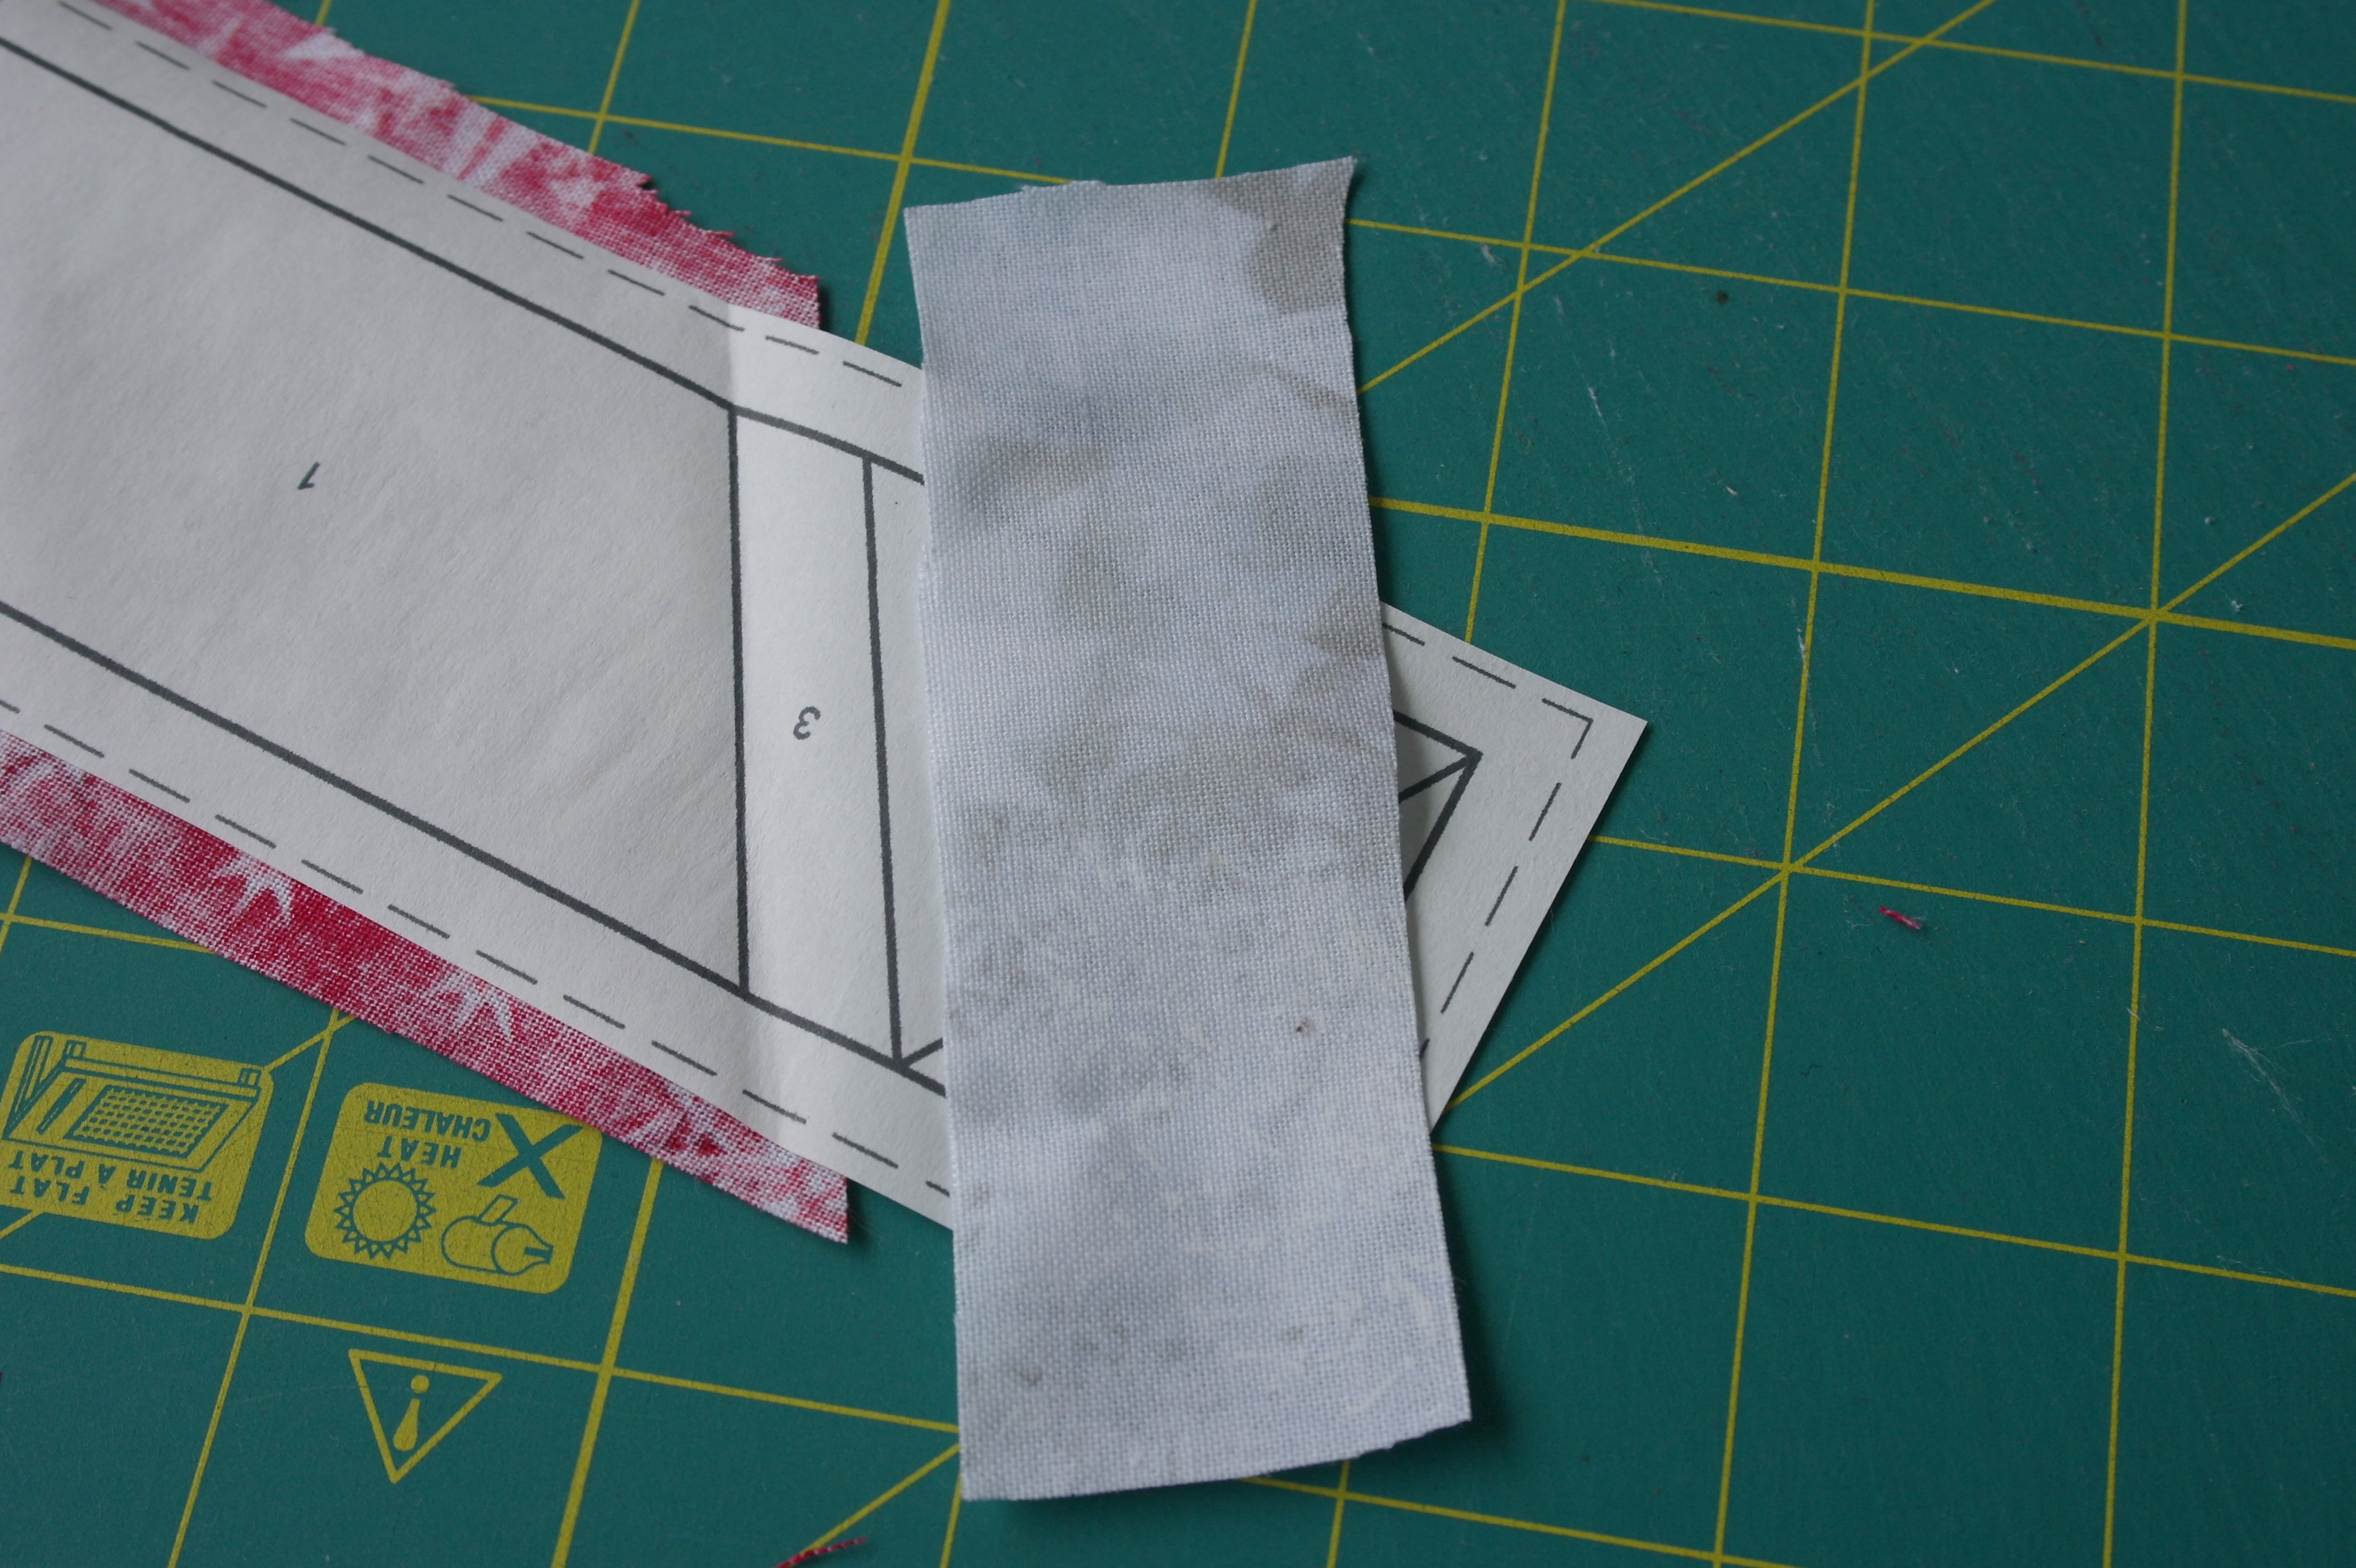
You can pre-cut scraps of fabric, but be sure they are large enough to cover the entire section + at least 3 x the seam allowances. This bit of extra gives you more confidence to sew pieces of fabric onto the paper, without having to rip them all the time. You can also make paper templates, larger than the sections + 3 x seam allowances, and cut your fabric pieces using those templates. My fabric pieces are cut and I have placed them in rows of 5, according to the way they will be sewn onto the paper Units.
Unit A is the sections with the chimneys: you can choose to use different prints of fabric for all chimneys, or use them 2 by 2 per Unit (that’s what I have done): these are sections 2 and 3 of Unit A. The three other sections 1, 4 and 5 are background = white.
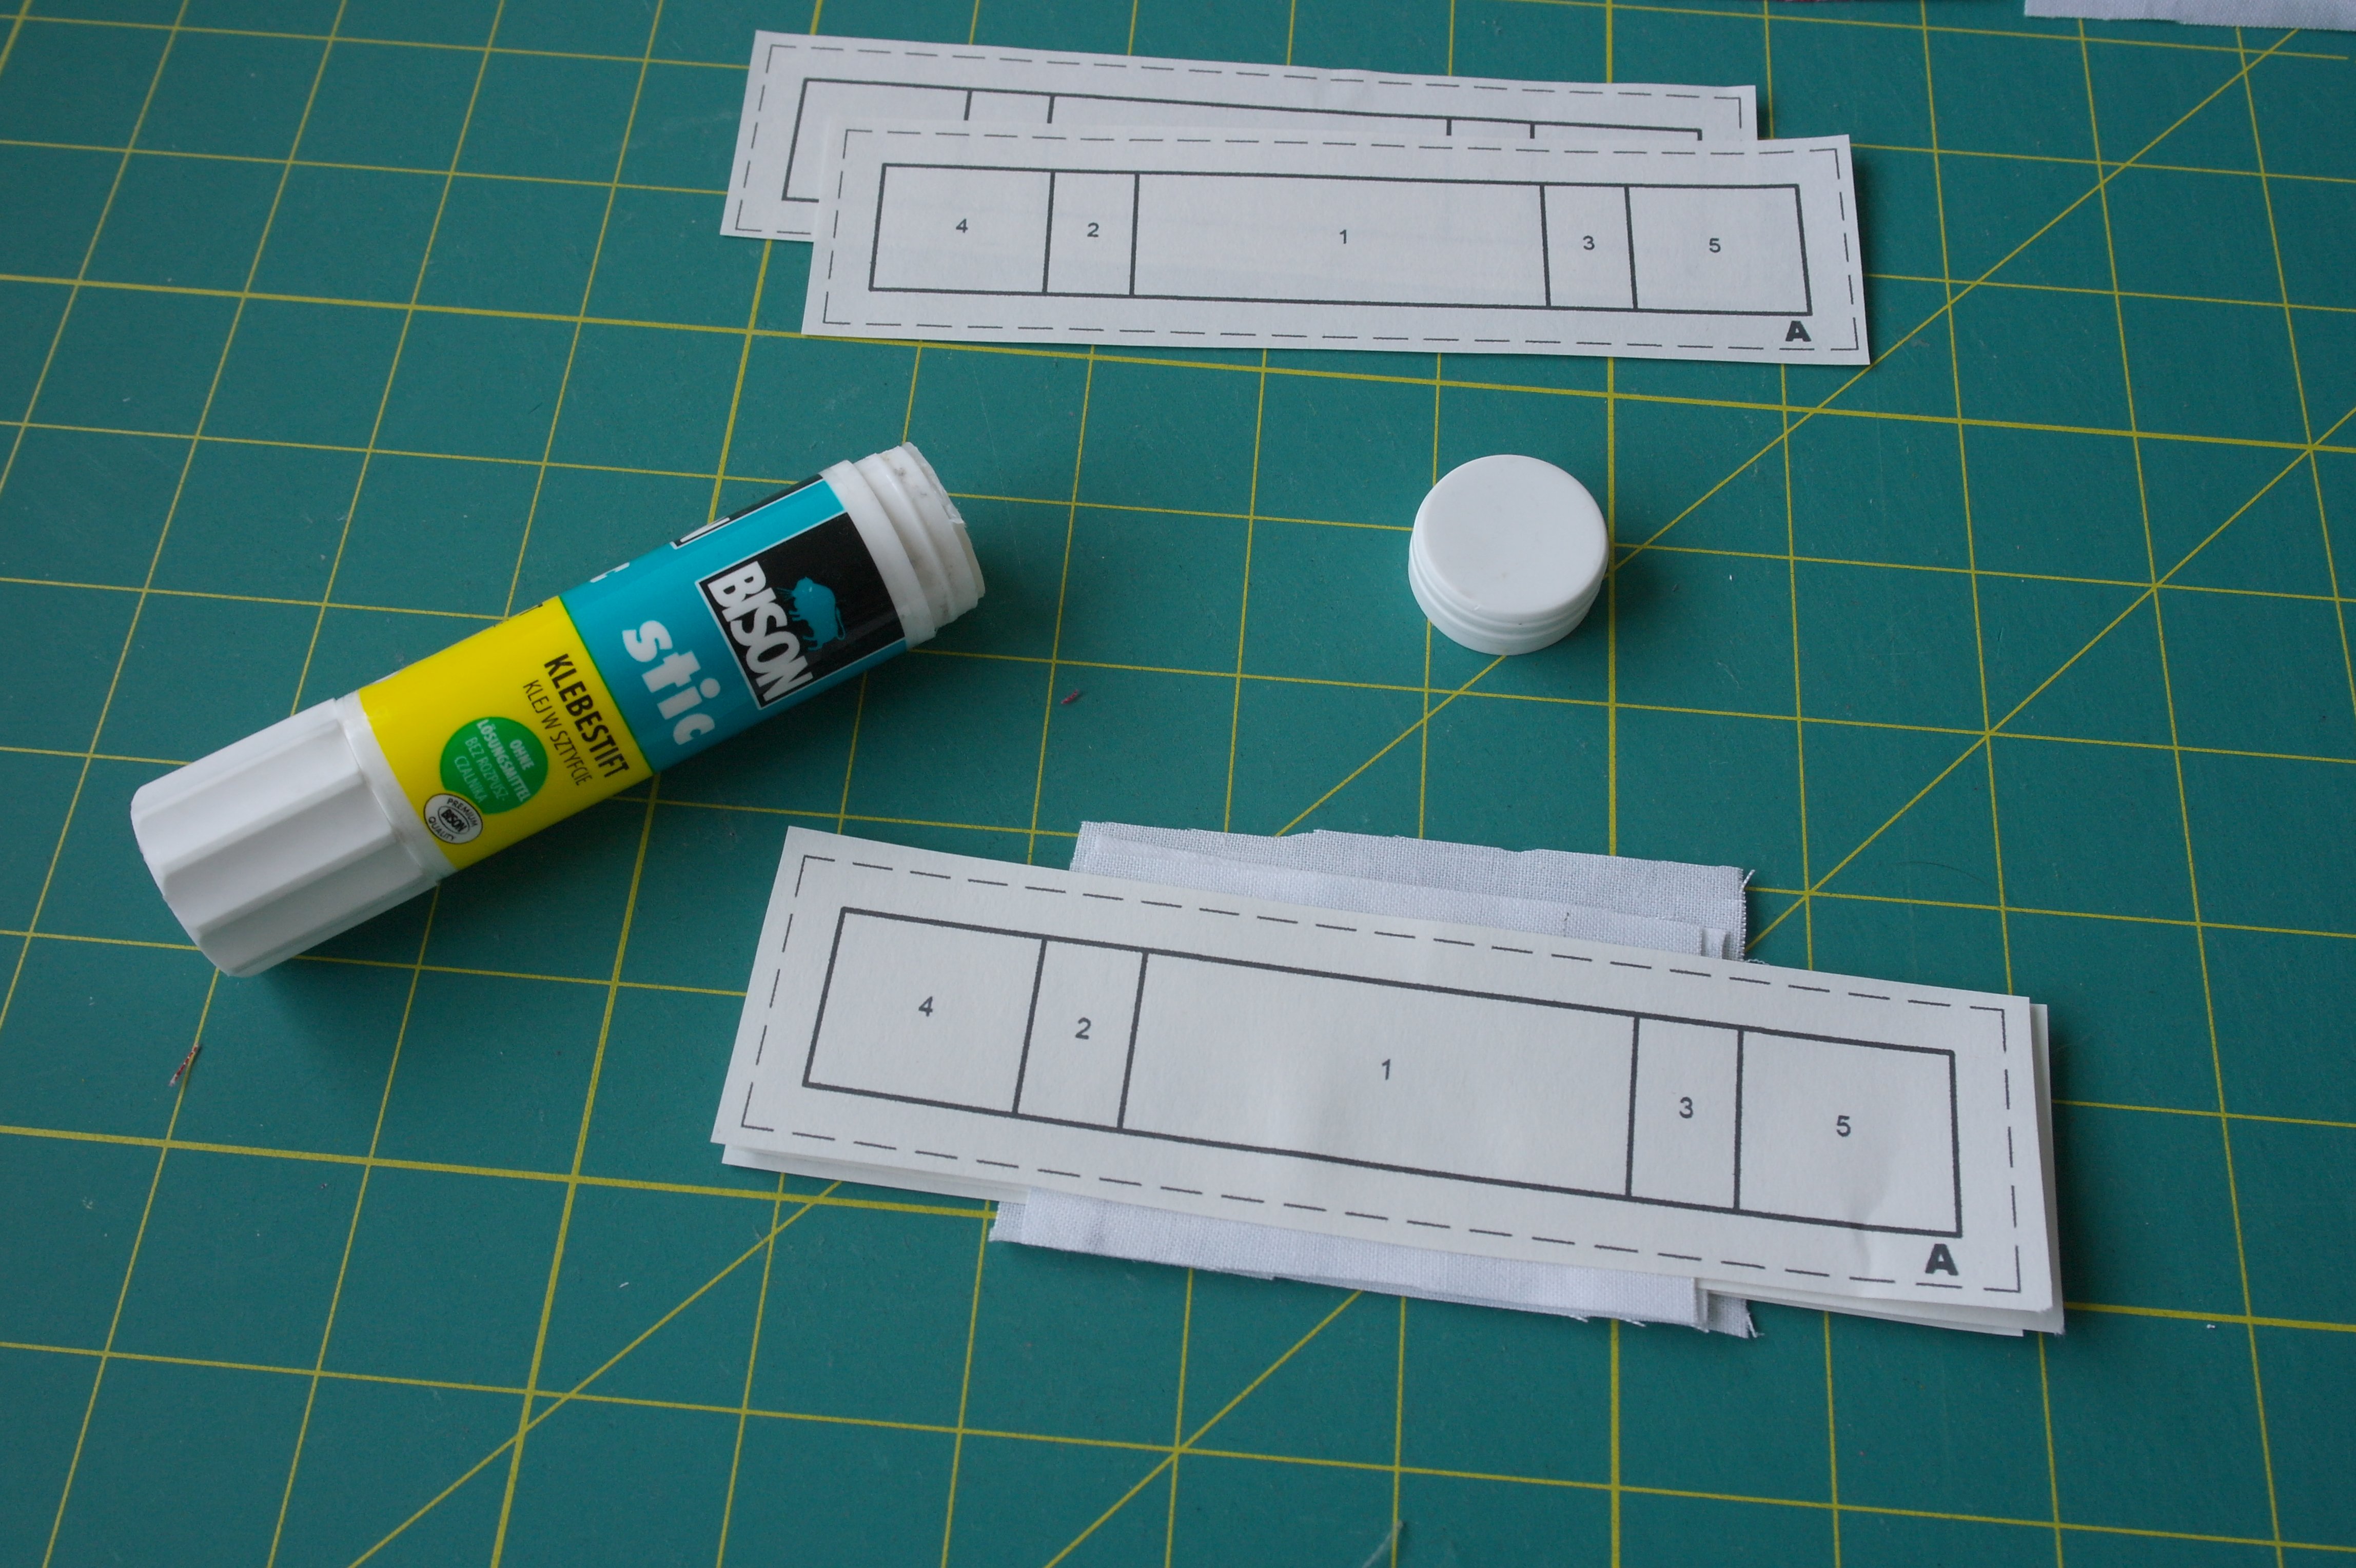
The fabric for the first section (nr. 1) is always glued onto the back of the Unit: as you can see, I have made piles: first placed fabric 1 upside down, a Unit A with glue underneath section 1 sticking to that first fabric, second fabric upside down with Unit A and glue on section 1 on top of that second fabric etc. I always make piles, to see how the fabrics should be placed. Placing them on top of each other, or slightly shifted, you can see how the pieces of fabric should be placed.
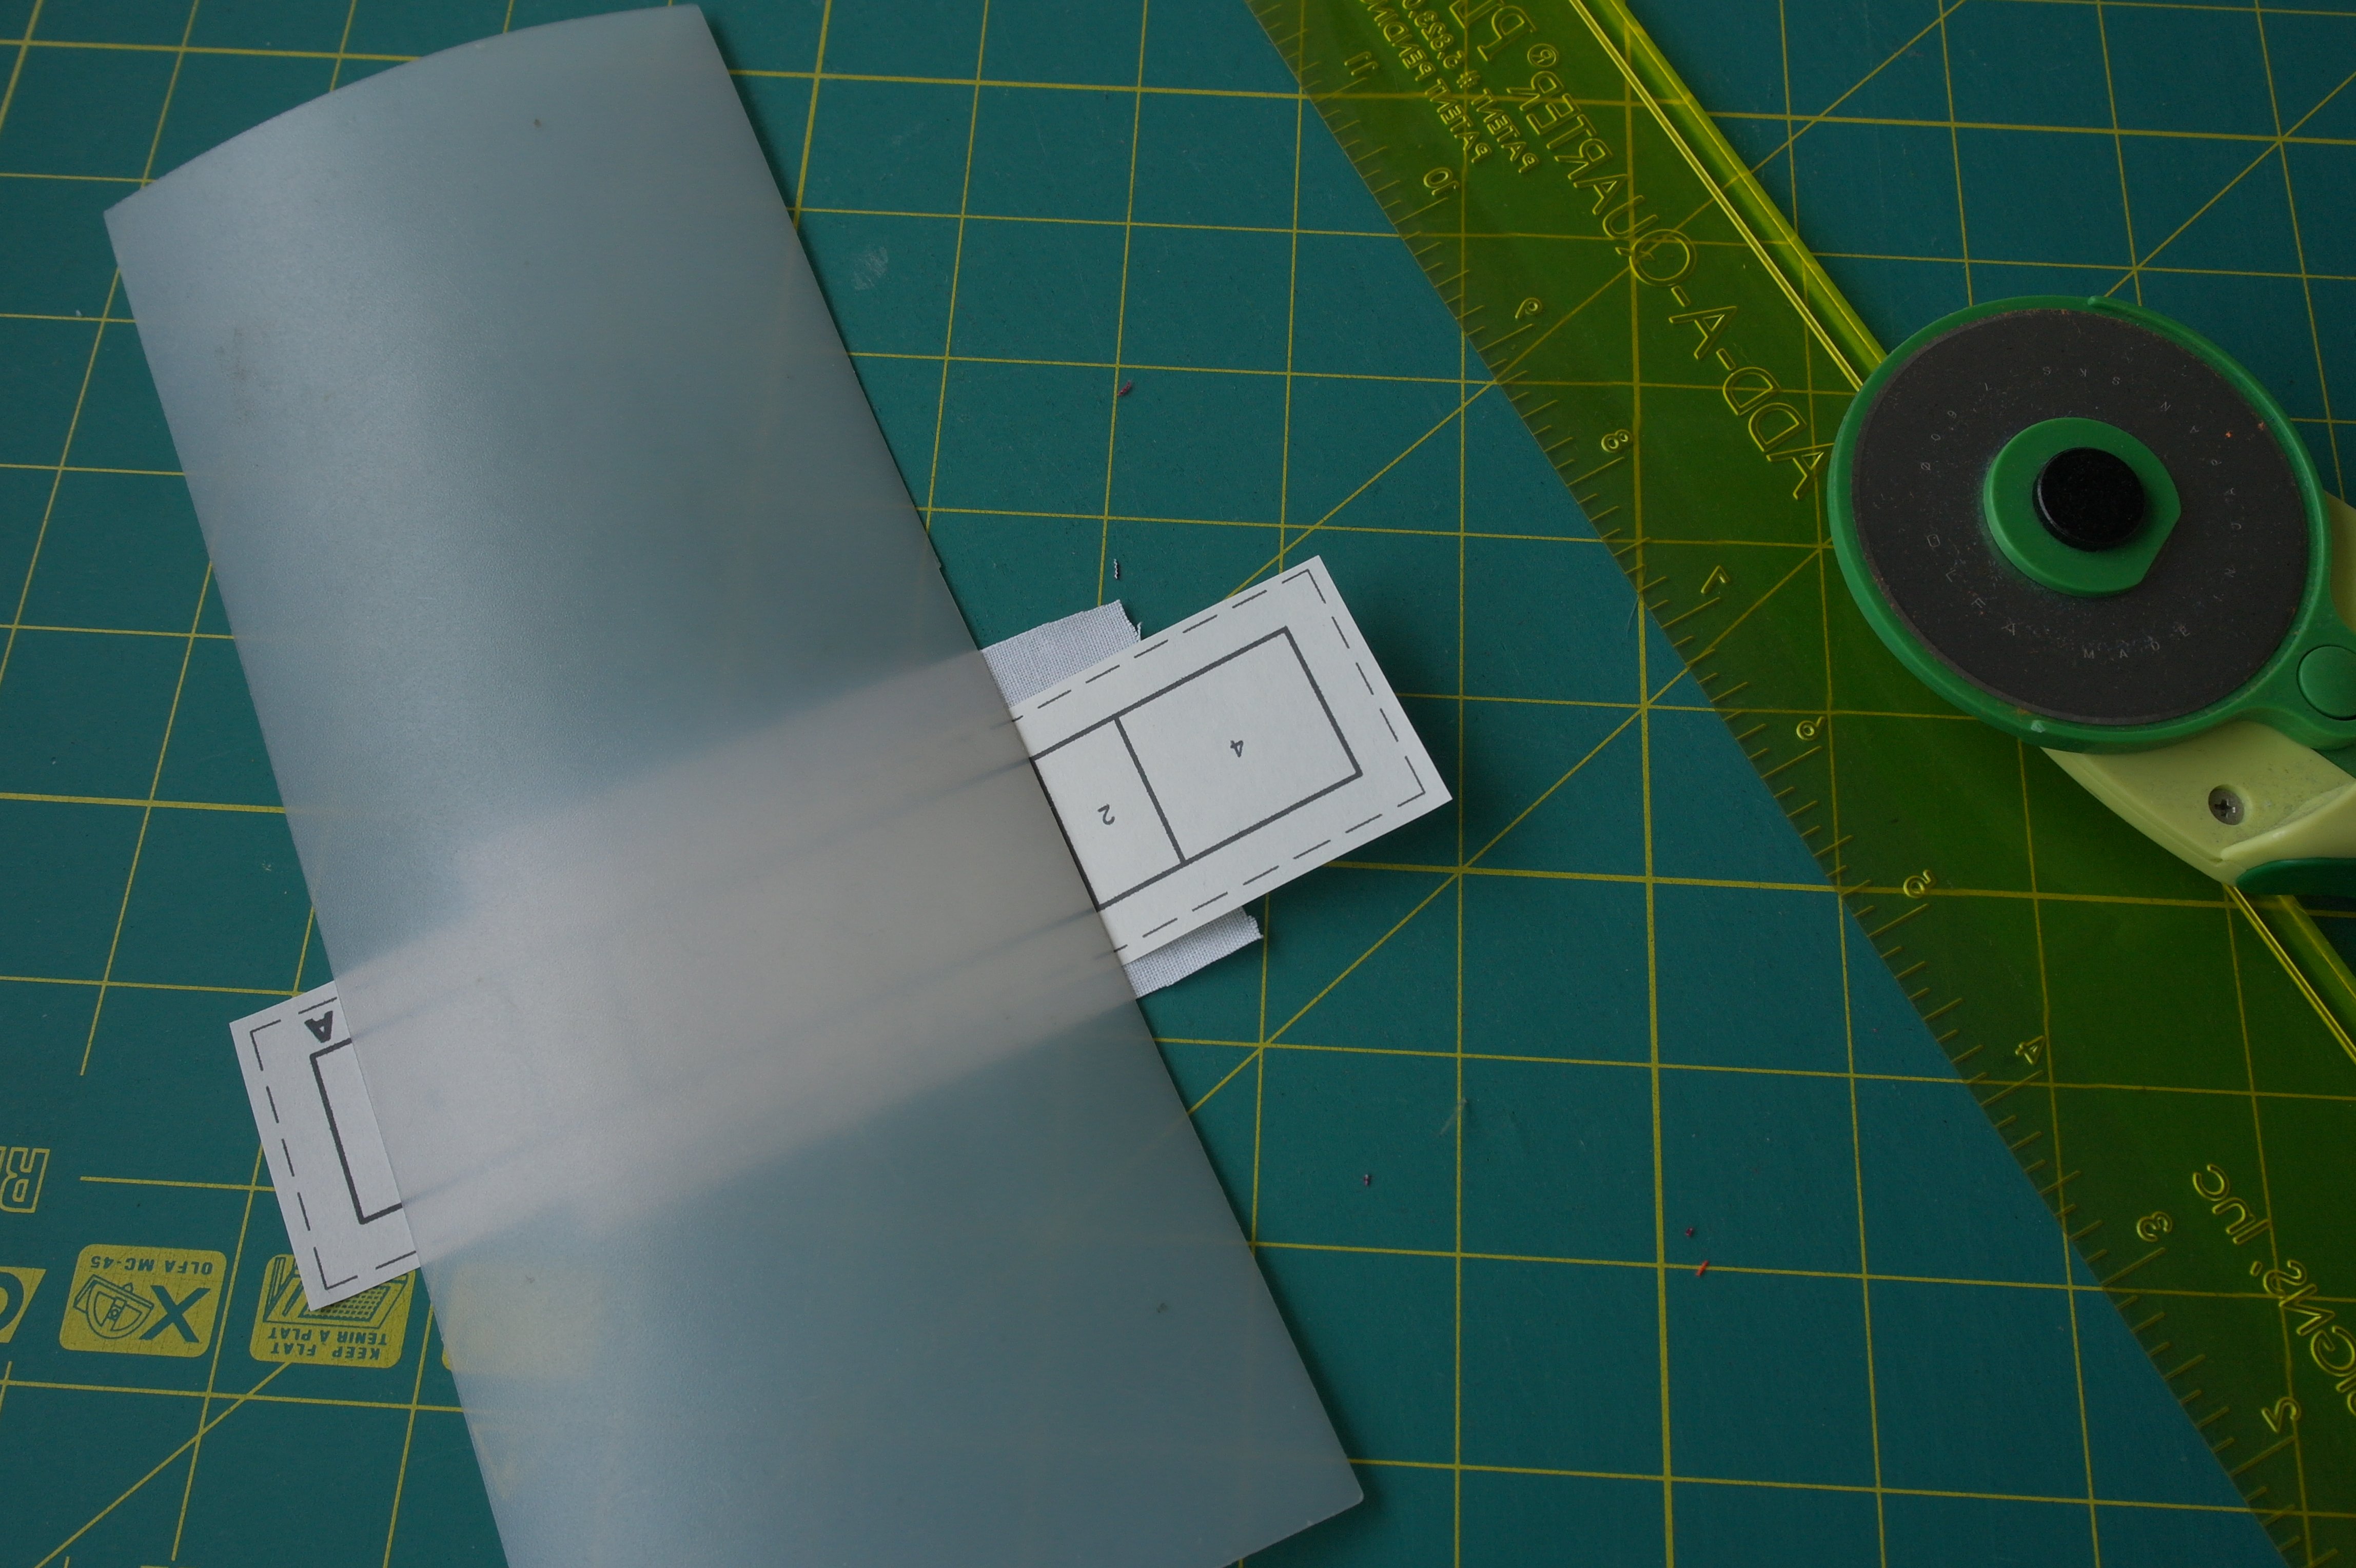
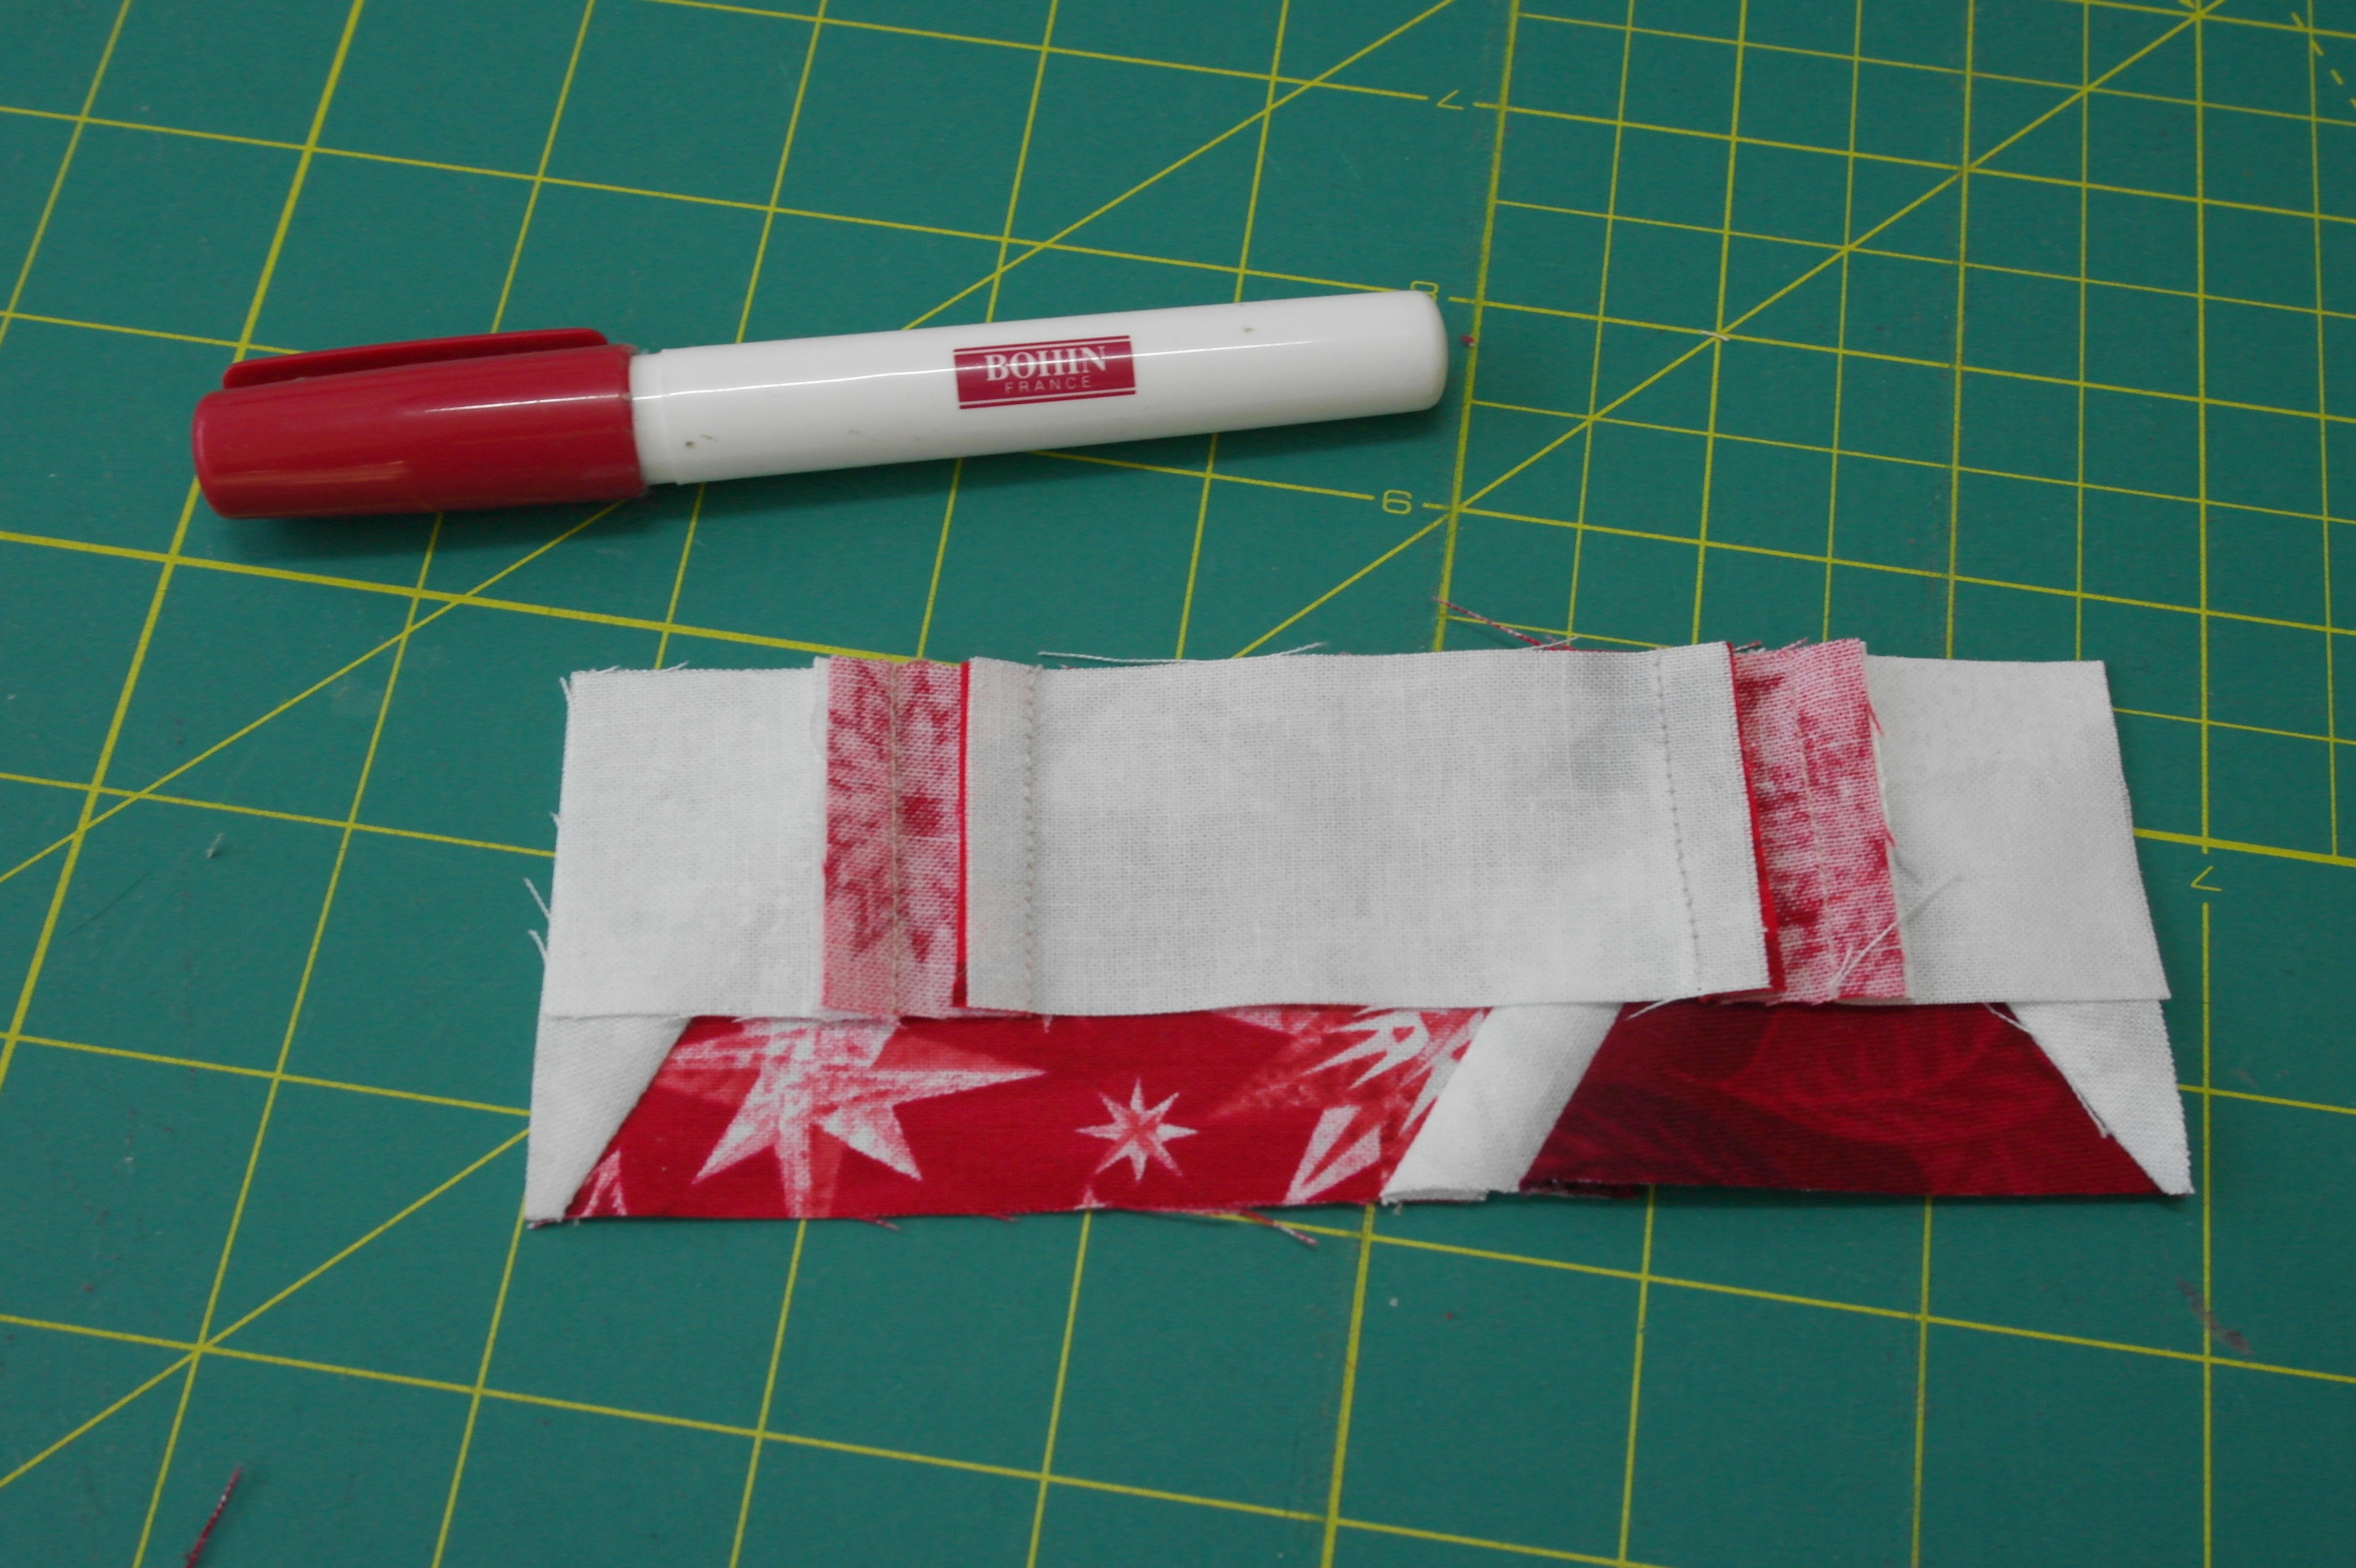
To prepare the first sewing line (between section 1 and section 2), I have placed the folding template up to the solid sewing line.
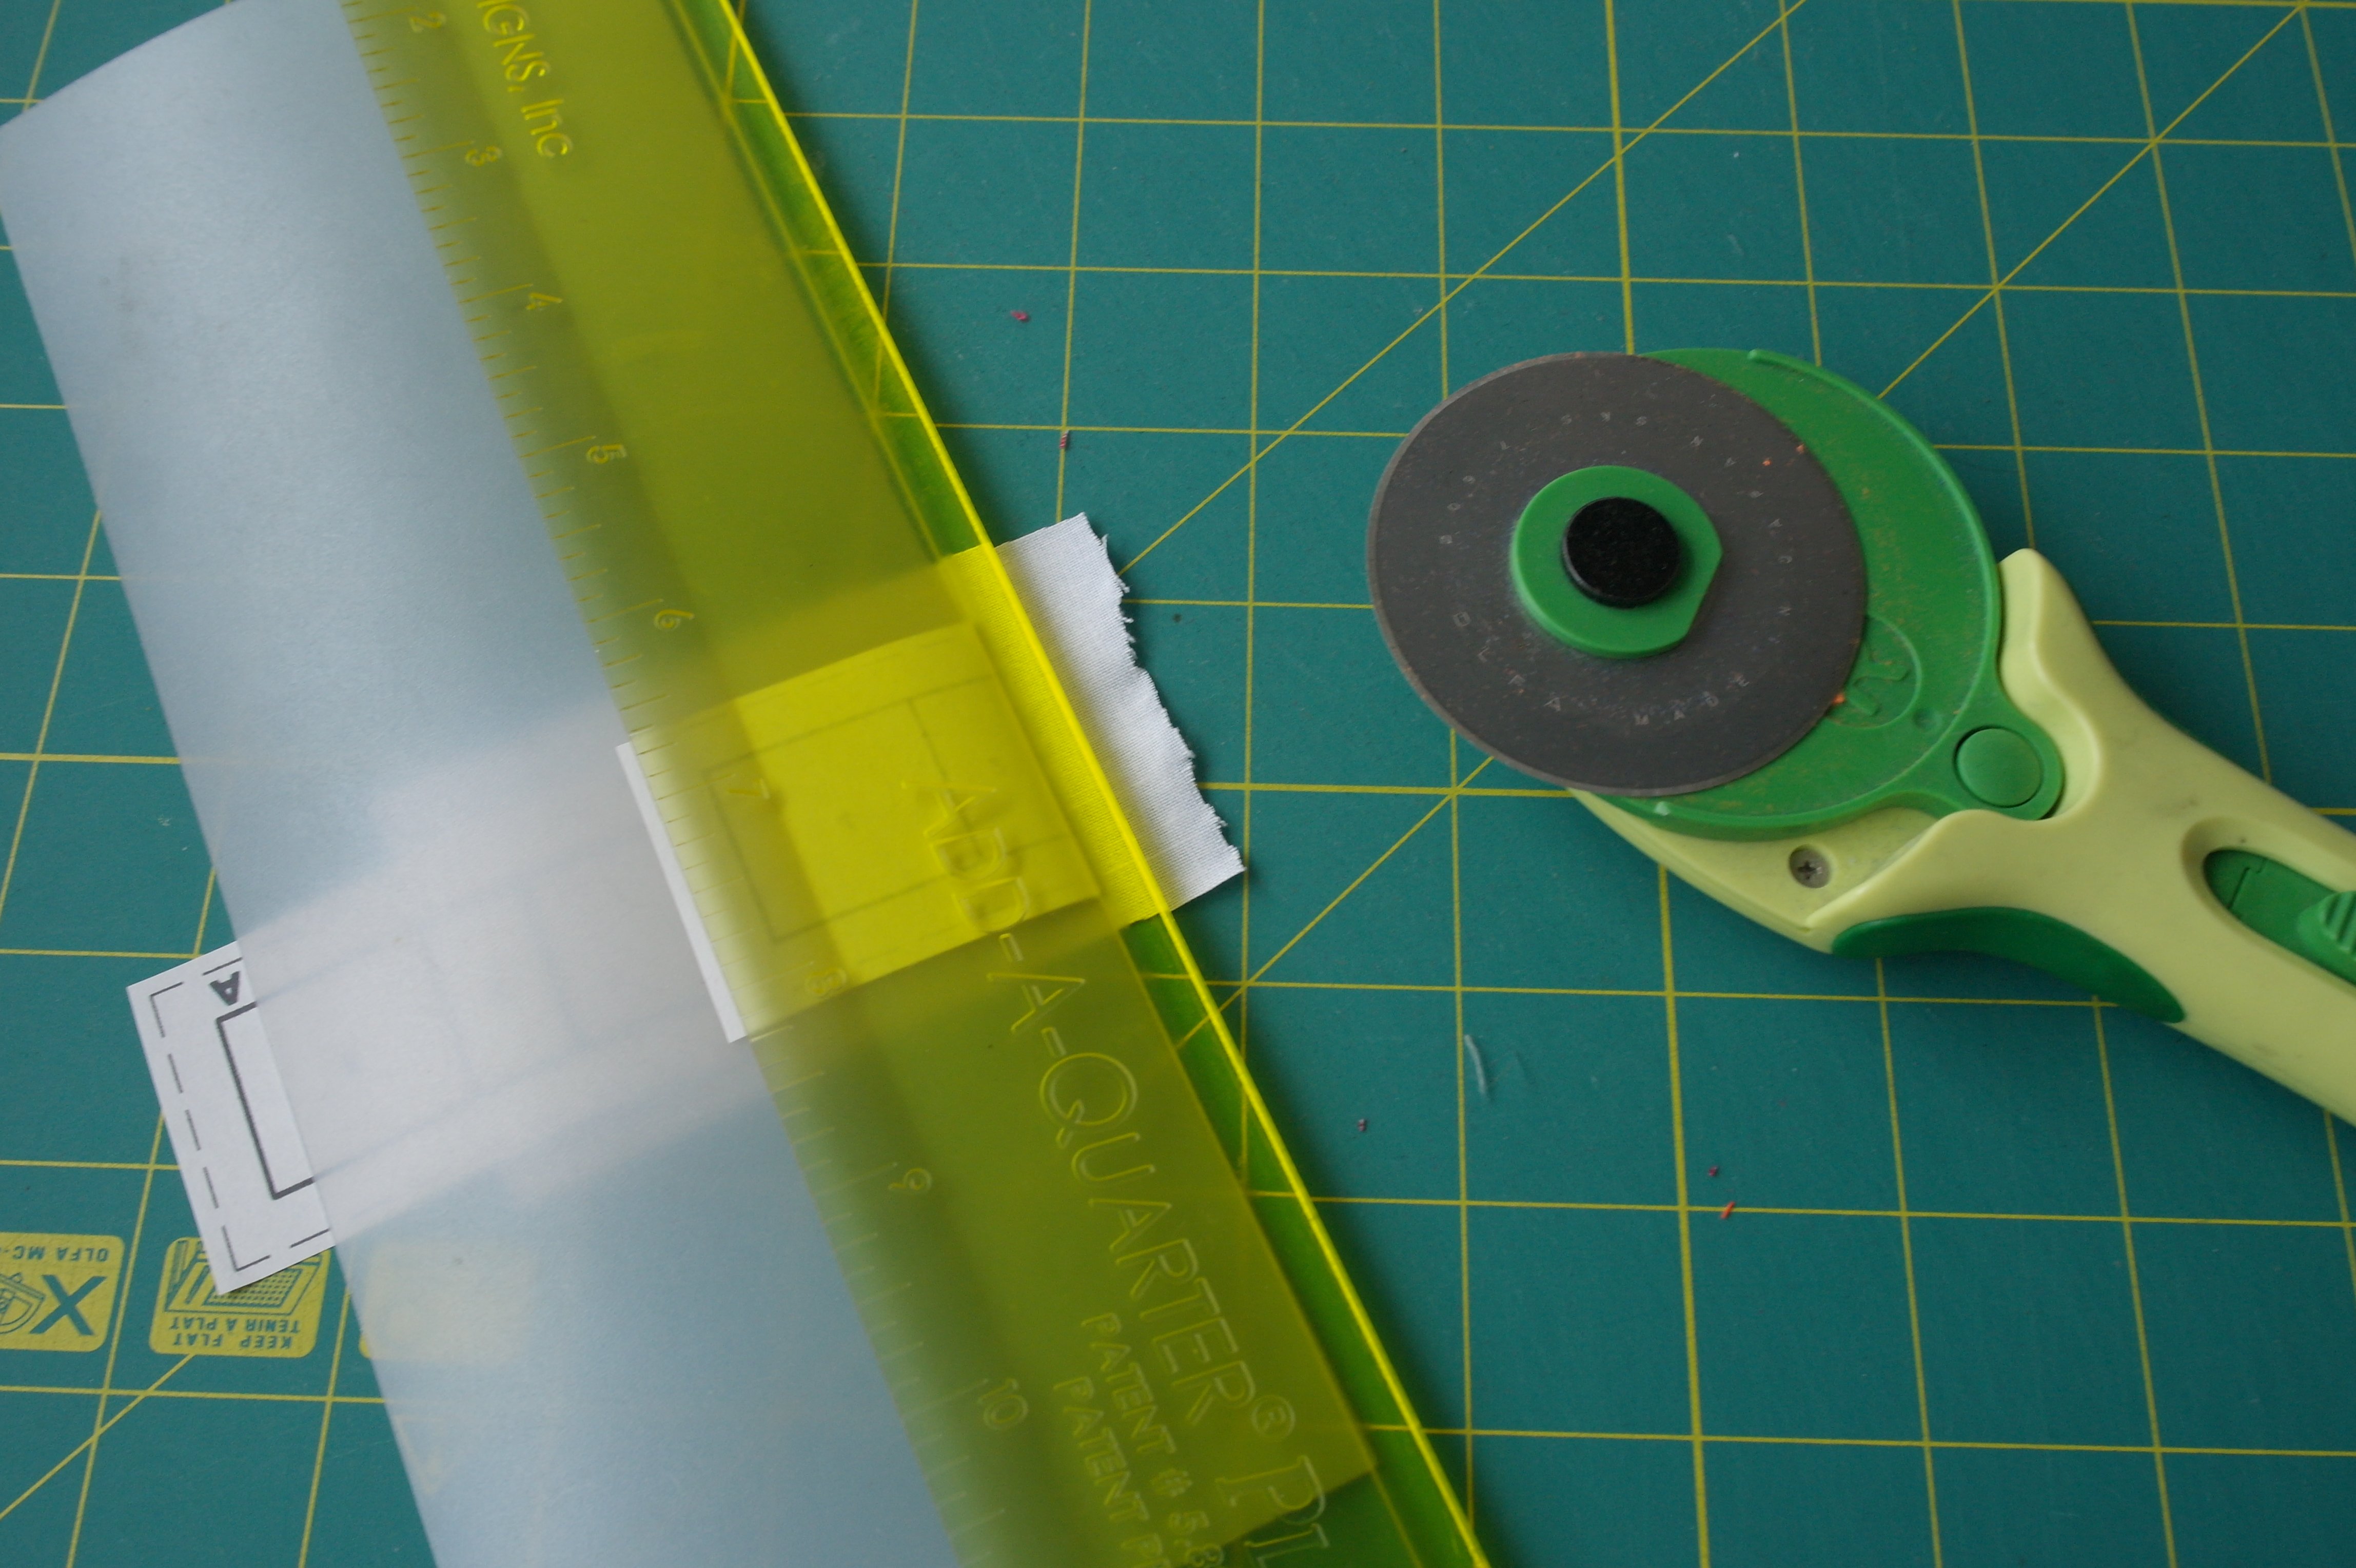
Folding the piece of paper over this folding template, placing the Add-a-Quarter ruler (1/4 inch ridge down) against the folding template/paper piece, to click it secure (it should lock itself),
then cut the extra fabric with my Rotary Cutter to get a smooth 1/4 inch seam allowance. Prepare all 5 Unit A’s the same way, before sewing.
How to sew in chains.
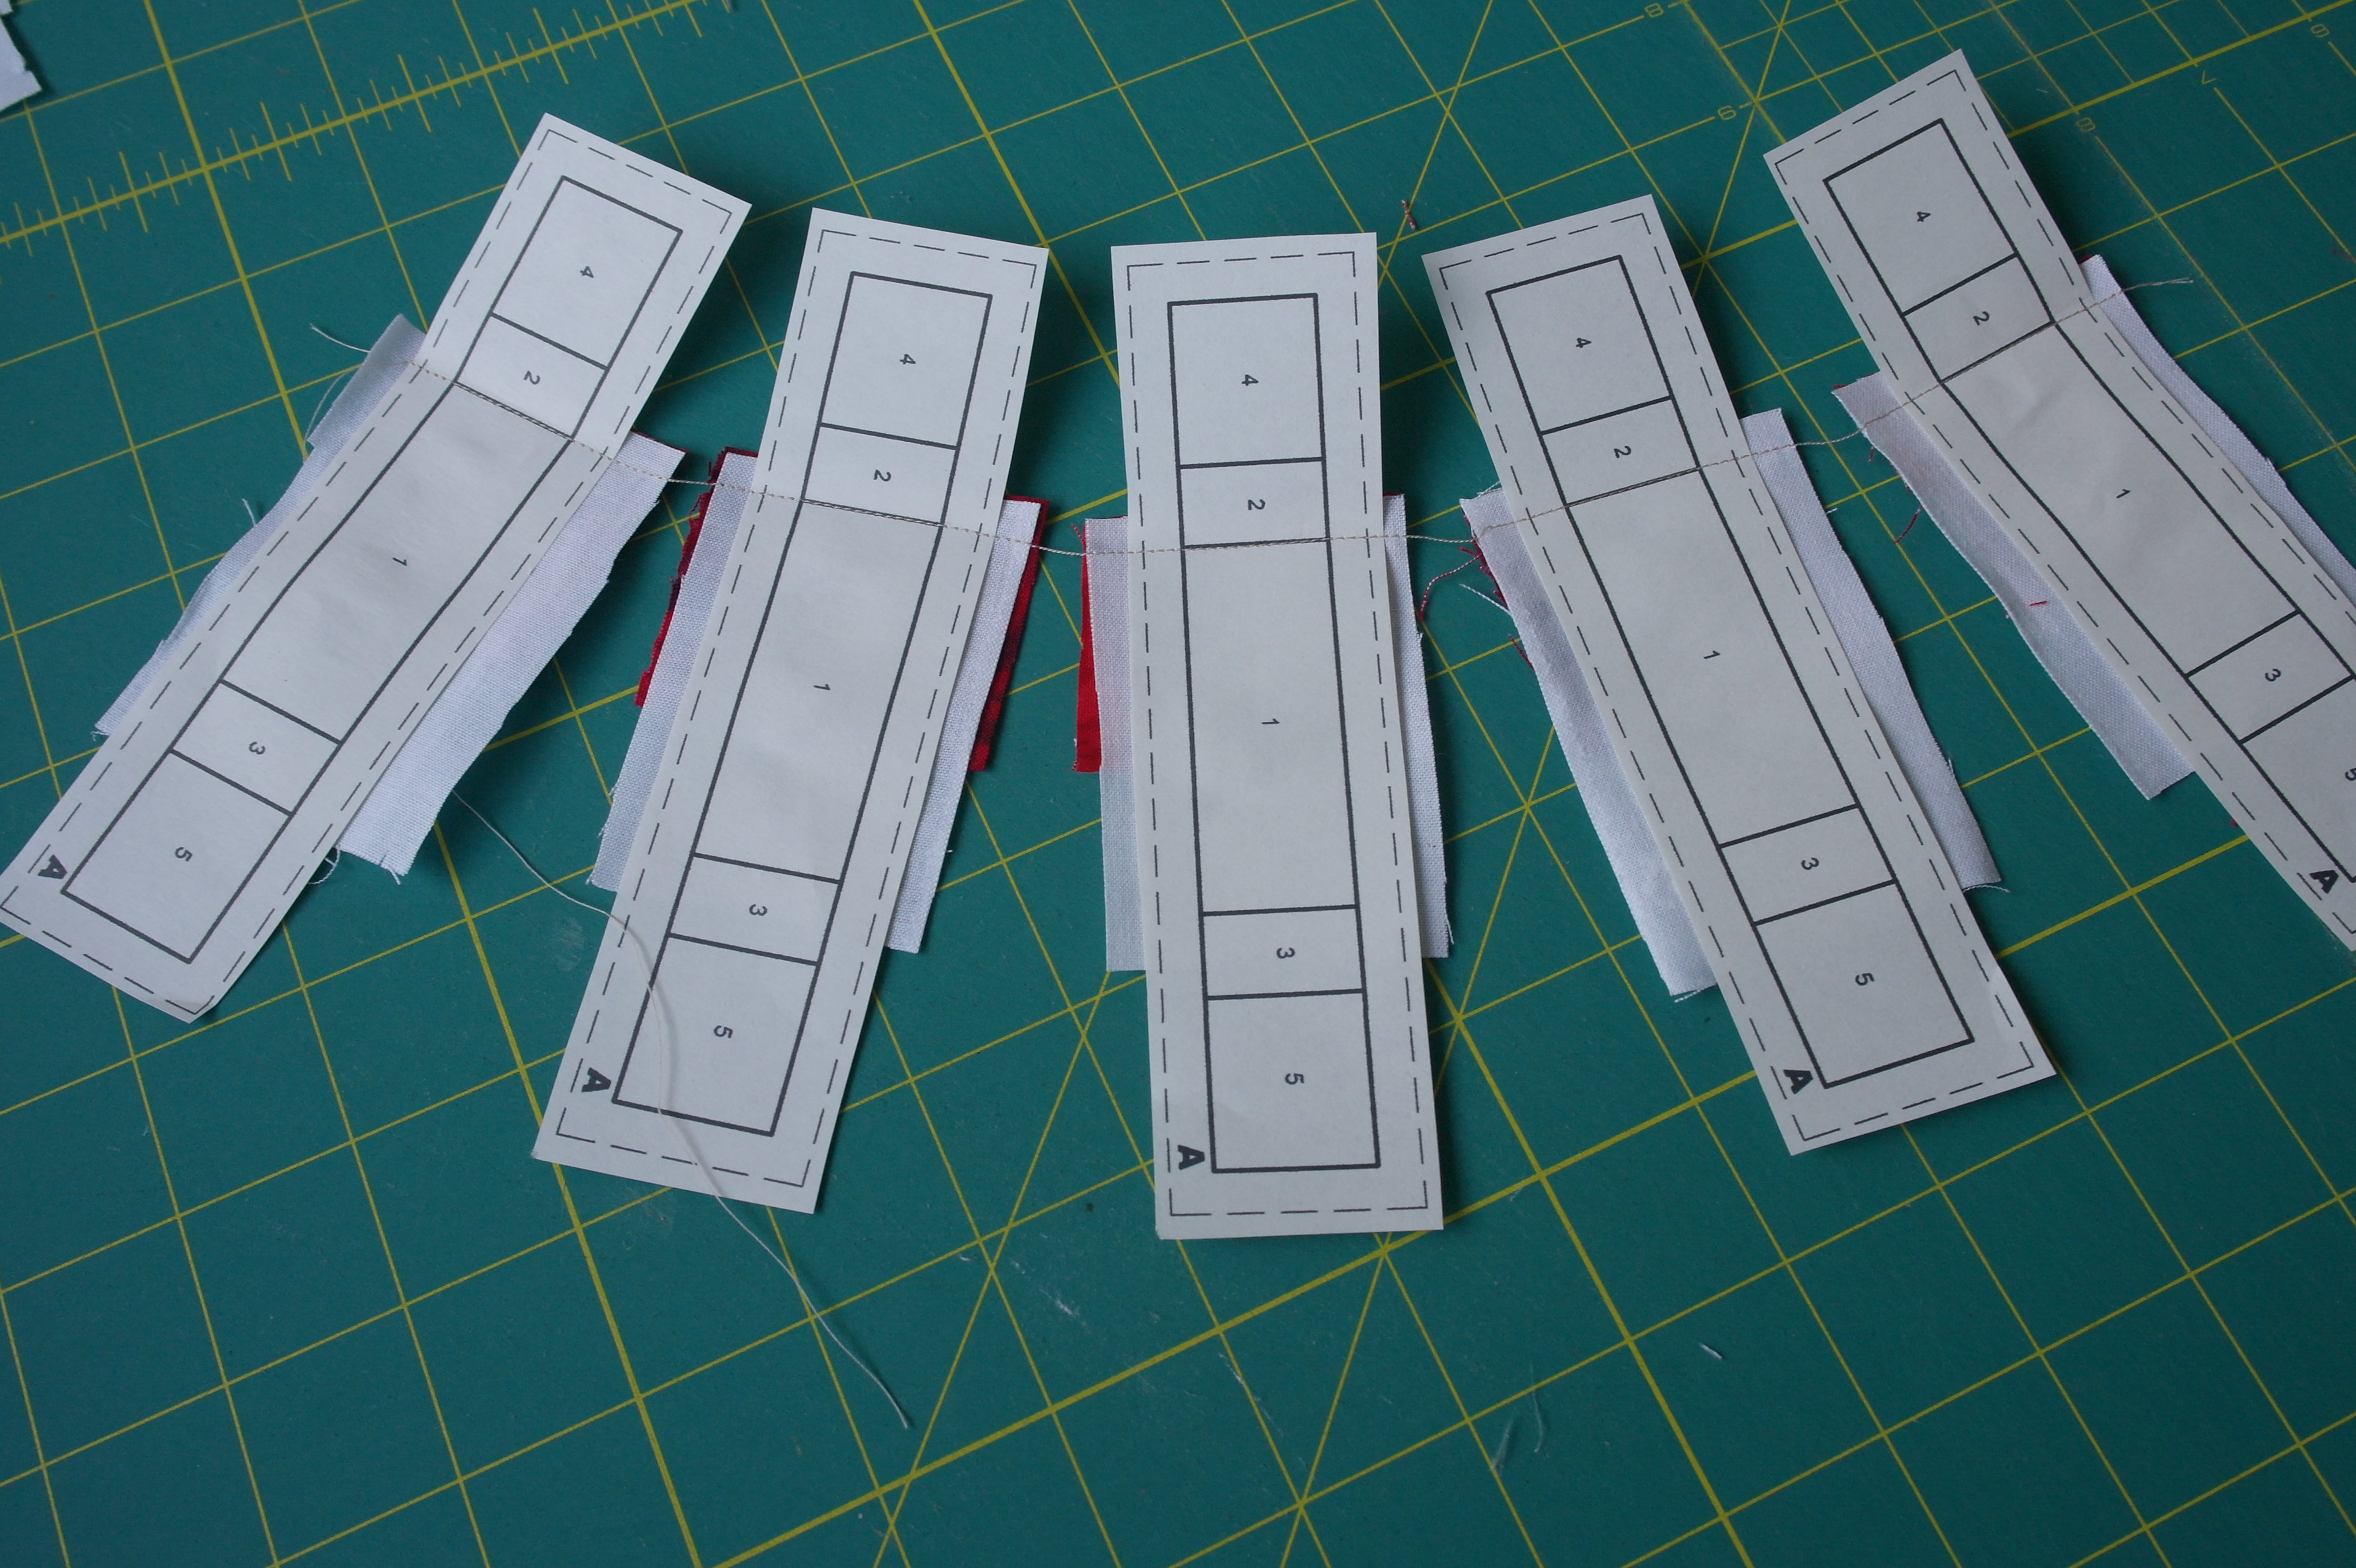
Set your stitches to ‘small’: this gives you more holes in the paper, which makes it easier to tear away afterwards. Place the fabric for section 2 (red) underneath the fabric of section 1, seam allowances together, and sew each Unit on the solid line between section 1 and 2, 2 or 3 stitches beyond the edges of the seam allowances. If you have sewn the first Unit A, place the second Unit A close to the first, and proceed sewing: this is chain piecing. Leaving a small piece of thread between the Units, you can separate them after sewing by cutting these threads.
Working with chain stitching, following the number sequence, makes it also very easy to remember what to do. When you are ready sewing, cut the Units loose, fold fabric 2 to the right side and iron it. Don’t stack the Units while ironing: the ink from printing could be transferred onto the withe fabrics! Iron them per piece, then move on to the next section.

Repeat the same method of cutting 1/4 inch seam allowances with the Add-a-Quarter ruler, folding template and Rotary Cutter, sew the next piece of fabric on the paper Unit and iron the piece to the right side. It is a simple repetition of: sewing, ironing, cutting. Again, work in numerical order to complete the Unit.

After completion, cut the Unit A back by cutting on the solid lines = edges seam allowances. Leave the paper behind the Units until later.
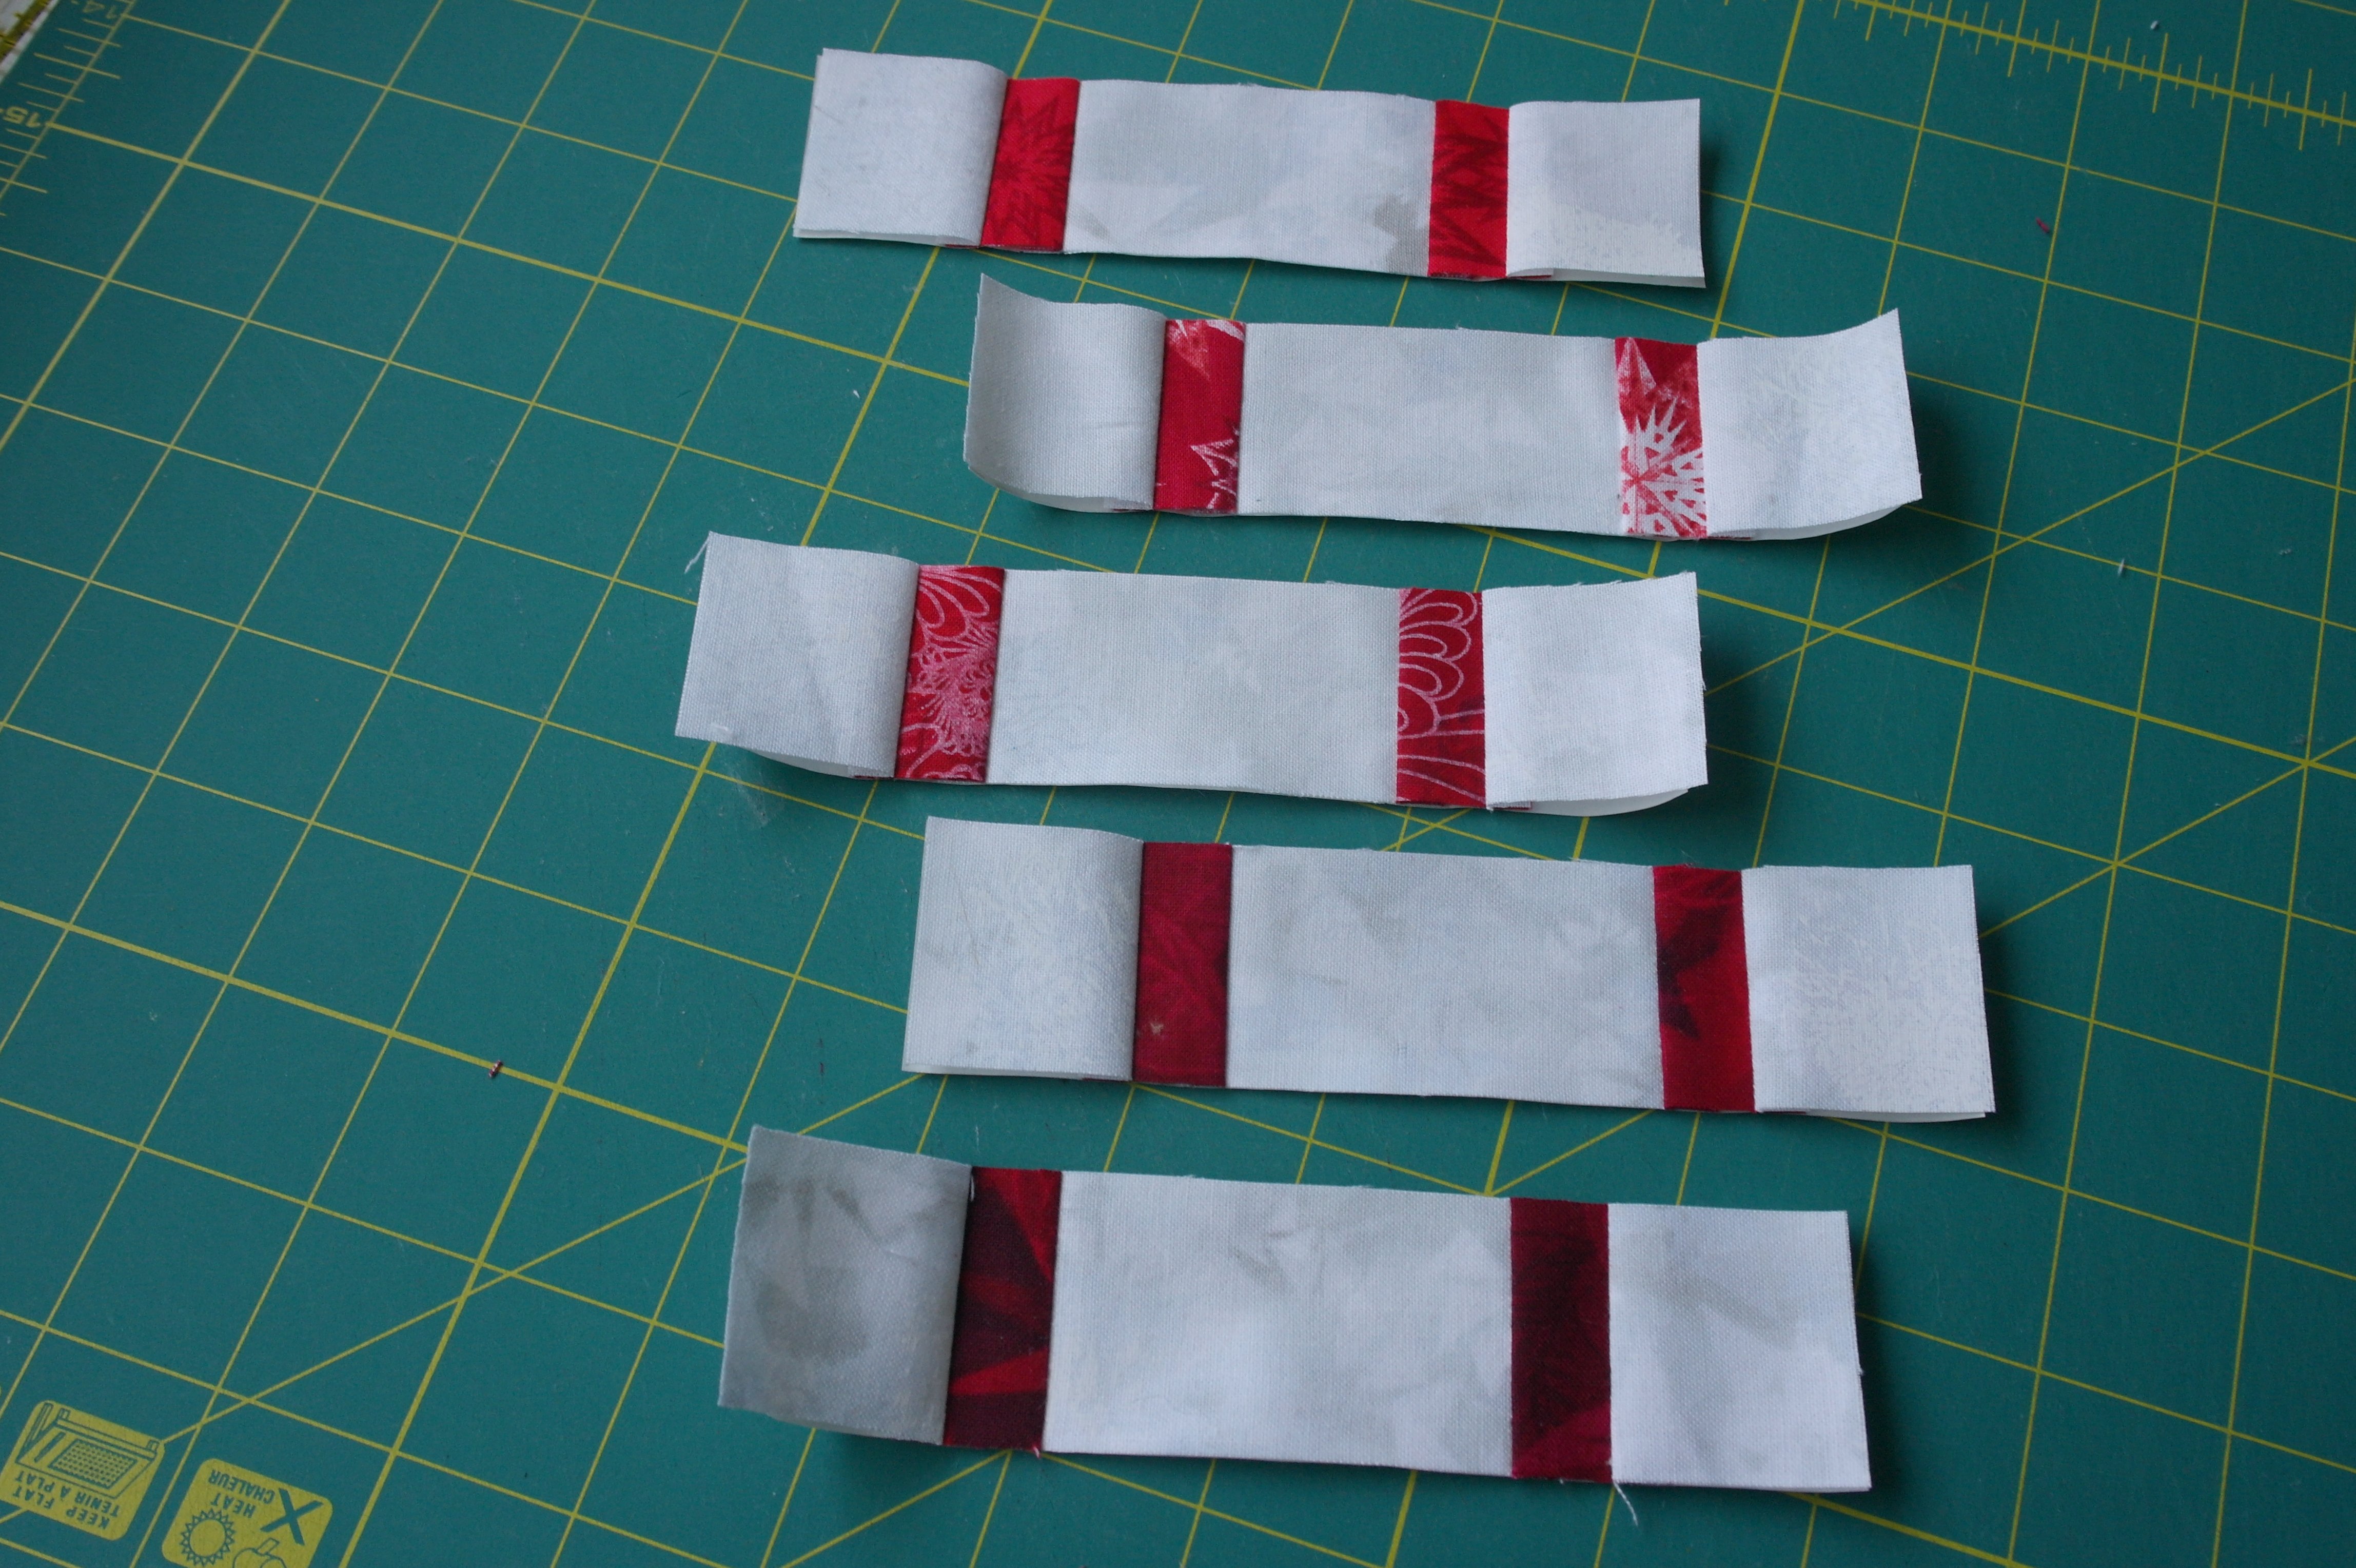
This are the 5 Units A: neatly cut. I have used different reds for the chimneys, but the same per Unit A. It is all up to you what prints you are using.
The next Units = B,C and D
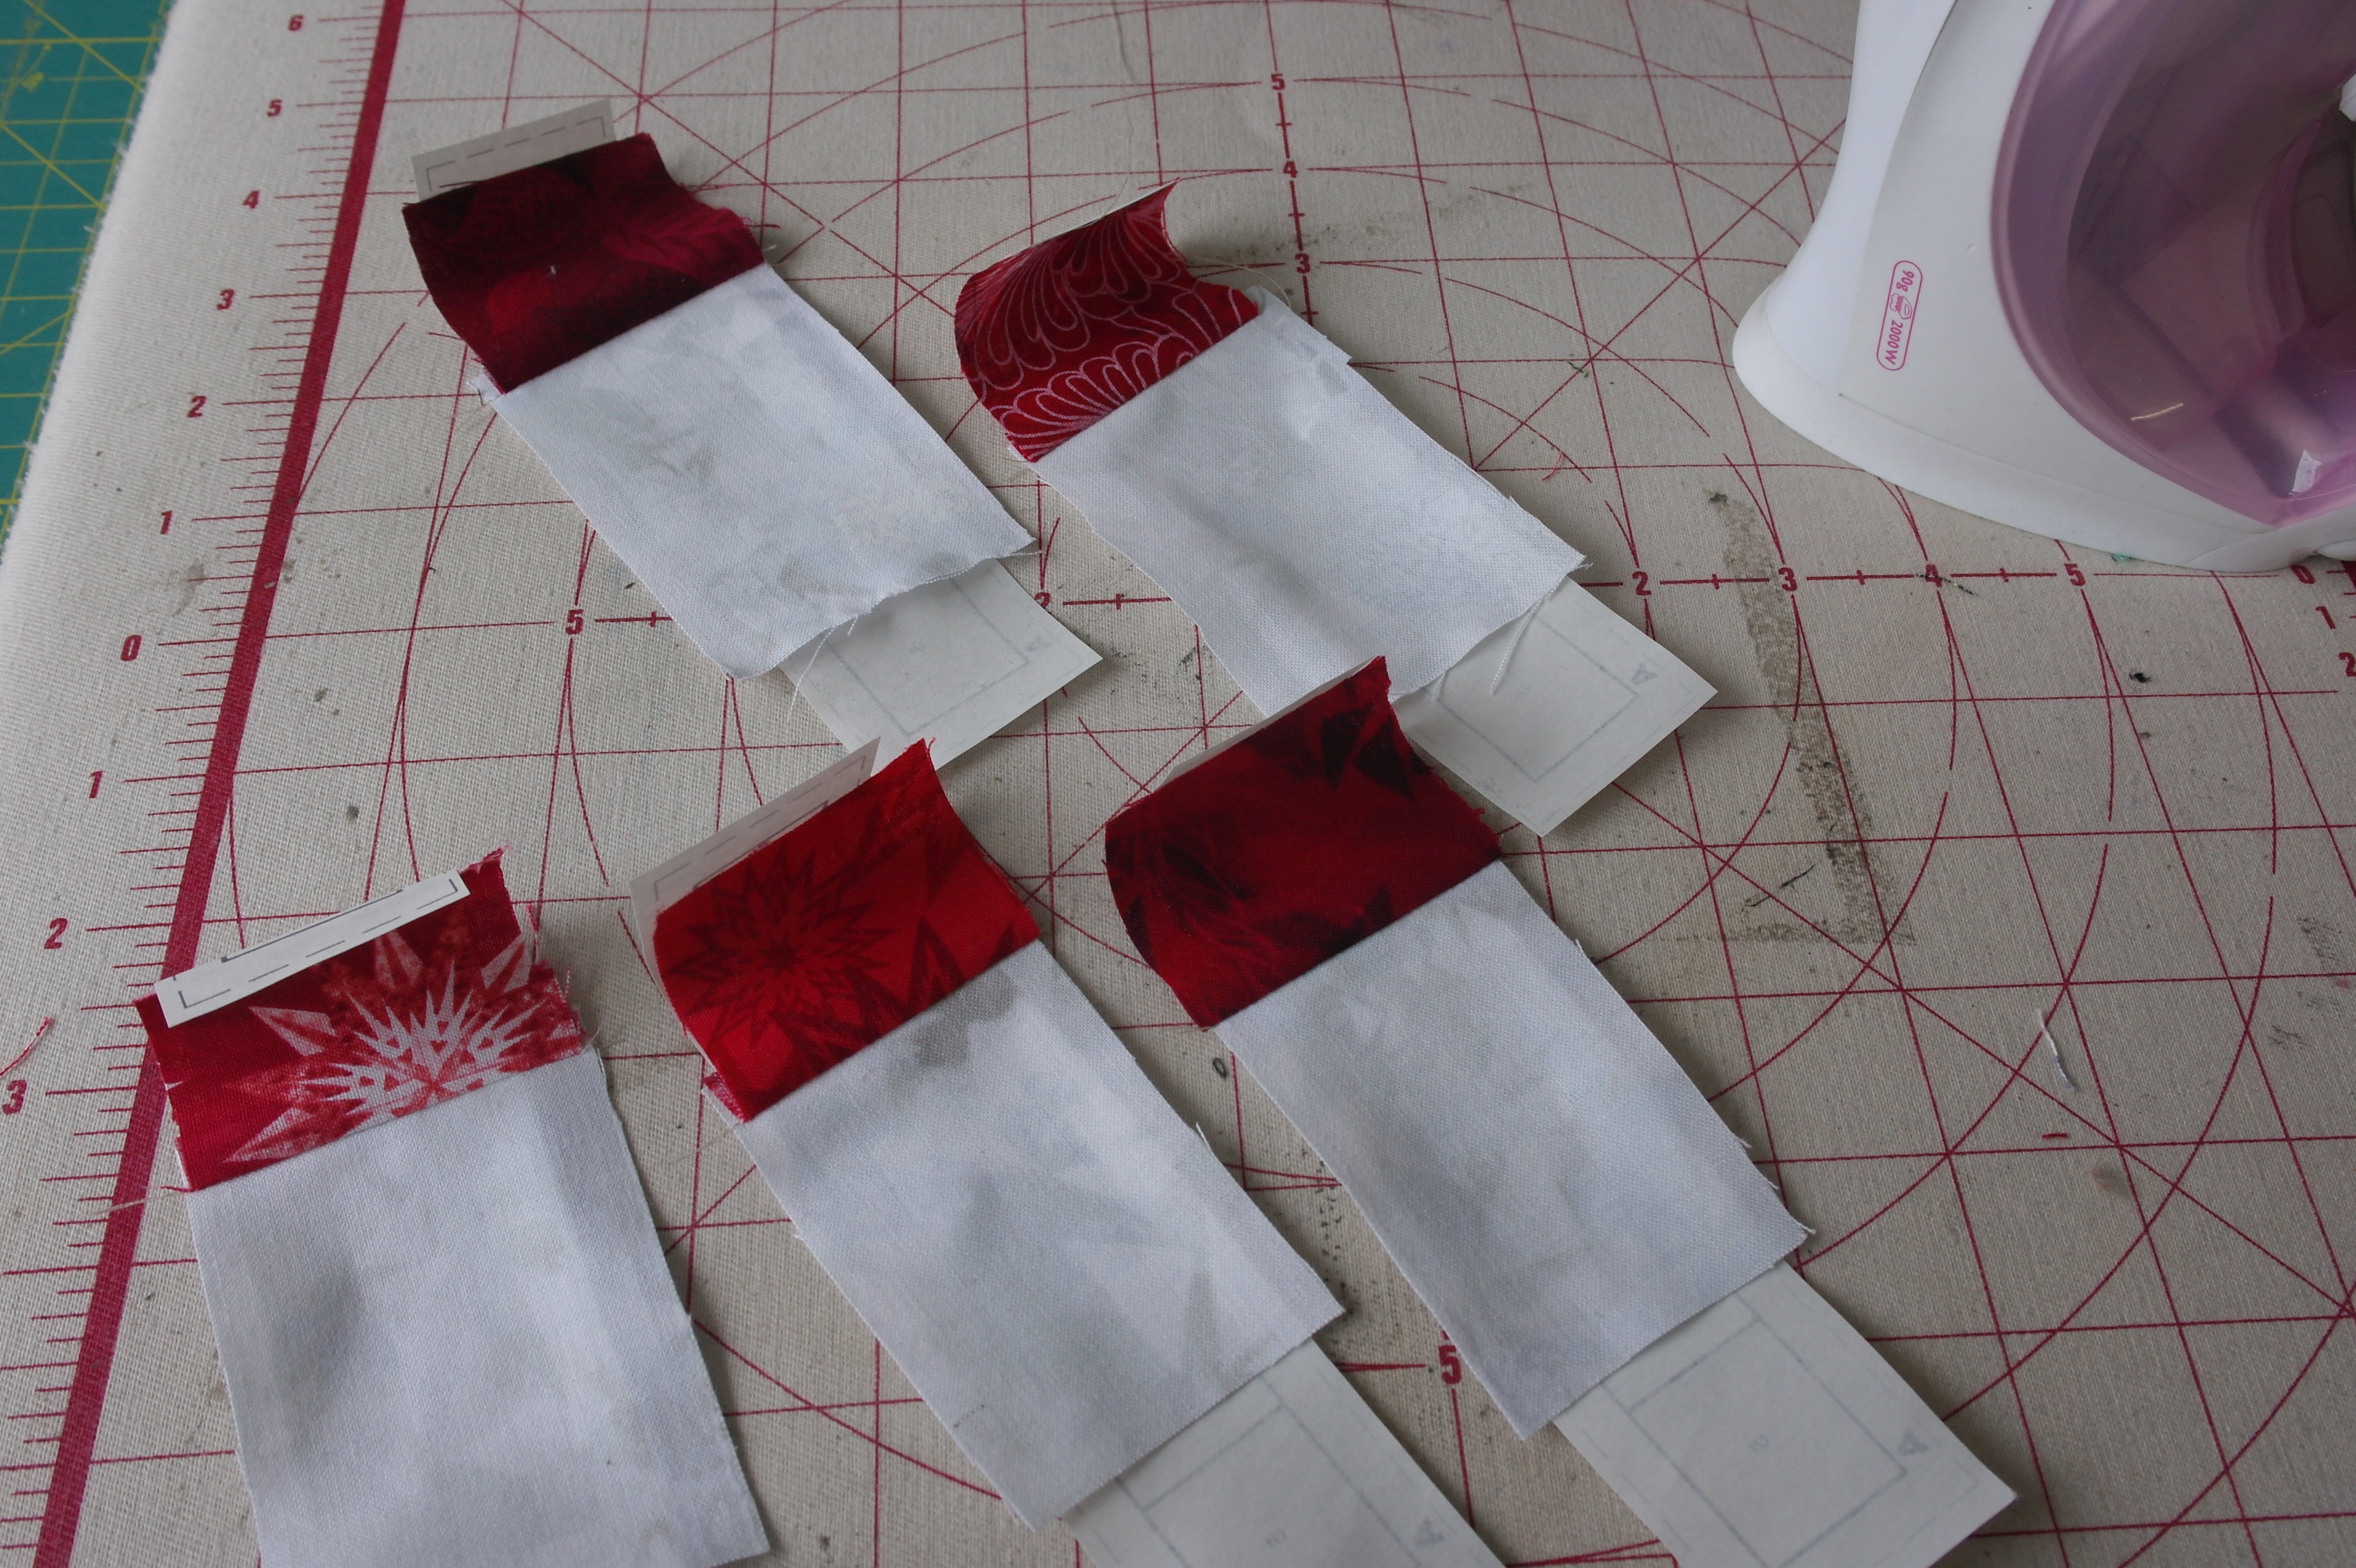
Make the other Units the same way: always glue the first fabric onto section nr. 1, cut the seam allowances back to 1/4 inch, sew 2nd fabric onto the sewing line, fold that fabric back, iron it in place and move on to the next.

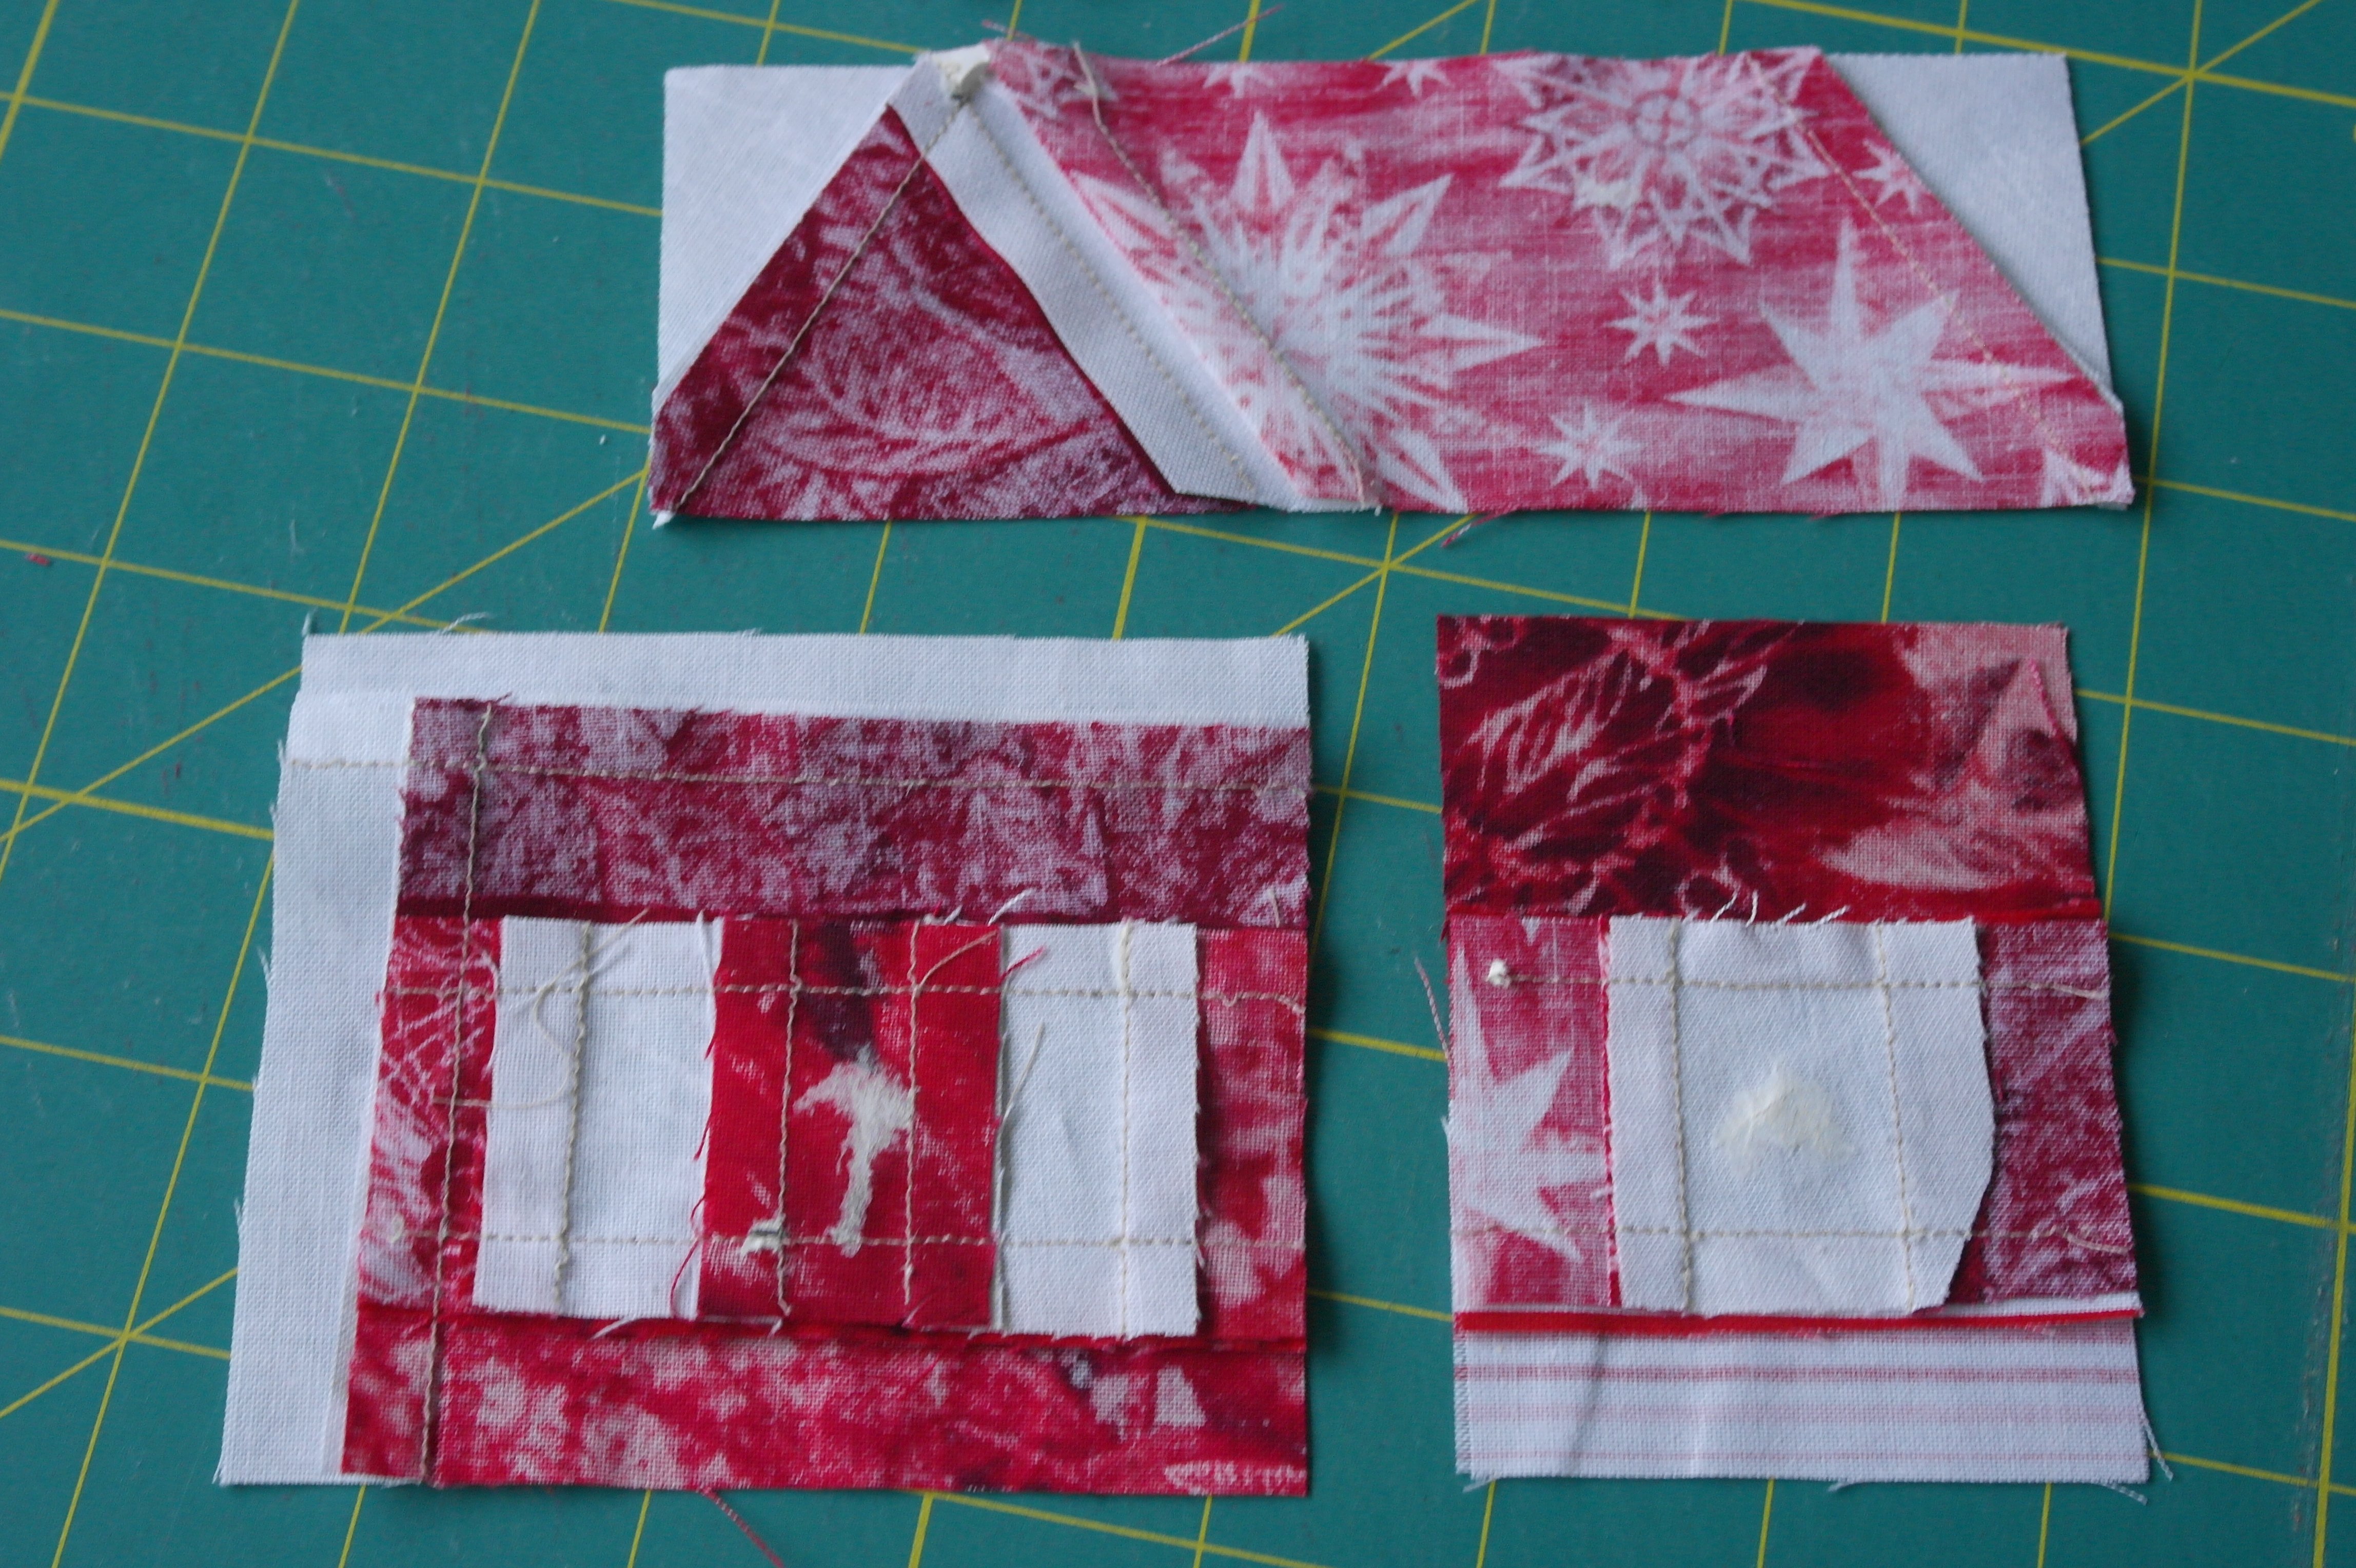
Use a rectangular piece of fabric + seam allowance for section 1, 2 and 3/Unit B, and a square piece of fabric + seam allowance for section 4. Be sure to cut them large enough to cover all seam allowances needed, even after the fabrics are folded to the right side after sewing: the picture above shows the white fabric folded back after sewing it onto the Unit: it was cut large enough to cover the section + seam allowances! Again, cut paper templates per section if you think that works for you.
BE AWARE that a couple of sewing lines are diagonally placed on the Units: that means you will have to cut fabrics much longer than ‘normal’, because they still need to protrude the Units, after folding them back when they are sewn on. The white strip for section 3 with Unit B is much larger and will be ok, after folding it back. If you cut these fabric pieces too short, you will have to rip your sewing and start over.
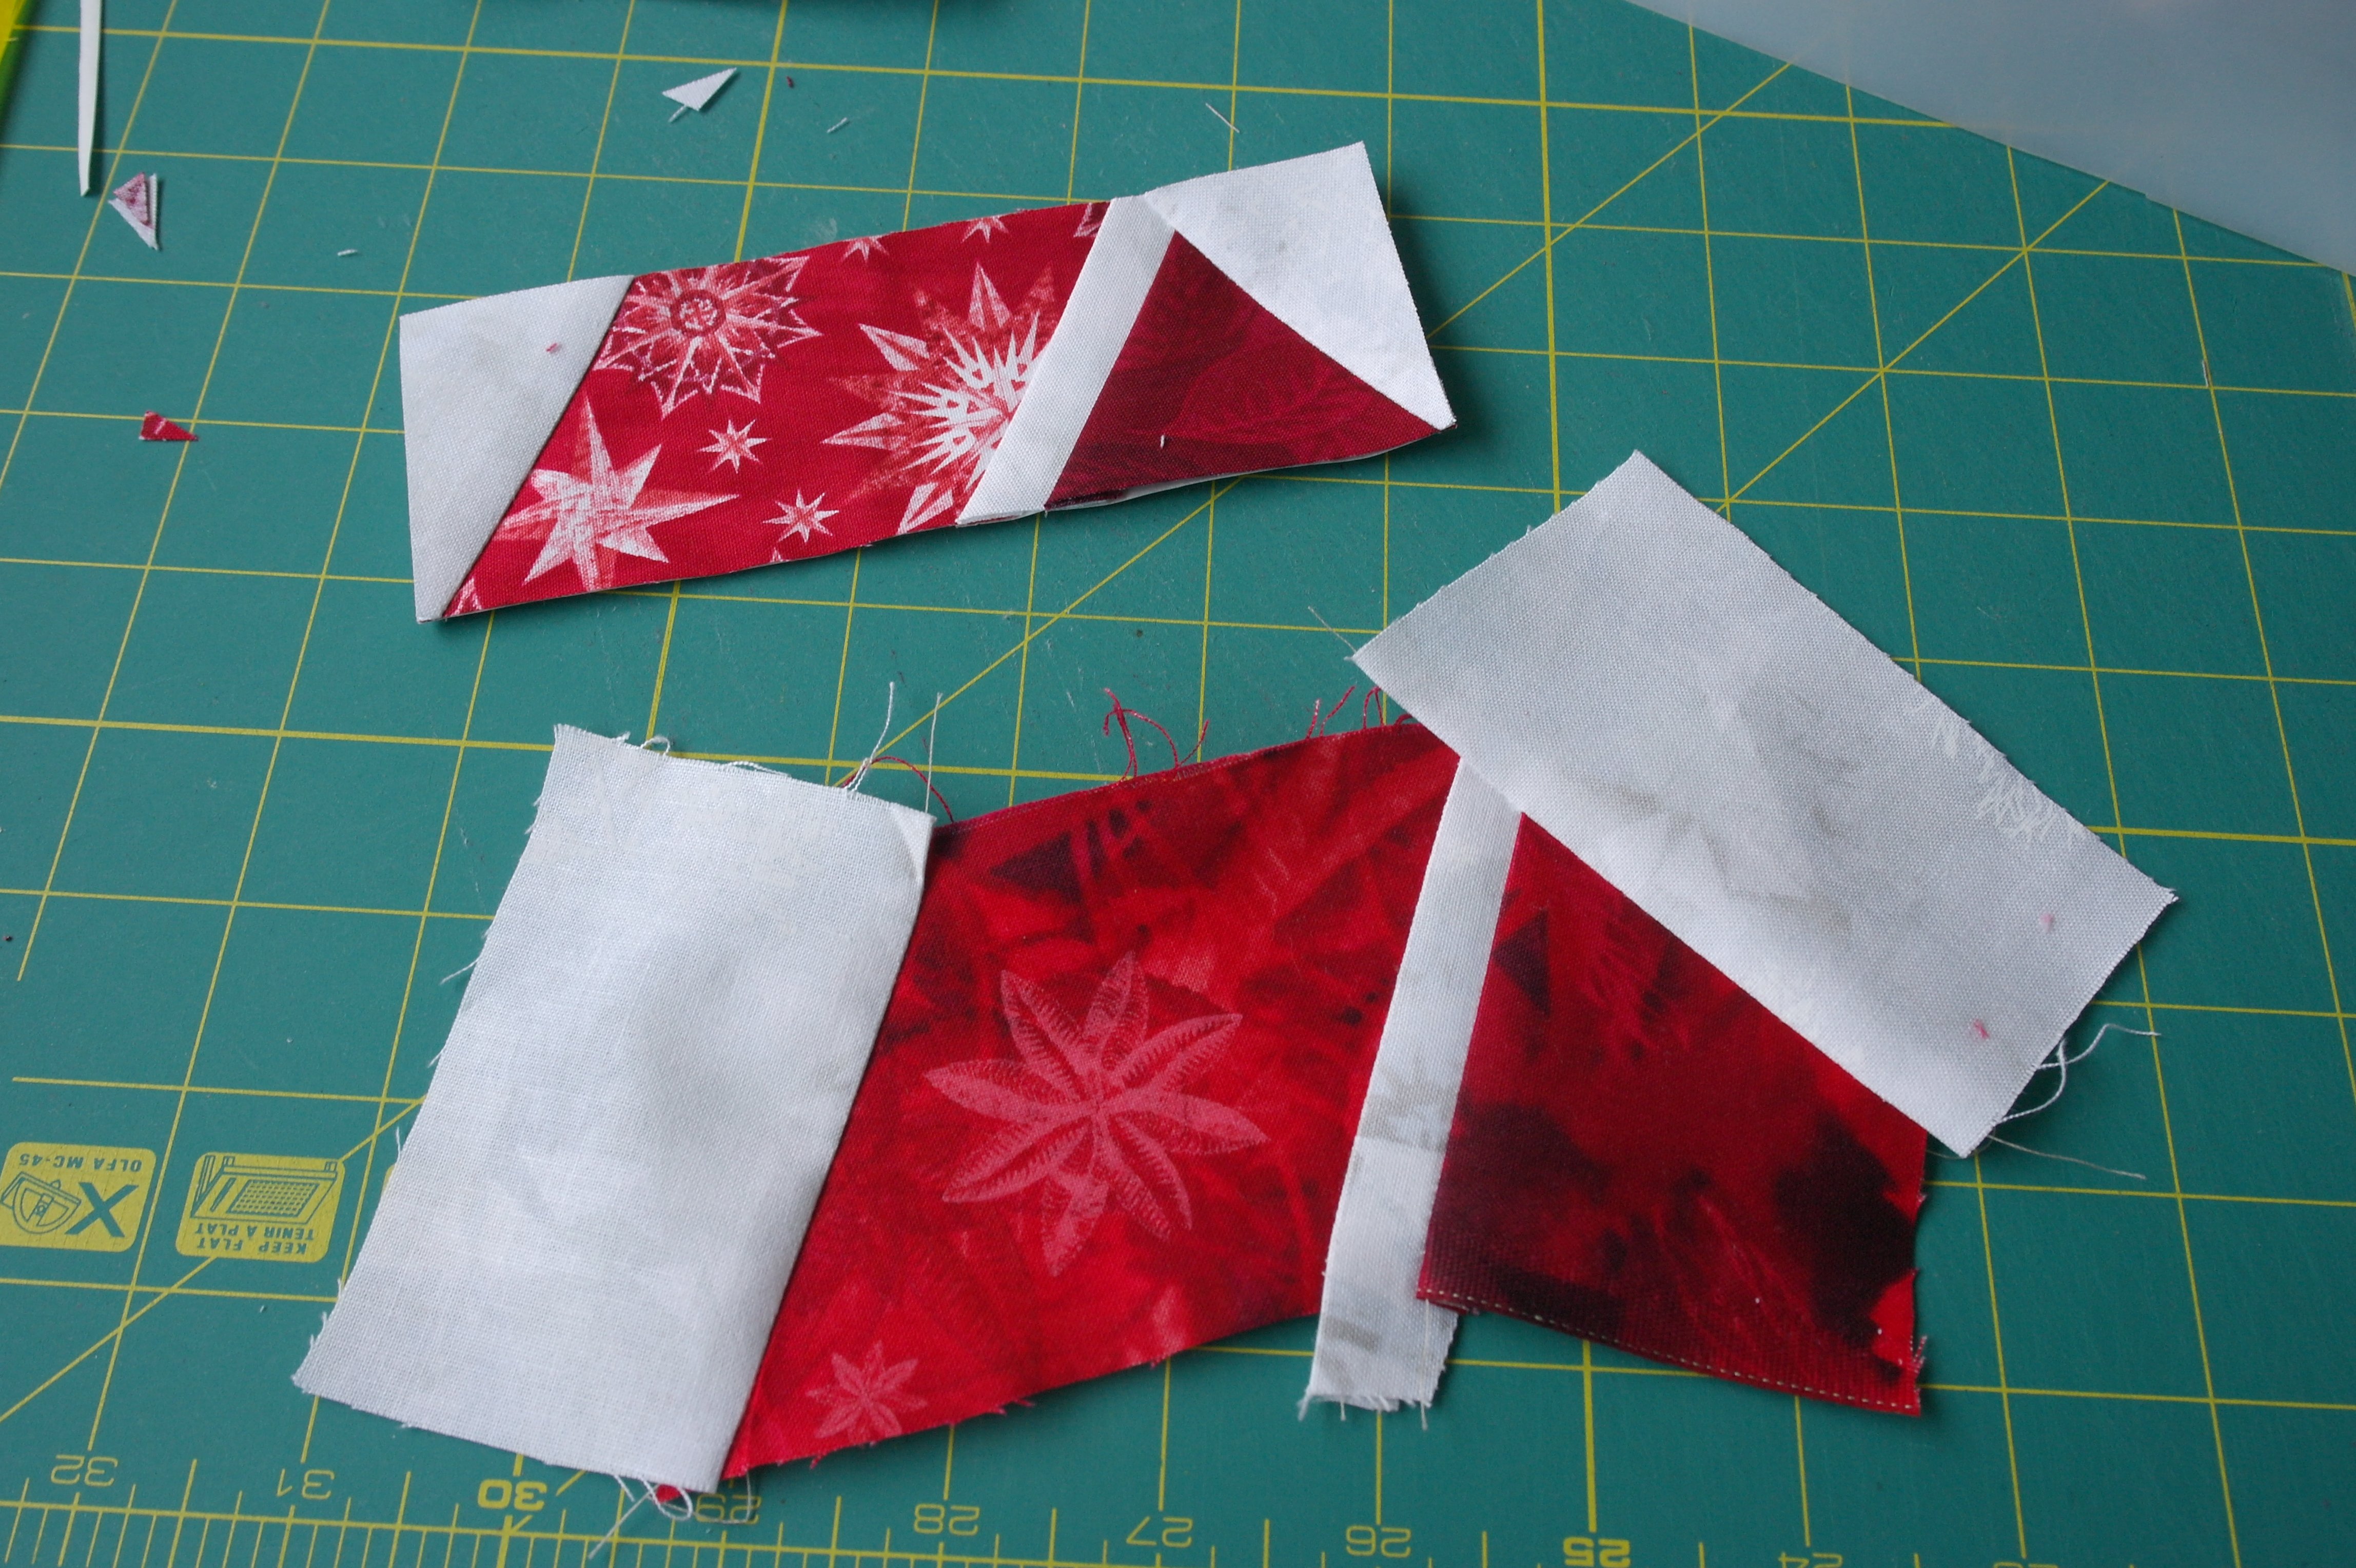
Unit B is ready: uncut and cut. Make sure fabrics are protruding at all sides, beyond the dotted line = edge of the seam allowance of the Unit.

Here you can see how I’ve started sewing way beyond the solid lines and ended that way also: remember there is a seam allowance around each section, so start and finish at least 1/4 inch + extra when sewing in the middle of a Unit C. This makes sure the seam allowances are secured too.
If there are multiple sewing lines perpendicular to the new sewing line, just first fold the paper INCLUDING fabric over the folding template, then (only then) gently pull the fabric away from the fold, before cutting the 1/4 inch seam allowance via the Add-a-Quarter ruler. Be careful NOT to tear the paper Unit.

Unit C complete: the right is uncut and the left is cut. I have used a red/white stripe for all sections 4 with the 5 Unit C’s, just for fun.

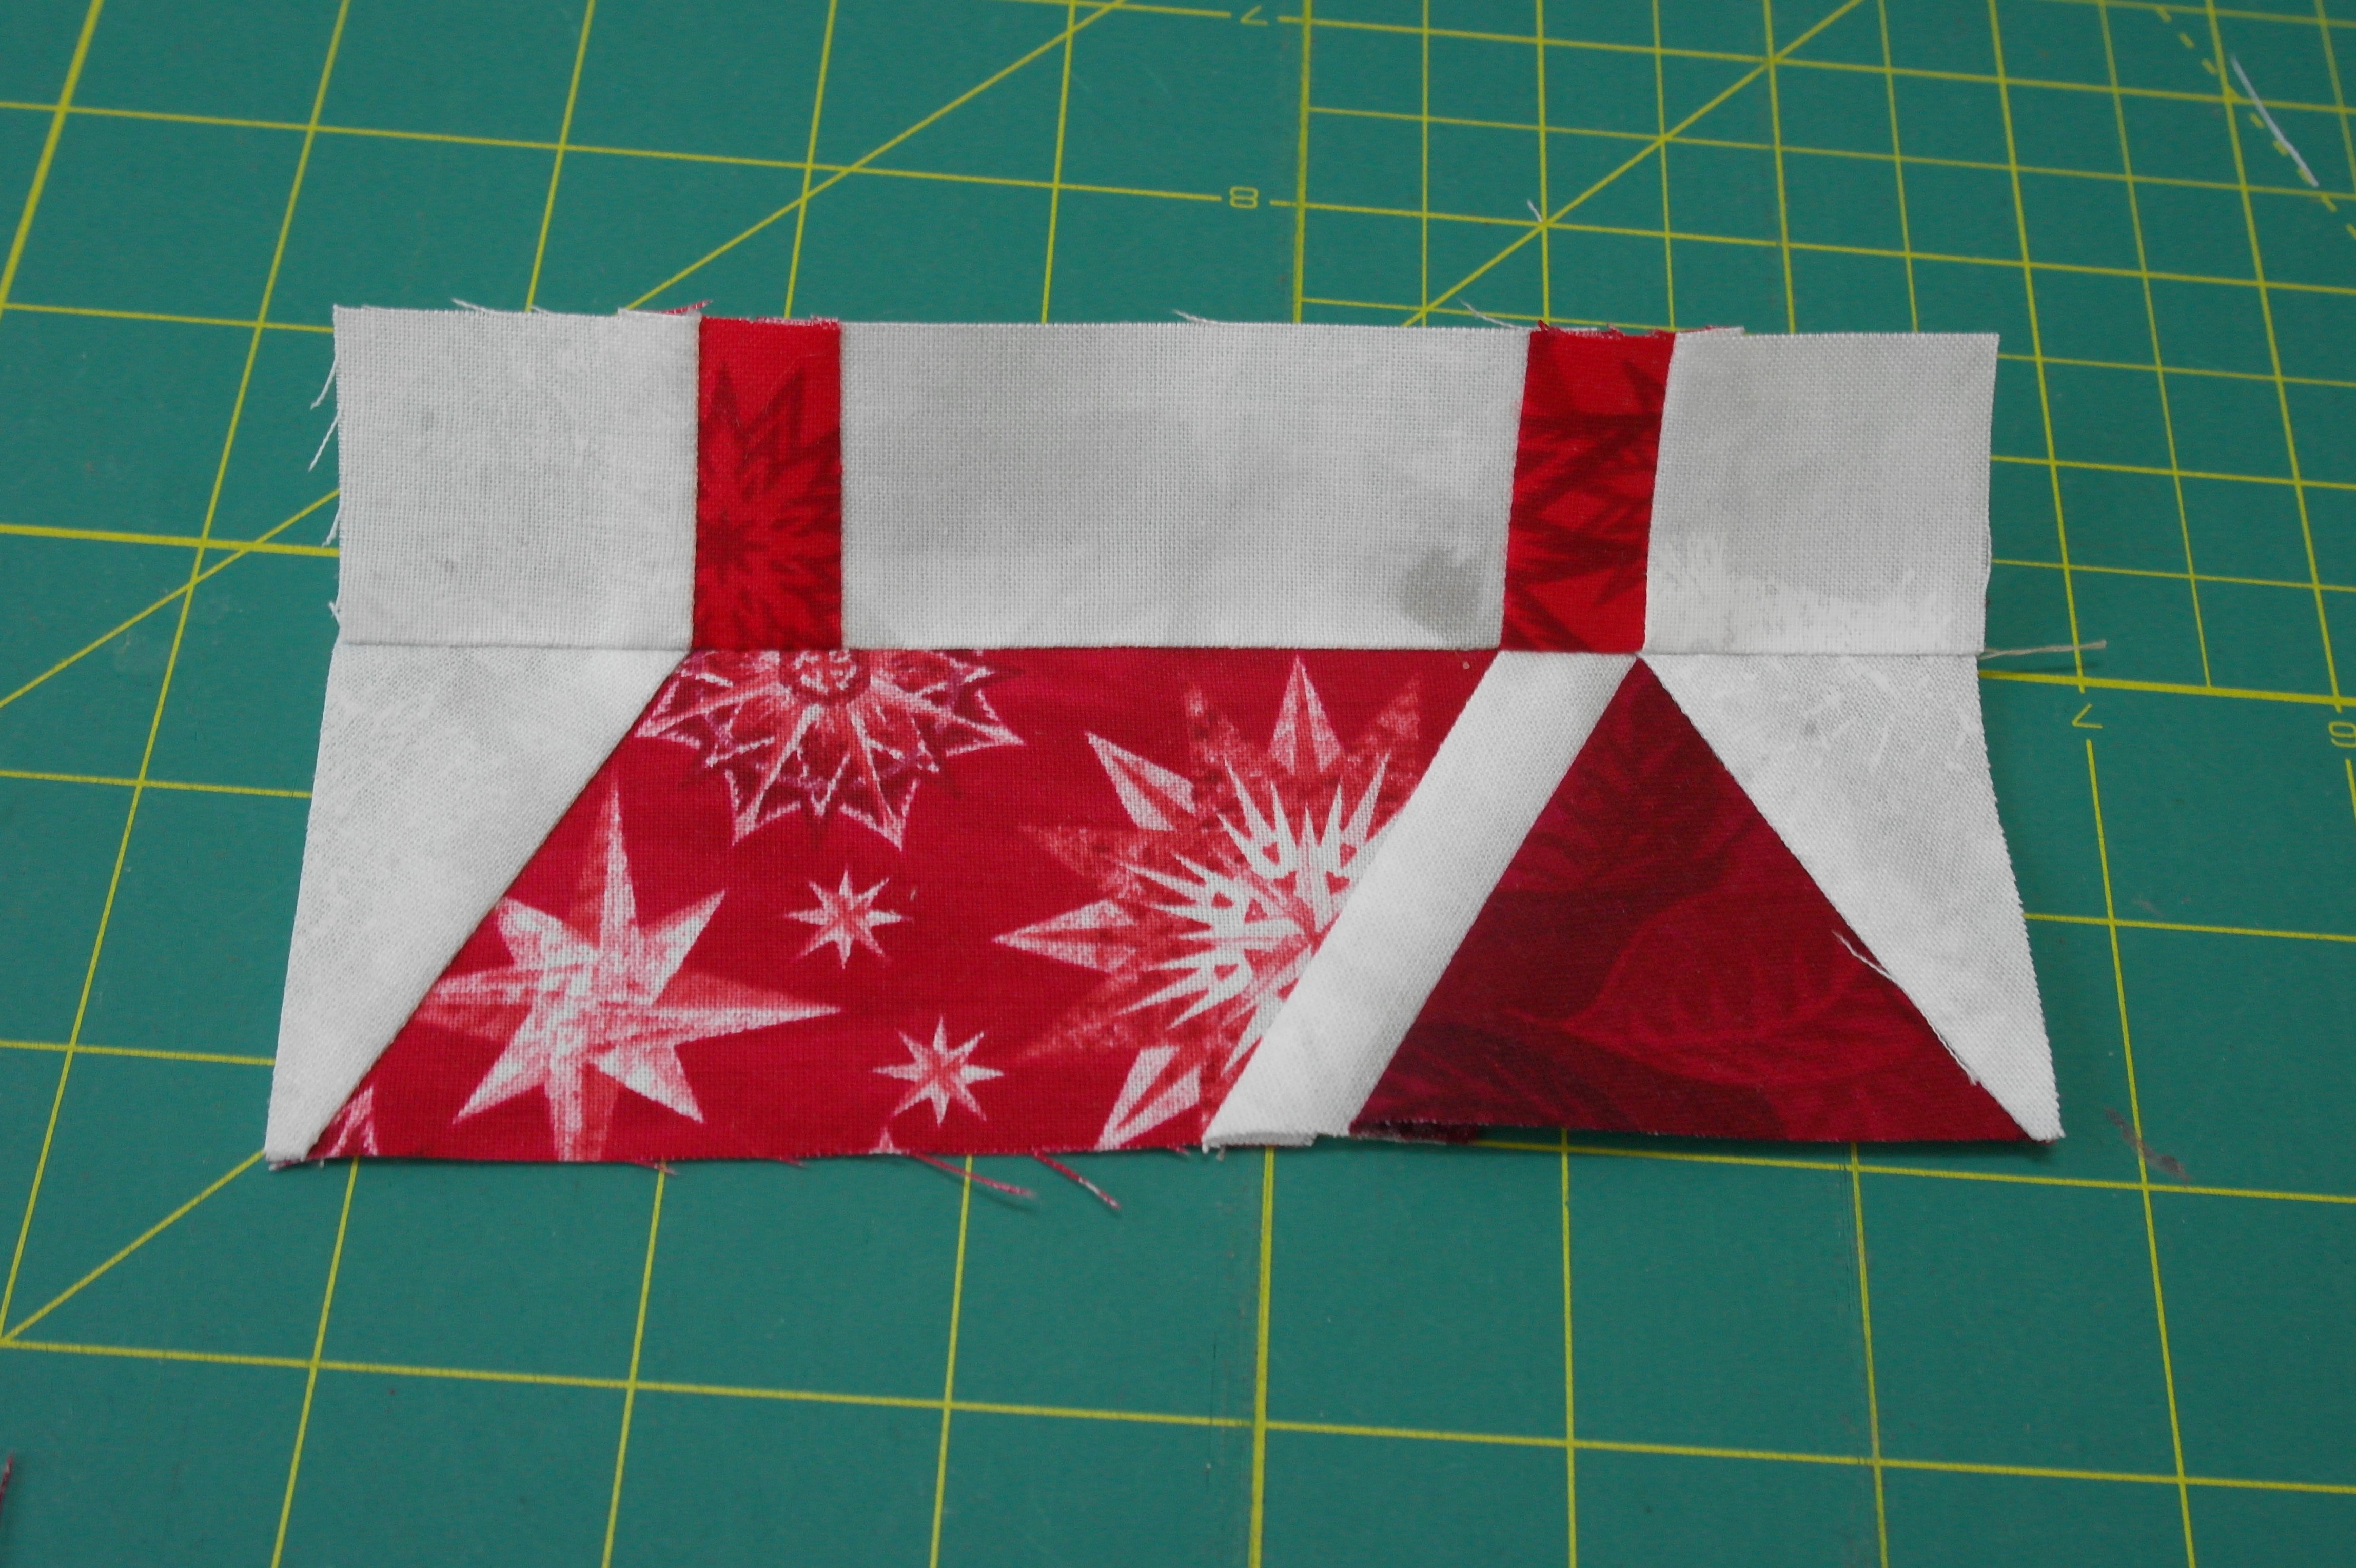
And Unit D: the right is uncut and the left is cut.
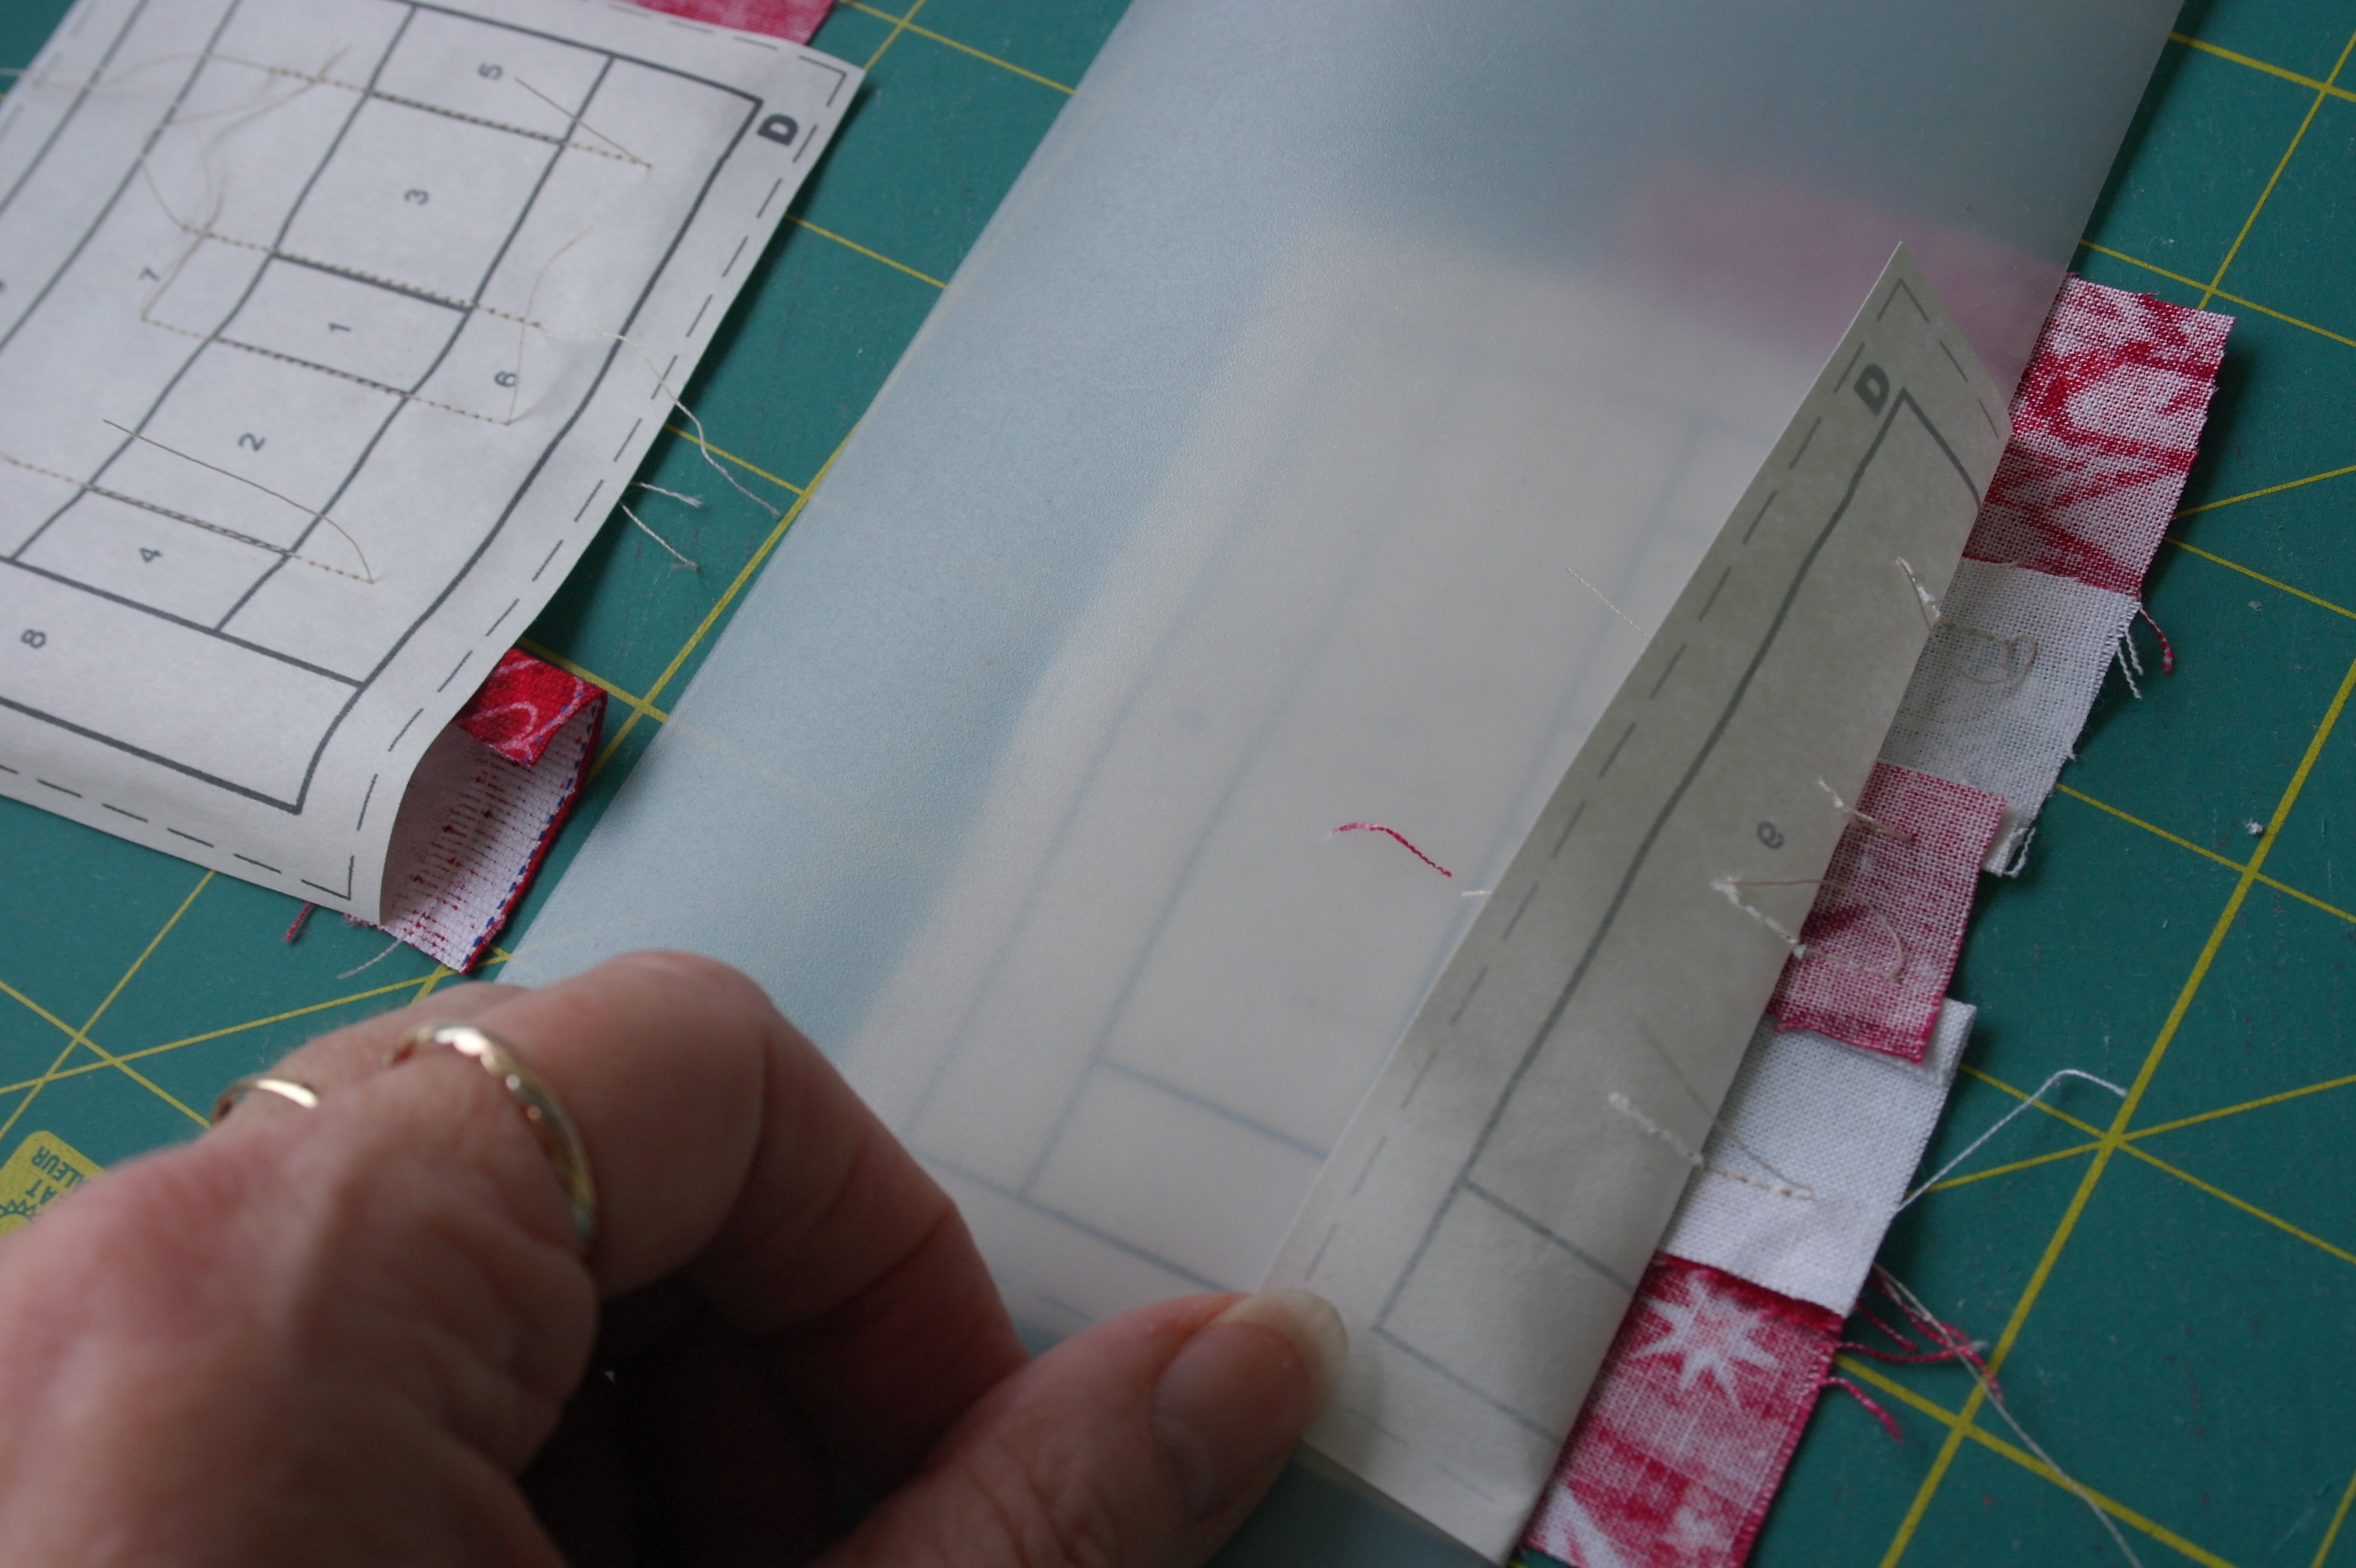
After completing 5 of each Unit A, B, C and D, and cutting them on the dotted lines = edge of the Units, remove the papers behind the Units. The best way is to do this in reversed order: start with the last paper section, and work your way towards the first with each Unit. Be careful not to loosen the stitches at the edges.
The back of your houses will look like this: sometimes a residue of the glue used for sections 1 is still remaining. Don’t worry: this will dissapear into the sandwich.
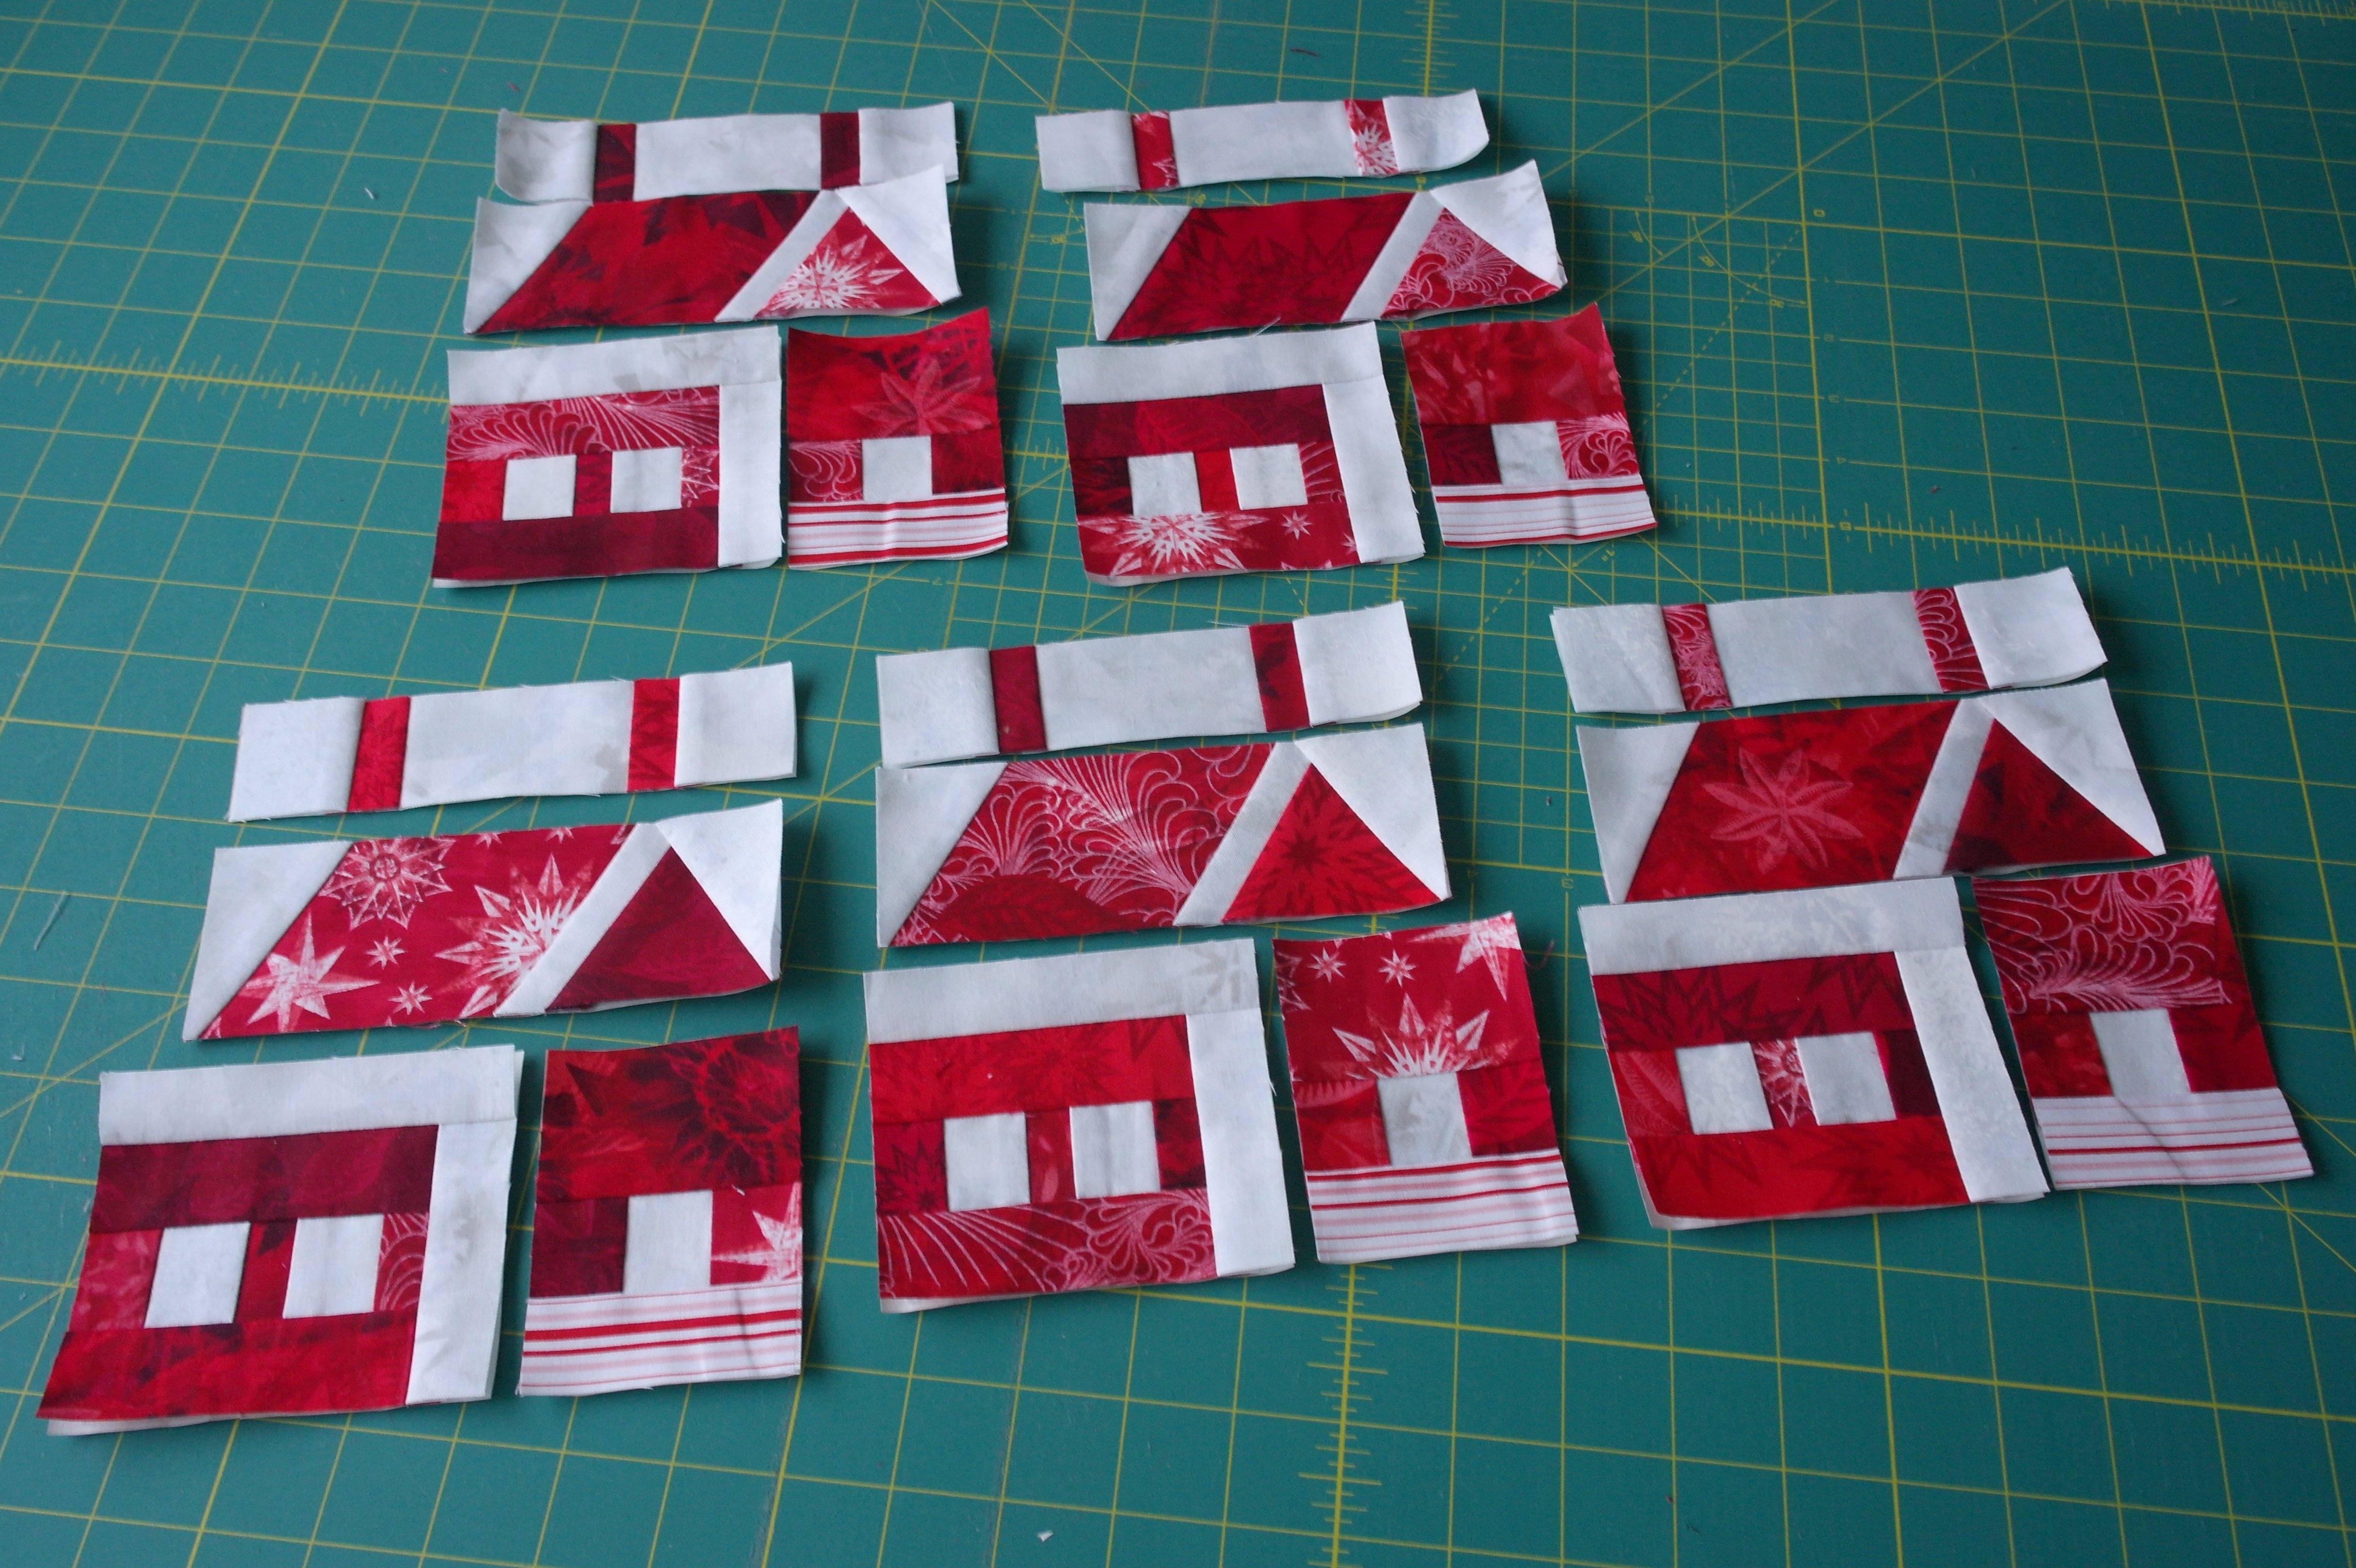
All 5 houses are ready for assembly. I’ve mixed the red prints, to make different houses.
Now let’s build the houses!
You will need the 1/4 inch Presser Foot with your machine, to be sure you are sewing with 1/4 inch seam allowances.
To prevent shifting, I have used a Bohin Glue Pen – placed small dots of glue ON the seam allowance (it won’t touch the sewing line). There are no pins needed this way. Also place dots underneath seams, so they will lie flat when sewing over them.
Sew Unit A on top of Unit B. Iron seam towards Unit A.

Sew Unit C to the right of Unit D. Iron seam towards Unit C.

Sew Units A/B on top of Units C/D to complete the hous(es). Iron last seam towards Unit B.
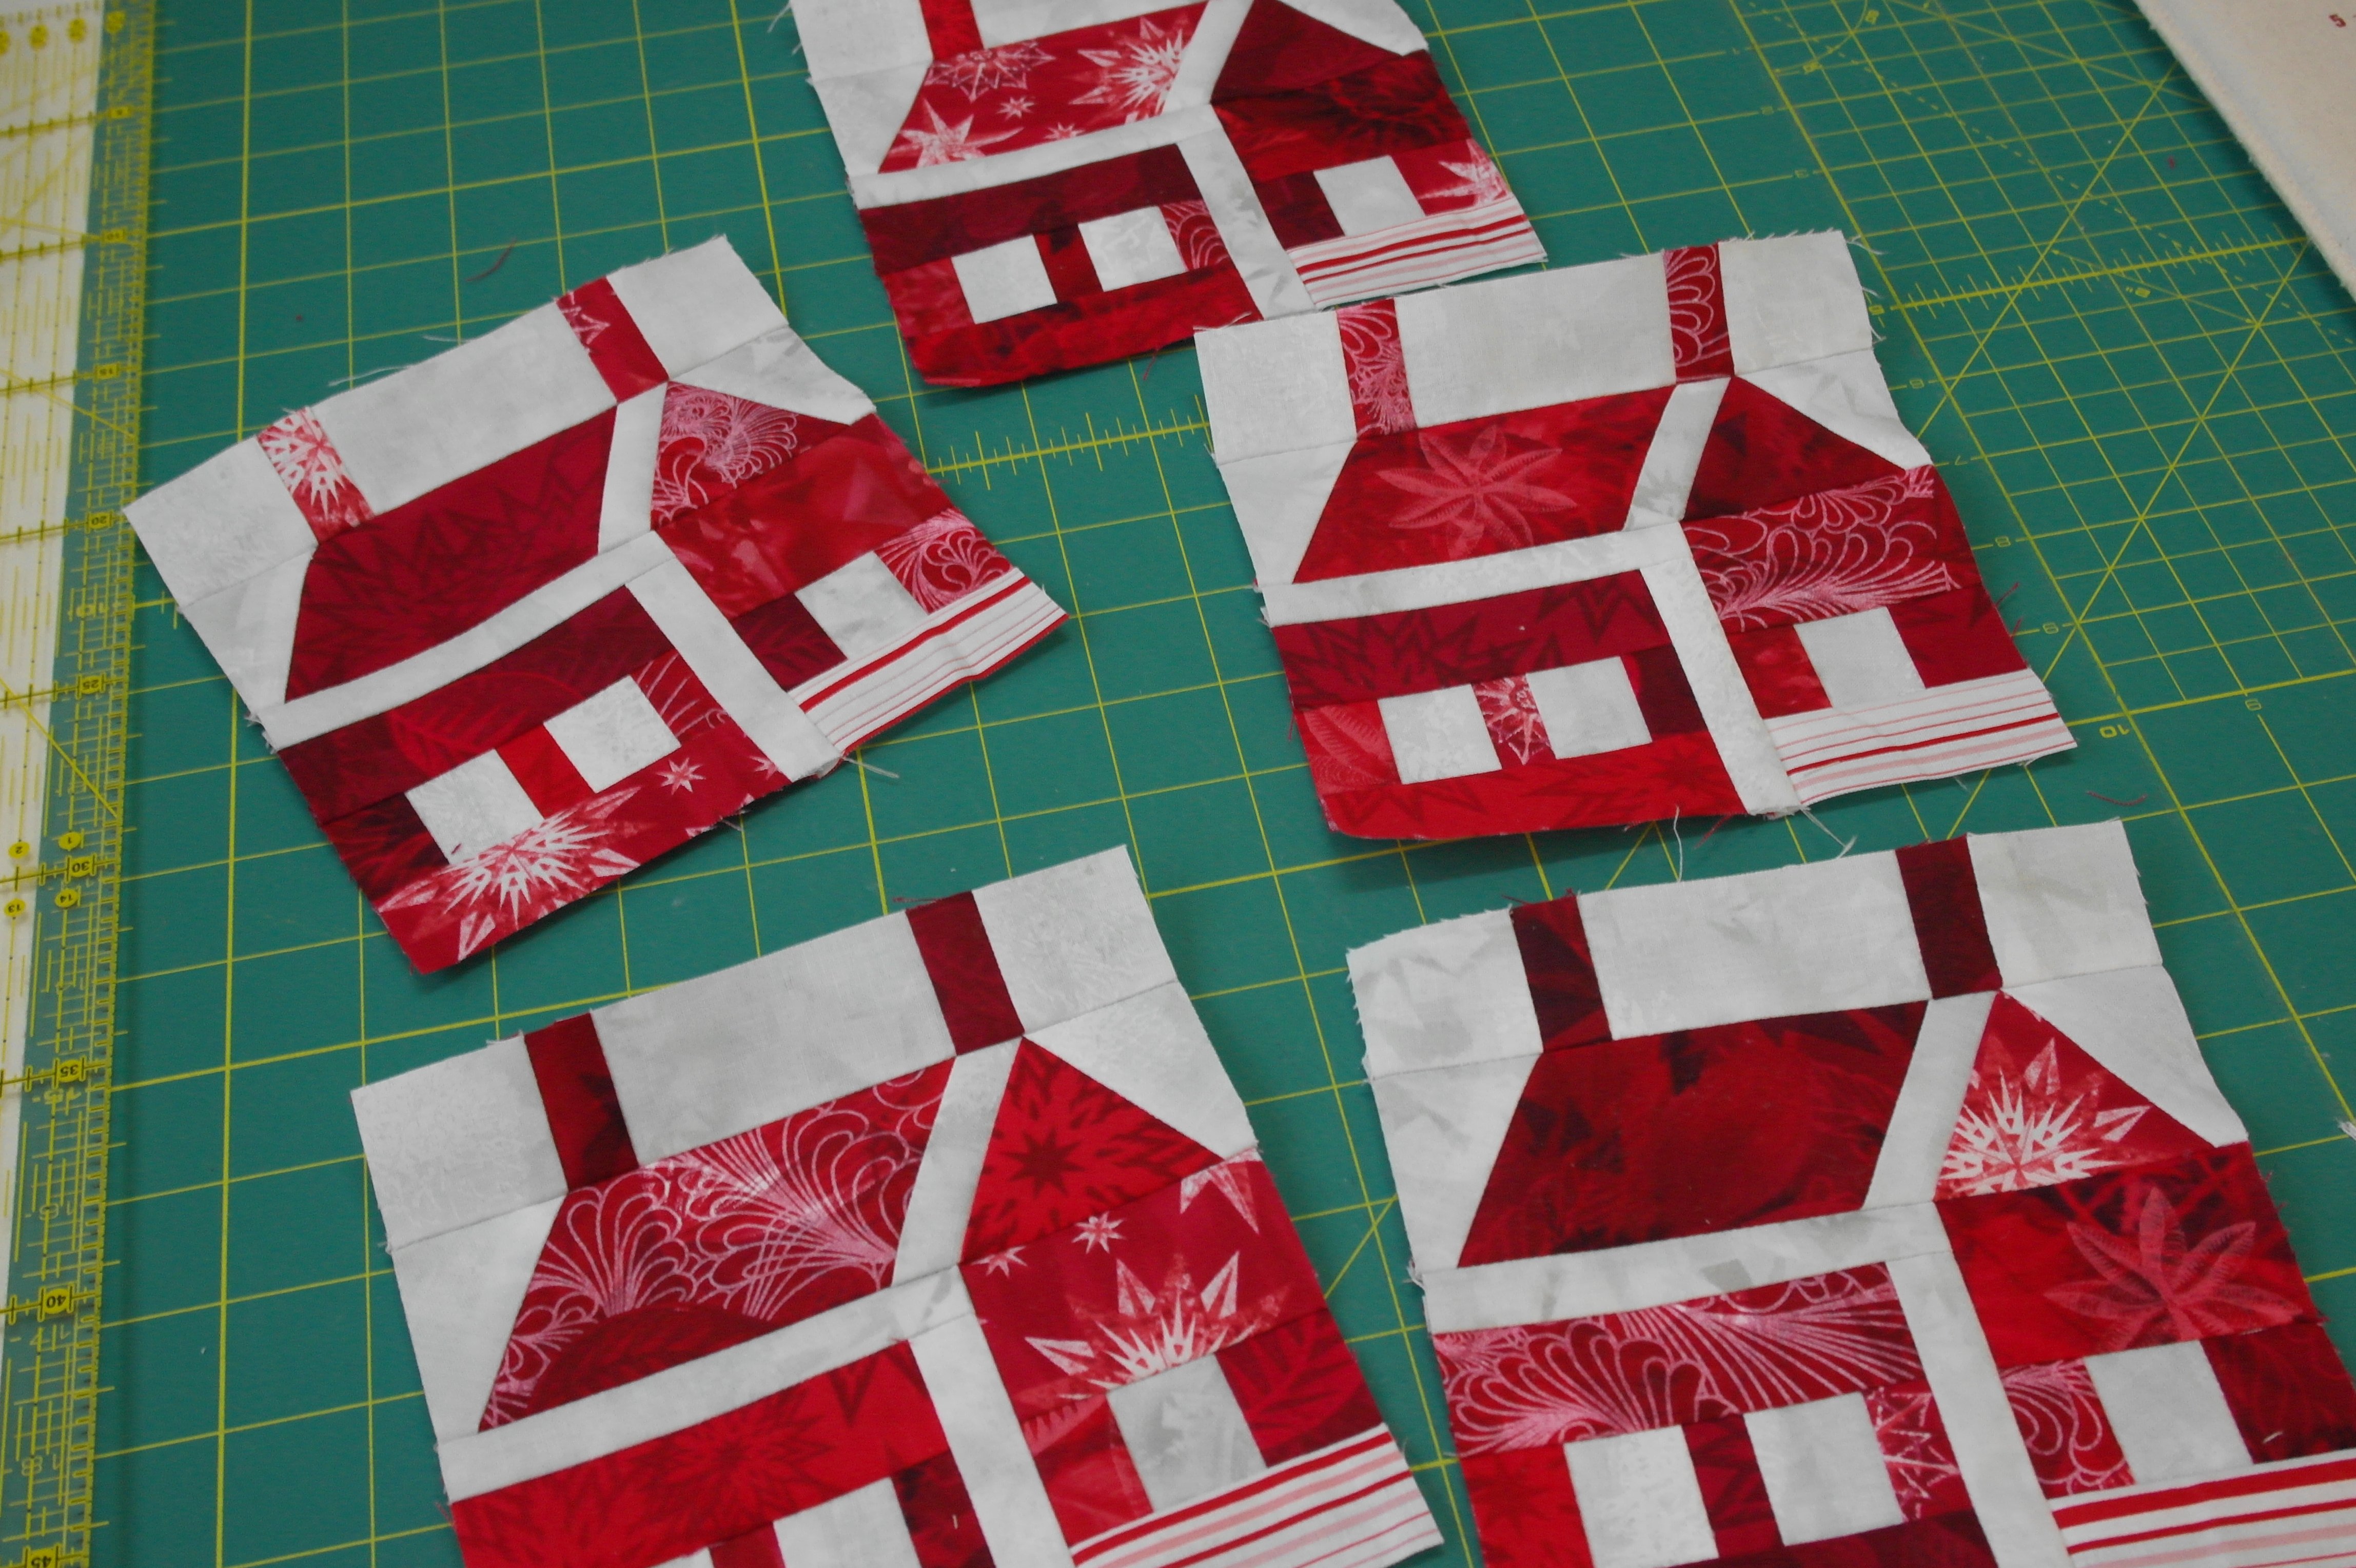
Well, aren’t they cute? 5 Houses via paper piecing: I would LOVE to make a quilt with lots of houses….

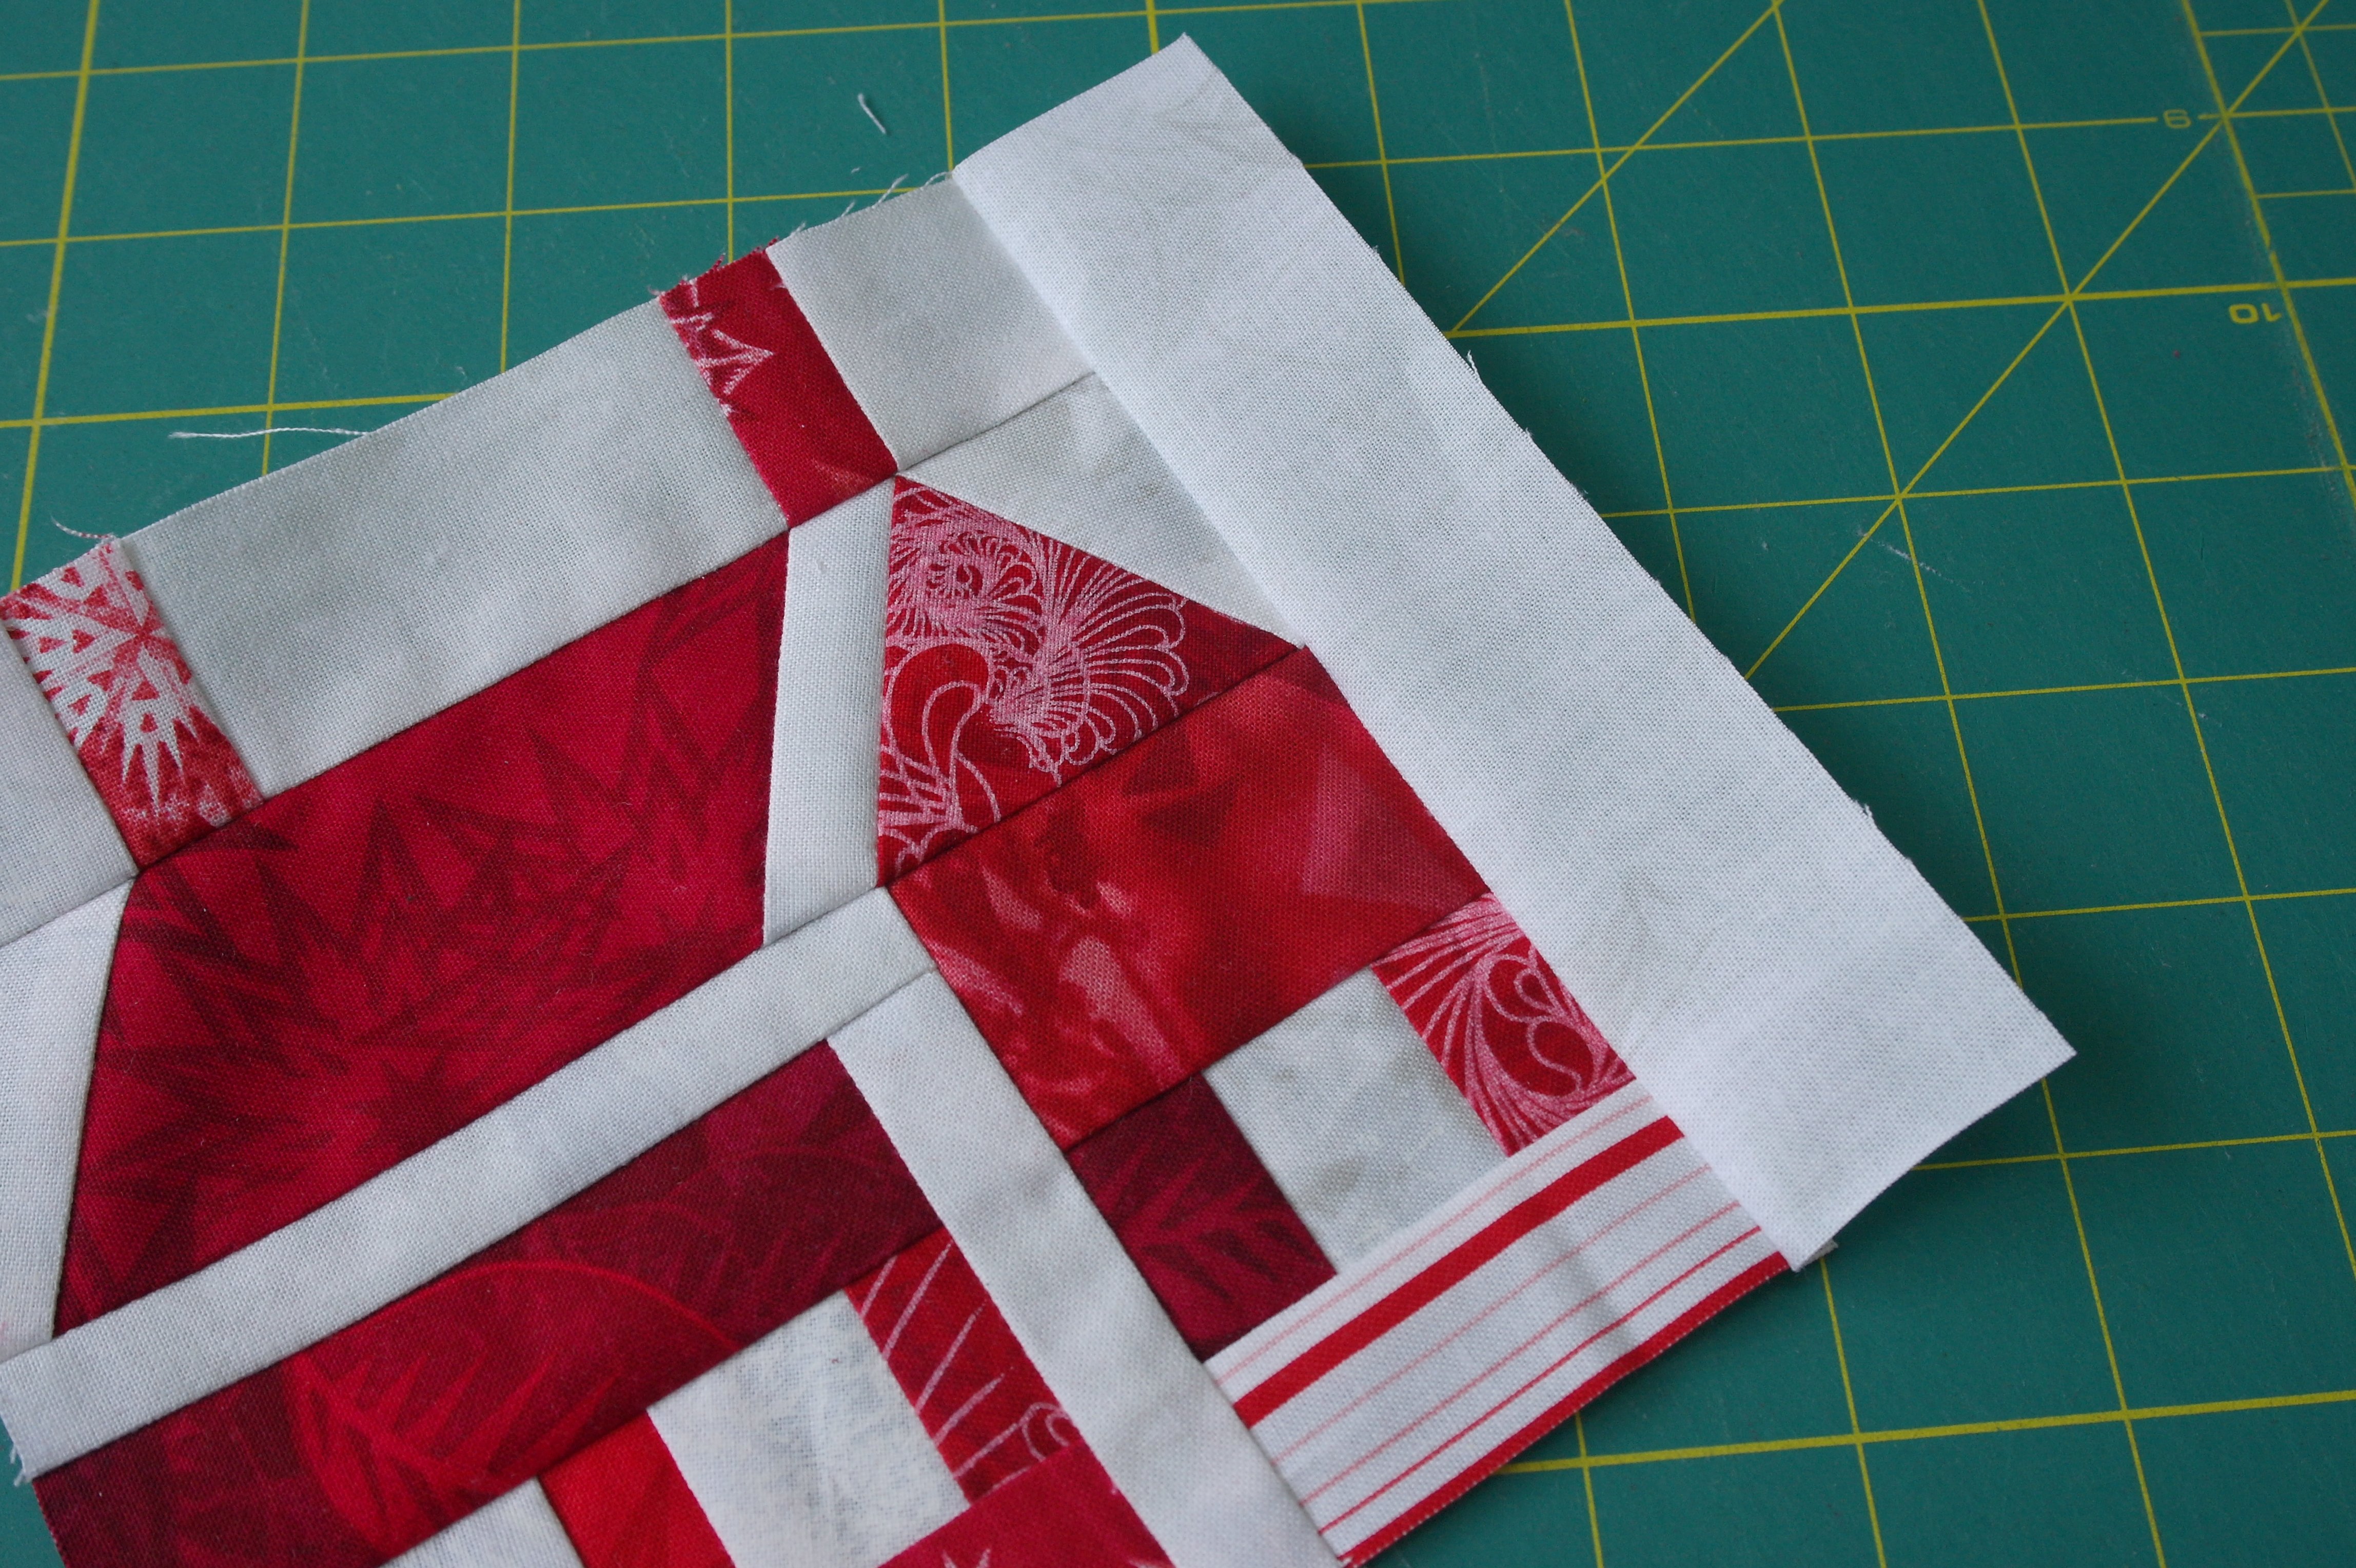
The back of one house block: this is how all seams must lie: flat and without bulk.
Before assembly, measure the width of the door (in your house, or in your friend’s house: the one you are making this Christmas Gift for) for which you want to use the draft roll.
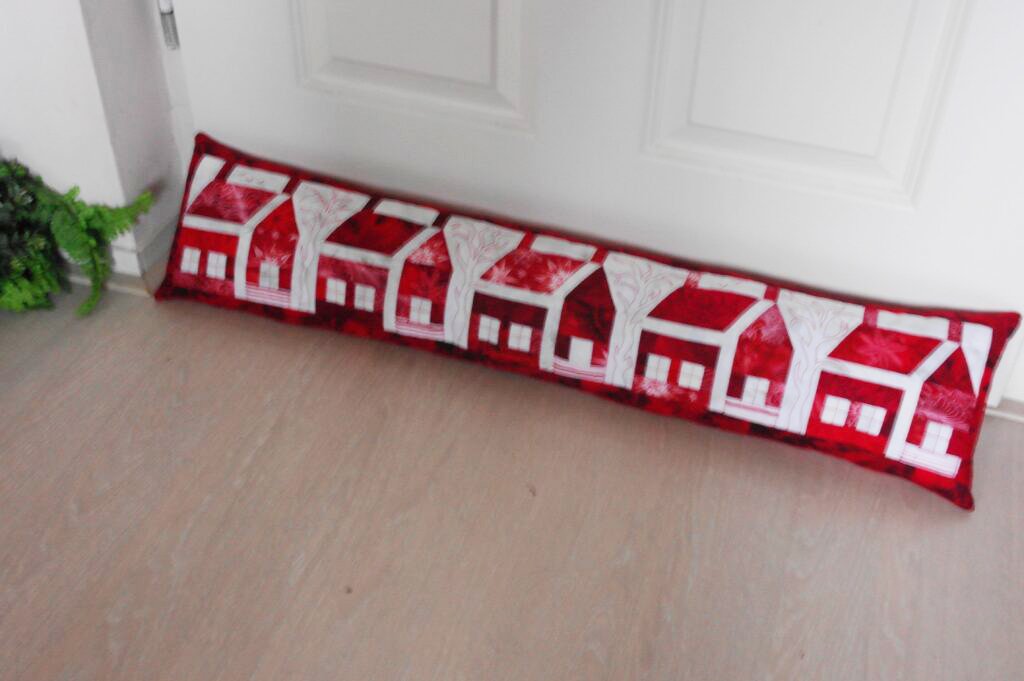
Our door is 80 cm (approx. 31 1/2 inches) wide. Then the math begins: there are 5 paper piecing houses, each measuring 14 x 14 cm (approx. 5 1/2 x 5 1/2 inches, US measurements) + seam allowances.
You will need the finished size to calculate how many strips you will need to sew between the houses, to make the entire width 80 cm. 5 x a finished size house = 70 cm (25 1/2 inches). While my door frame is 80 cm, I will therefore need to cut four strips, each 2 1/2 cm (approx. 1 inch) + 2 x seam allowance (remember to use 1/4 inch seam allowances, both when using centimeters or inches) to sew between the houses, to separate them. If your door frame is wider, just increase the width of the strips. Each strip will be cut to a height 14 cm (approx. 5 1/2 inches) + at least 3 x seam allowance, just to be on the safe side.
Cut the 4 strips (white) and sew the first on the right side of the first house. I have used the Bohin Glue again, onto one seam allowance, so no pins are involved. Iron the seams towards the white strip(s).

The second house – left side – is placed on the strip, glued and sewn.

This will make the front of the draft roll = 80 x 14 cm (approx. 31 1/2 x 5 1/2 inches) + seam allowances. Cut the ends of the strips if they protrude, to get a straight width and height.
You can add more strips to the sides later, once this front is quilted to keep the right measurements: with machine quilting the front will shrink. How much will depend on the intensity of your quilting.
Quilting free hand and finishing this Christmas gift.
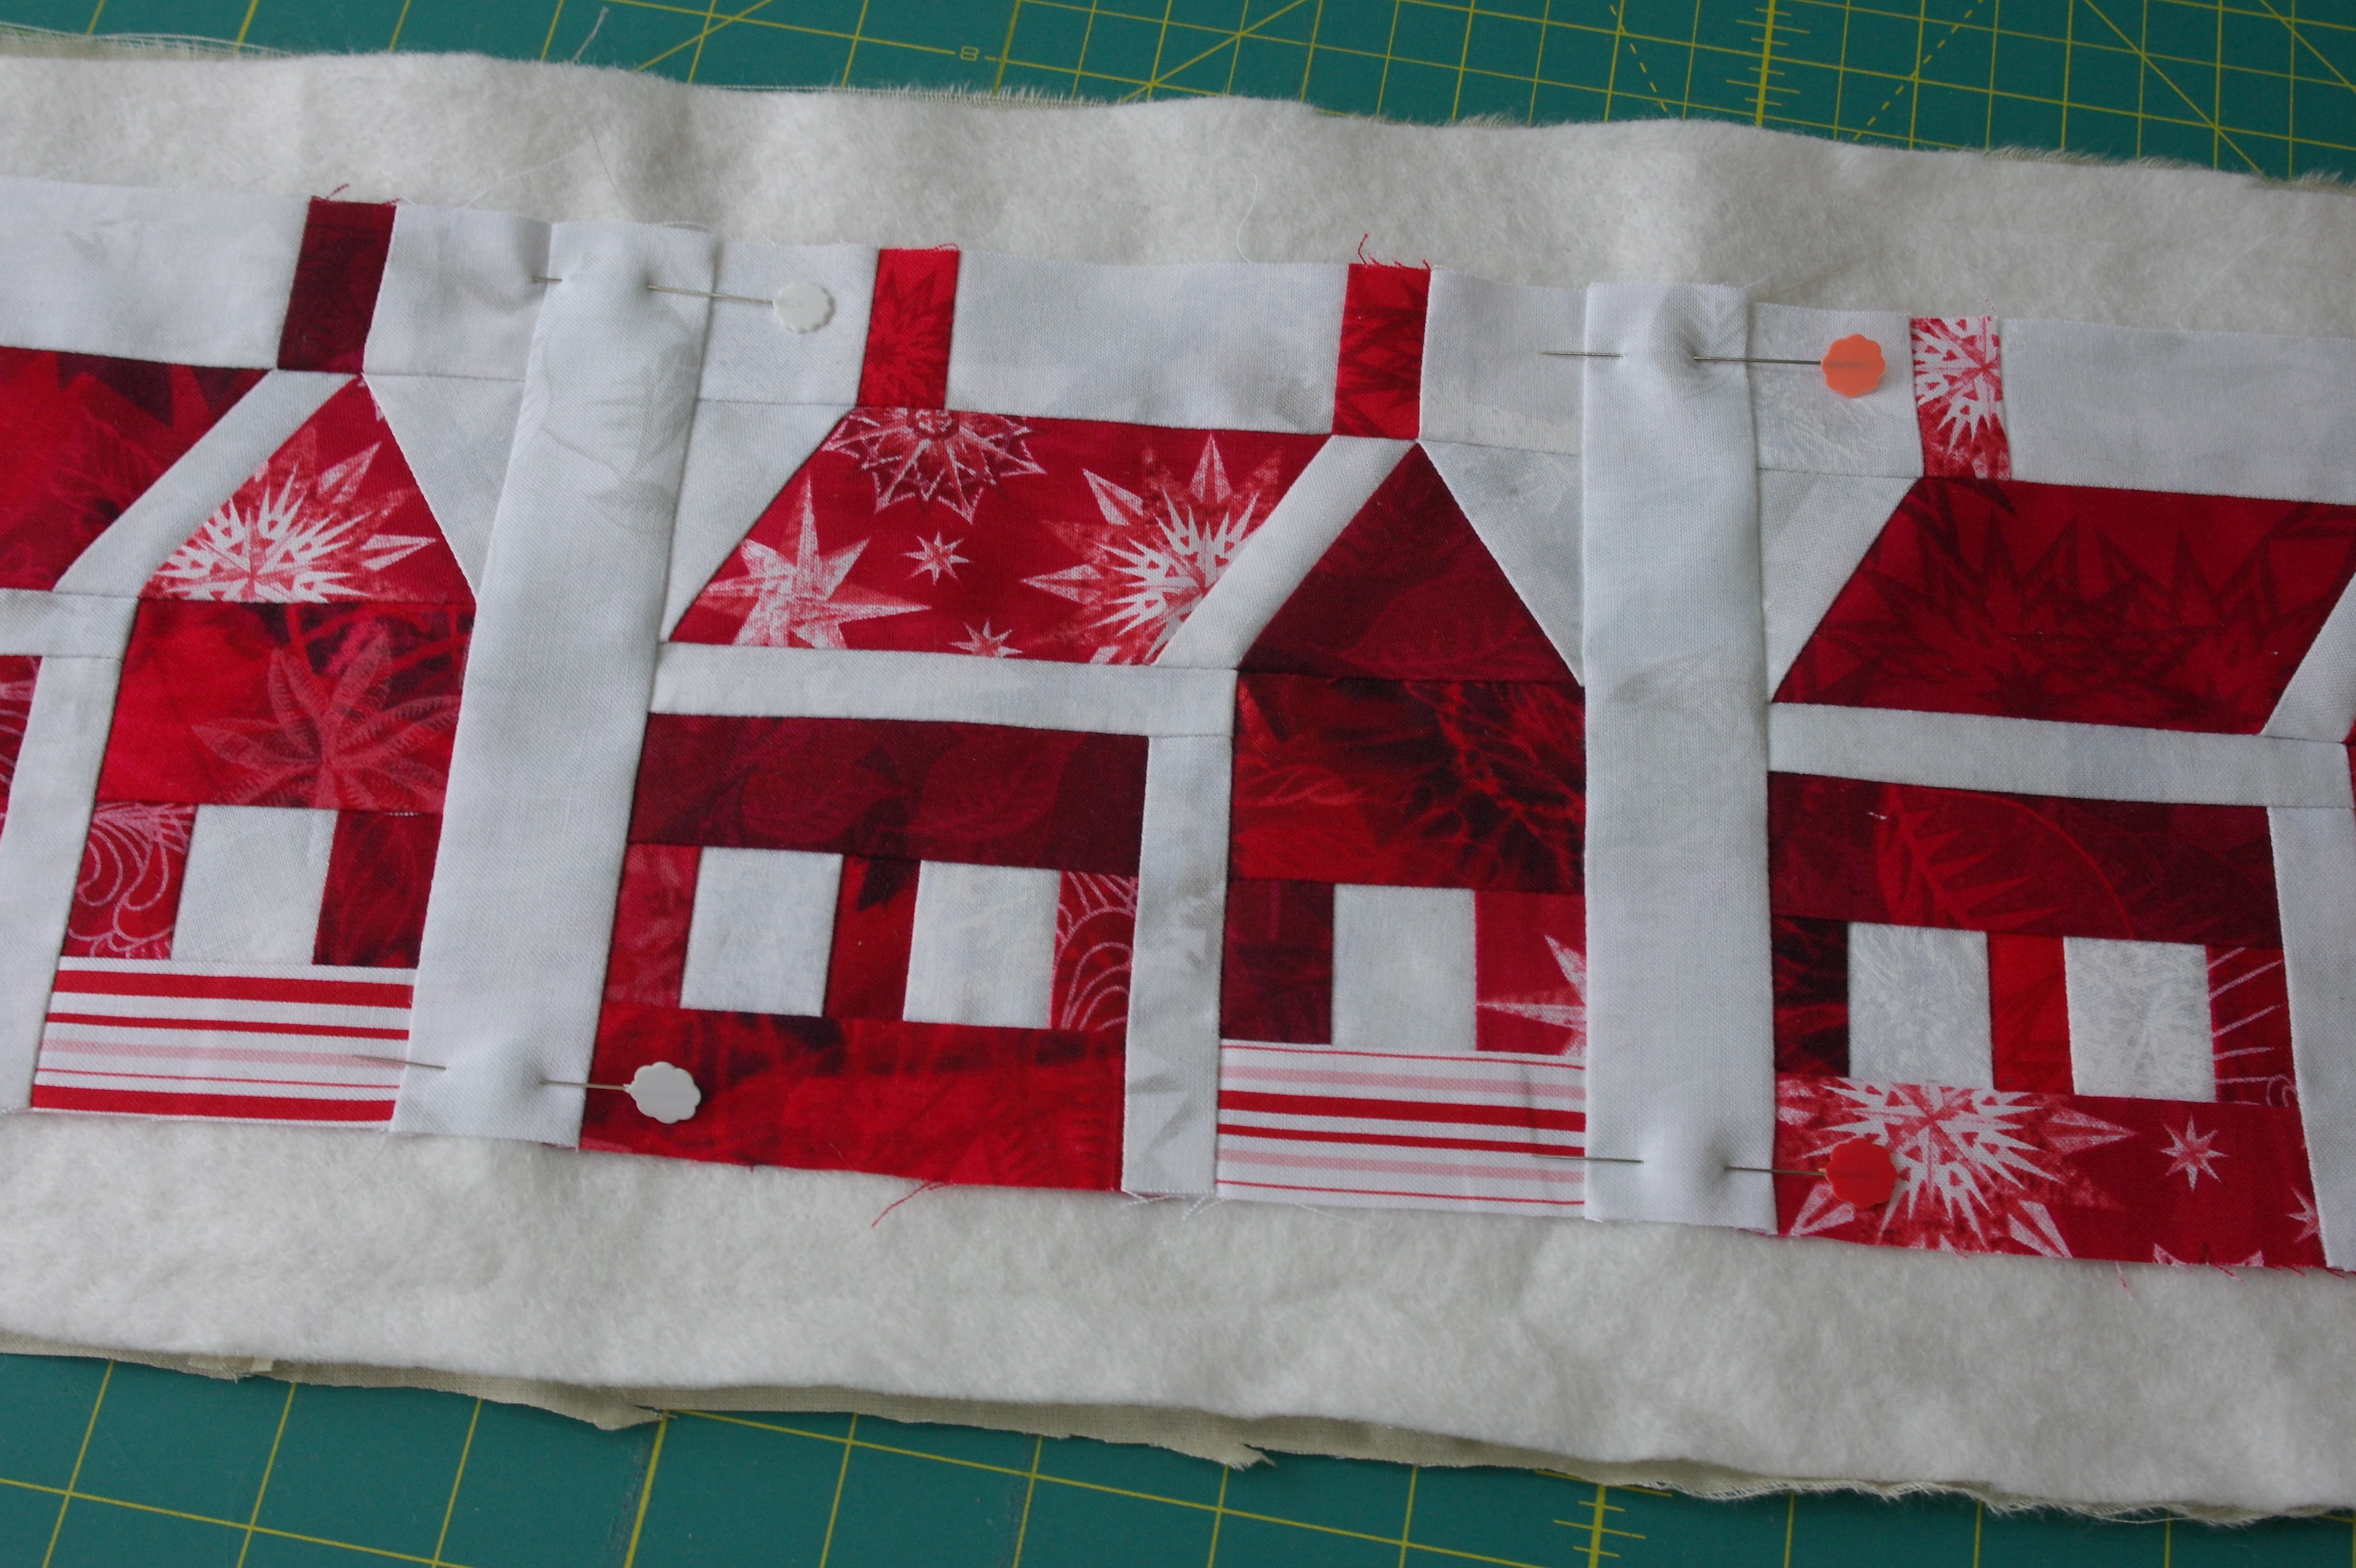
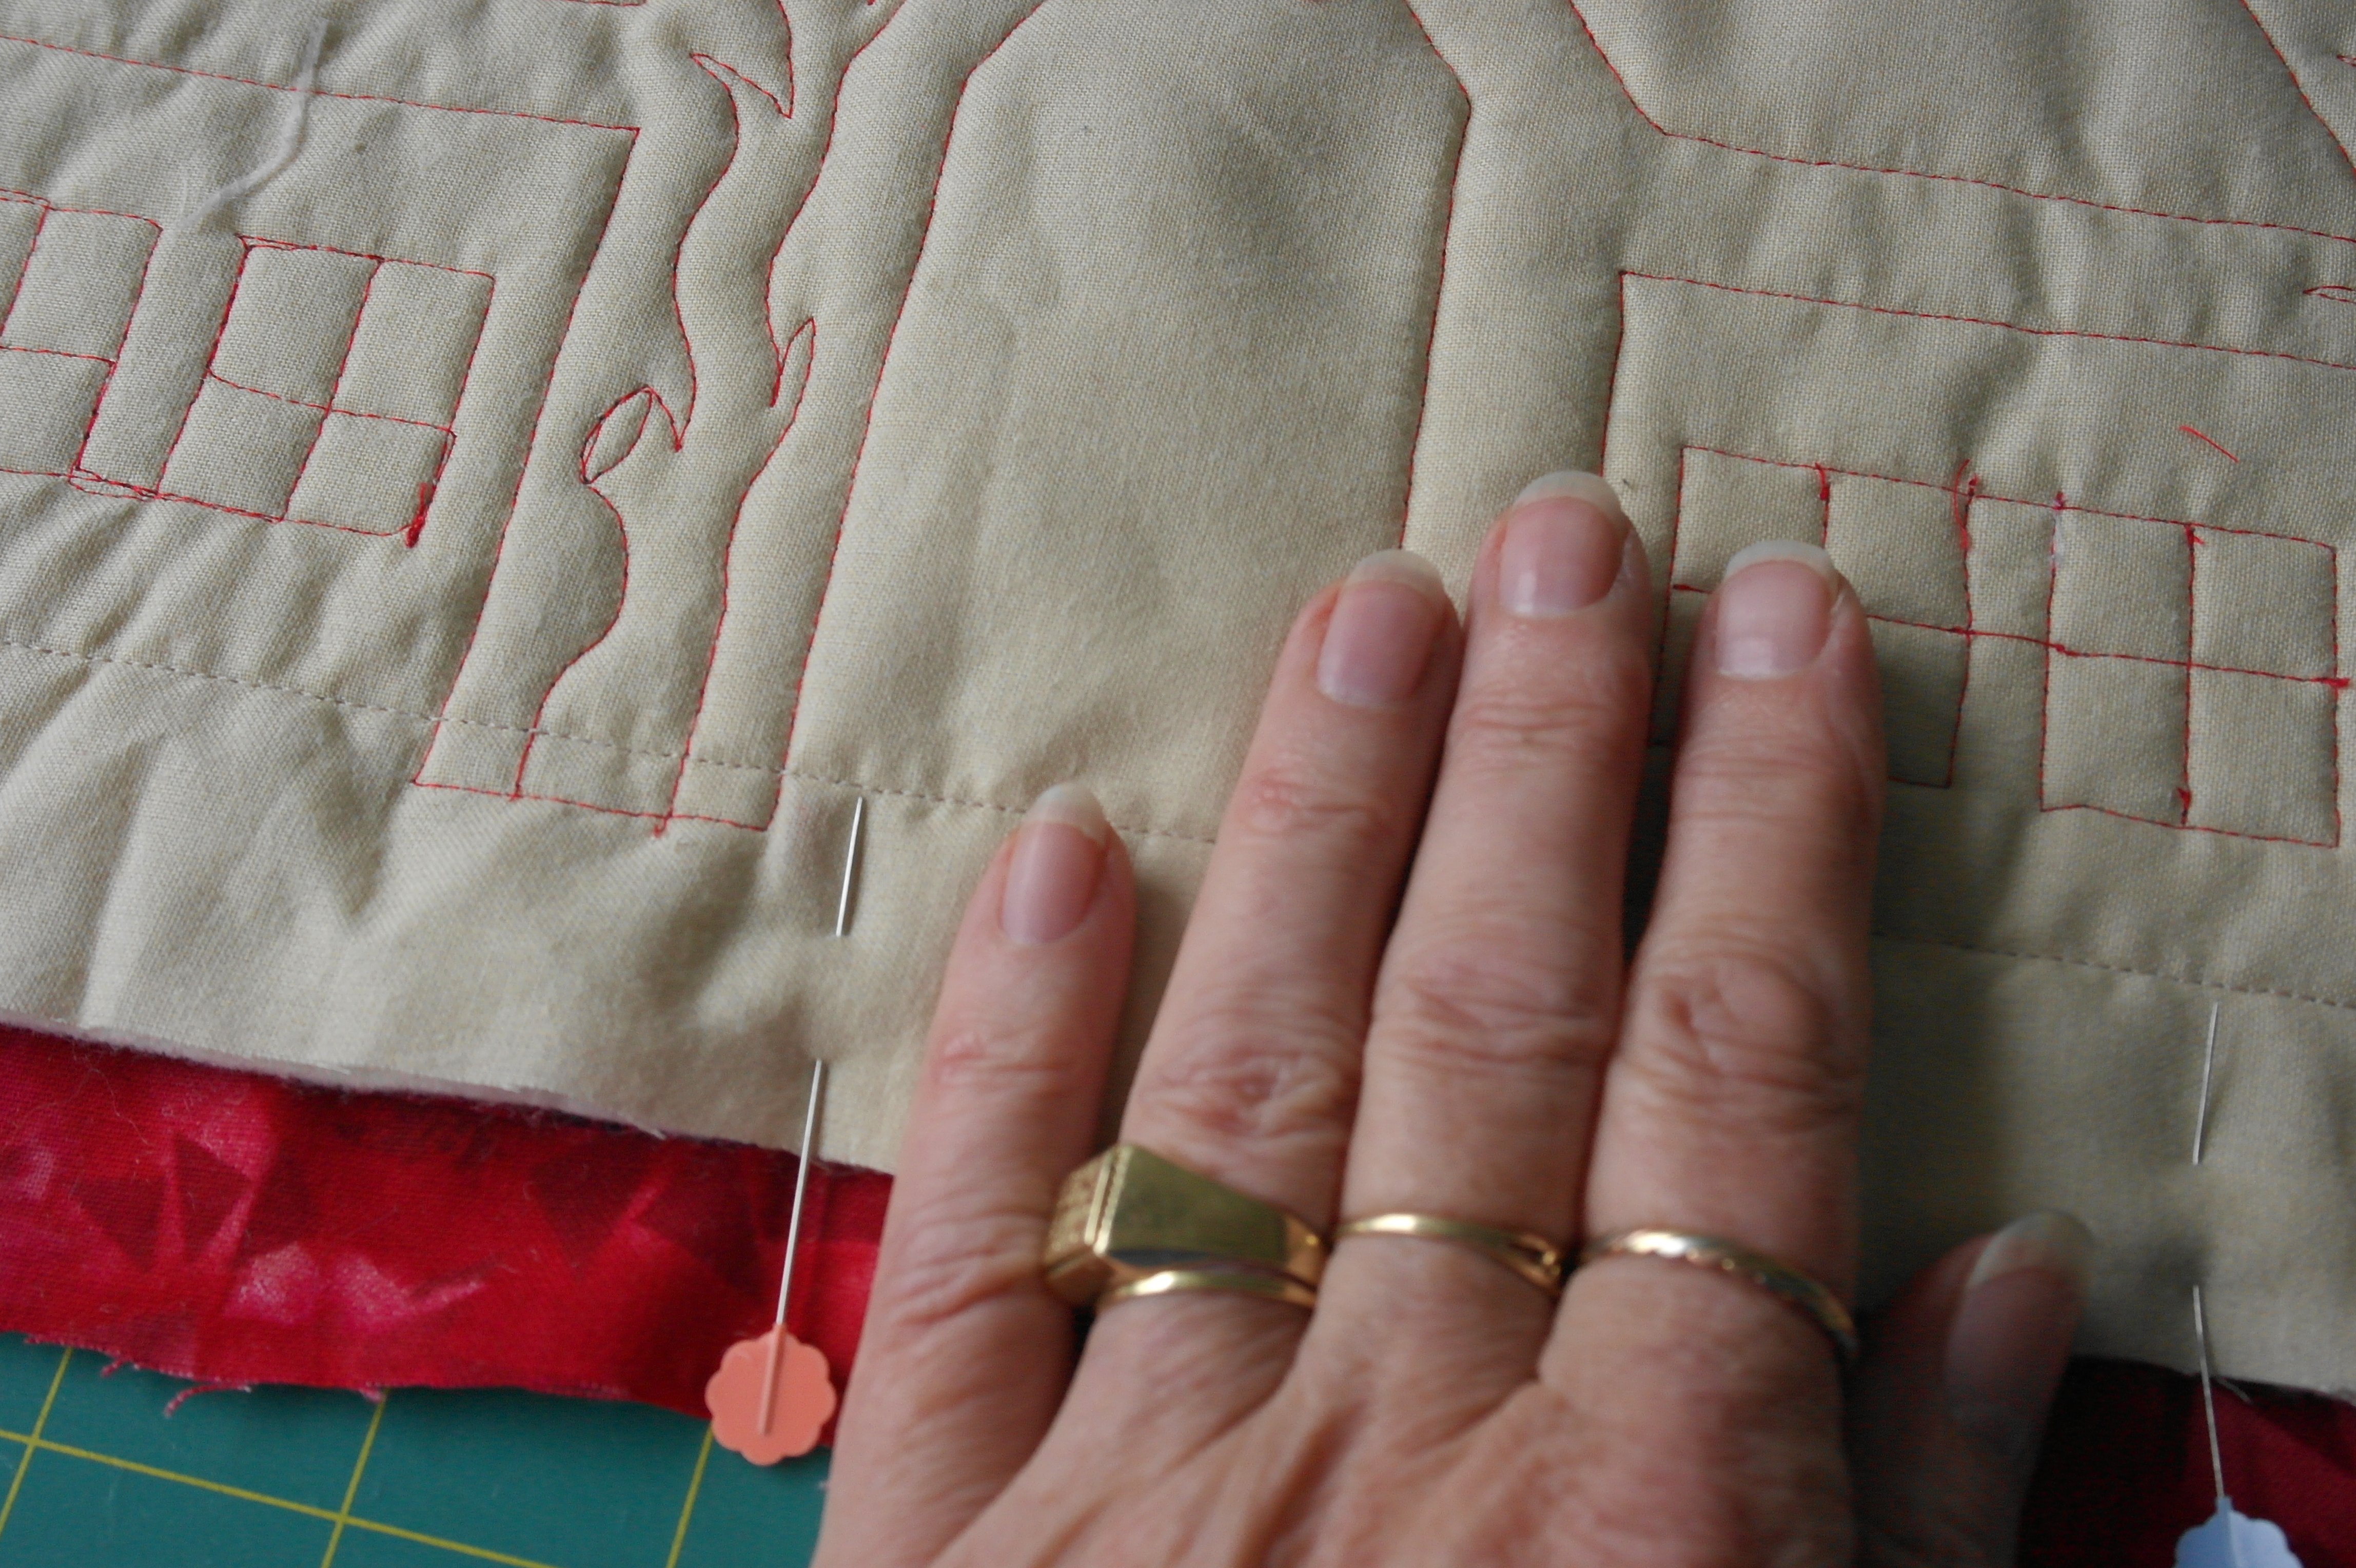
Make a sandwich of the front with the 5 houses/four strips, a piece of batting and backing (each 5 cm (approx. 2 inches) larger than the front. Pin in place with large quilting pins.
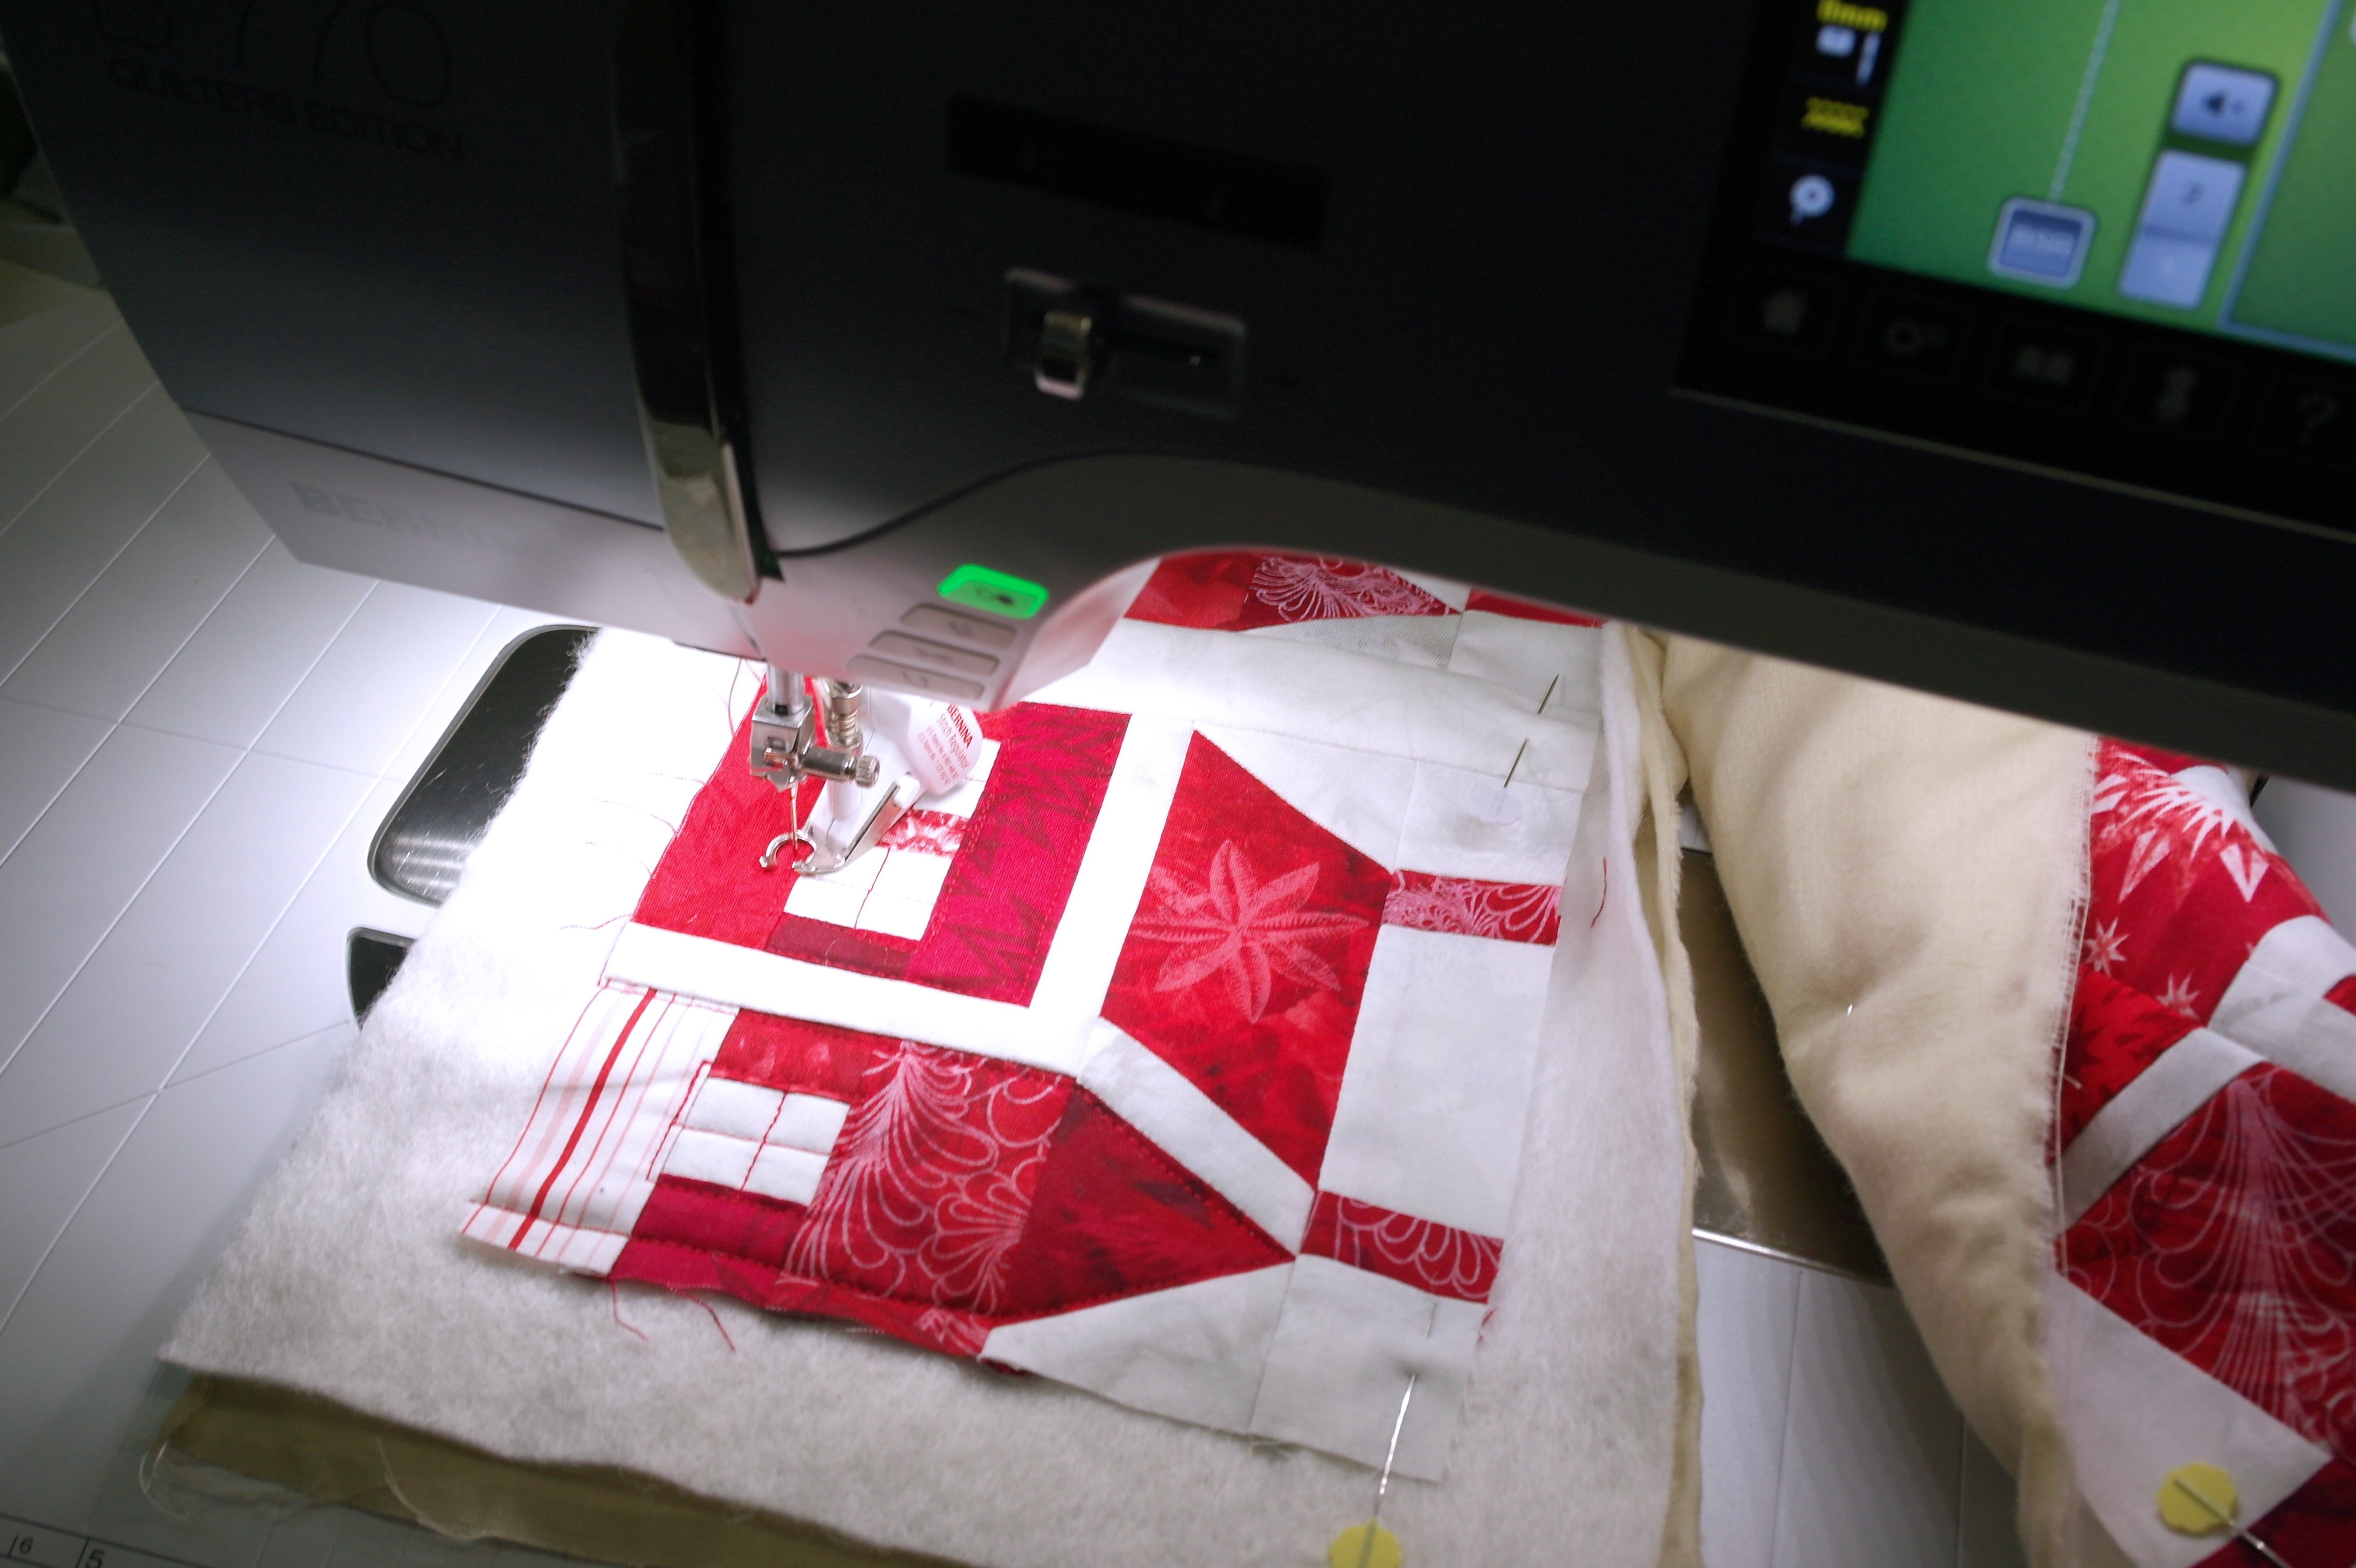
Quilt as you wish: you can quilt over it all by meandering, quilt in the ditch or custom quilt: all freehand. Use your Freehand Quilting foot, or the BSR of your (BERNINA) machine. When making just straight quilting lines, you can use a Walking Foot too, but then you will have to turn at each corner. Remove the pins while quilting. Start from the center and work your way outwards.
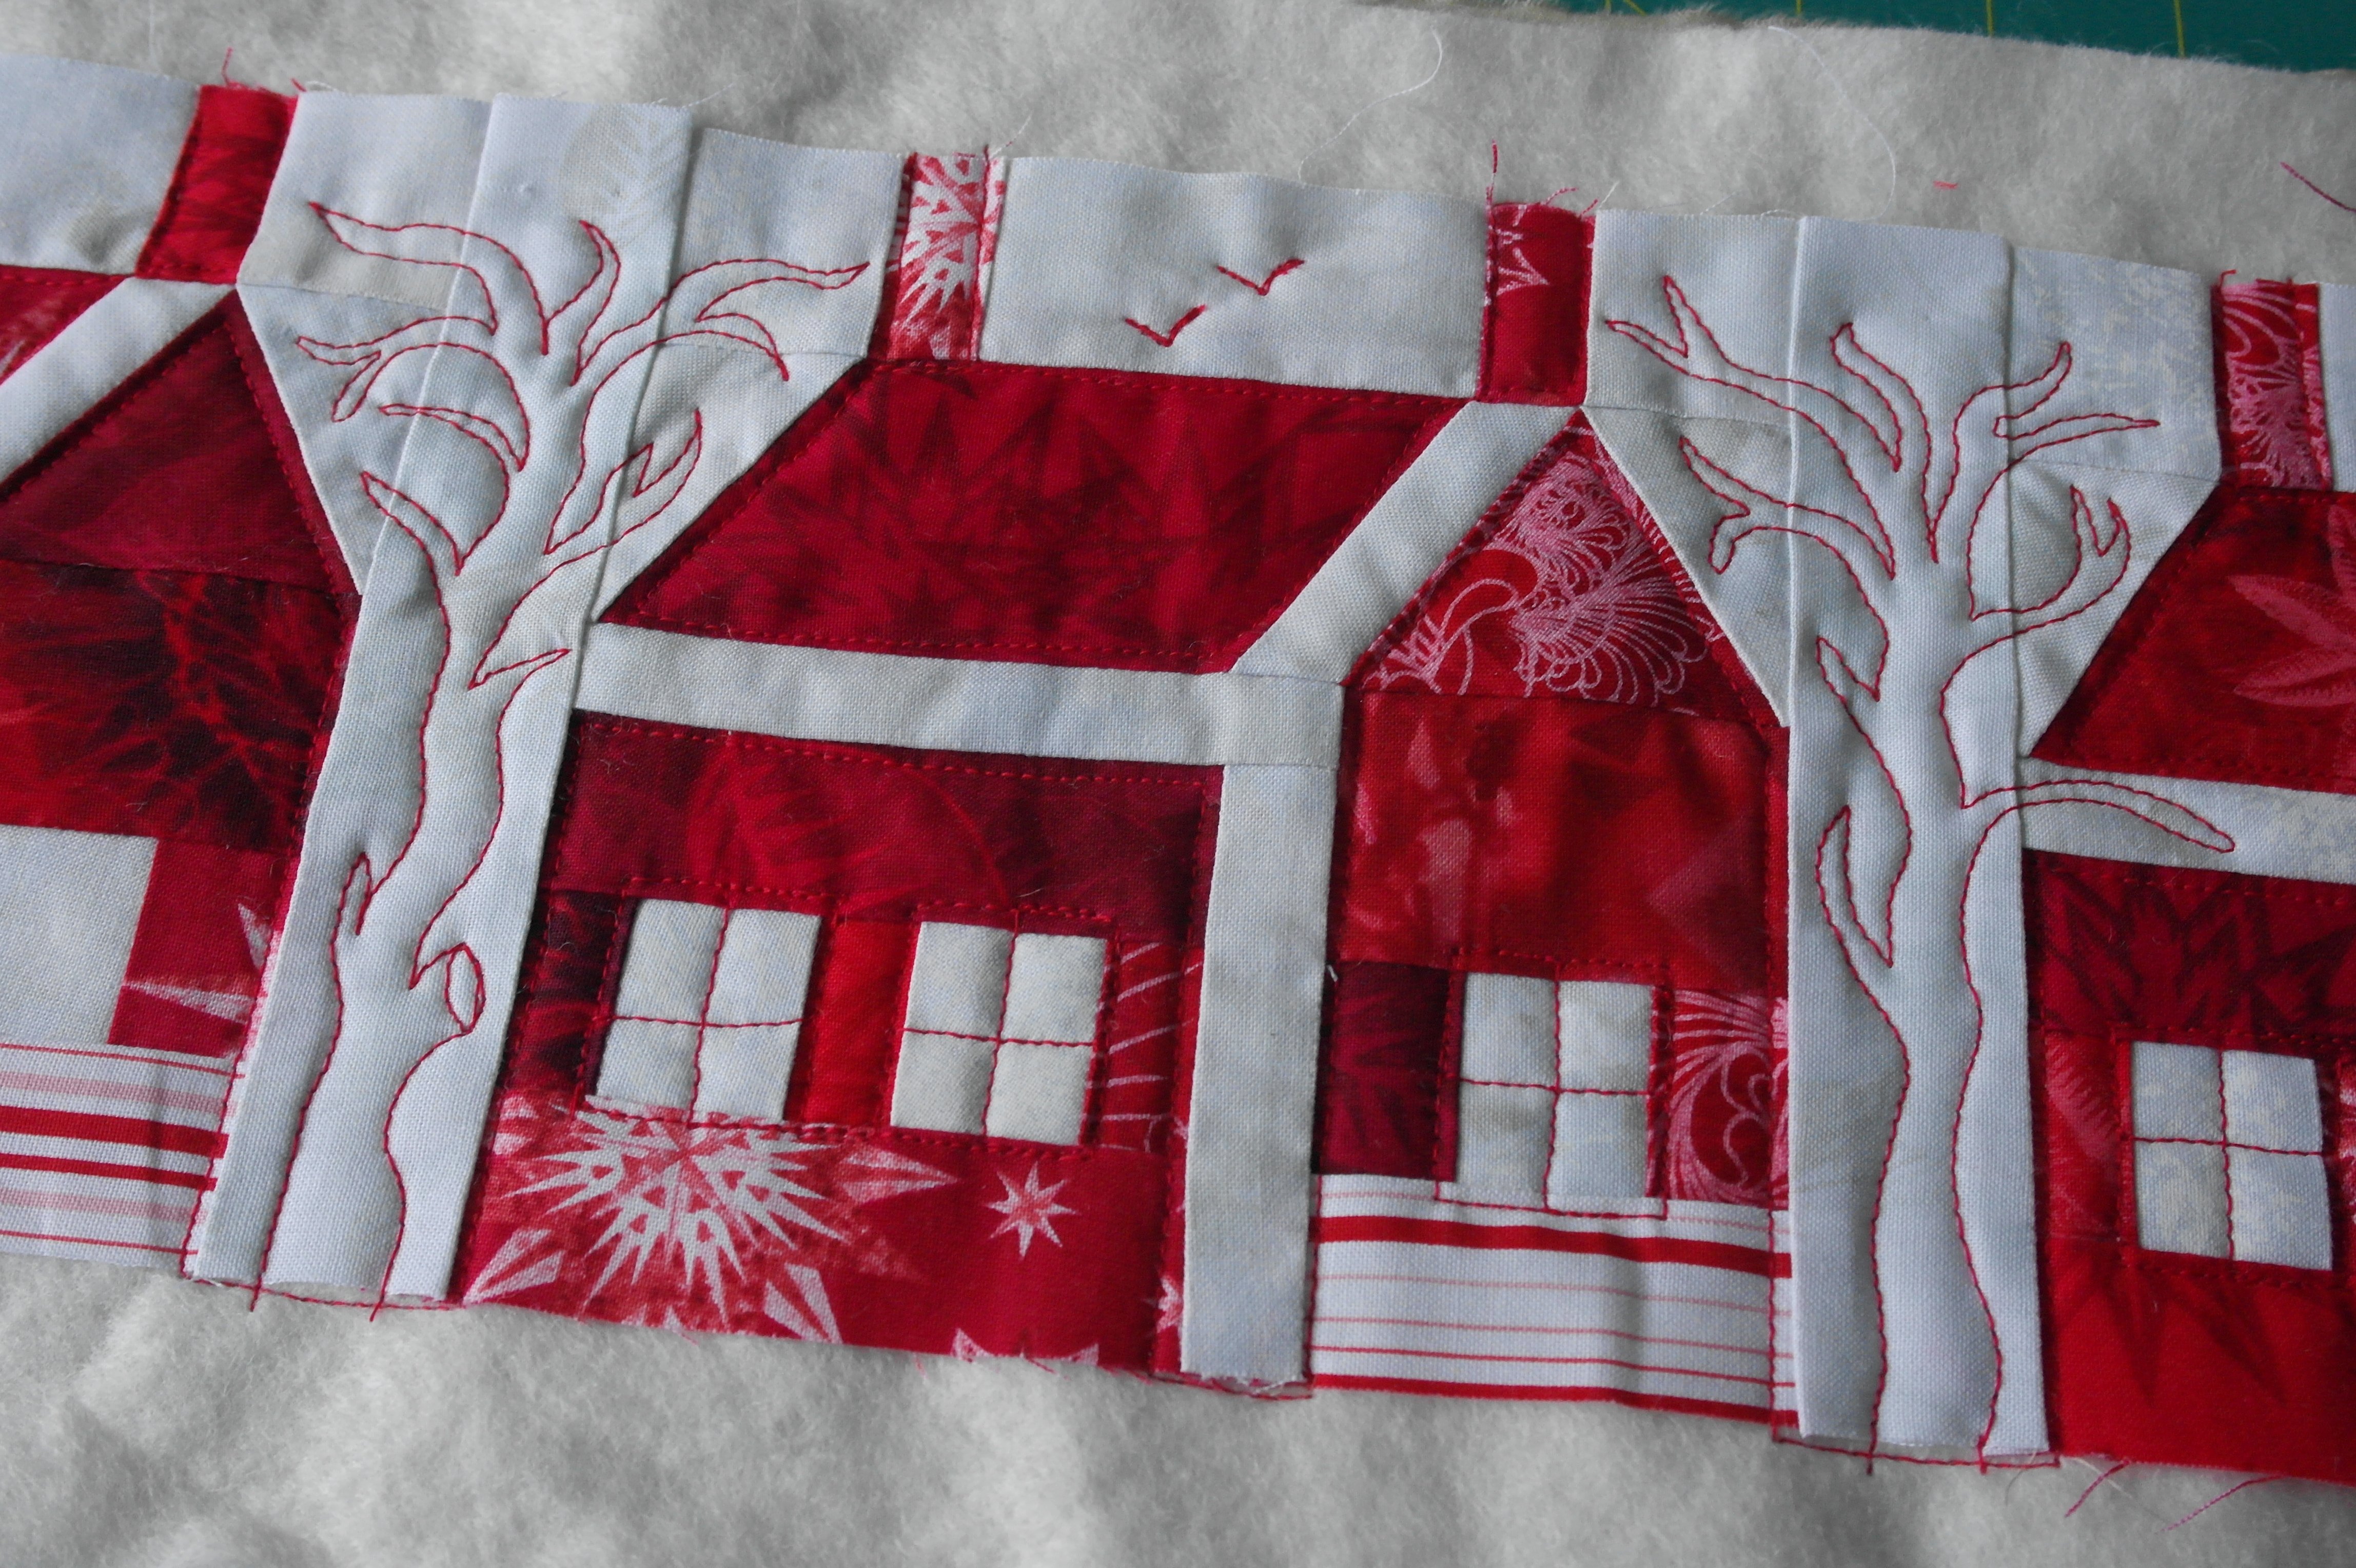
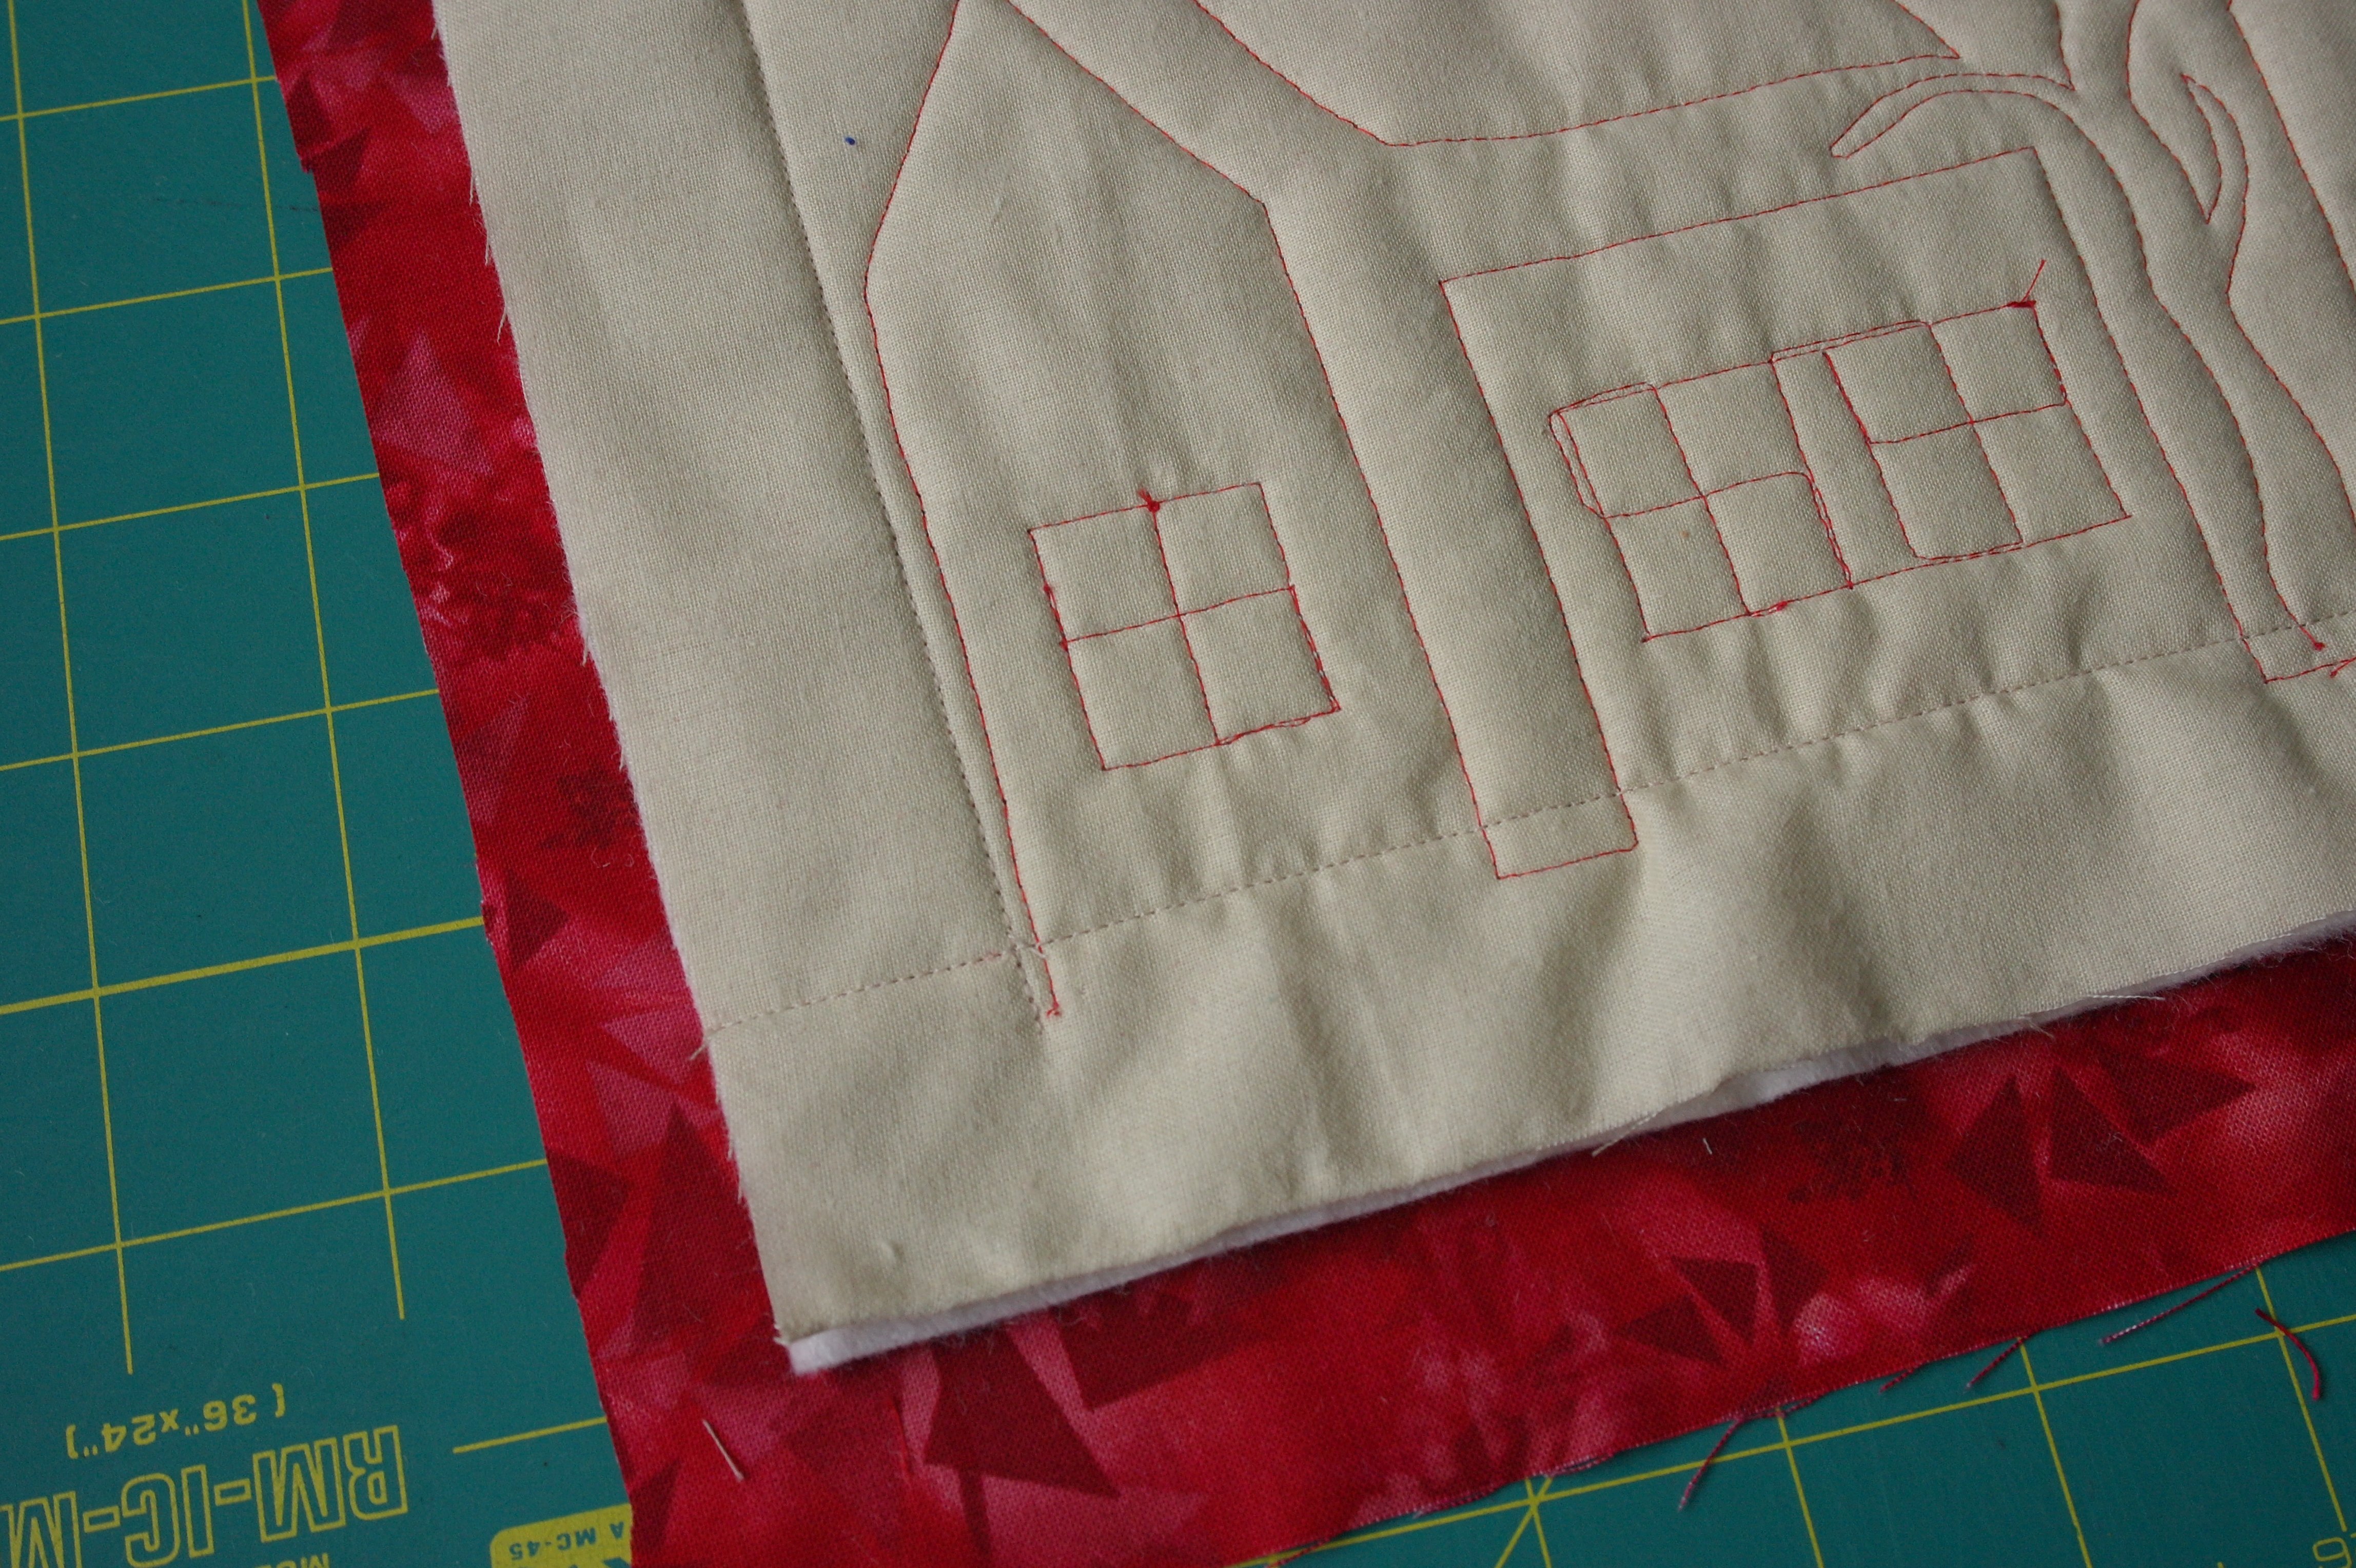
I have added quilting in the windows, and free hand quilted bare trees onto the strips between the houses, and some birds: all with red machine quilting thread.
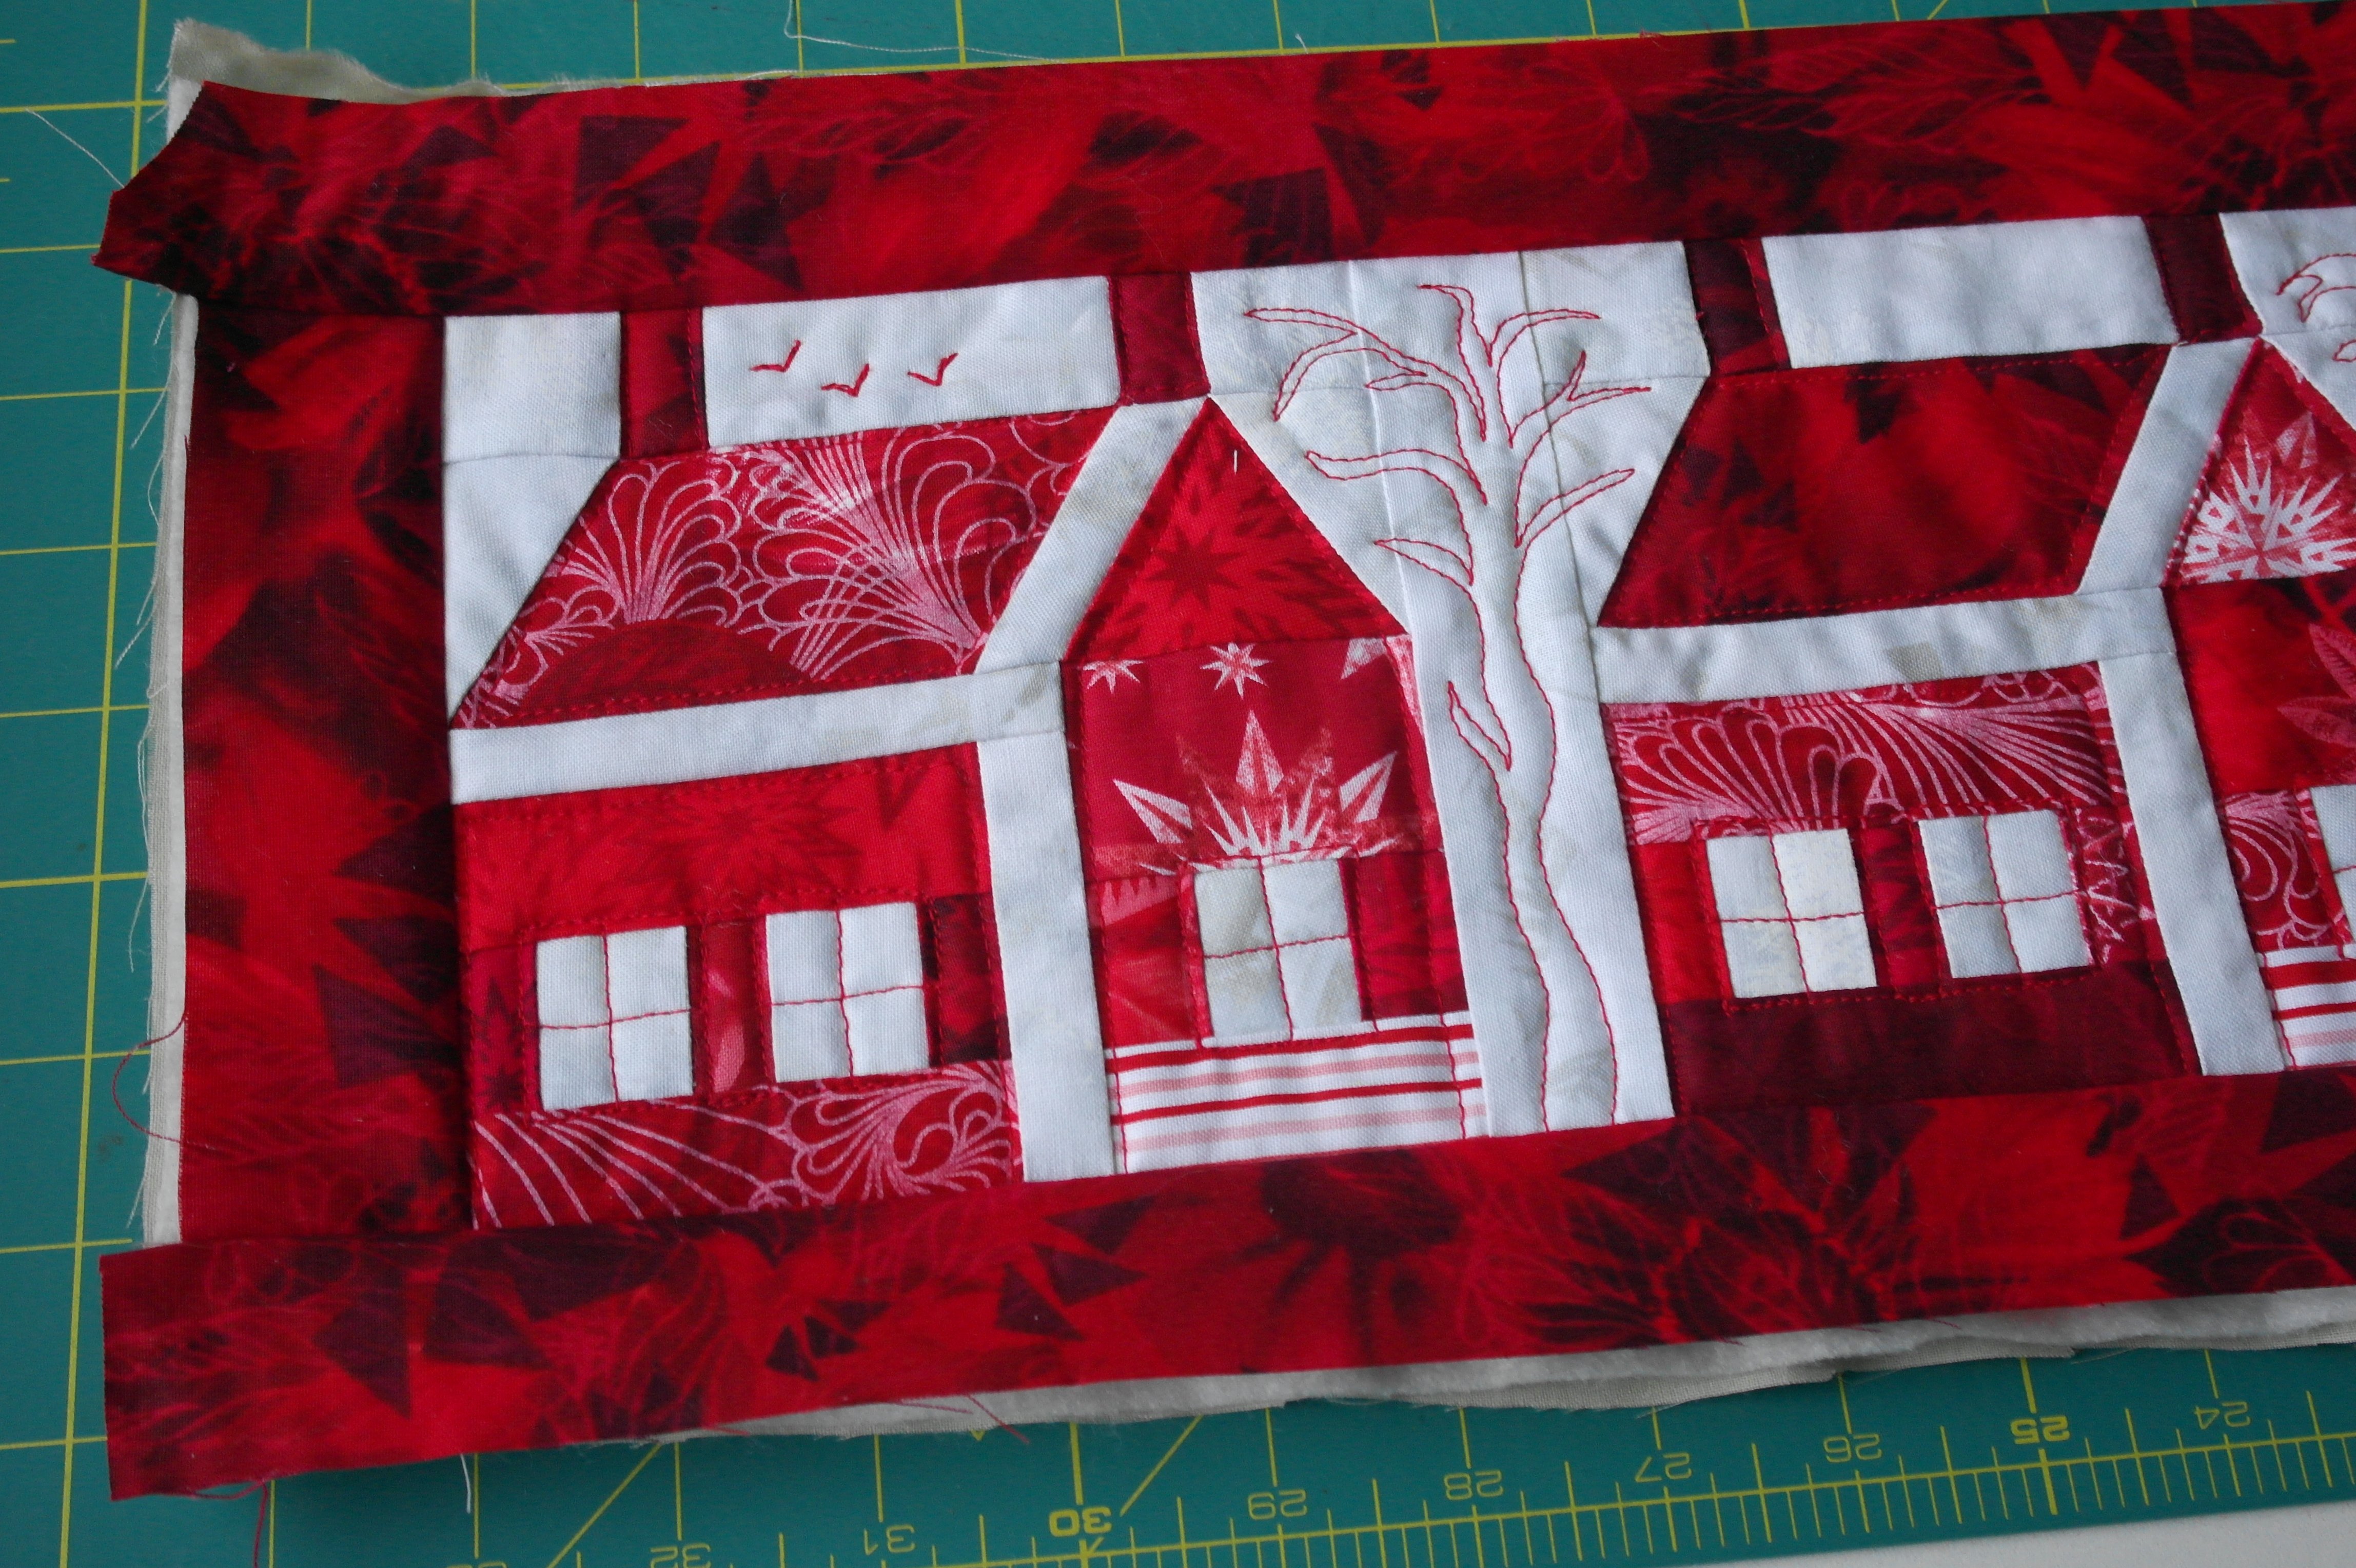
After quilting, straighten the sandwich (cut back), but be sure the required size remains. After that I have added four red strips to all sides – sewn them onto the sandwich, through each layer. Each strip approx. 4 cm (1 1/2 inches) wide = seam allowances included. If you don’t have a long piece of fabric to cut the long strips, sew shorter strips of different prints of red fabric scraps together to get the required length. This will add warmth to your draft roll and gives you the size you need: 80 x 14 cm (approx. 31 1/2 x 5 1/2 inches) + seam allowances or slightly larger if you have used wider strips.
Cut a piece of backing fabric = preferably red (you don’t want to wash this draft roll, so better use red prints instead of white prints), the slightly larger than the sandwich/front of the draft roll: you will cut it back after sewing. Sew these right sides together, wrong sides facing you,
leaving a hole (hand-width, because you will need to go into the roll elbow deep) on the underside of the draft roll.
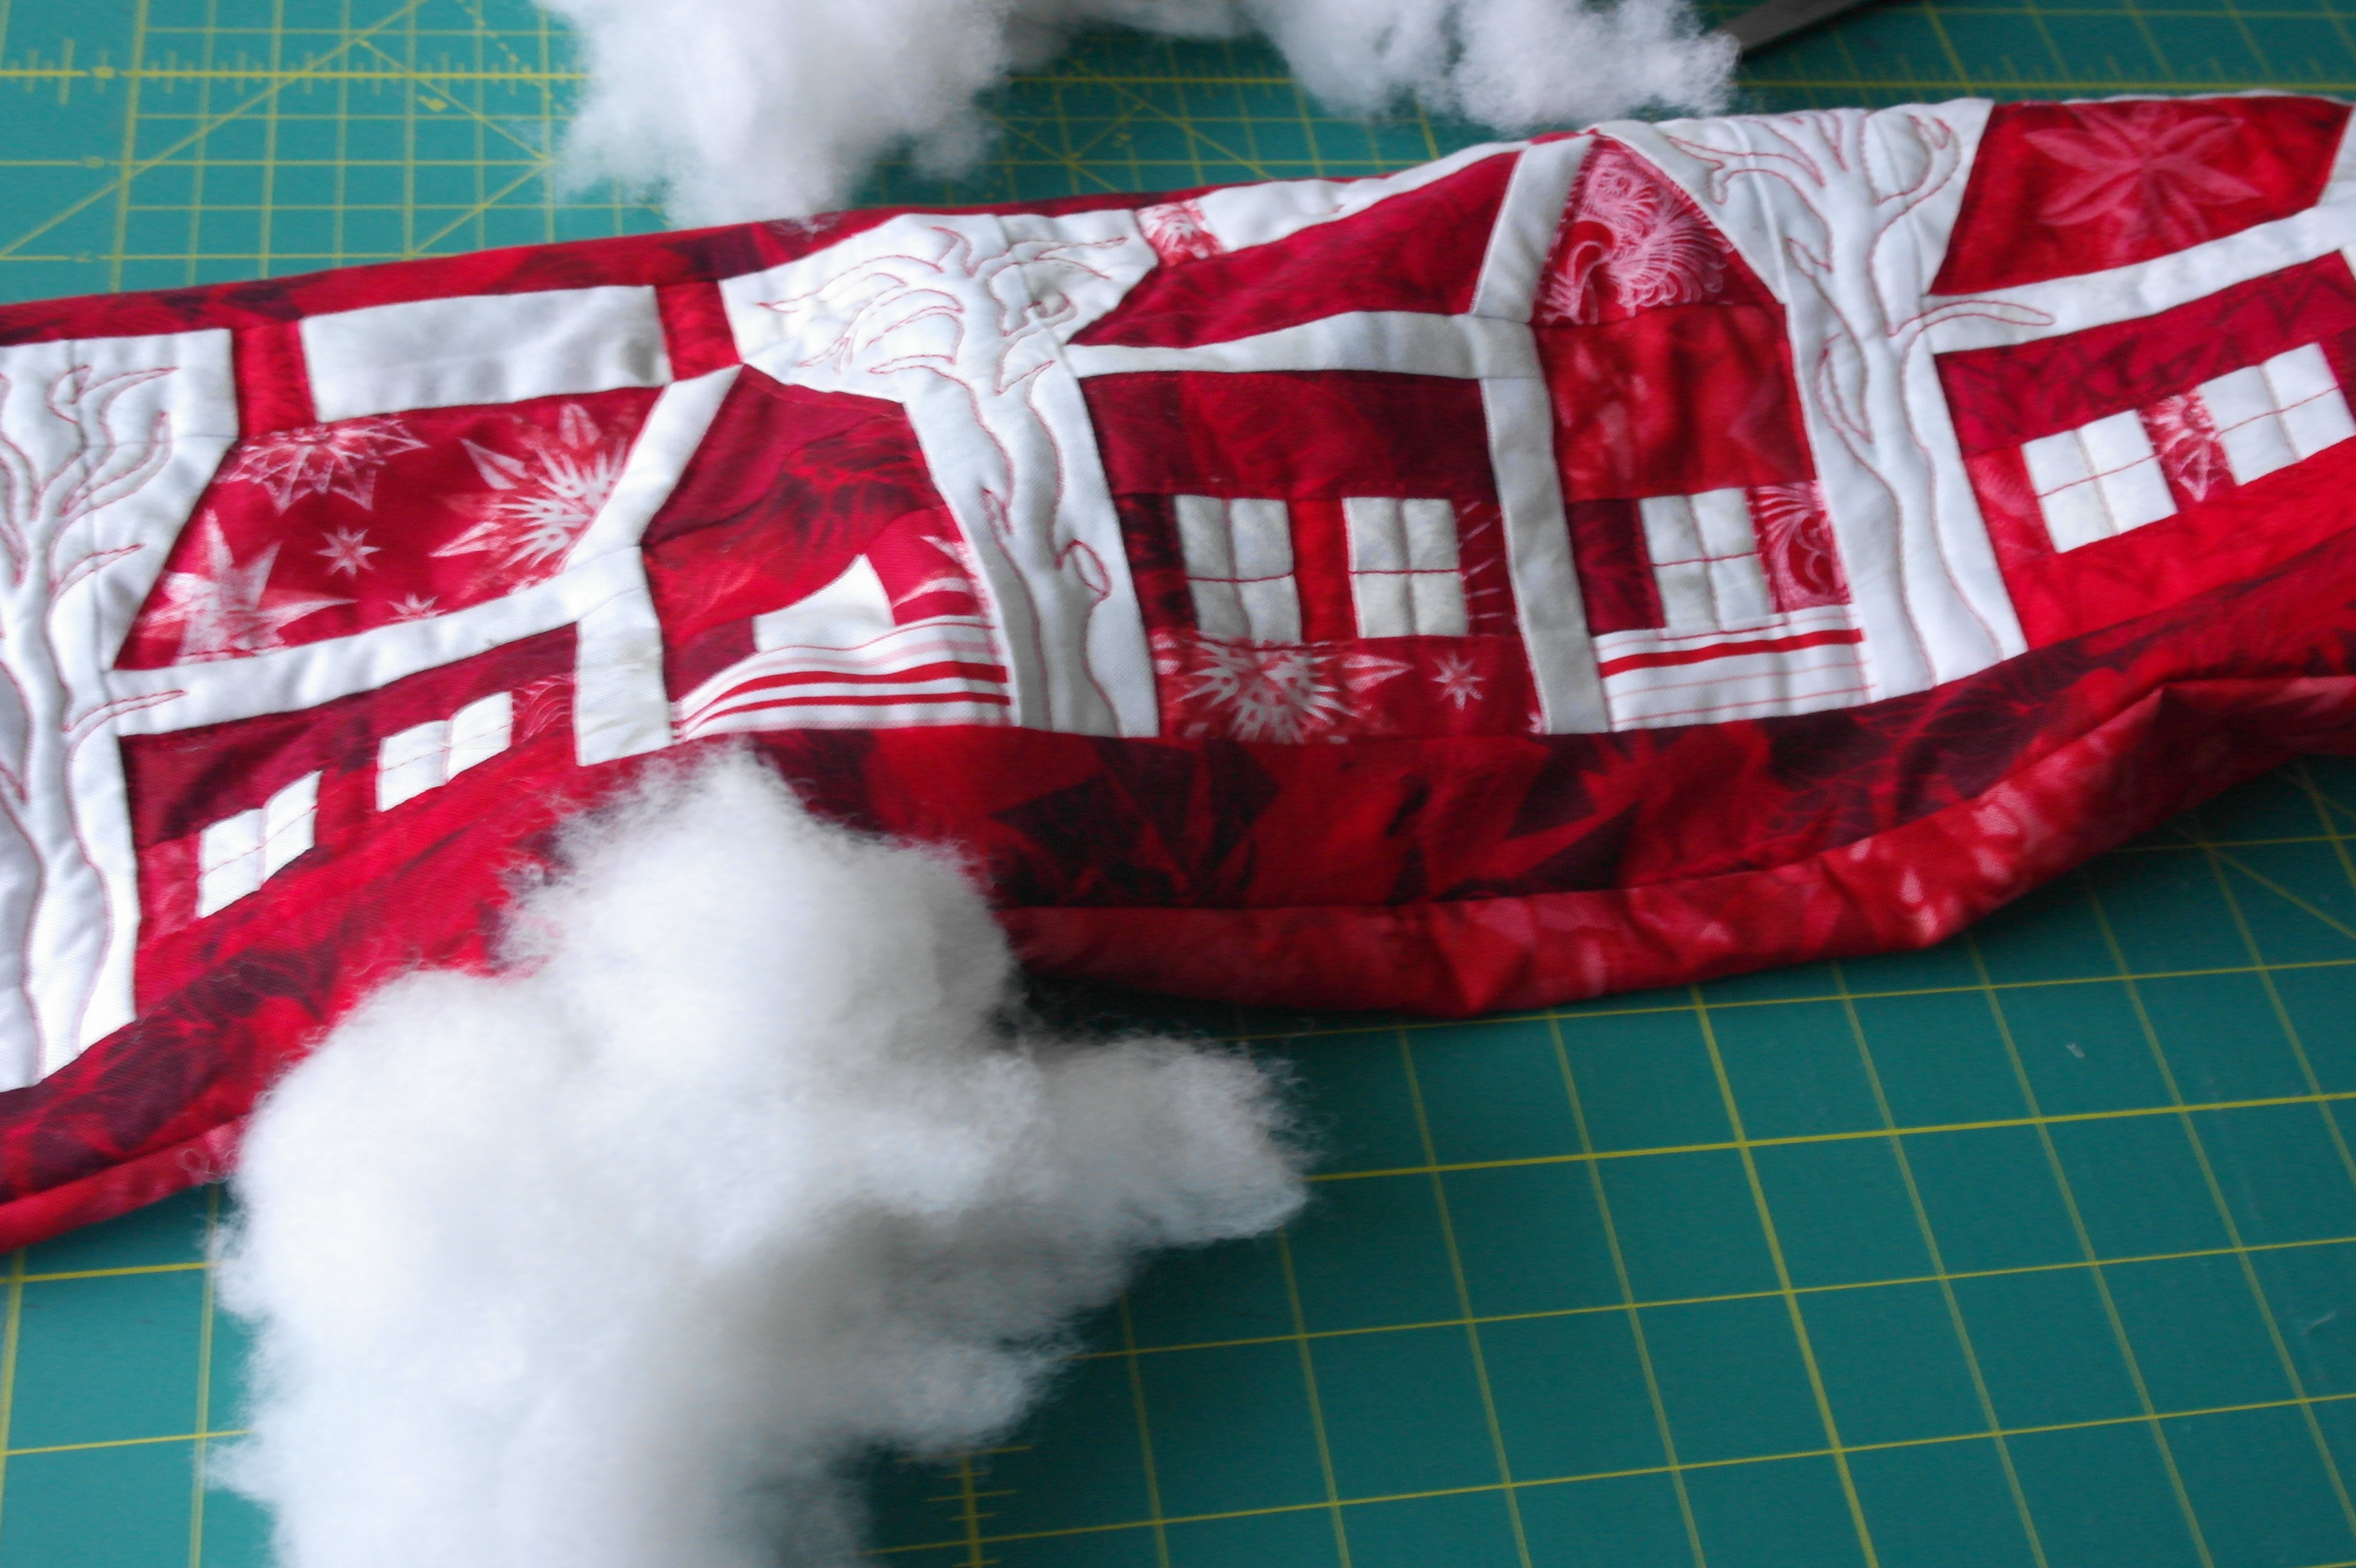
Clip the corners, turn the draft roll to the right side, push the corners to a neat point, and fill the draft roll with Filling flakes. It’s up to you how tight the filling should be. Hand-close the opening.
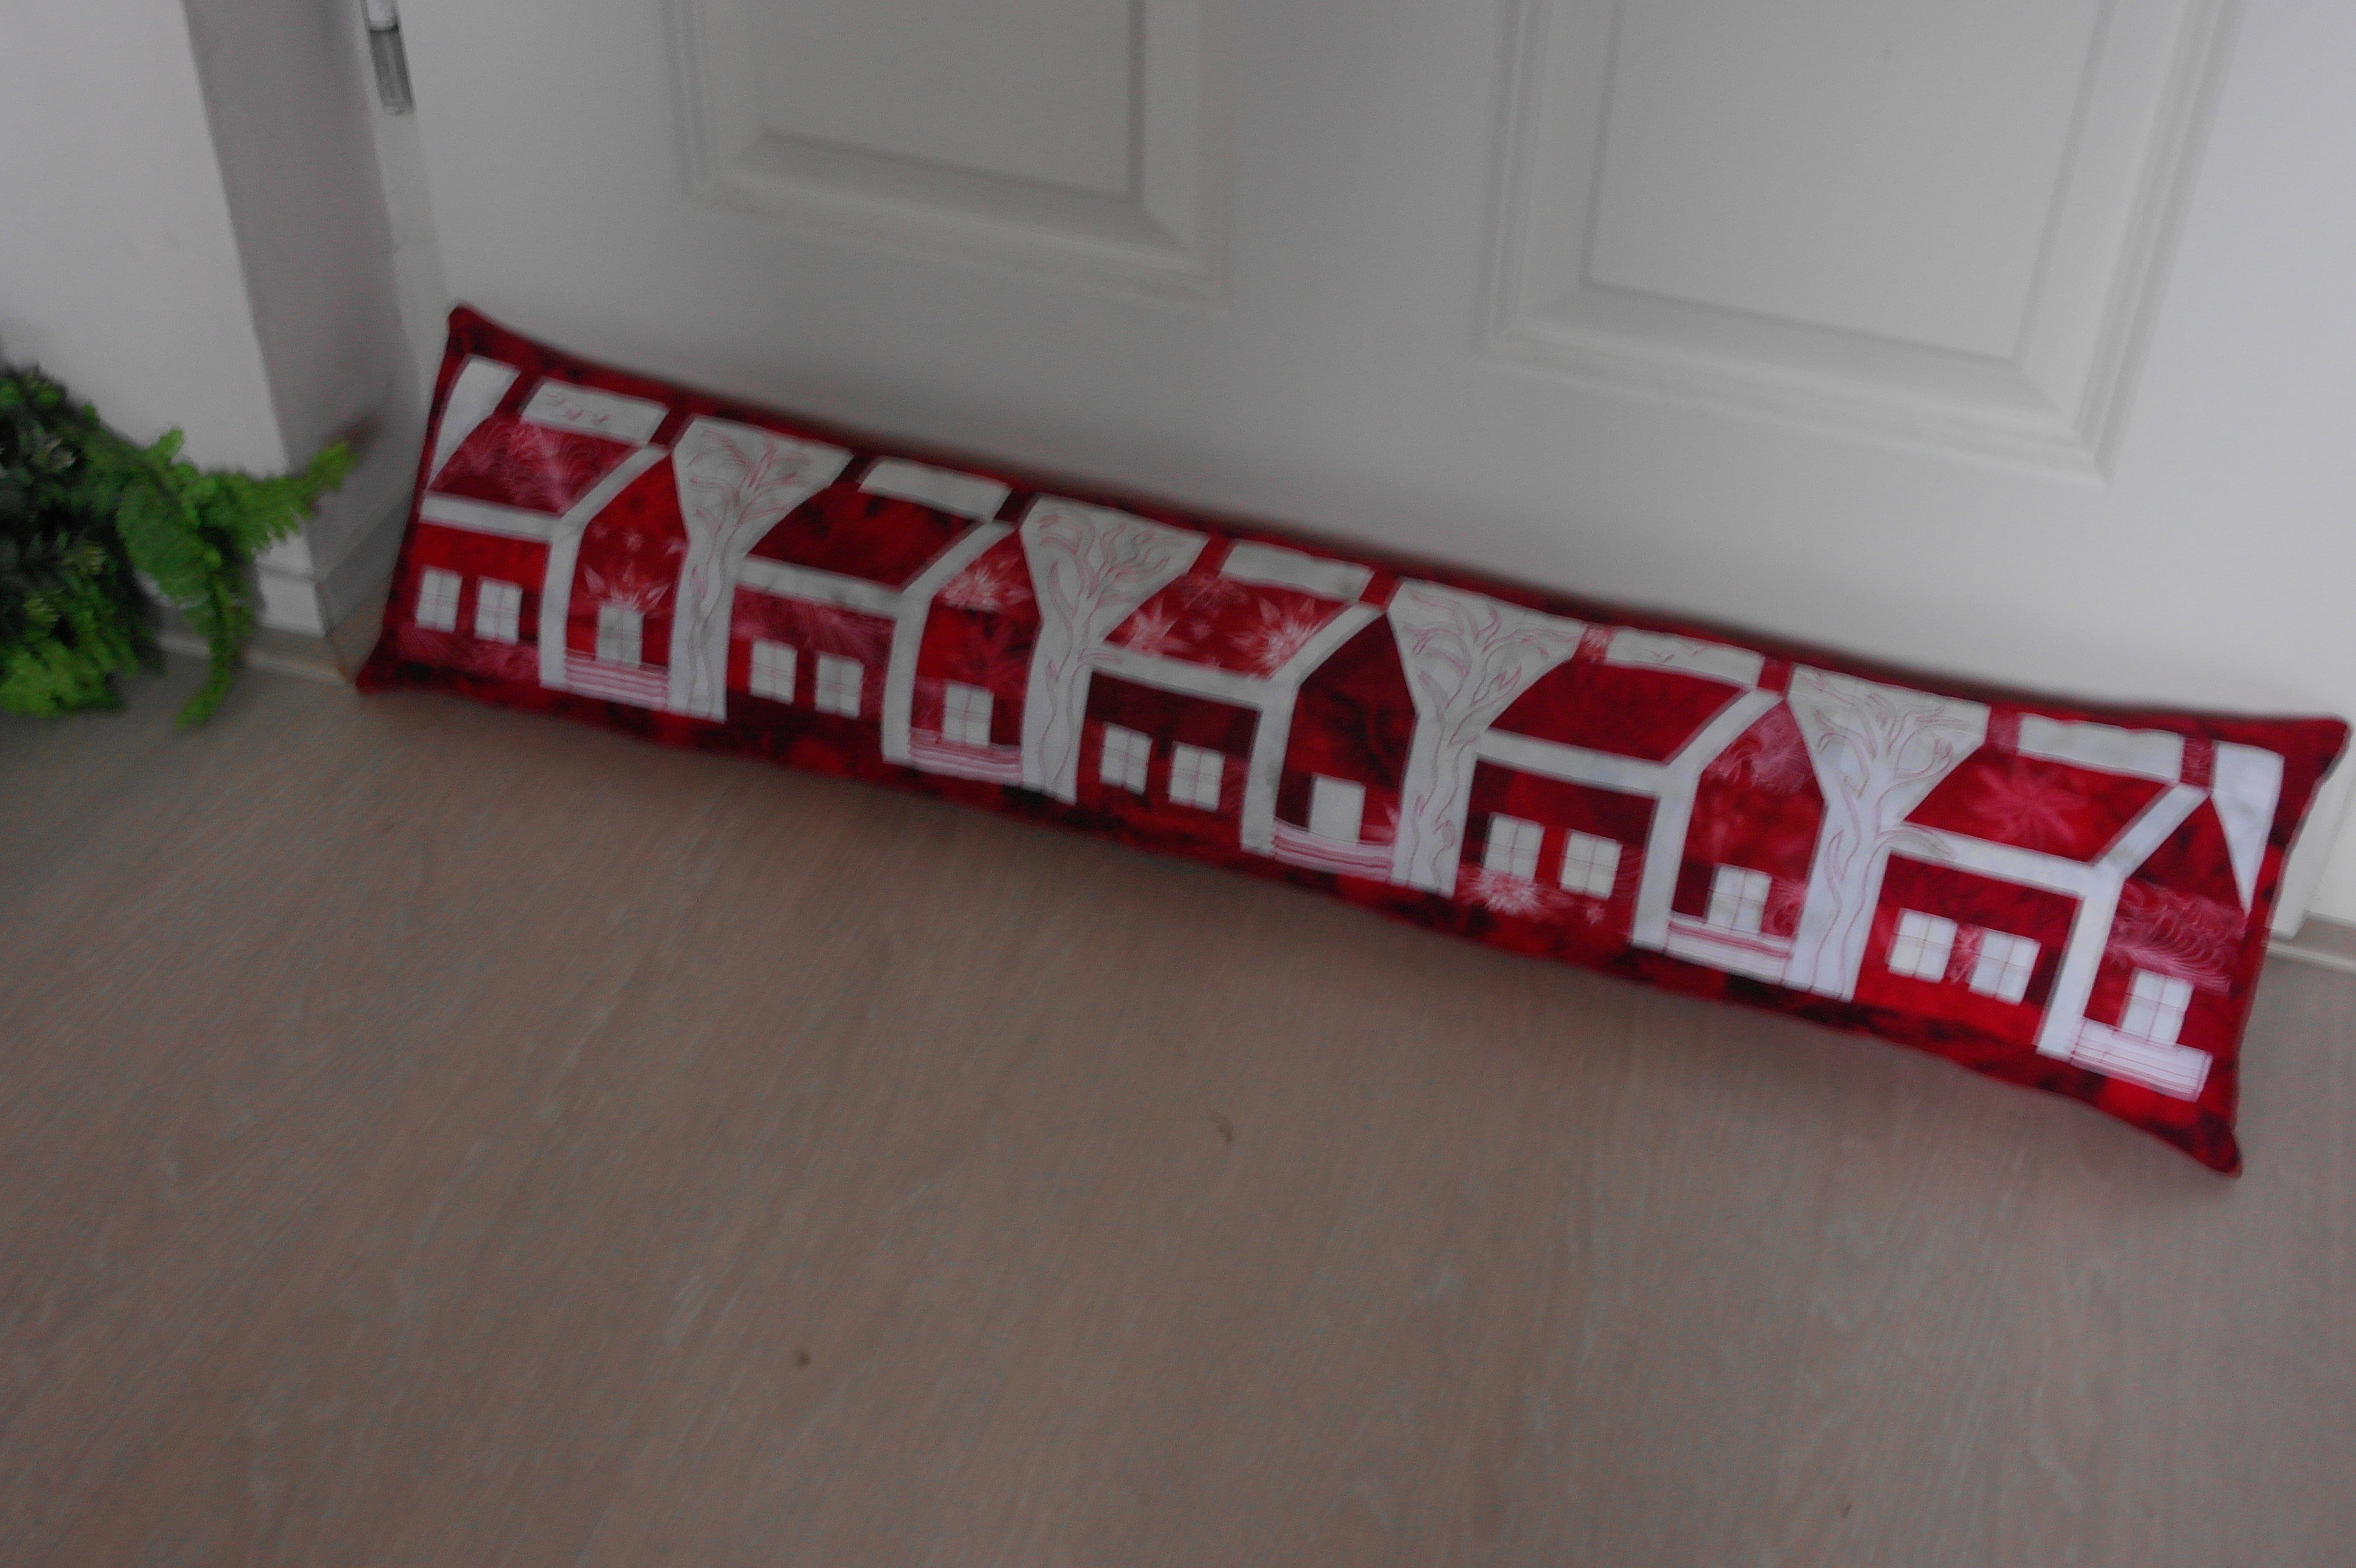
Your Christmas Houses-draft roll is ready for use: as a draft roll against a door…

or perhaps even as a ornament on the head board of your bed or couch!
I hope you’ve enjoyed making this Sustainable Christmas Gift: use colorful wrapping paper and place this as a gift under the Christmas tree. The recipient can use this all year around, because, although it is made in red and white, these colors are not just for Christmas.
Wishing you wonderful Holidays
Happy Stitching!
Sylvia Kaptein
Sylvia’s Art Quilts Studio
*It is helpful to understand the technique of paper piecing before making this gift. Always work in numerical order, seam allowances are all 1/4 inch, due to the use of an Add-a-Quarter ruler.

I love it – so warm and practical!
Regards,
Jan
Thanks, have fun making it!
Happy Holidays