 BERNINA Corporate Blog -
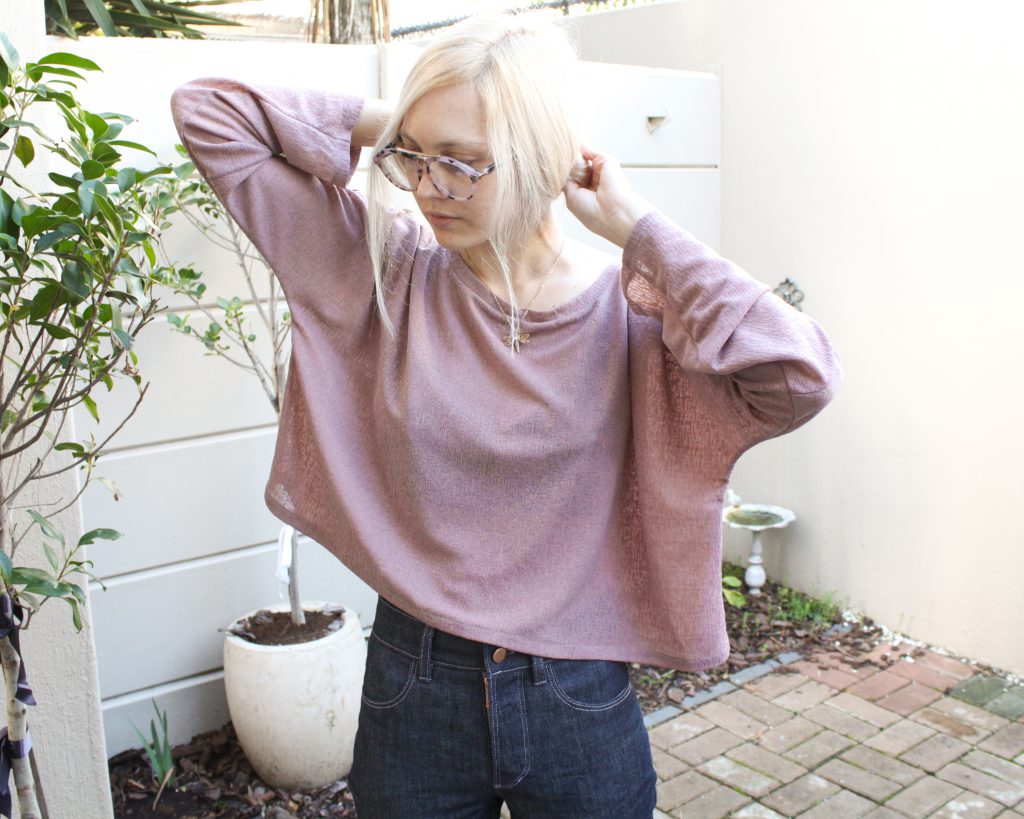
It is almost 4 months since Lockdown started here in South Africa.
Two days before it started, I stocked up on fabric while everyone else stocked up on food, water and other essentials. Even though our grocery stores were to remain open, the fabric stores unfortunately had to close. I knew there was no way I was going to manage isolation without keeping busy. There were a few projects I had been dreaming of sewing and now I had all the time to do them.
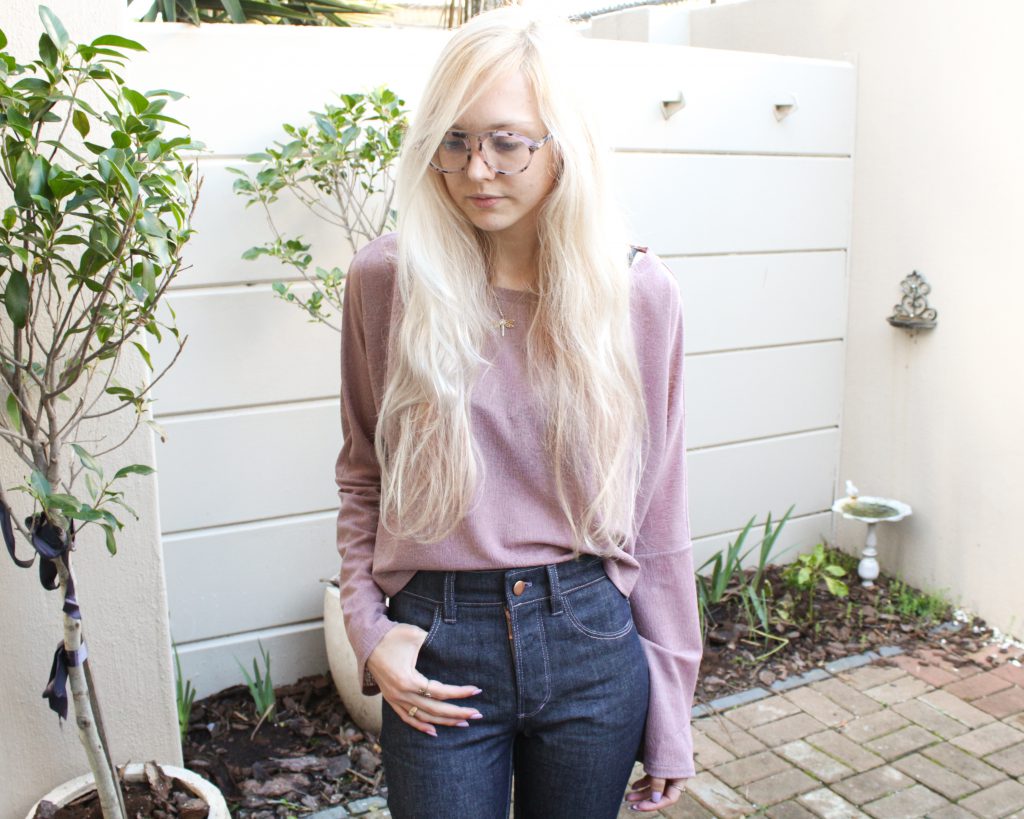
I bought an interesting lightweight knit to make a top and later came across the Athina Top pattern.
The Athina Top is a Free Downloadable Pattern from Tessuti Fabrics.
This pattern is super versatile so its a great one to have in your stash.
Due to its oversized boxy nature, the pattern will fit a variety of shapes and sizes. It can also easily be adapted to a variety of lengths and sleeve lengths.
The pattern is designed for woven fabrics, but I decided to adapt the neck finishing so that I could use my knit fabric.
This little adaption means the pattern has even more variety!
You could have a long sleeve crop top version in a cosy knit, a short sleeve dress version in a summery woven and a 3/4 sleeve mid length top made from something inbetween. There are so many possibilities.
What you’ll need:
- Athina Top Pattern (free download from the Tessuti website)
A guide to get your free pattern - Pattern Paper
- Tracing wheel
- Ruler & Tape Measure
- Paper & Fabric Scissors
- Tape if piecing together the A4 print out version
- Your choice of light to medium weight knit fabric
Work out from your adapted pattern or refer to the pattern’s downloadable Instructions for the fabric quantity. - 3 or 4 threads to match your fabric
- Ball-point/jersey/stretch needles
- Sewing Machine
- Overlocker
Seam allowances are included in the pattern and are 1.27cm (0.5inches).
Please keep in mind that this post is about sewing a knit version of the Athina Top.
You are more than welcome to follow the instructions provided with the pattern for a woven version.
Pattern Adaptions
Once you have assembled your printed pattern and traced off your size, here are some adaptions you can do.
Top Length
The pattern comes in 2 great length variations: 63-65cm and 74-77cm
However, you have the ability to lengthen or shorten the pattern to suit your style.
I personally prefer a more cropped top due to my short torso so I chose to make my pattern length 47.5cm.
I measured along my centre back from where the neckline would sit in my neck down to where I want the hem to be.
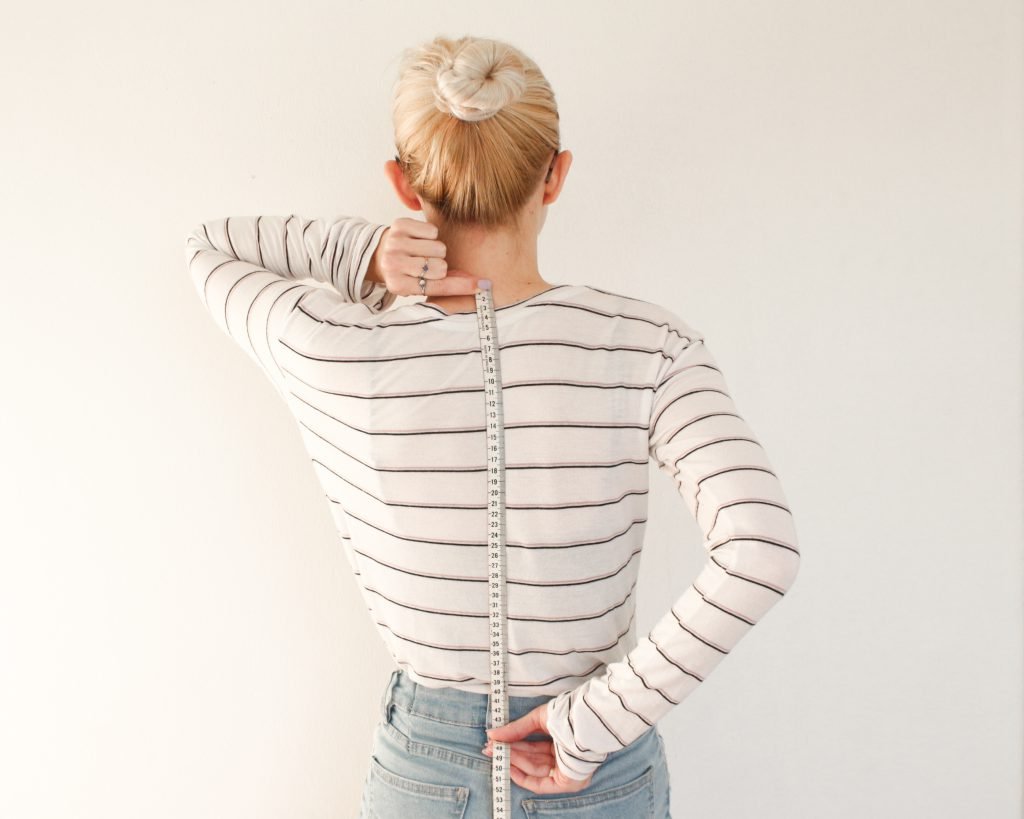
When changing the length of a pattern, keep in mind the seam and hem allowances (both are 1.27cm in this pattern).
Eg: my back length is 45cm so I need to add 1.27cm seam allowance and 1.27cm hem allowance which makes it 47.51cm
If lengthening the pattern, keep in mind the hem width. You don’t want the hem to potentially restrict your walk and may need to widen the pattern at the hem to accommodate this.
Sleeve Length
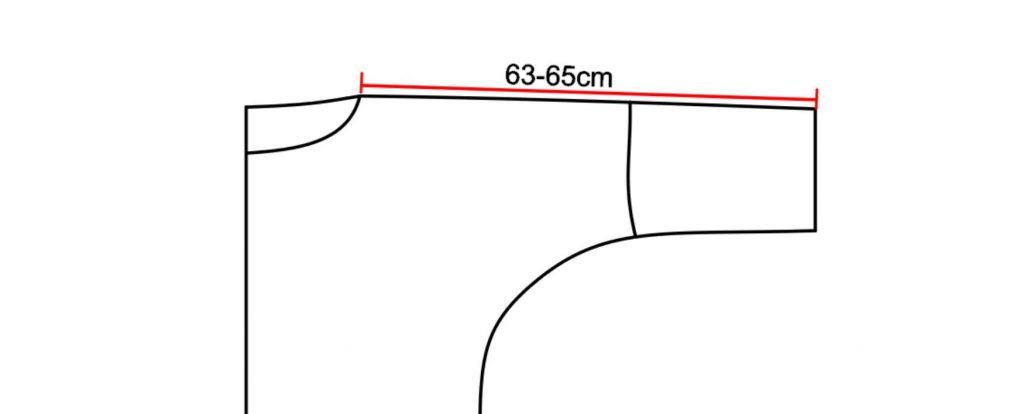 This pattern has long sleeves: 63-65cm from the neckline edge.
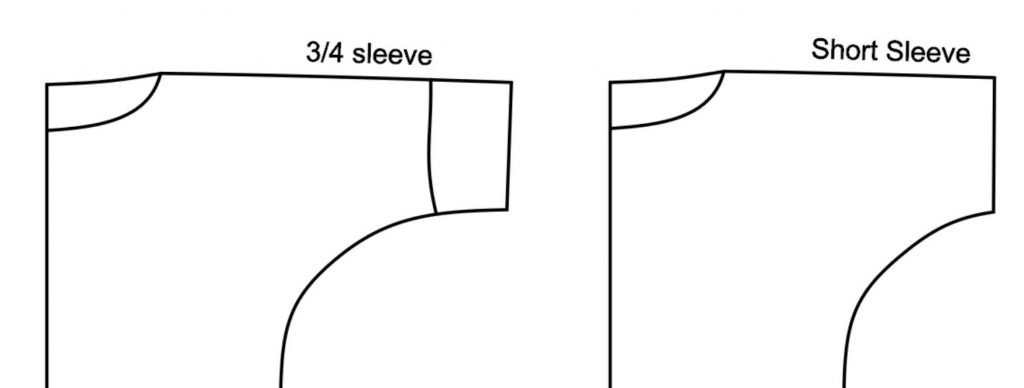
You could halve the sleeve pattern piece or turn it into a cuff for a 3/4 length sleeve. Alternatively leave out the sleeve pattern piece for a short sleeve version as the extended shoulder of the top creates a short sleeve.
I prefer to keep my sleeves long and roll them up as needed.
Neckline Adaption
For a knit friendly neck finishing, I chose to add a neckband.
When determining the width of the neckband keep in mind this calculation:
2 x (finished width + seam allowance) = Neckband width
Eg. For my neckband: 2 x (1.5cm + 1cm) = 5cm
To accommodate my neckband I needed to adapt the neckline of the pattern.
As I wanted the finished width of my neckband to be 1.5cm but wanted to keep the original neckline, I needed to remove 1.5cm from the neckline on the pattern. I also wanted the seam allowance to be 1cm not 1.27cm, so I needed to remove a further 0.27cm. This meant removing a total of 1.77cm.
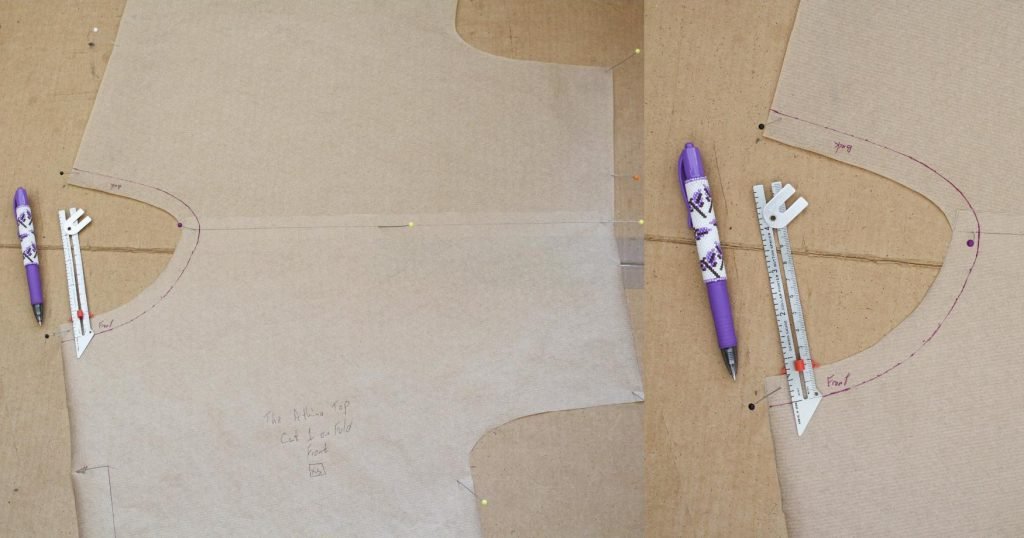
Overlap the Front & Back pieces along the shoulder seam and draw in the new neckline (for me this was 1.77cm in from the original neckline).
Cut along the line for your new neckline.
There are many equations available for determining the perfect length neckband that sits flush against your body. However there is no set rule as a lot depends on the percentage of stretch in your fabric. The only rule I follow is to cut the length of the neckband in the direction of the most stretch (usually on the cross grain ie. Selvedge to selvedge). This is so that you are able to make use of the stretch properties.
For my neckband I chose to use this calculation:
(Length of opening x 0.9) + (2 x seam allowance) = Length of Neckband
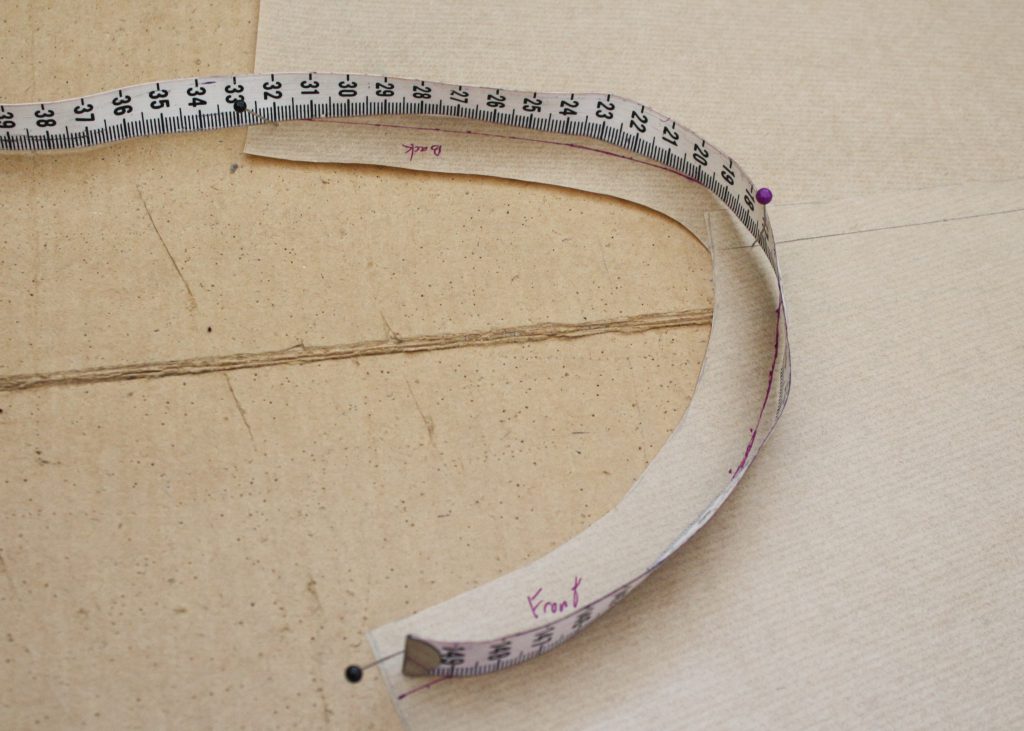
Measure the neck opening from Centre Front to Centre Back and multiply by 2.
(I measured my neck opening prior to cutting off the original neckline)
The length of my neck opening is 32.5cm x 2 = 65cm
So to determine the Neckband Length:
(65cm x 0.9) + (2 x 1cm) =60.5cm

Using this information I drafted my Neckband Piece.
Length of Neckband = 60.5cm
Width of Neckband = 5cm
Optional Reinforcement
You can reinforce the neckband by binding the seam allowance along the back of the neckband.
To draft this piece use this calculation:
Width = 3 x seam allowance
Length = (2 x seam allowance) + length of back neckline
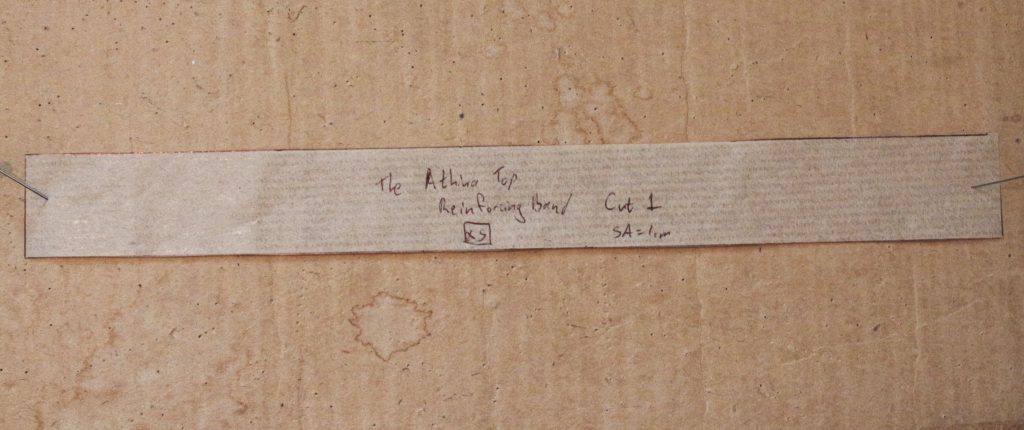
Eg. 3 x 1cm = 3cm width
(2 x 1cm) + 30cm = 32cm length
Assembly
1. Attach Front to Back along shoulder seams and press towards the Back.
I chose to overlock all my seams so I trimmed the excess seam allowance as I overlocked.
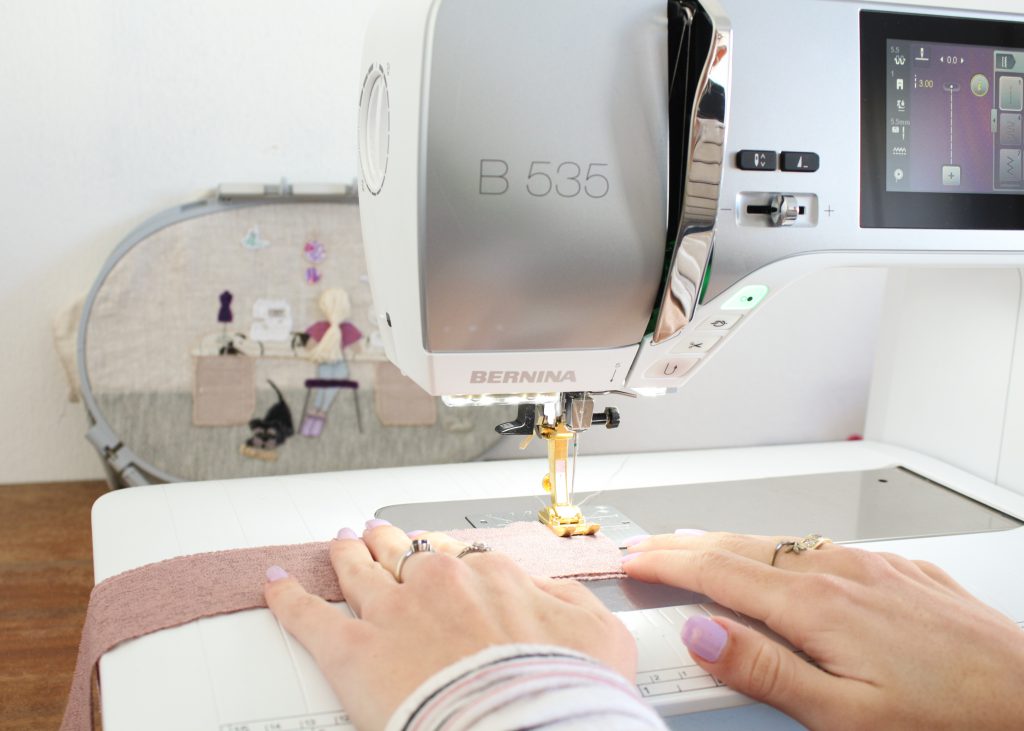
2. Join the ends of the Neckband. I prefer to straight stitch them together rather than overlock to reduce bulk.
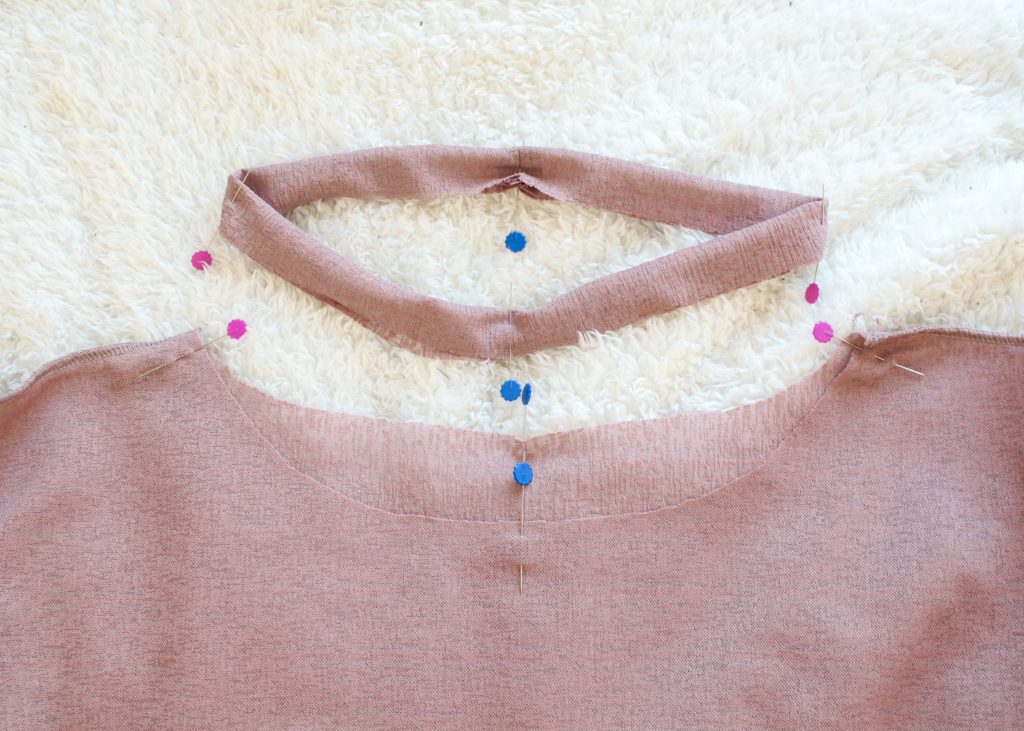
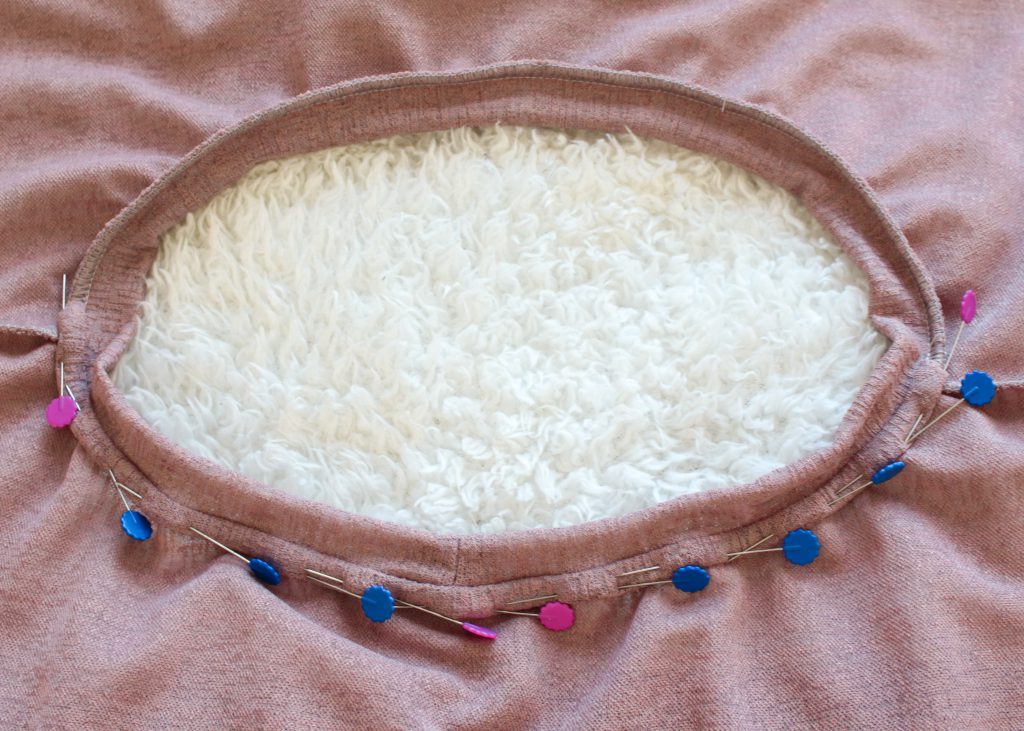
3. Divide the Neckband and the Neck into equal quarters.

4. Match up the Neckband to the Neck and join. Gently stretch the Neckband to fit the Neck opening.

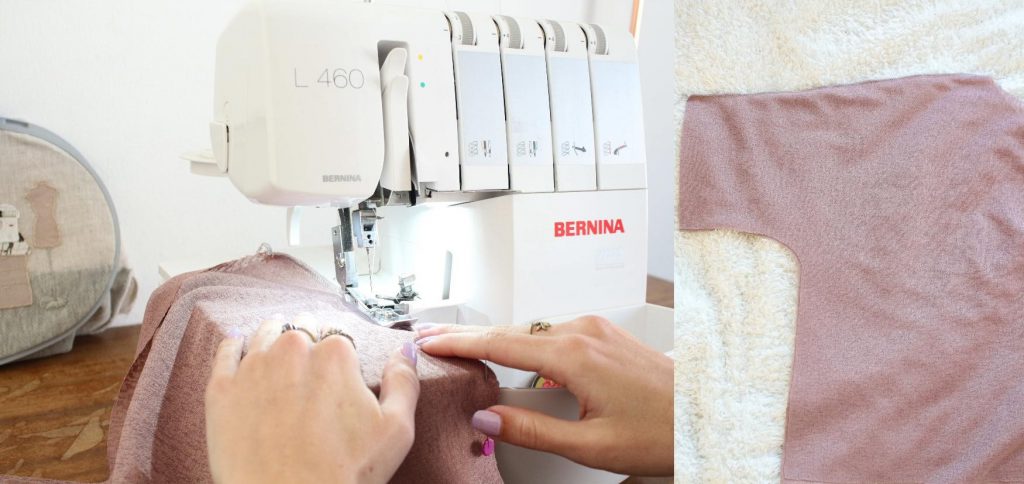
5.1. Optional: Attach the reinforcing strip..
Pin and sew the reinforcement strip along the Back Neckband seam. Fold in the ends.
5.2. Fold the strip over the Back Neckband seam to encase it.
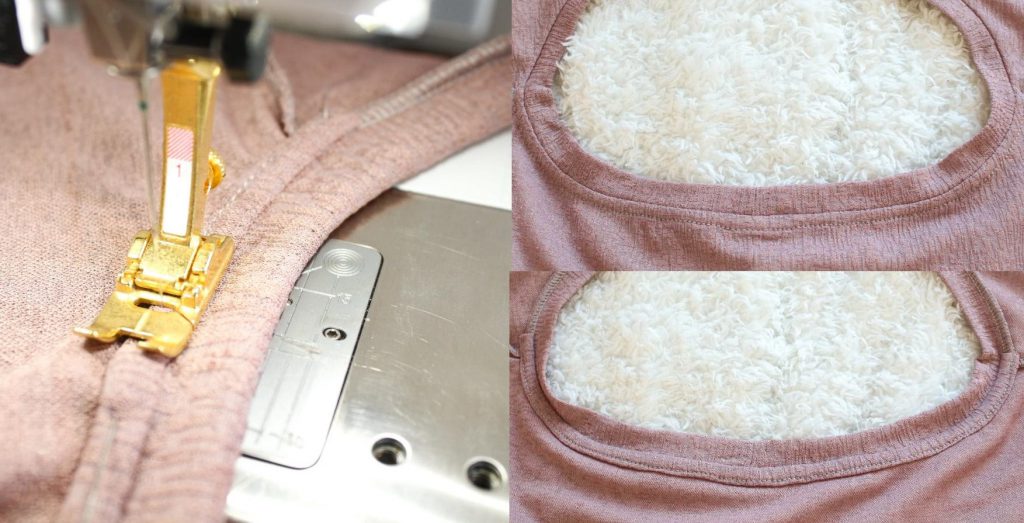
5.3. Using a straight stitch, sew the reinforcement strip to the back of the garment.
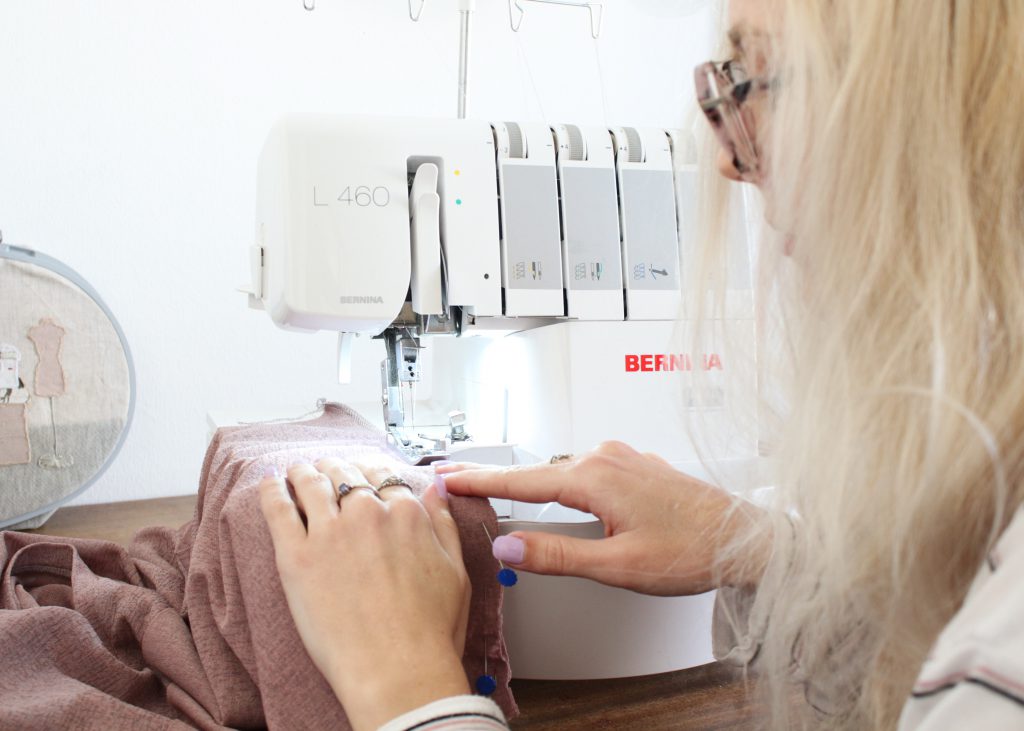
6. Attach the Sleeves.
Remember to match up the Shoulder Seam with the centre of the Sleeve Head.
Press the seam towards the Sleeve Hem.
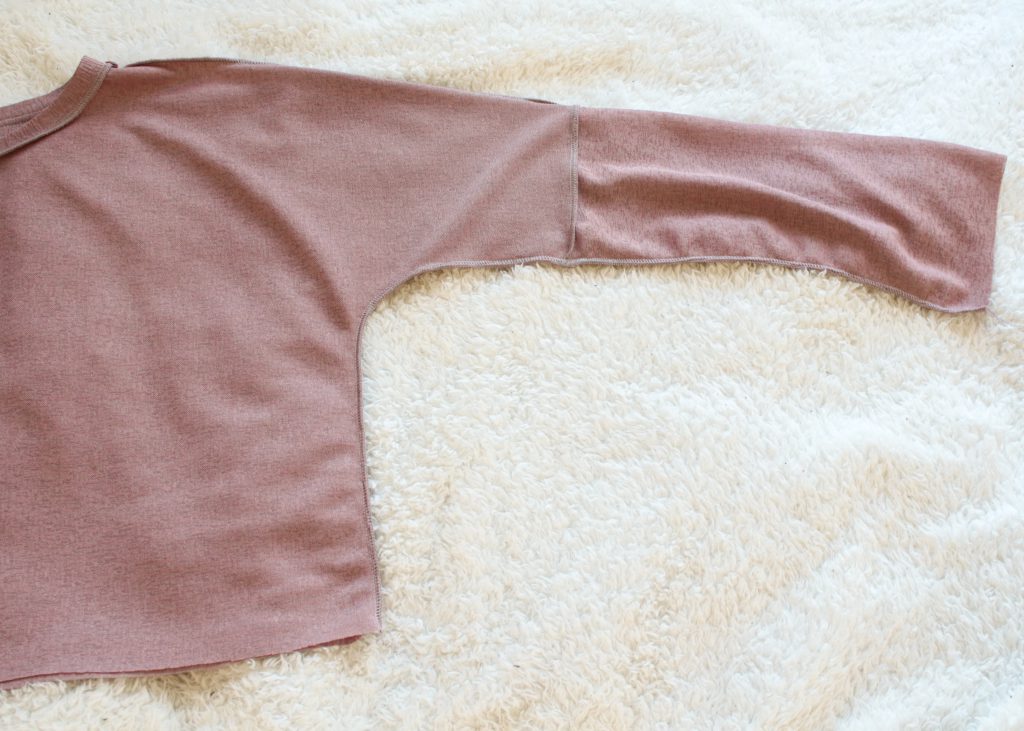
7. Join the Side Seams and press them towards the Back.
Match up the seams where the Sleeve joins the Body.
Join all along the Side Seam from the Sleeve Hem to the Body Hem.

8. Sew the Hems.
Finish the edges with overlocking.
Fold up the Hem allowance (1.27cm) and press.
Stitch it in place.


Tips
- If your neckband is standing up/not close to your body, you need to reduce the length of the neckband.
- If your neckband is causing the neckline to gather, you need to increase the length of the neckband.
- I learnt the tip about reinforcing the neckband from French Navy Patterns. I think it adds a touch of professionalism to a me-made garment.
- For reference, I made my version of the Athina Top in a size XS.
I would love to see what you make, please feel free to share with me!
And remember to use #athinatop and tag the pattern maker @tessutifabrics
-Hannah-Rose


Hello.This post was extremely interesting, particularly because I was looking for thoughts on this topic last Thursday.
Thank you so much for this tutorial really appreciate it.
Best,
Anne
Hi Anne
Only a pleasure!
Please feel free to share a pic of your Athina Top 😉
Hi, my daughter loved the shirt you created and she also loves the color. Are you allowed to share the fabric source? Best regards.
Hi Jill 🙂
Oh lovely, thank you.
Yes sure! I have no idea what exactly the fabric is except that it was labelled as a type of jersey. I bought it at Material Mart in Bellville, Cape Town. It is a thin fabric which I think will be great for in-between and warm weather.
I hope your daughter can find it or at least something similar 😉
All the best
Hi, Thank you fir this pattern. Especially the piece about calculating the neckband!! I am just a beginner, but find this newsletter very helpful and interesting. I am also from South Arica and agree with you about keeping busy. Stay safe.
Hi Esther
Thank you for commenting 🙂
I’m glad enjoyed the newsletter, Bernina compile a great list of articles. I am always flattered when they choose to feature mine.
I hope you have some luck with your neckbands 😉
Iv’e written a few articles about some great free patterns if you want to have a look.
All the best and I hope you and your family keep safe and healthy.
Hi Hannah,
Thank you for this. I think you are so clever.
I went to download the pattern but the website won’t let me have it without joining yet another ‘club’ and giving them all my banking details which I’m reluctant to do.
Is there any other way to get hold of the pattern?
Please keep up inspiring us to make our own clothes.
Best wishes
Trish
Hi Trish!
 See you on Facebook ❤︎
Thank you for your comment
After reading your comment I created a “A guide to get your free pattern” and uploaded it under the “What you’ll need” section.
As long as you select the free “Download-Print at Home or Copy Shop” version, no banking details are required.You can provide as little information as you are comfortable with under the “Billing Details” section, however a valid email address is required.You can also deselect the “Keep me up to date” option.
I really appreciate you bringing it to my attention. I downloaded the pattern a while ago and completely forgot that the download process is a bit daunting.
I hope you and your family are keeping warm and well