 BERNINA Corporate Blog -
Only three rows remaining! Today we will start with part 10 of the quilt along. For this row we will use the reverse applique technique for the second (and last) time to sew some curves.

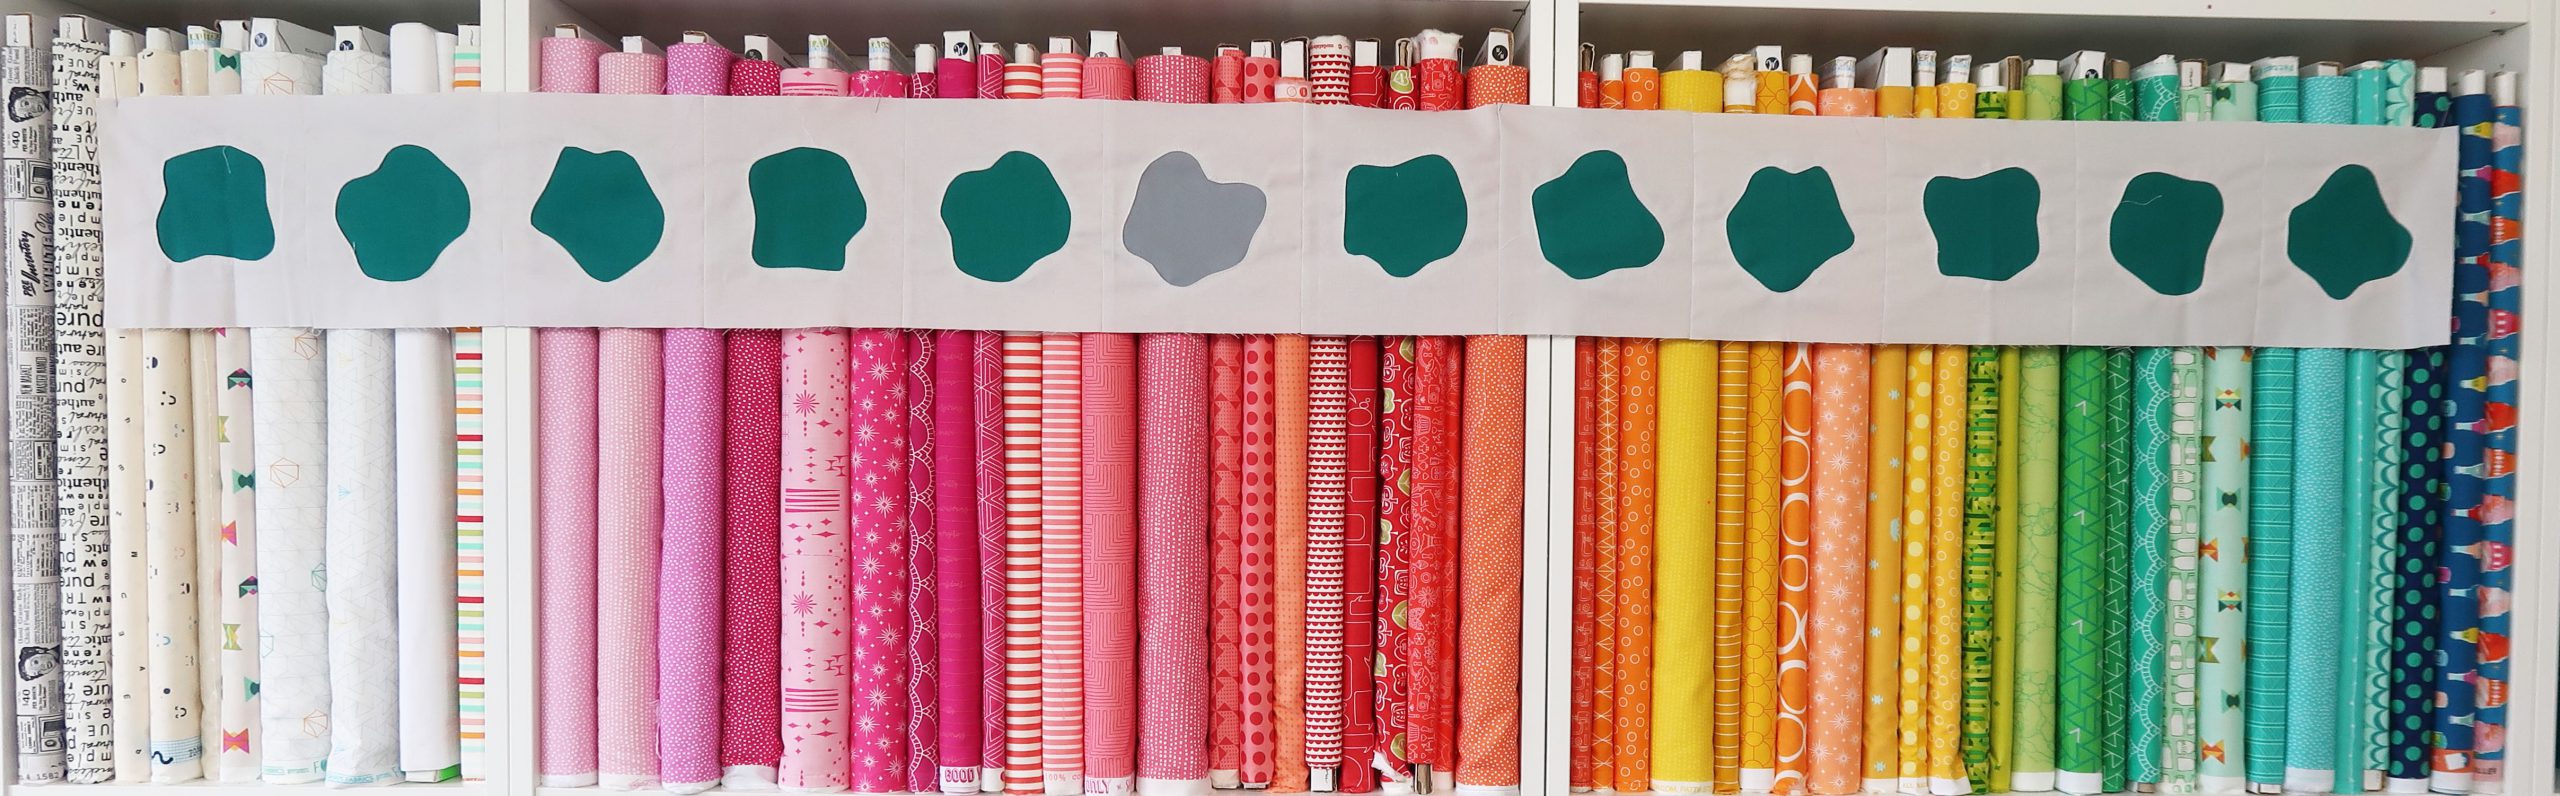
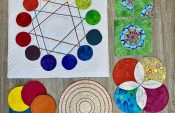
Row #10 ‘Dot dot dot’
You did it before, so I know you can do it again! For this row we will be sewing curves, full circles this time, with revere applique. Some of you really liked this technique. Others were a little bit less impressed with the ‘Around the corner’ row. (I get that, applique or round shapes wasn’t my cup of tea the first time I tried it either!)
However, I’m super happy and proud that you’re still sewing along with our QAL. We are so close to finishing it!
This row will be a bit quicker than the previous row with reverse applique. You will ‘only’ have to make 12 blocks instead of 28. Sounds nice right. Let’s go and make row 10!
Check out the video below to see all the steps to make this row. I’ll go over the whole technique again.
New here?
If you’re new here, welcome! On the 28th of November we kicked off a super fun quilting project. We started a quilt along, where thousands of quilters from all over the world are making the same quilt. Every four weeks a new part of the pattern, a new row, will be released. After 12 rows you will have a quilt of 70 x 90″.
Even though we started eight weeks ago you can still join us! You will have enough time to catch up. There are also still fabric kits available for this quilt along. You can make the quilt in rainbow colors on silver fabric, in rainbow on white fabric or with blue fabrics. Of course you can also pick your own fabrics or use what you have in your stash.
On this page your can find all the links to previous blog posts about this project. Hop over to this blog post to read all the general information about this quilt project. And also read this one to learn more about the materials we use and the fabric requirements.
Fabric + Material
For this row you will need some teabag paper or thin lining fabric besides your fabrics.
Did you order a kit for the quilt along? Than you’ll use the blue fabric called ‘Emerald’ for this row if you are making a rainbow quilt. Or the dark grey fabric called ‘Titanium’ if you’re making a blue quilt. We will make one circle in your accent color, so also get your accent fabric out. And of course you’ll need your background fabric.
For those of you who want to play with the location of the accent color in each row, or add extra accent colors or just want to get a little more insight in the layout of the quilt. Here is a schematic of the rows and the placement of the accent colors.
And this is what the schematic of the quilt looks like for the blue fabric kit.

You will need the following to make this row.
- Main fabric: 11 inch
- Accent fabric: fabric for a few bobbles
- Background fabric: 15 inch
- Tea bag paper or thin lining fabric
- Inch ruler (12 x 6 or 24 x 6 inch both will be fine)
- Rotary cutter
- Cutting mat
- Iron + ironing board
- Sewing machine
- Thread (I use thread in the color of my background fabric)
Ronde vormen
Voor deze rij maken we weer ronde vormen met reverse applique. We naaien over de lijnen die je eerst tekent op theezakjes papier
Round shapes
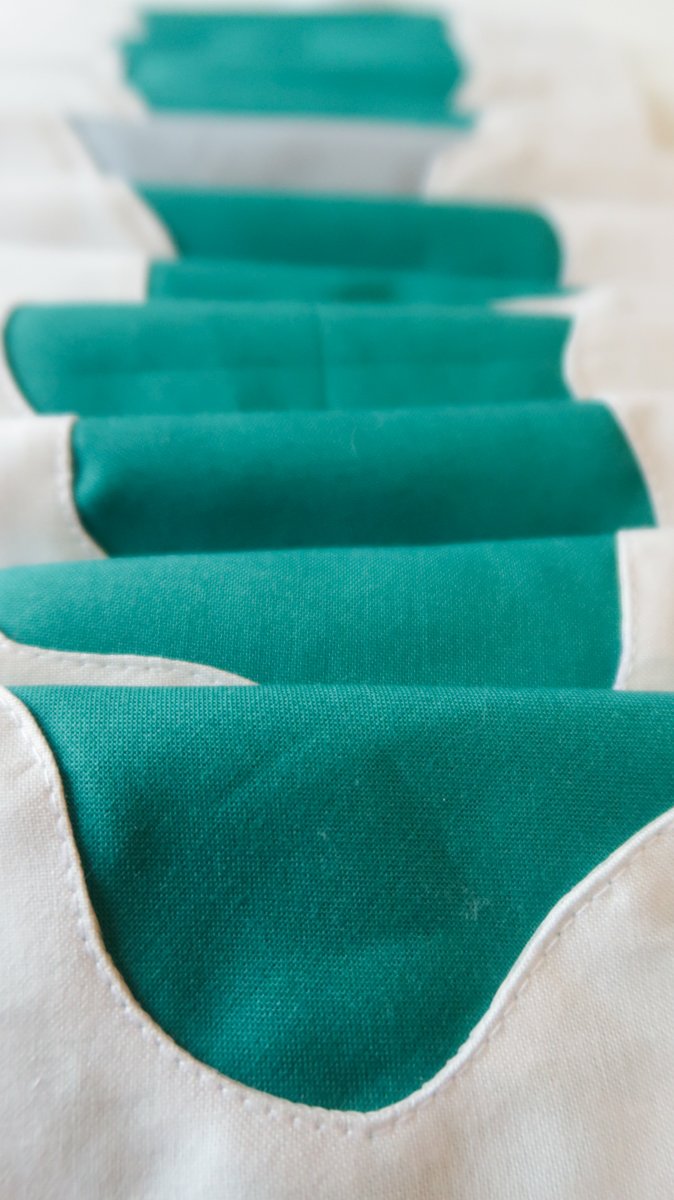
For this row we are going to make round shapes with reverse applique again. The sewing is very straight forward. You will sew over the lines that you first draw on your tea bag paper. No complicated cutting of round shapes and no pulling and tugging at your fabric while you’re sewing.
With this method you can make any rounded shape and you will exactly know how it turns out. It’s nice and precise. In stead of the half circles we did last time, we will now sew 12 circles.
Border included
This row already has the border included at the top and at the bottom. So you don’t need to add any borders to this row when assembling the quilt.
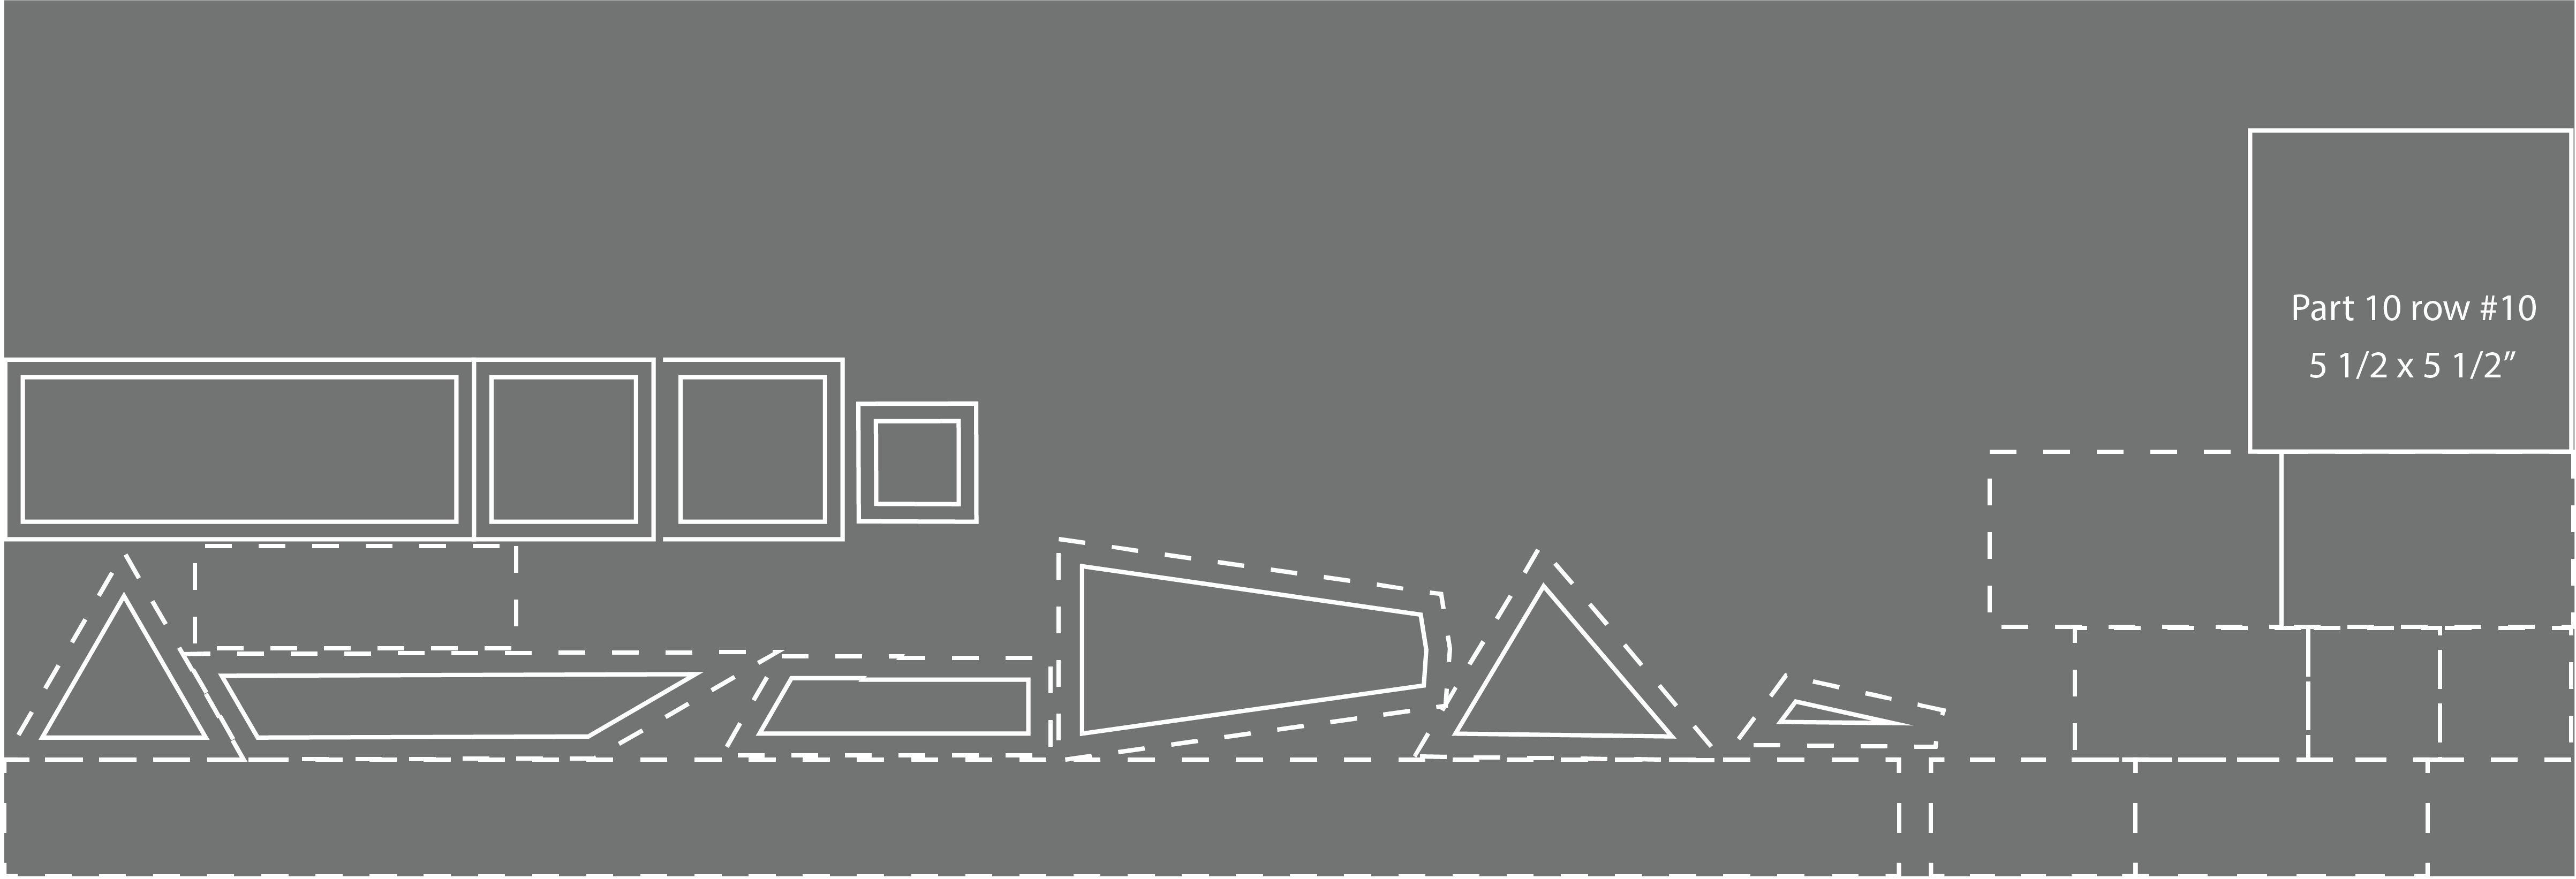
Cutting your fabric
Here is an overview of what to cut for this row. Before you start cutting all the fabric I would recommend making a test block. That way you can see if you like the size of the pieces listed below or if you want to cut your pieces a little bigger.
Main fabric (Emerald)
- 11 x a piece of 5 1/2 x 5 1/2″
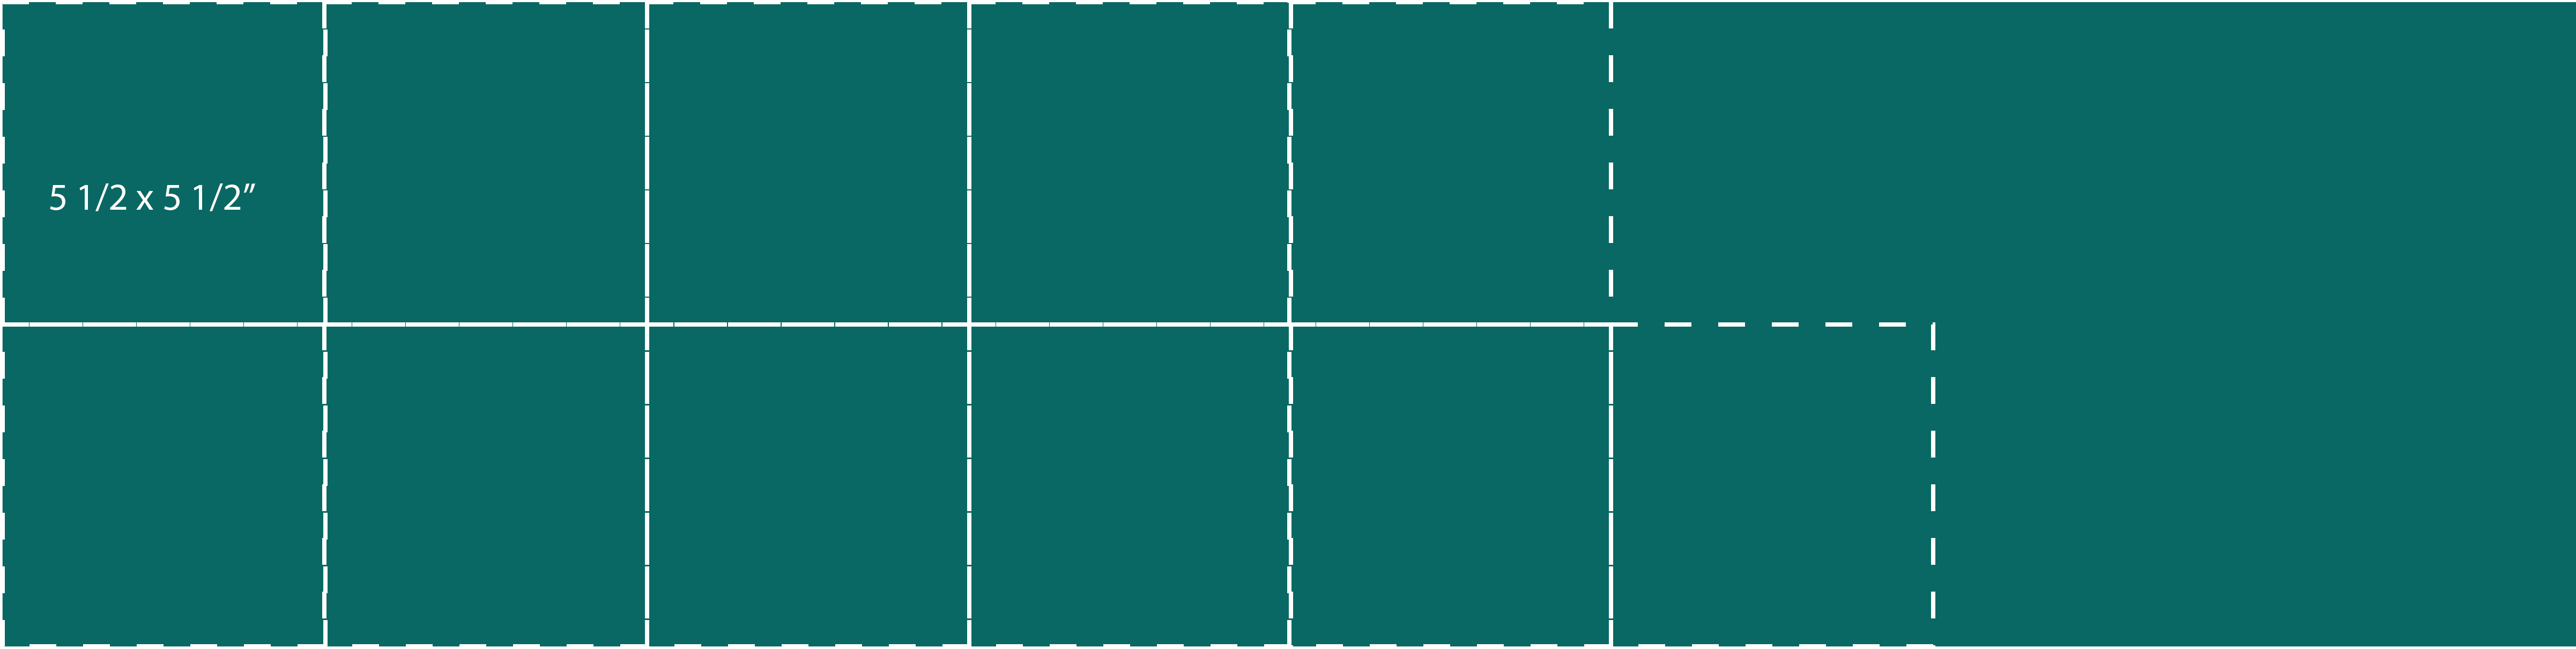
Cutting scheme for main fabric Emerald
Background fabric (Silver)
- 12 x a piece of 7 1/2 x 7 1/4

Cutting scheme for background fabric Silver
Accent fabric (Titanium)
- 1 x a piece of 5 1/2 x 5 1/2″
Cutting scheme for background fabric Titanium
Tea bag paper
- 12 x a piece of 6 x 6″
These cutting schemes can also be downloaded as a PDF:
Cutting schemes for QAL part 10 – Row #10 [Rainbow]
Here you can download the cutting scheme for the Blue fabric kit:
Cutting Schemes for QAL part 10 – Row #10 [Blues]
To improv or not to improv
You can make 4″ circles for this row, or go with shapes that are a little less perfect. Go with what feels good for you.
You can improvise and draw up your own shapes, or you can download the template below and use my 4″ circle template. In that template I’ve also included some improve shapes.
Download your template for a 4″ circle and improv shapes
Make your blocks
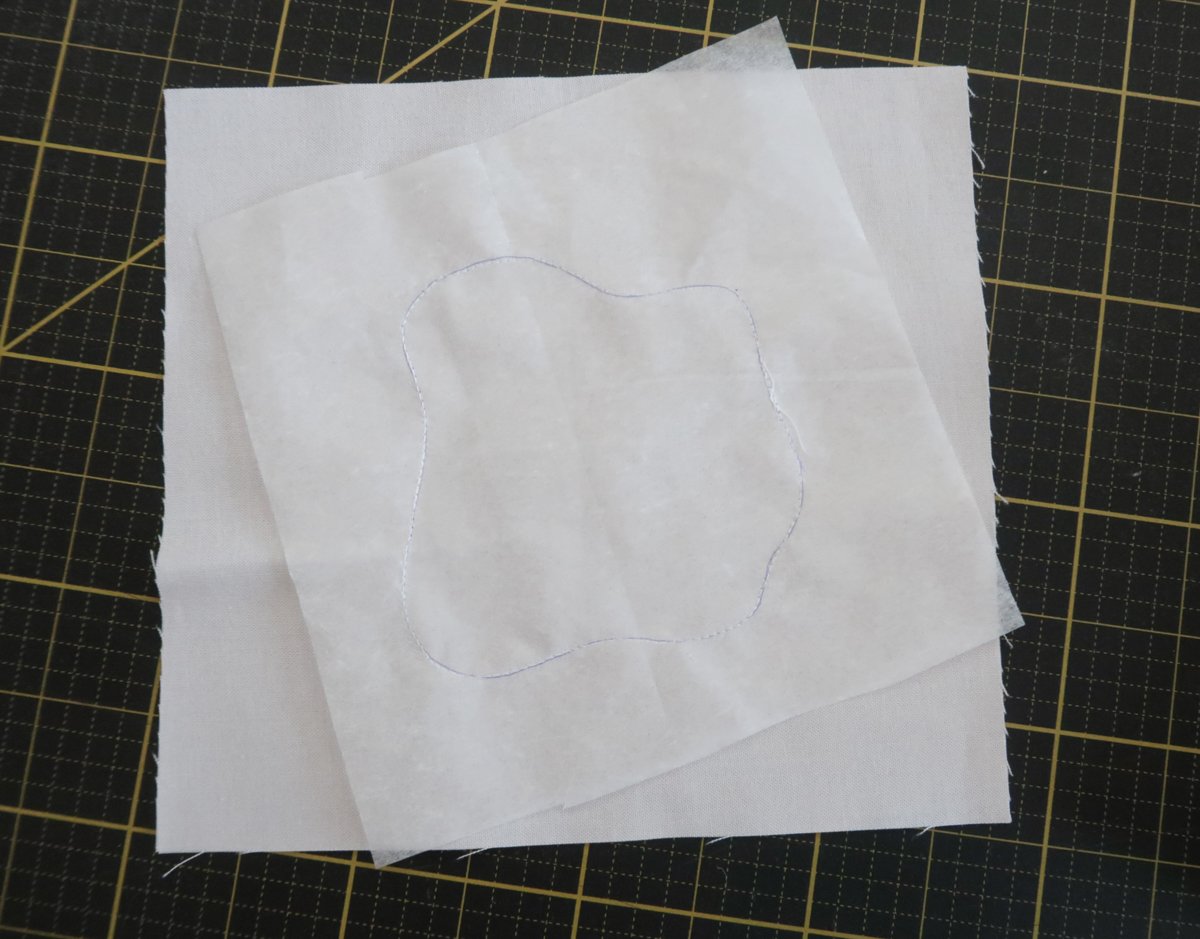
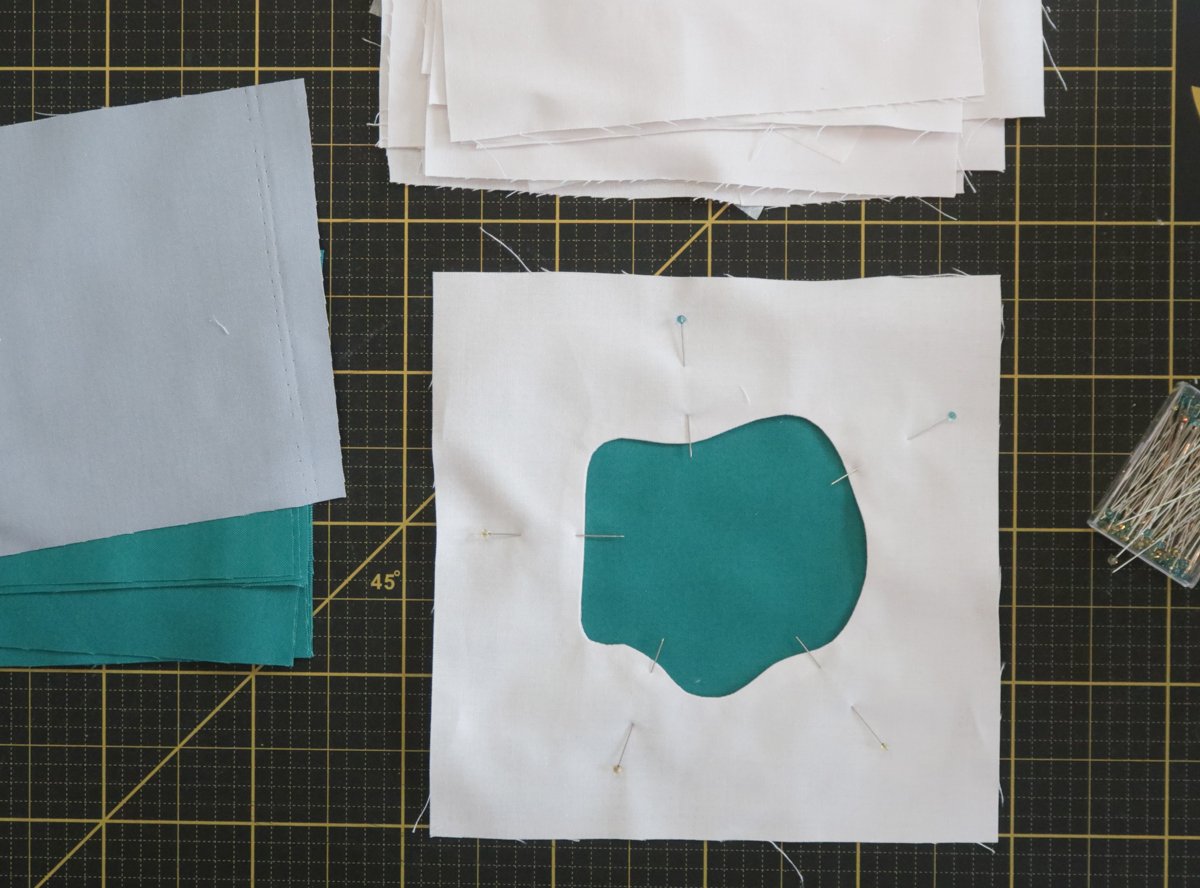
Lets’s start with our first block. Take a piece of tea bag paper (or very thin lining fabric) and draw a circle or a improv shape on it.

Place the tea bag paper on a piece of background fabric. Try to align it in the center of the fabric. In the video I’m sharing some tips on how to do that.
When working with print fabric, place your fabric with the right side up, then place your tea bag paper on top of that.
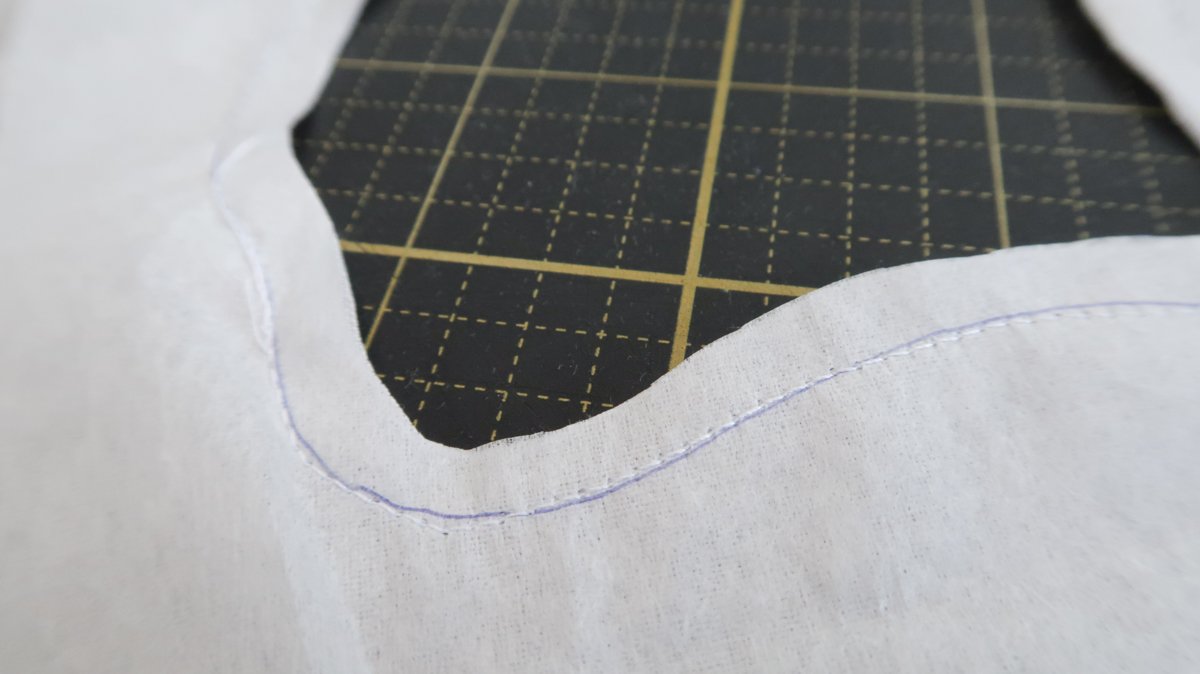
Now you sew over the line on the tea bag paper. Set your stitch length a little smaller then you normally use for stitching. I put my Bernina 770QE in the needle down position so my foot hovers just above the fabric when I stop to turn my fabric a bit when needed.
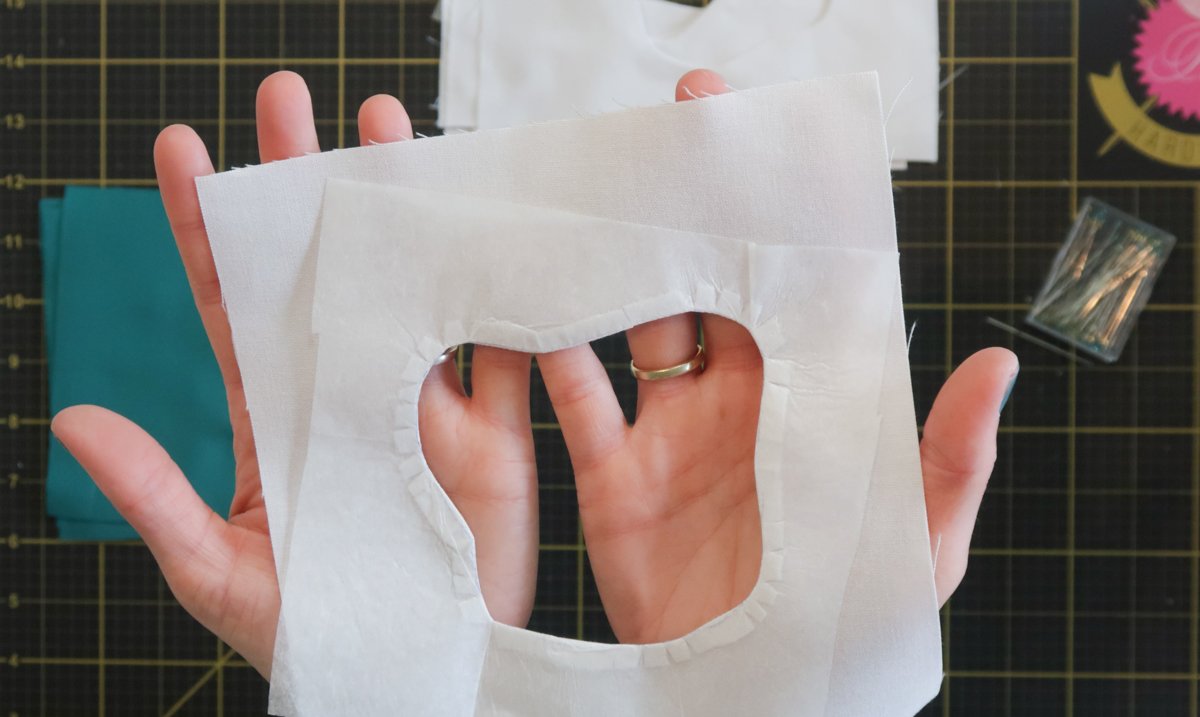
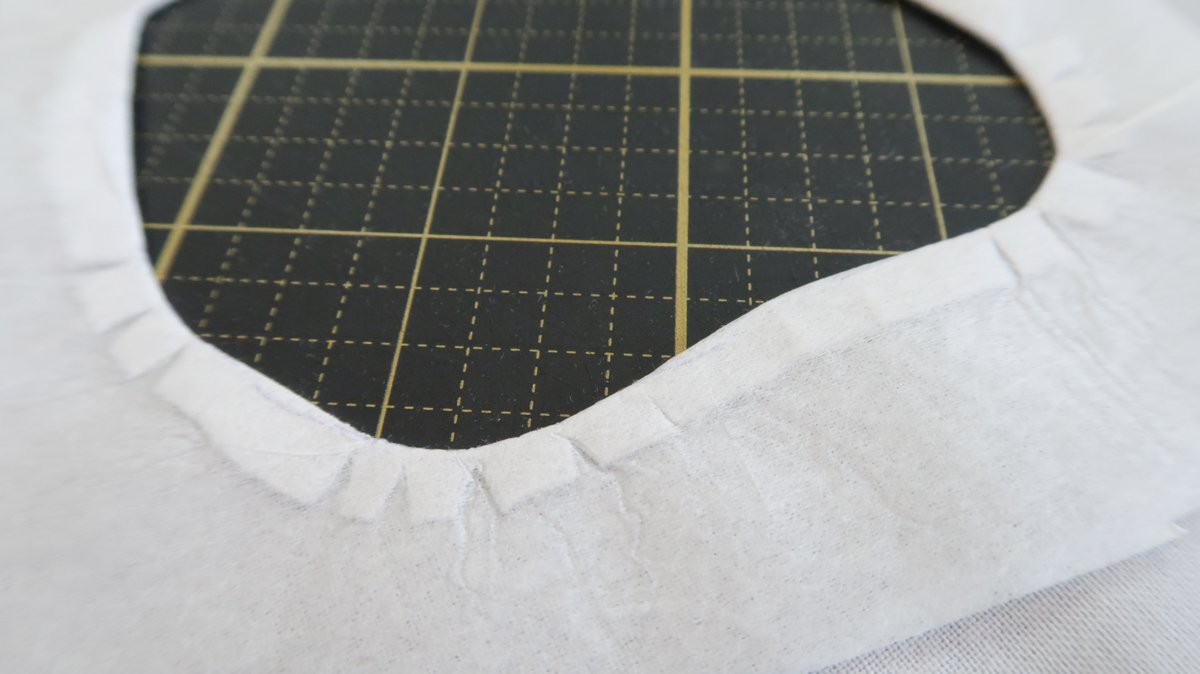
After sewing your shape you cut the inner fabric away. Also make little cuts in the fabric toward the sewing line.

Now you can turn your piece ‘inside out’. Flip the tea bag paper to the other side and press it flat. Make sure your tea bag paper isn’t peaking out on the front.
When this is nicely pressed you take a piece of main fabric and place it behind the background fabric. Also here, when you work with print fabric, place your fabric right side up.
Put in a few pins around the end and top stitch the background fabric on top of your main fabric. I set my stitch length a little bit bigger, to 3, for this. If you like, you could even go for a blanket stitch or a different decorative stitch.


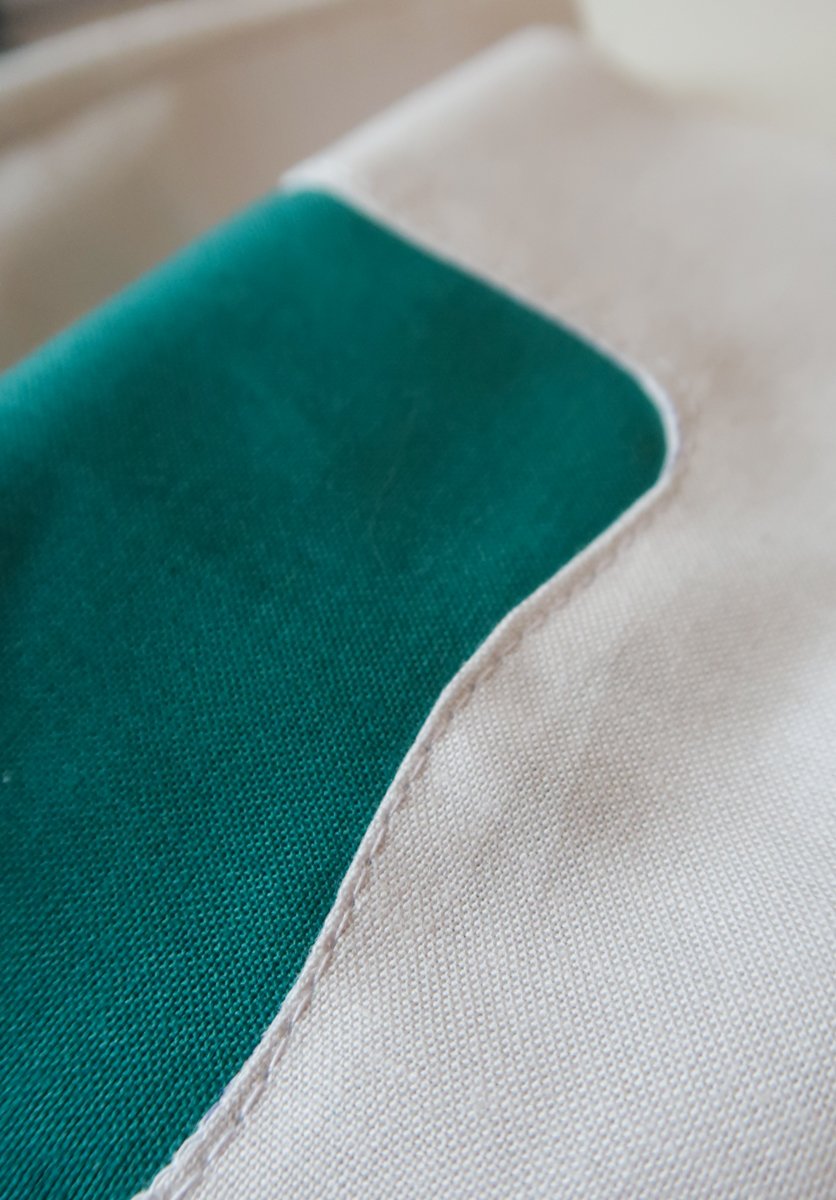
Now trim the excess fabric and teabag paper from the back.
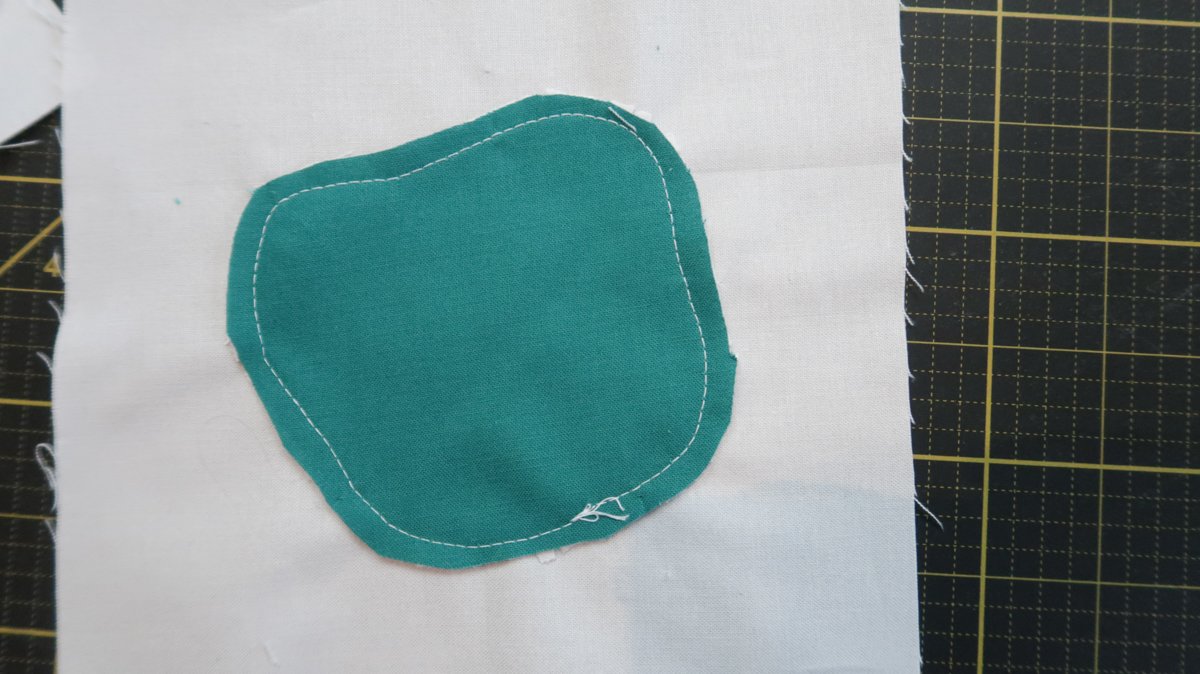
Make 11 blocks in your main fabric and 1 block in your accent fabric.
Trimming the blocks
Now we need to trim the block to the correct size. The height of the blocks should be 7″ including seam allowance.
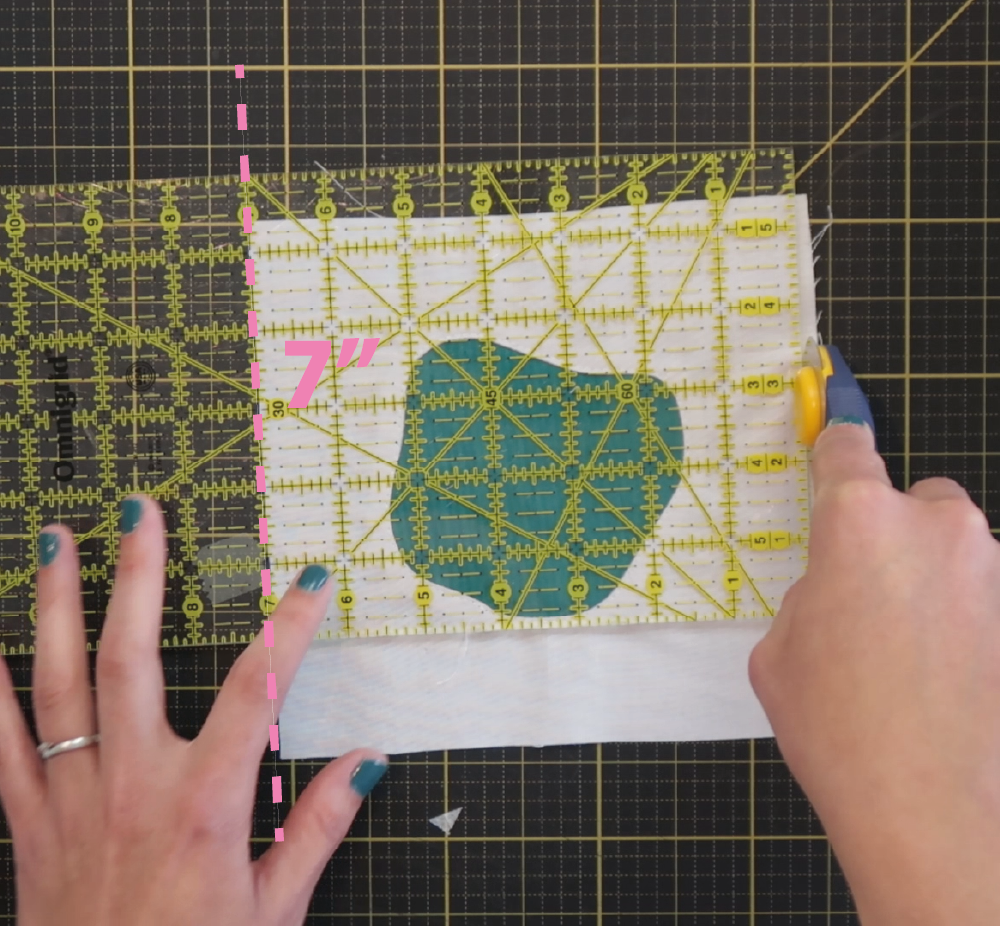
For the width you should cut the block to 6 3/8″ (including seam allowance). That means you should cut the background fabric on both sides of the 4″ circle to a tiny bit less than 1 1/4″. Somewhere between 1 1/8″ and 1 1/4″. That is 1 3/16″ to be precise.
(I know that 6 3/8″ is a bit of an odd size, but that size just spaced out the circles better on the row than 6 1/4″or 6 1/2″.)

When you measure from the center of your block you should cut at 3 3/16″. With my improv block I kinda eyeballed it and made sure that the total width of the block was 6 3/8″.
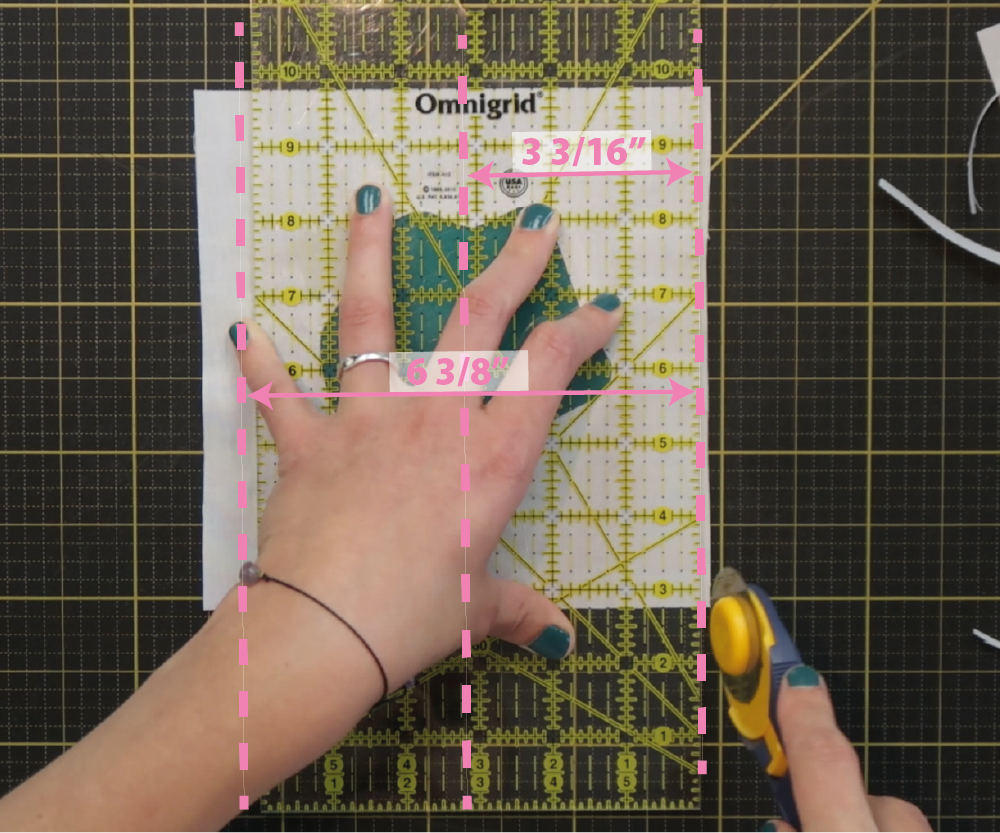
Sew the row together over the 6 3/8″ sides of the blocks. The height of the row should be 7″.
The total width of the row will be 71″including seam allowance. You can trim the row to 70 1/2″ right after you finish it, or wait until all the row’s are assembled and trim them off then.
See you in four weeks 🙂
Irene
Went with symmetric circles instead of splotches. I like the uniformity:)
Maine Coast USADot, Dot, Dot…. as Heart, Heart, Heart ❤️I really appreciate Irene’s “play with it” quilt philosophy. Now that I know who this will be gifted to, I think my niece will appreciate the hearts. I like seeing these ? rows all together. It’s gonna be a fun finished quilt for her. (And thanks to @justgetitdonequilts for sharing her “how not to get behind” wisdom…. I’m all caught up, and still wondering where the month of August disappeared to.?) I’m looking forward to completing Part 12 in October and then the final quilting process.
Hello, I’m very confused – I saved all the cutting instructions and have just looked at the one labelled part 11, but in the actual pdf, it is entitled “Fabric cutting scheme Sugaridoo Bernina QAL part 10 Row #10”, so I renamed it. But looking at it, the fabric name is CAMELIA and it doe snot look like dots. Was this an initial error that’s been rectified (I probably downloaded around April-May time) but I didn’t notice – and also, are there any other updated/amendments that I have missed? Many thanks. Sue
Row 10! Two more to go!
[caption id="" align="alignnone" width="1221"] Dot dot dot[/caption]
Dot dot dot complete (shown next to Cross Stitch row)
Another row on the hanger. I enjoyed this row very much. I am a bit short on my accent fabric so my accent is a heart in a square instead. Thanks for the idea fellow quilters. I was afraid I would need to skip the accent altogether.

I must admit, this one wasn’t as fun, purely because of the squaring up at the end. There were some errors, but it’s done and that’s what matters!
Love Love Love this block….I really want to make a quilt of All Dots! Looking forward to the next one!")
Finally accomplished #sugaridooberninaqal
Did find a little difficult trying to keep the shape from the stencil, so mine are wonky shapes. Maybe I should have tried circles! Just have to practice more.
[I’m adding here and then will upload to the community SUGARIDOO QAL – I’m a bit confused when it asks for ‘tags’. I have posted there before so just add a dot to move on. Can someone please explain]

Please tell me where can I get just the instructions and not all the additional pages and photos?
Hi there, all the instructions are available for free on the Bernina blog in this blog post. There is no download for it. You can copy/paste and print is for yourself if you’d like. Thanks, Irene
Helloo kitty! 😀 Oooh I love your blocks for this row!
I am a bit confused. Are we sewing the blocks together along the 7″ sides?
Hi Cheryl, the row is going to be 7″ high, so we sew them together on the 6 3/8″ side. I’ll add that to the blog post. Thanks
I’m doing blue and wonder if the color for this row should be emerald when the row above (Delta) is also emerald.
Hi Cheryl. when you’re doing the blue quilt you should go for Titanium fabric.
Looks amazing and look forward to giving it a go. Like the ‘quirky’ one and will go well with my other wonky rows.
Yay! Have fun with this one!