 BERNINA Corporate Blog -
CREATING FABRIC (Part 4)
CREATING THE ART
A beautiful new fabric is created and the graffiti sketching is done. The next step is how the artwork is created. The plan was to draw a gecko on the synthetic background and fill his body in with zentangles or doodles. Firstly the outline of the gecko was sketched onto an A3 size paper, then traced onto Avalon. Only a couple of pencil lines are needed as a guideline for the zentangles. The gecko was to be superimposed on the graffiti but the lines had to be visible.
STARTING TO SEW.
When sewing the outline, be sure that the black shows off beautifully as the lines might not be thick enough. I continued for a while on the Q24 using foot #24, however, the lines were too fine. In conclusion, I had to sew over each line a couple of times. After a bit of this, I got tired of having to concentrate so hard all the time.
TIME FOR A CHANGE!
The background fabric plus the Avalon were taken off the frame and moved over to the Bernina 770. It is important to thread the machine with two 100% black cotton threads as well as cotton thread in the bobbin. The needle was changed to a cordonnette needle. It’s a good idea to put the adjustable stippling foot #73 on. With the wide open space in the front part of the foot, it was very easy to see where to stitch! One cannot sew accurately without quilting gloves!
The zentangles could only be filled in once the gecko outline was done. So much fun!
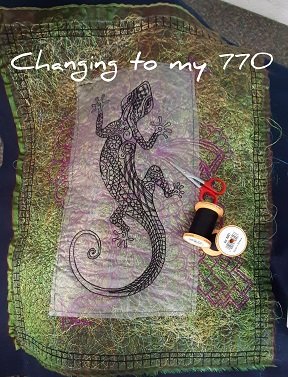
Change to Bernina 770
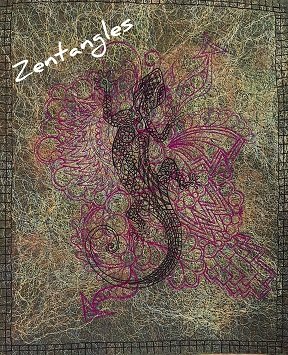
Zentangles or doodles in the body
SEWING A STRAIGHT BORDER.
As soon as the gecko’s body was filled with zentangles, the quarter inch foot #97D was put on and the dual feed plugged into the back of it. That helps to sew a nice straight line as a border around the outside of the background fabric.
SOAKING OUT.
The whole cloth was soaked out in lukewarm water to get rid of the Avalon. It was put it outside in the hot autumn afternoon sun to dry. A soldering iron was used to burn holes between the stitching. Afterwards a heat-gun was used to singe the edges however, I really didn’t like what it looked like. A different plan will have to be made with the edge!
Zentangles burnt out.
If you would like to create your own artwork like this one, you will need:
- Your own newly created synthetic background fabric with your own graffiti design sketched on (see previous blogs)
- Paper to draw on
- Permanent marker
- Sheet of Avalon
- Two reels of 100% black cotton thread
- Quilting gloves
- Cordonnette needle
- Sewing machine of which the feed dogs can be dropped
- Correct foot for FMQ, in my case, foot #73
- Your machine’s walking foot or Foot #97D
- Soldering iron
- Heat-gun
Gecko Artwork
ALWAYS REMEMBER TO DO ANY BURNING OF FABRIC OUTSIDE OR IN A WELL-VENTILATED ROOM.
You can follow me on Instagram #tillydeharde and on Facebook, Tilly de Harde Textile Artist to see more interesting things that I do and classes that I teach. Please remember to leave a comment below!

Ek is mal oor gecko’s, dit is pragtig!
Thanks Marie, I also love them and I had so much fun creating this gecko!
Tilly you said you had to go over the lines several times as it was not thick enough. Could you have used a different thread? A thicker one perhaps?
Hi Frances, I’m sure I could but I’m always in such a hurry to see the end product that I didn’t want to waste any time experimenting…it was quicker to change over to my 770!
Hi Tilly. I loved this and will try it. I did a course with you at Quilt Indaba and really enjoyed it. Would love to do another course with you but Covid intrudes on our lives now. Much love Mary Chapman
Hi Mary, it was such fun to create this art work! Please send me photos of your work? Soon I’ll be offering online classes to make it easier for people everywhere to join in the fun!