 BERNINA Corporate Blog -
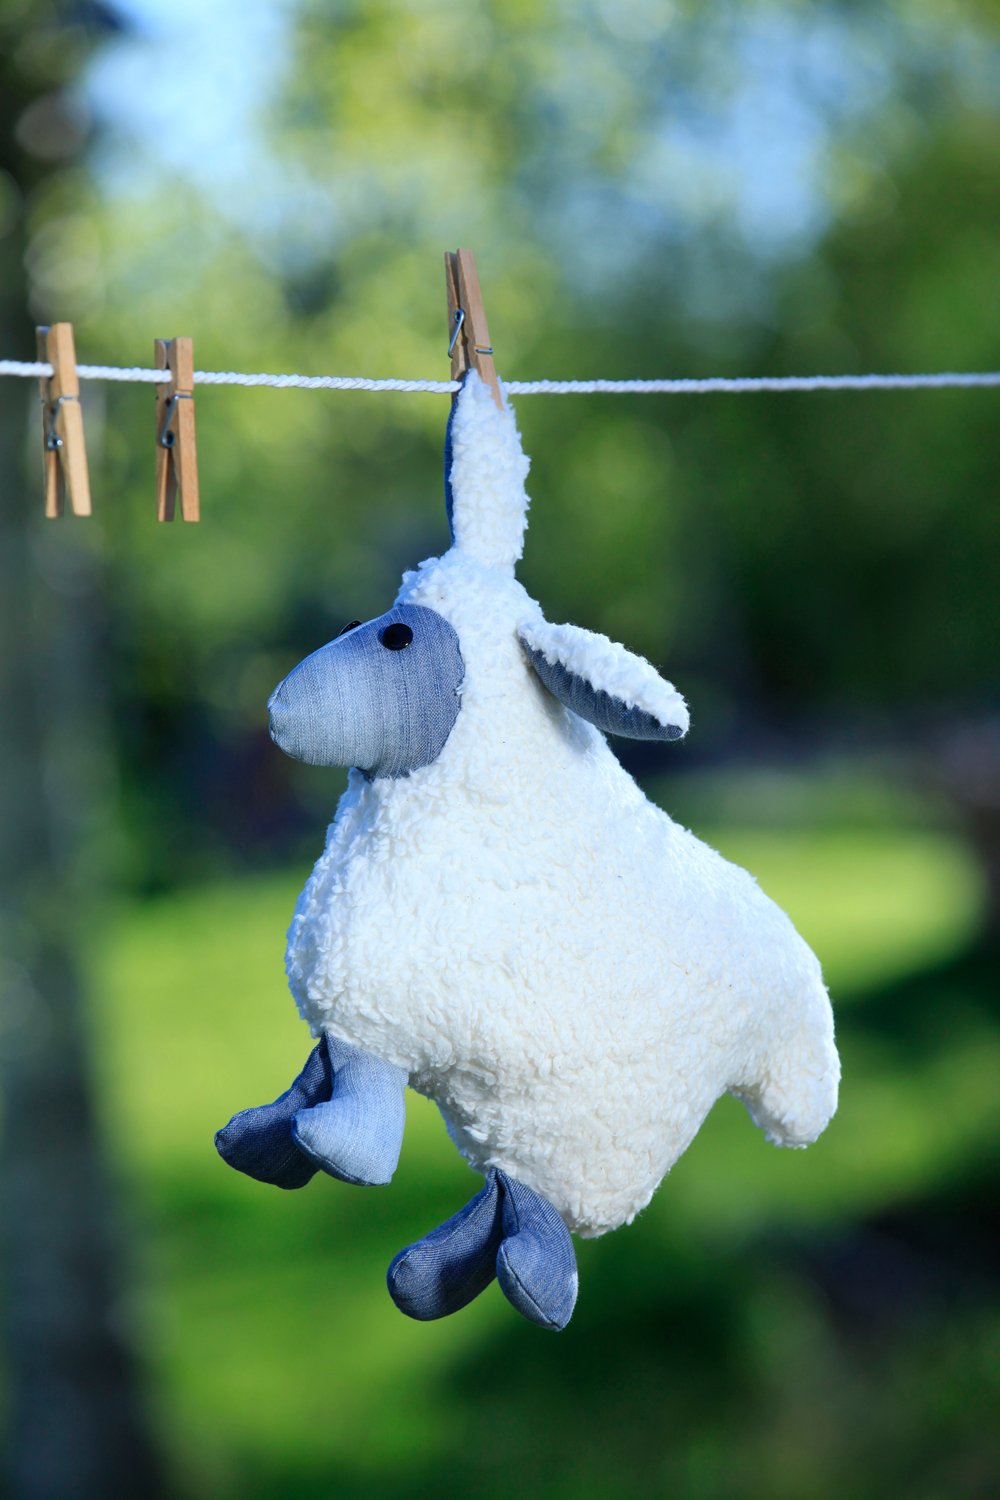
Hello, I’m Laura and I’m delighted to share my sewing instructions to make a cuddly sheep today!
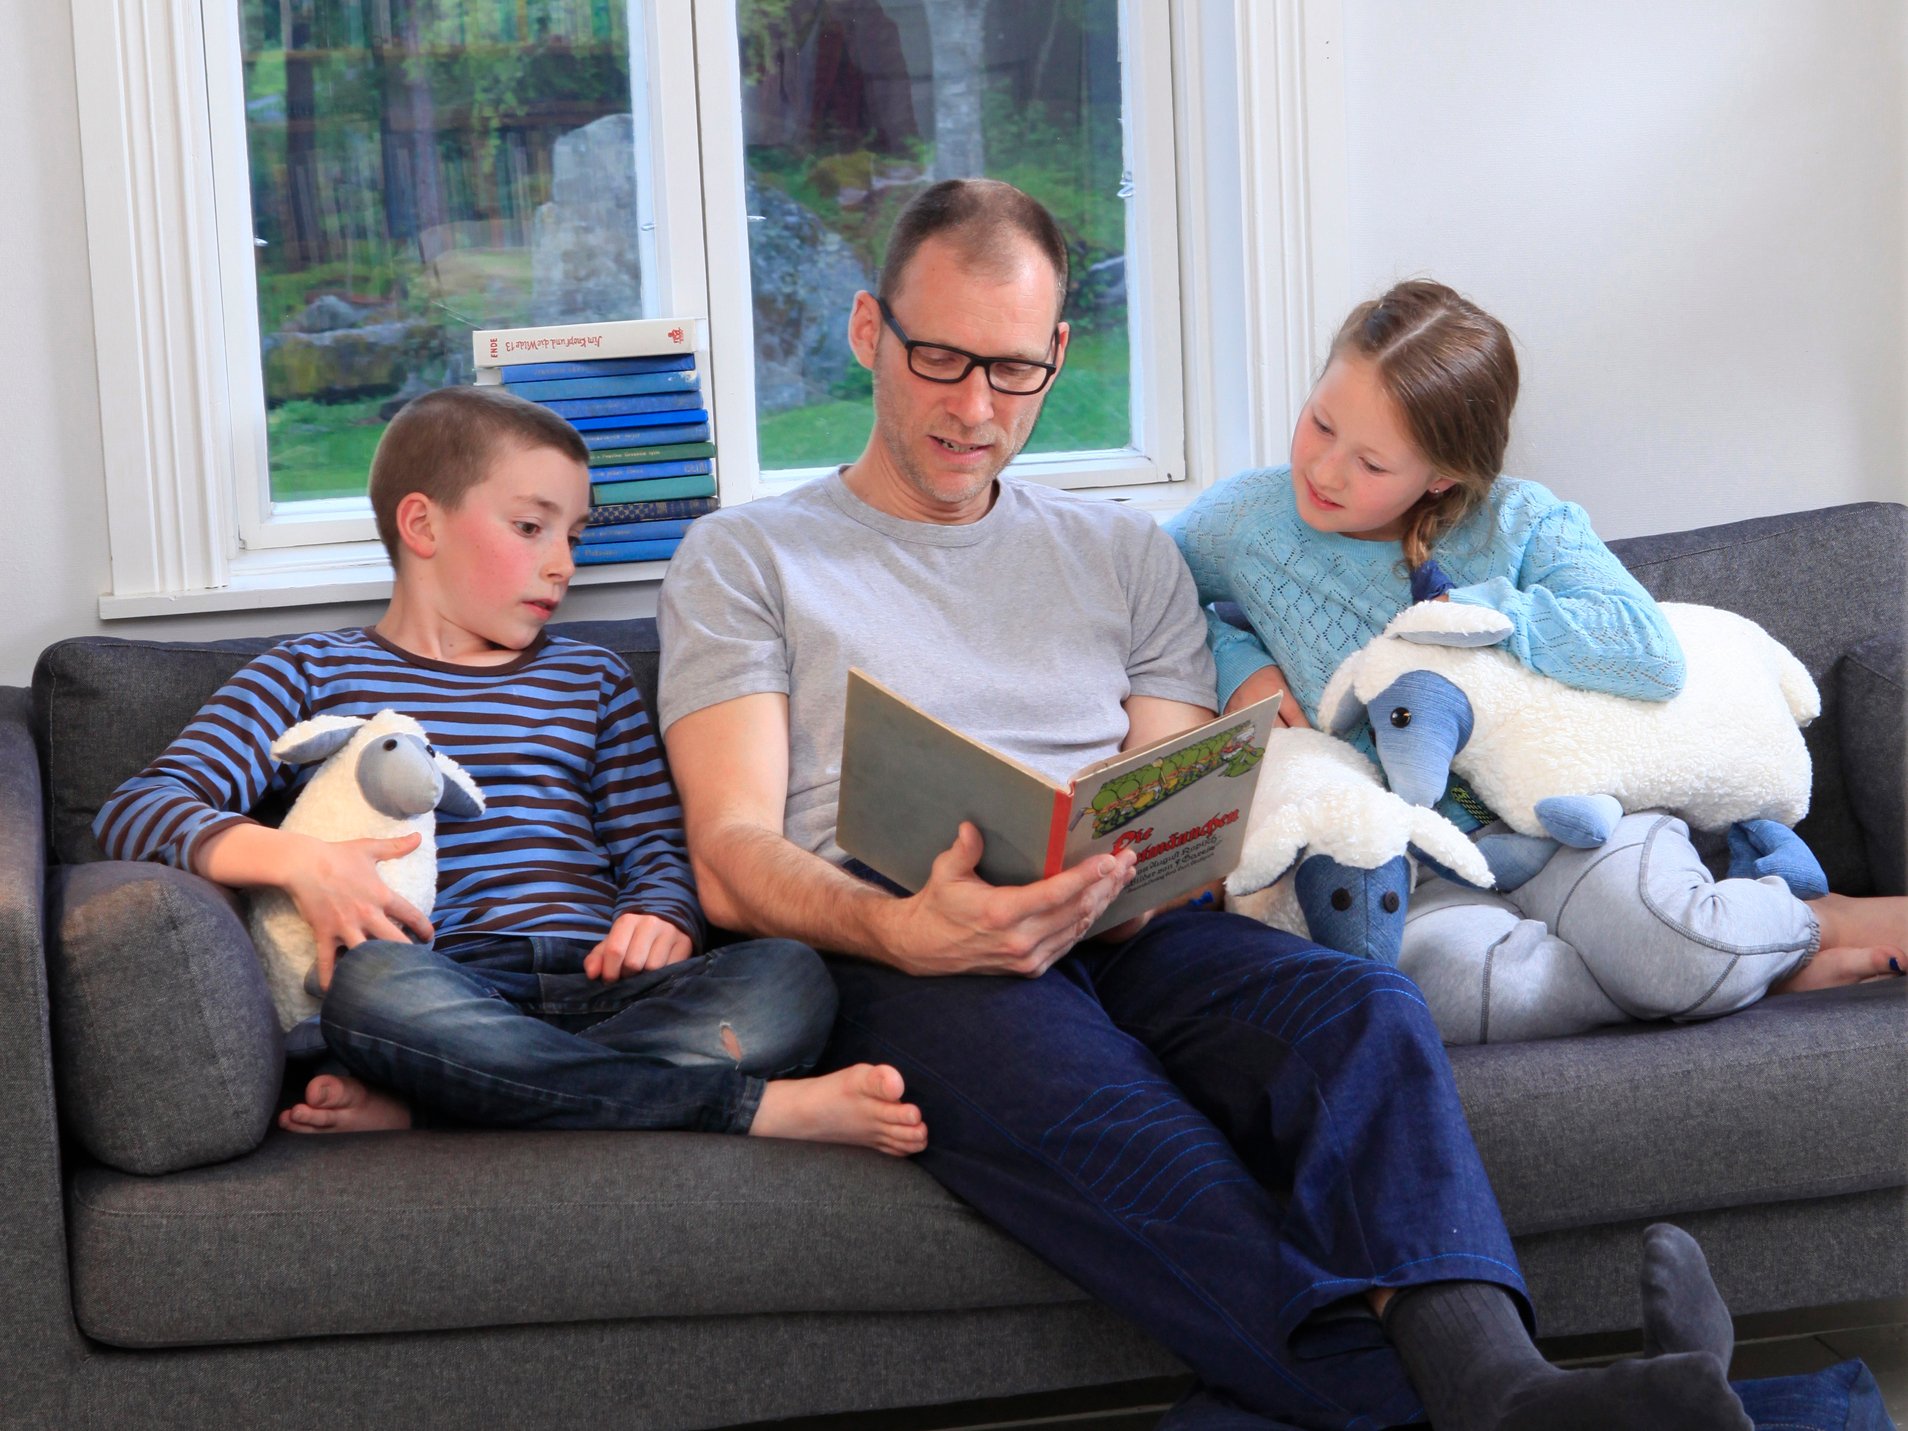
A few years ago, in a Finnish knitting book from the 1960s, I came across a photo of a little boy holding a large knitted lamb in his arms. It looked so cute that I decided to create a sewn version of it.
It took a few tries before I was satisfied with the plush toy pattern for the sheep. But don’t worry, the “trial sheep” all ended up in the beds of children who still love them to this day.
Today, I want to show you how to sew the plush toy. My cuddly sheep comes in two different sizes. I am providing you with both of them here in the blog, including the patterns.

Sew a cuddly toy – the plush sheep
This plush toy can also be used as a pillow or as a travel companion; the cuddly sheep is also ideal for use as a travel pillow in the car, train or plane. And if at some point wash day comes around for your sheep – no problem, it will soon dry on the line in the sun and be ready to cuddle again.
Size
You can sew your plush toy in the following two sizes:
- Small sheep: 25 cm x 35 cm (H x W)
- Big sheep: 35 cm x 50 cm (H x W)
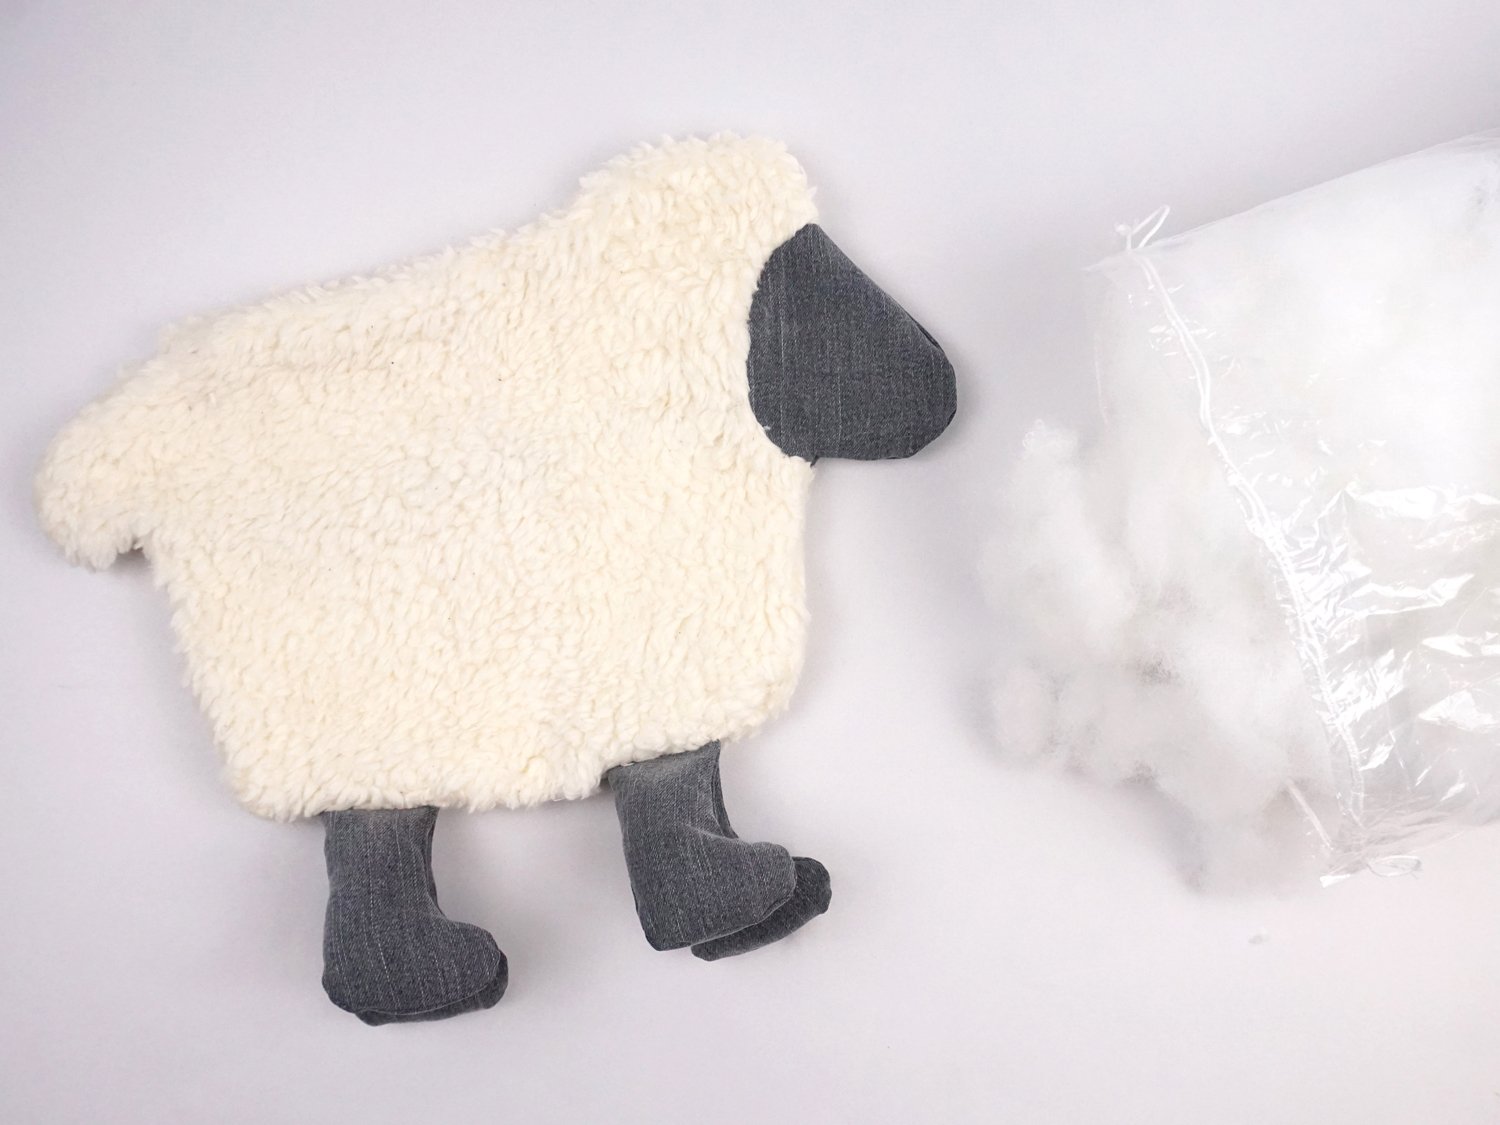
Materials for a cuddly toy
- Teddy fabric: 35 cm (small sheep: 25 cm)
- Denim remnants: yard goods or old jeans legs (the fabric should not be too thick and it is fine if it contains elastane.)
- Fiberfill or filling flakes: 500 g (small sheep: 300 g)
- Sewing thread in a matching color
- 2 black buttons for the eyes (alternative for children under three years: black embroidery or woolen thread to embroider the eyes.)
Pattern download
You can download the pattern for the cuddly sheep plush toy in both sizes from the following link:
When printing out the pattern, make sure not to make any size adjustments.
Seam allowances
As indicated on the pattern, all the pattern pieces are to be cut out with a 1 cm seam allowance.
Cutting out
Transfer all the markings from the pattern onto the pattern pieces.
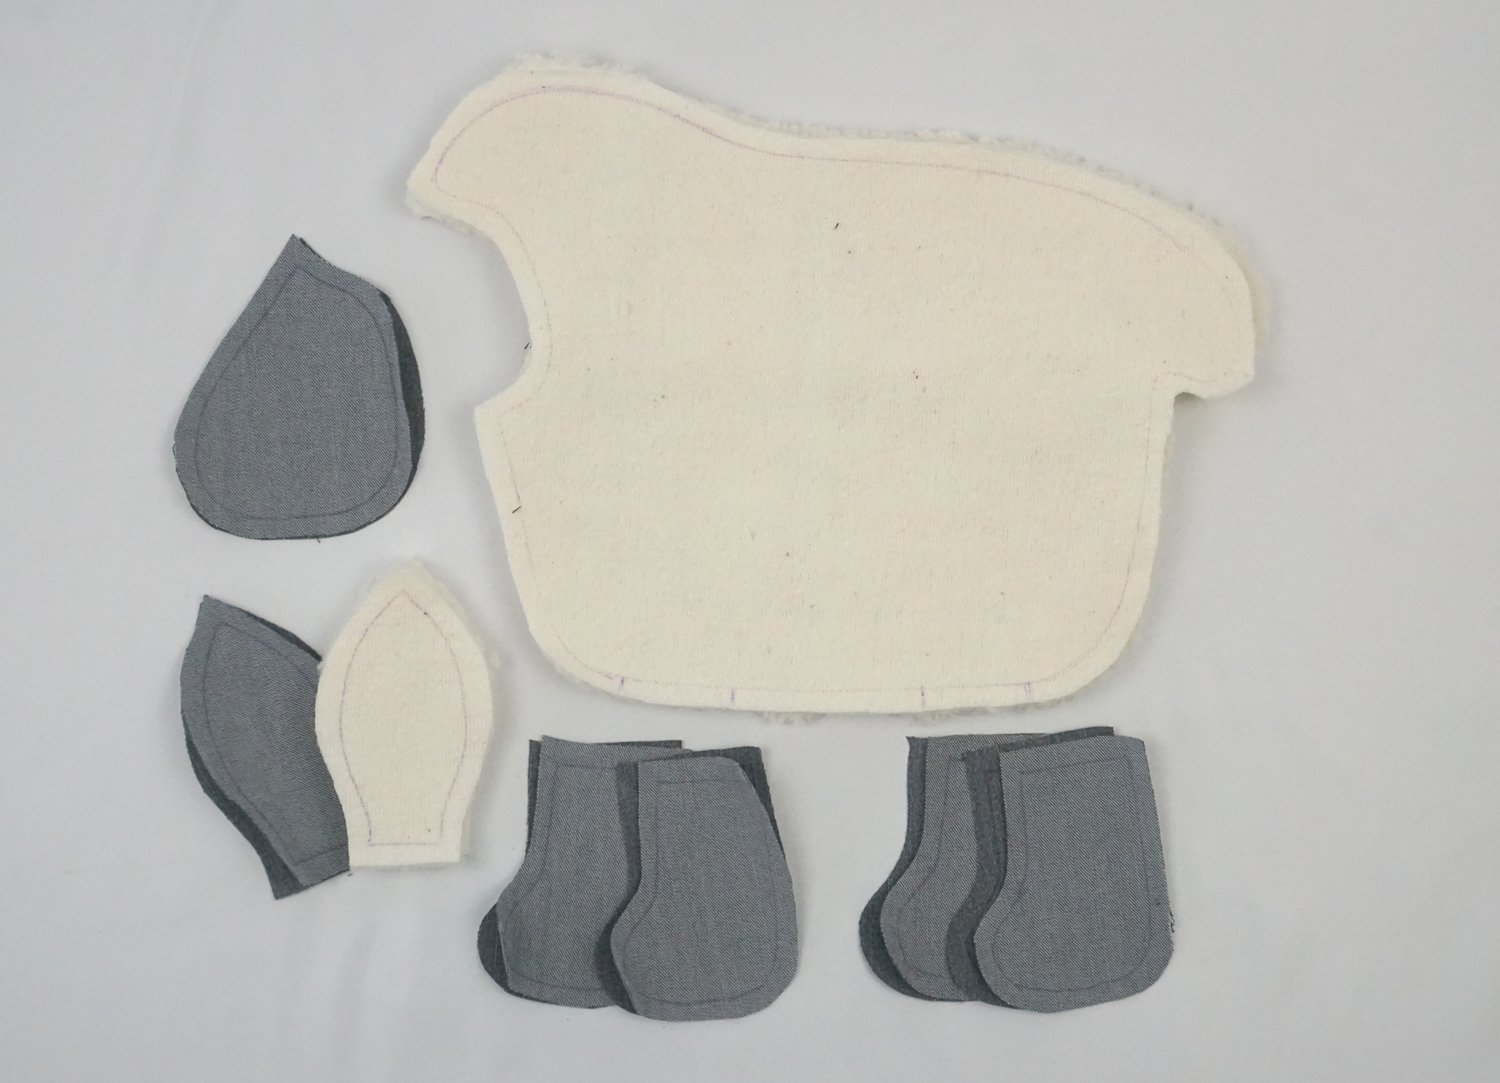
From the teddy fabric, cut:
- body, mirror image (2x)
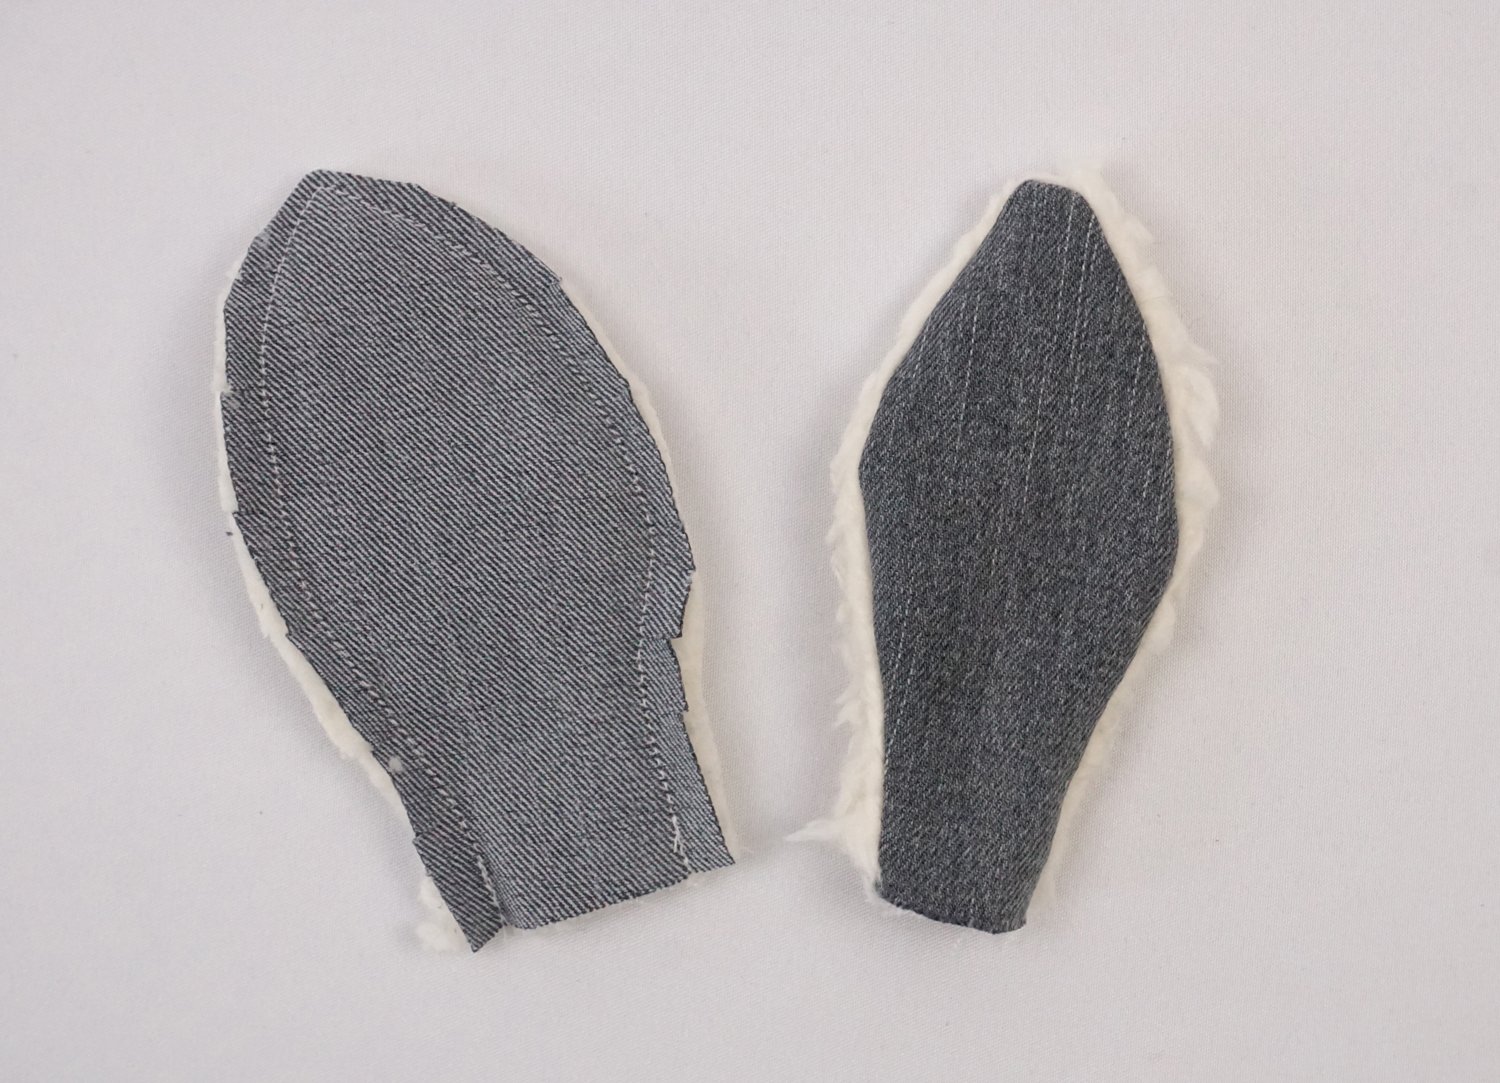
- ear (2x)
From the denim, cut:
- head, mirror image (2x)
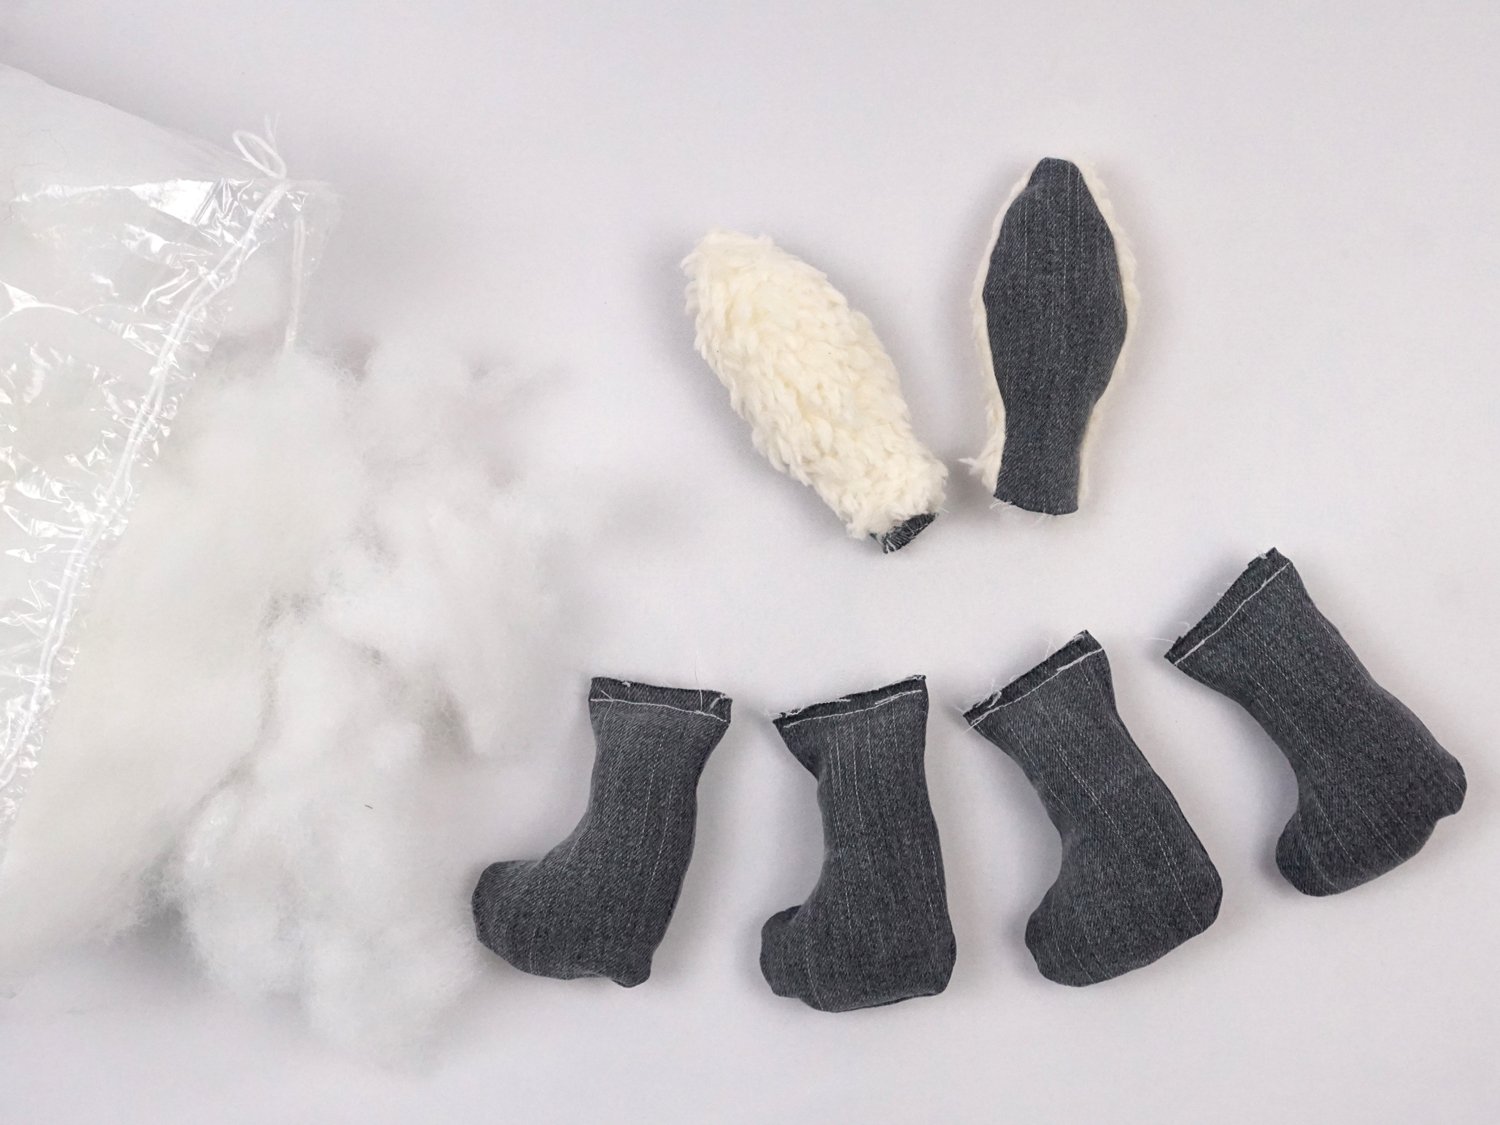
- foot (8x), 4x each mirror image
- ear (2x)
Sew a cuddly toy – sewing instructions for the plush sheep
1. Pin the head pieces onto the body pieces with the right sides together, following the markings.
2. Then sew the head pieces in place. Secure the beginning and end of the seam with back stitches and then iron the seam allowances towards the body.
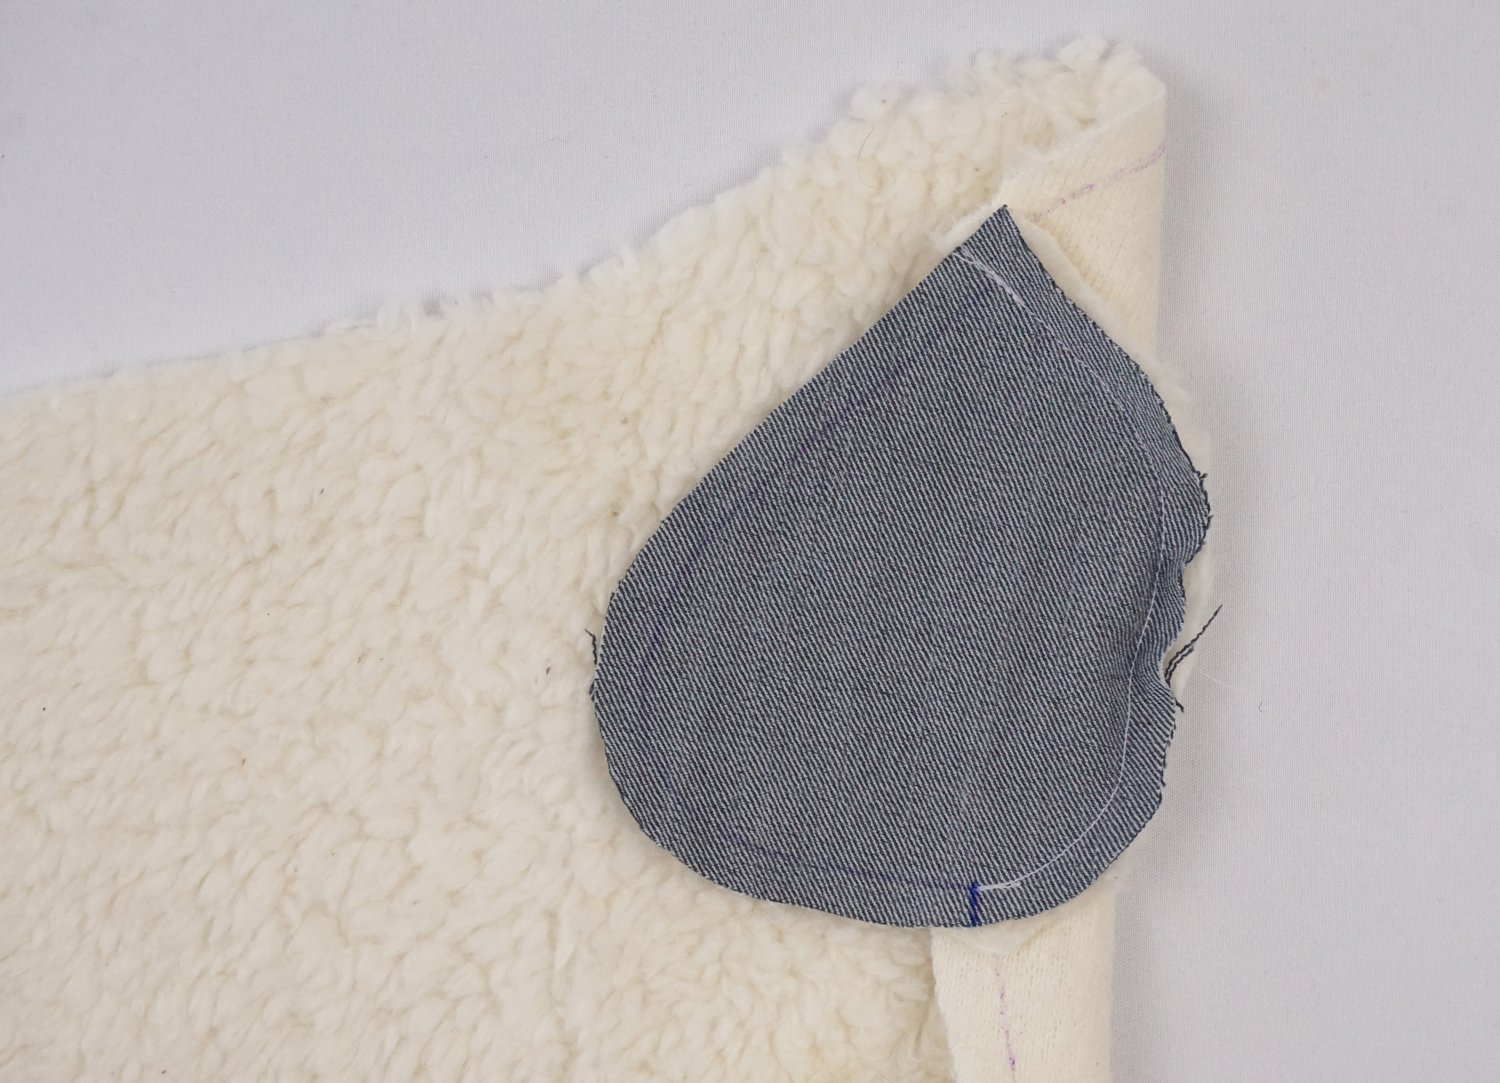
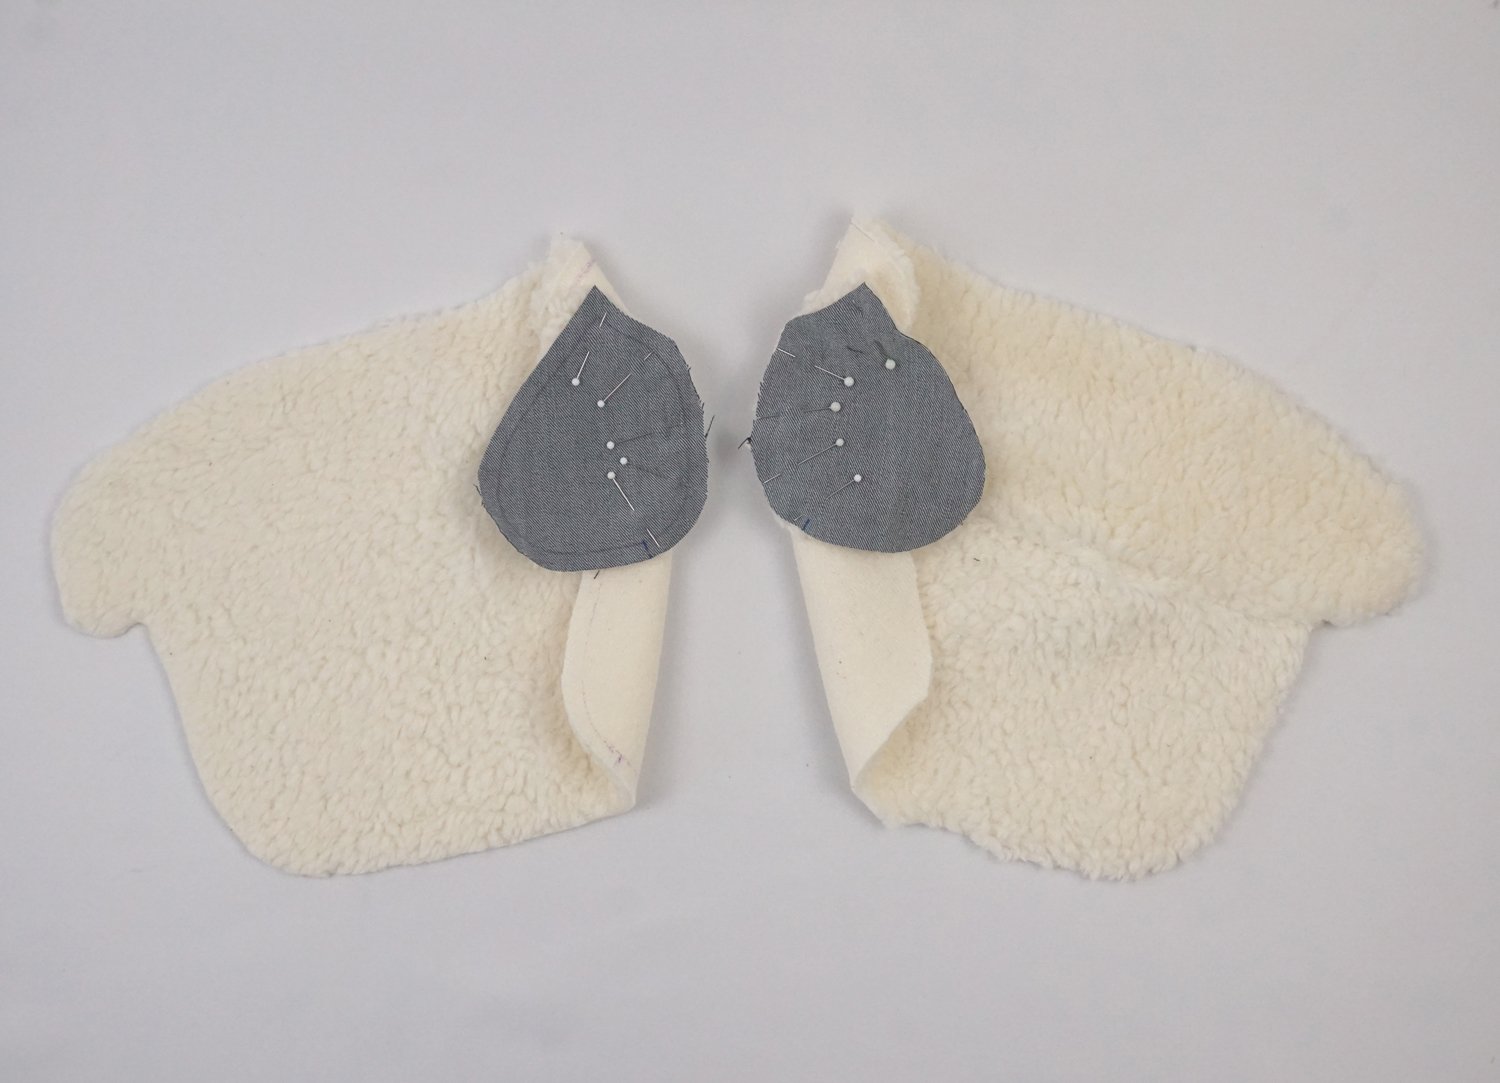
Sewing the ears
3. For the ears, tack a plush piece and a denim piece together with the right sides facing and sew them together. Leave the bottom edge open for turning. Once again, secure the beginning and end of the seam with back stitches. Trim the seam allowances back to 0.5 cm and cut into the curves up to 0.2 cm from the seam. Then turn the ears the right way out and shape them carefully.
Sewing the feet
4. Lay the pattern pieces for the four feet with the right sides together, pin and sew. Leave the top edge open for turning. Secure the beginning and end of the seam with back stitches to prevent the seam from coming undone. Trim the seam allowances back to 0.5 cm and cut into the curves up to 0.2 cm from the seam. Then turn the feet the right way out and likewise shape them carefully.

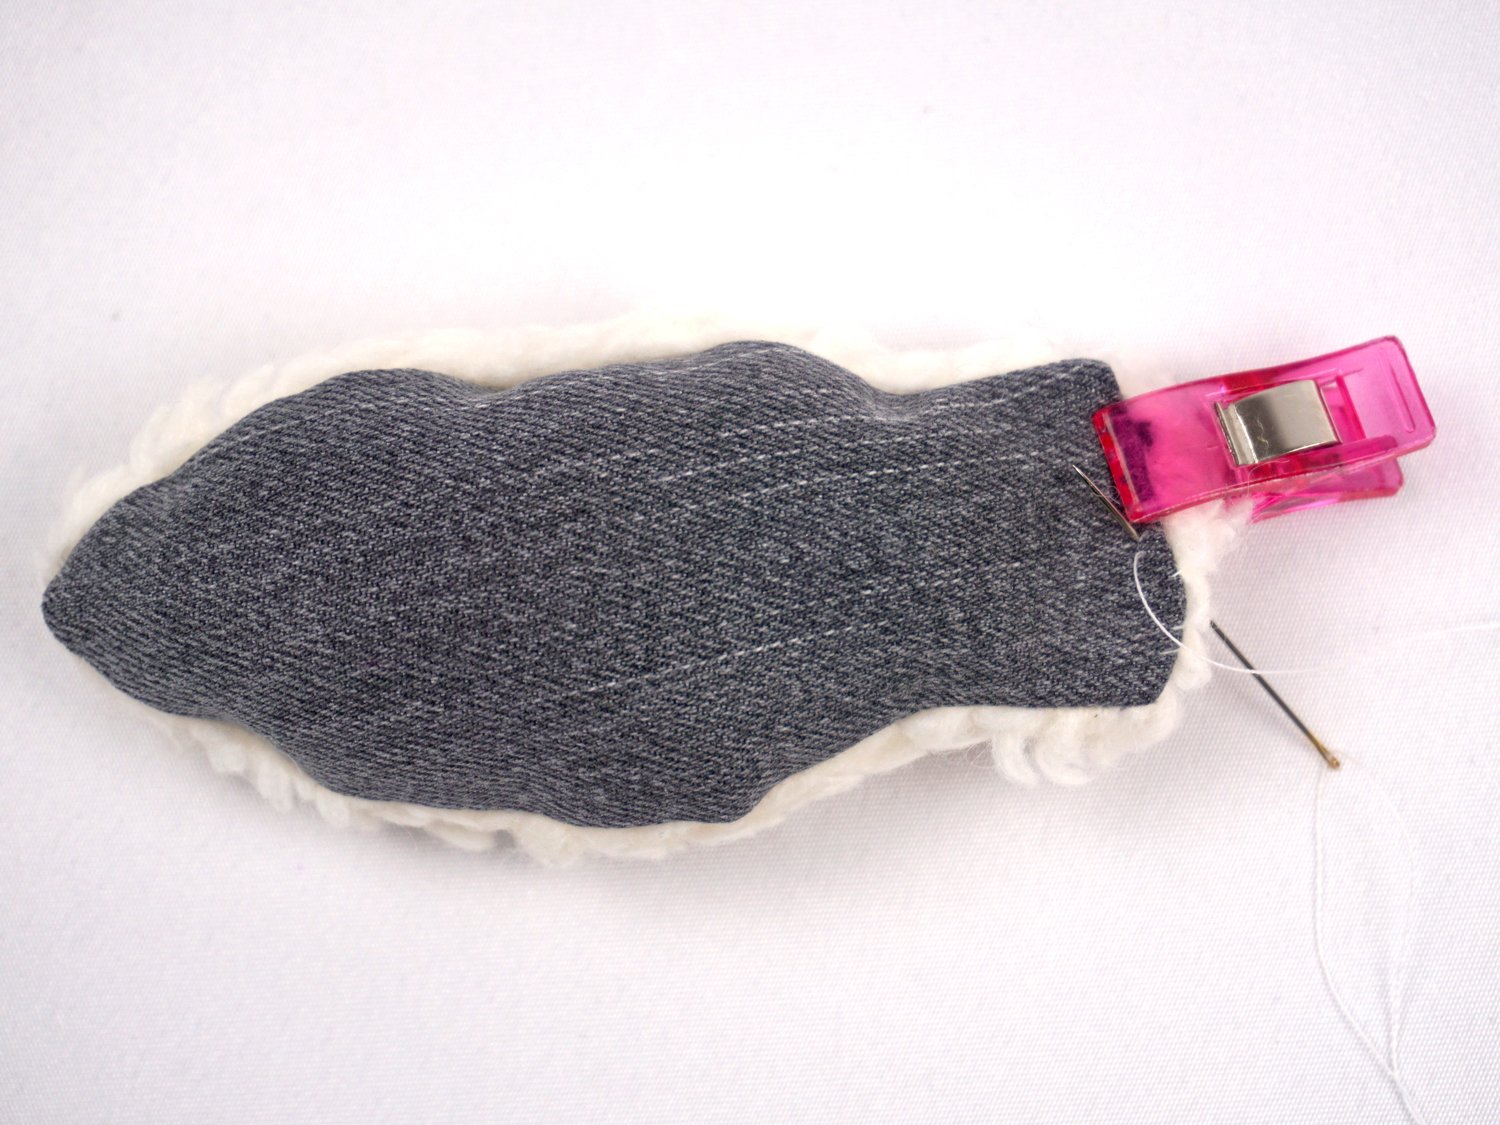
5. Next, stuff the ears and feet with fiberfill. Leave about 2 cm unfilled at the top of the feet to make it easier to sew the feet onto the body later on. After filling, topstich the top edges of the feet closed.
Sewing the feet onto the sheep’s body
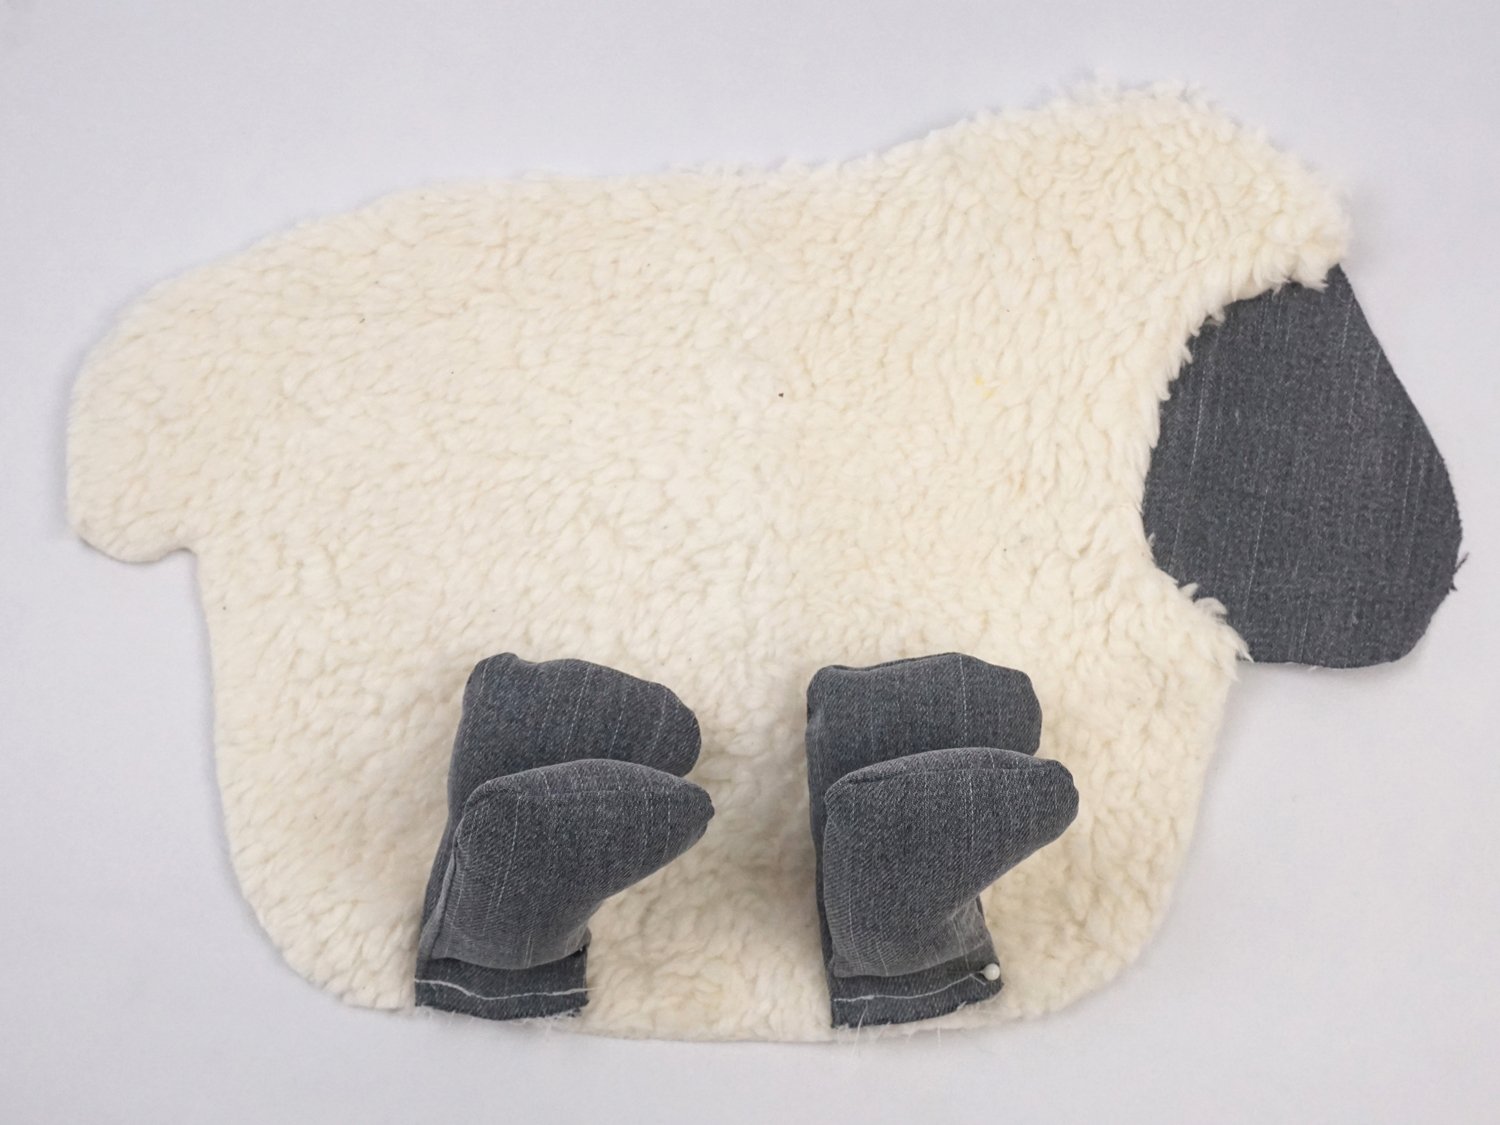
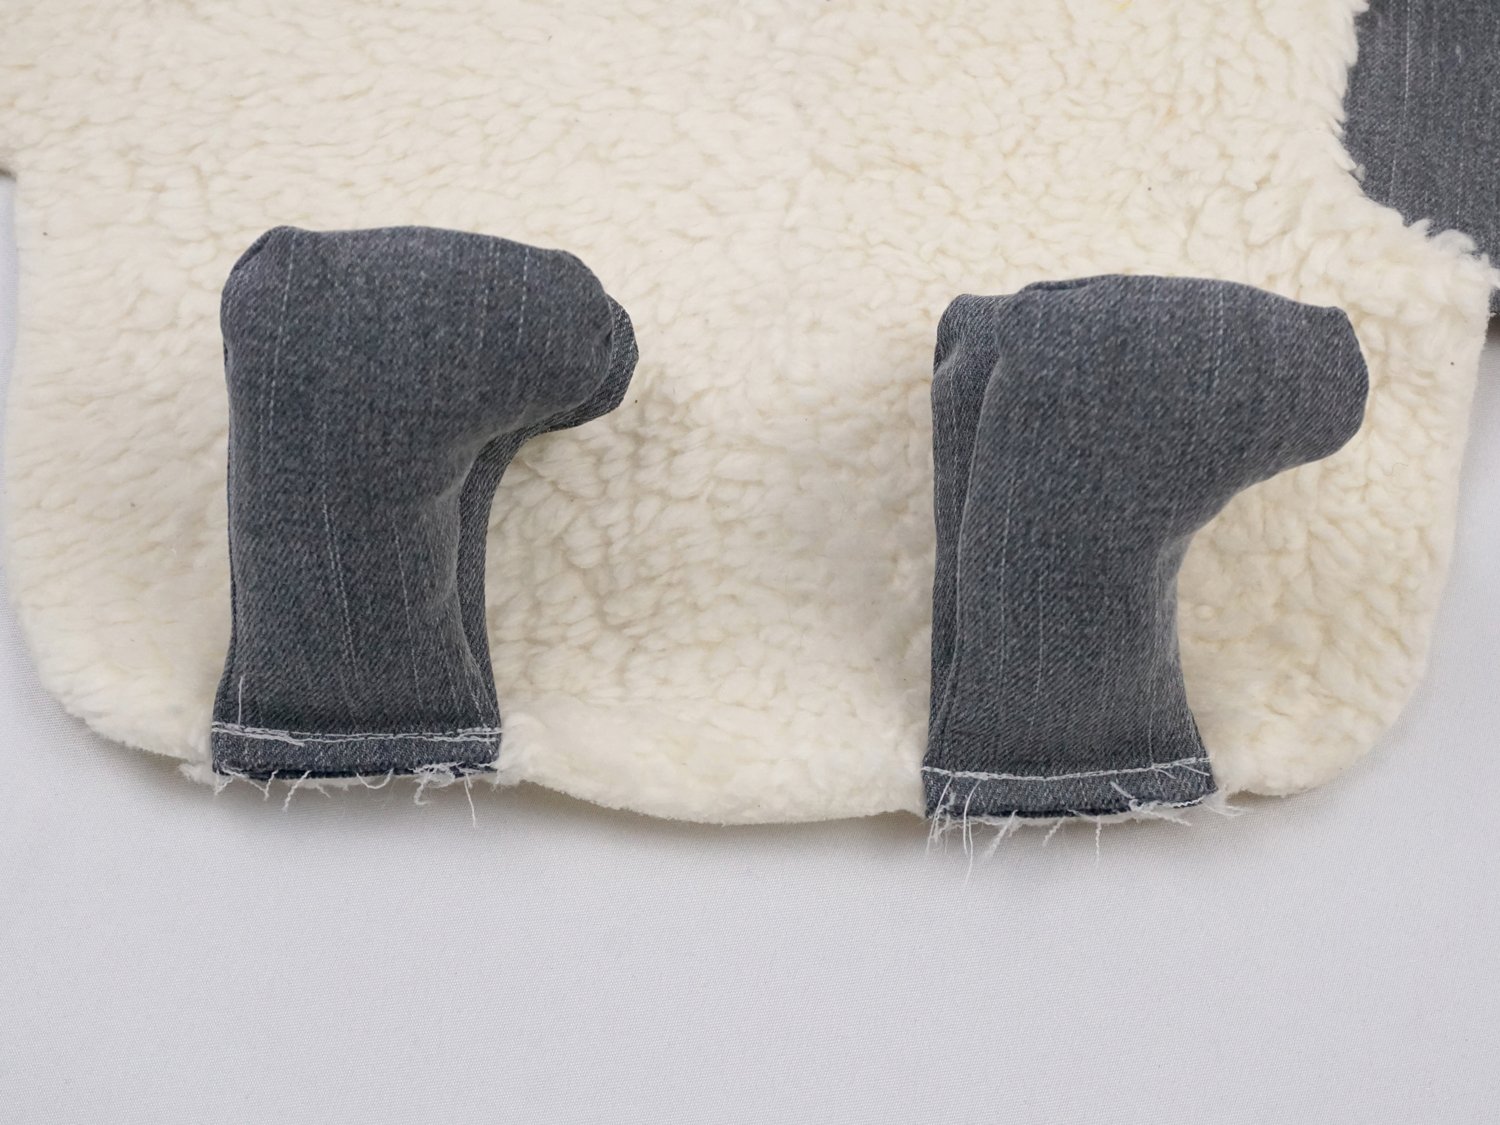
6. Pin each set of 2 feet onto the right side of a body piece according to the markings as shown below and sew them on inside the seam allowance.
Sewing the body pieces together
7. Then place the body pieces with the right sides together, still with the feet pointing up so they are between the two layers. Baste the two layers together and then sew them together except for the turning opening between the feet as marked on the pattern. Once again, secure the beginning and end of the seam with back stitches.


8. Next, turn the cuddly sheep the right way out and stuff it with fiberfill.
Then close the turning opening by hand (e.g. using an overcasting stitch).
Finish the ears
9. Fold the seam allowances at the bottom edge of the ears inwards and sew the opening closed by hand (e.g. likewise using an overcasting stitch).
10. Then sew the ears onto the body by hand.

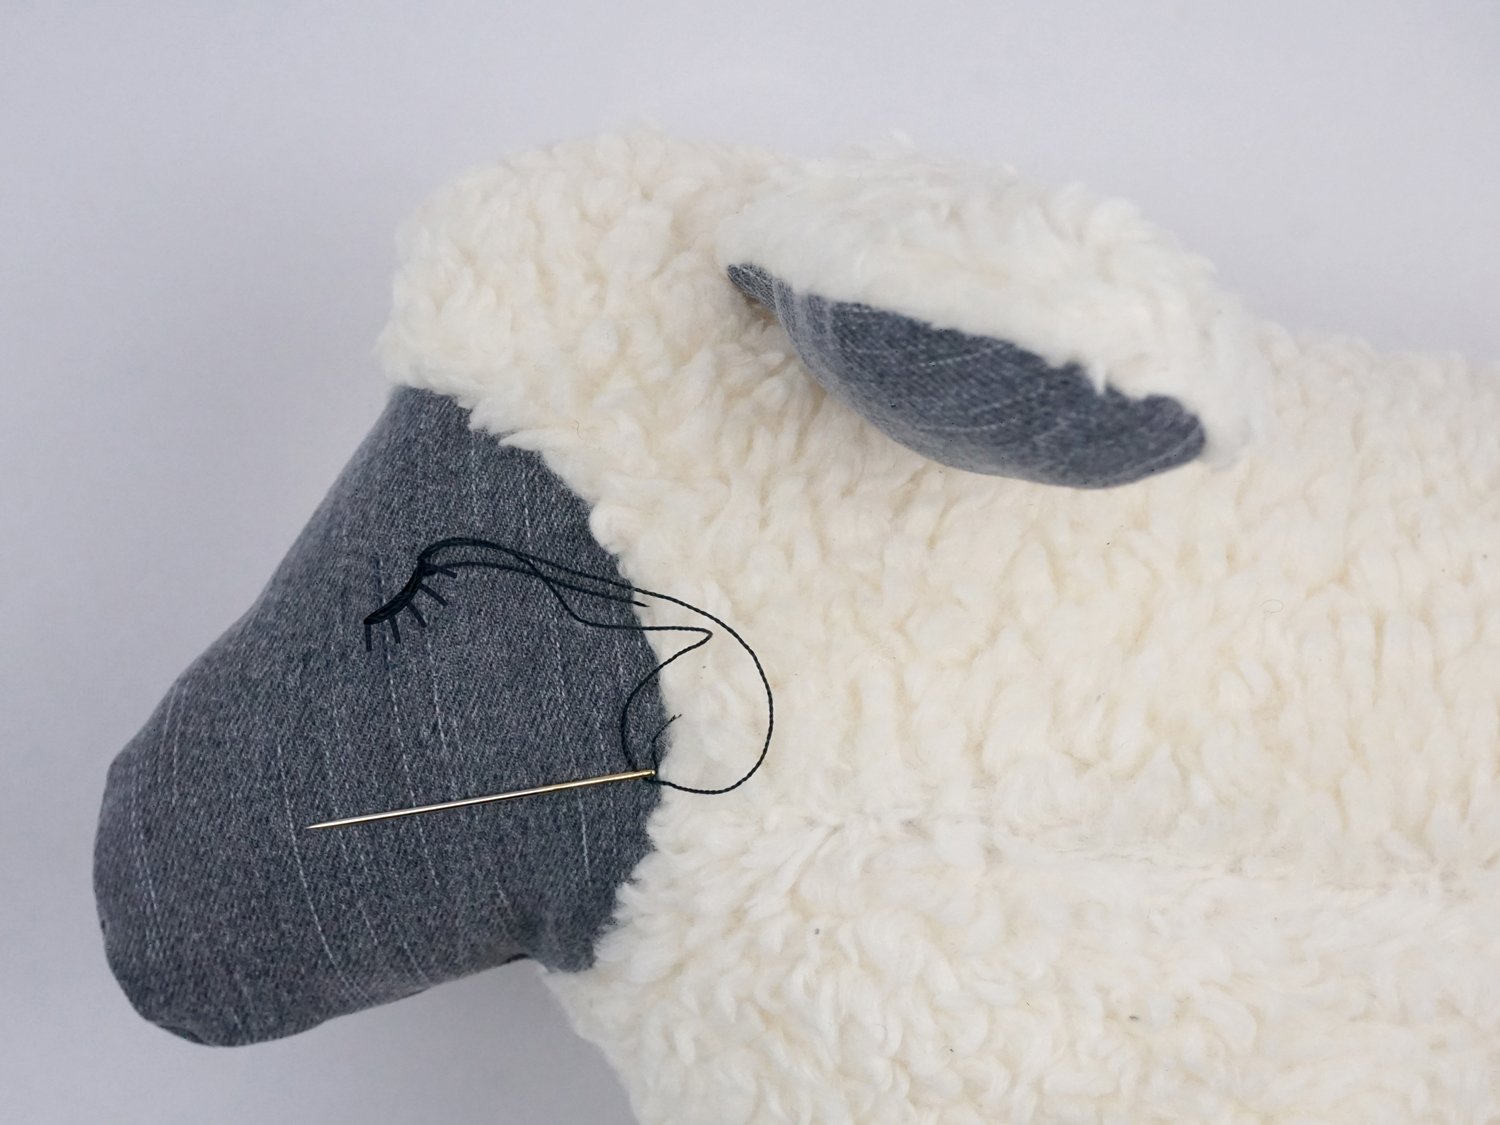
Attaching the eyes to the cuddly toy
11. Finally, sew the buttons on as eyes.
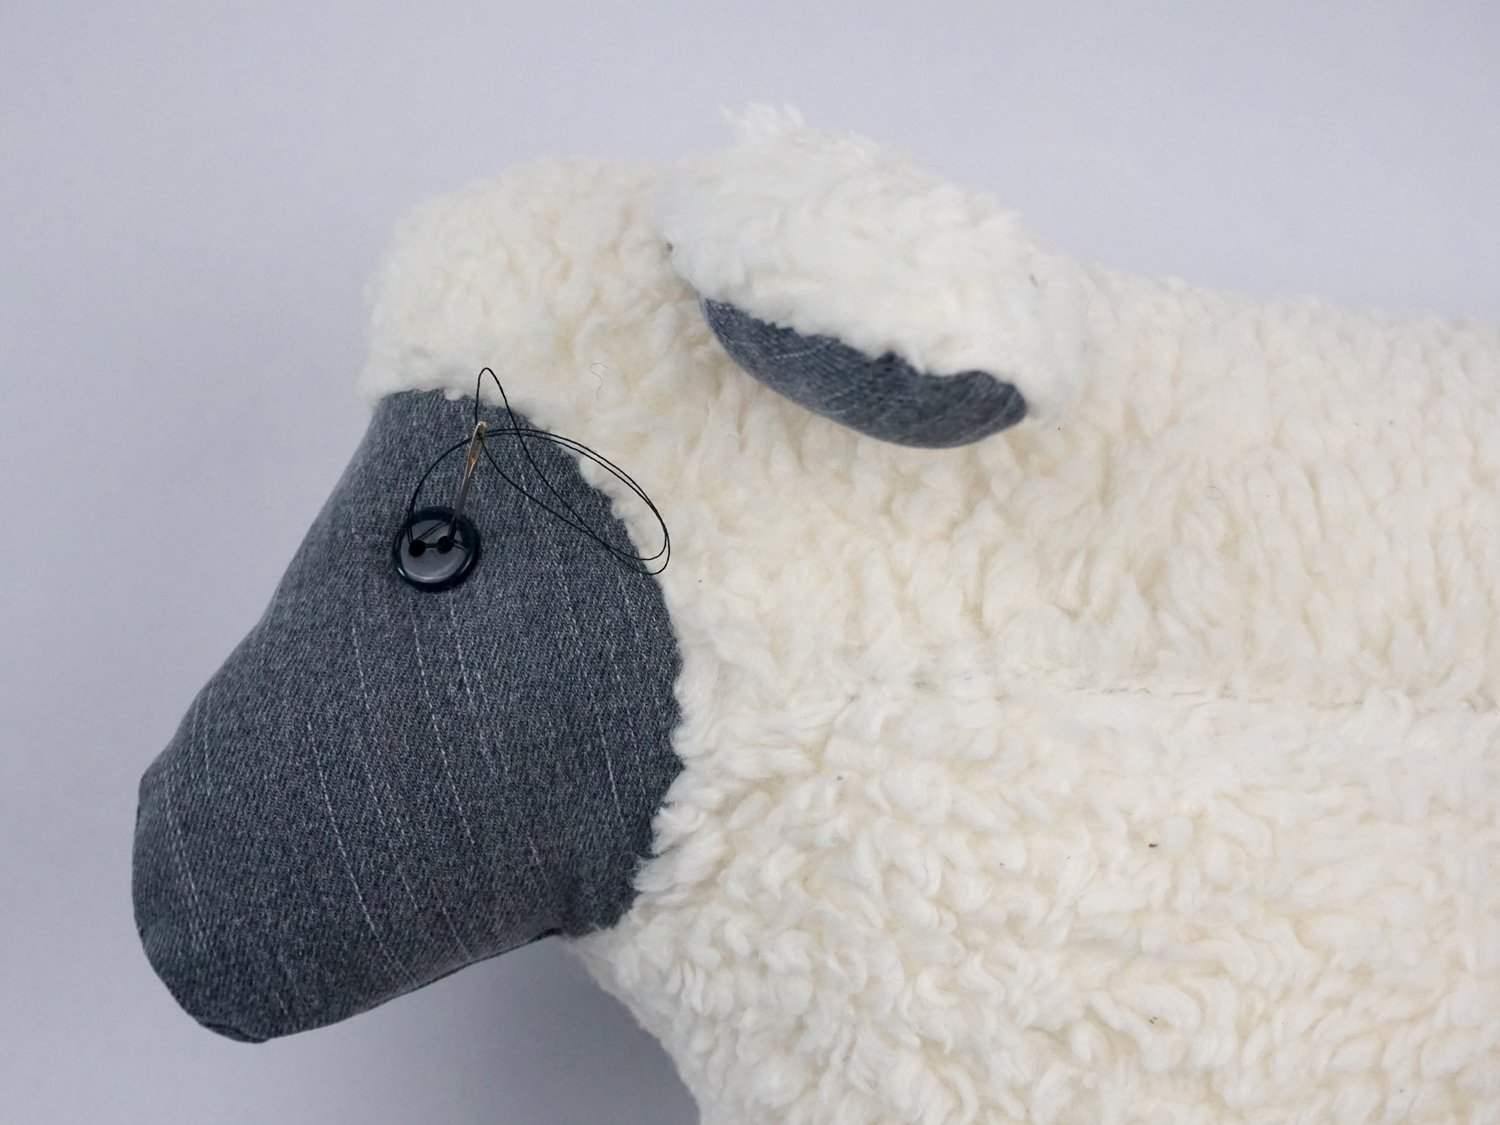
Please note: Buttons should not be used for children under three years of age as these are small parts that can be swallowed. In this case, the eyes can be painted on with the textile pen or sewn on with embroidery or woolen thread.
Your home-made cuddly sheep is now finished and ready to cuddle.
I hope you have lots of fun sewing it.
Best wishes,
Laura
Finished product photos ©copyright of
photographer Marjo Koivumäki

Thankyou for providing such a simple but charming pattern.It uses the plush fabric very efficiently and the result has been a cuddles magnet for adults as well as the kids.I embroidered ‘sleeping’ eyes, which meant no buttons in the way of snuggles.The big sheep definately needed a strip gusset between its legs. Thanks Michelle C for suggesting it.Next I’m going to adjust the print size to get a ‘medium’ sheep to have a trio.
I made the small version out of totaly upcycled materials. It was lots of fun. Next time, I would sew the eyes and ears on before assembly and would create a gusset for the belly so the legs wouldn’t be ‘conjoined.’ I hope my Granddaughter likes it.
Thanks for suggesting the gusset. I put one into big sheep. A simple extra strip with triangle ends, placed in from middle of the chest to the equal place below the tail.
Separated the legs nicely.
This is beautiful and I can’t wait to try it. I have a stash of denim and I am always on the lookout for new ideas to repurpose it. Thank you
Não localizei o.molde para impressão.
Prezada Lisiane,
Você pode baixar o padrão clicando em “Download cuddly sheep pattern”.
Thank you for the pattern! I have been enjoying making the small sheep. I am using multi-colored polka-dot on white fleece and blue batik fabric (on fusible fleece), as is what I had on hand. I only have the eyes left attach. Will be donating to a small online spring auction next month. It is turning out very cute!
Would you please send this information in English please? I am going to attempt to make this for my soon to be granddaughter 🙂 Thank you! Zonica Brown
Dear Zonica,
I am sorry, but I do not know which information you need. The instruction and pattern are both already in English. Which additional information do you need? It would make a lovely present for your granddaughter!
Kind regards, Ramona from BERNINA International
Thank you for the English Translation! This will be perfect for my granddaughters! God Bless! and Merry Christmas!
Hallo,Ik heb alle patroondelen uitgeknipt en wil de erste stap (kop aan lijf uitvoeren.Maar van punt A naar B vastmaken lukt me niet.Kop te kelin, lijf te groot. Kan je dit nog even verduidelijken?MVG jo
Beste Jo,
Ik vermoed dat het niet past vanwege de naadtoeslag. De naad is rond, dus de naadtoeslagen op het hoofd zijn groter en de naadtoeslagen op het lijf kleiner dan de naad en het past niet in elkaar. Waar u echter naait, moeten de rondingen dezelfde lengte hebben. Het volgende kan u helpen bochten te naaien:
– Kies een naadtoeslag kleiner dan 1 cm – dan zijn de verschillen minder uitgesproken
– Trek indien mogelijk de rondingen recht tijdens het naaien. Maar ik weet niet hoe goed het werkt in zulke kleine en smalle delen
– Eventueel de naadtoeslag inknippen met driehoekjes om deze beter te kunnen “strekken”.
Ik hoop dat dit je helpt.
Met vriendelijke groet, Ramona van BERNINA International
Bonjour, je n’arrive pas à positionner le tissu pour le nez. Ce serait envers contre endroit ce serait nickel mais endroit contre endroit ça ne va pas du tout. Est-il possible de m’aider ?
Chère Mireille,
Je suppose qu’il ne convient pas à cause de la marge de couture. La couture est ronde, c’est pourquoi les surplus de couture sur la tête sont plus grands et les surplus de couture sur le corps sont plus petits. Là où tu couse, cependant, les étirements doivent être les mêmes. Les éléments suivants peuvent t’aider lors de la couture de courbes :
– choisissez la marge de couture inférieure à 1cm – alors les différences sont moins prononcées
– Si possible, “dessiner droit” les courbes pendant la couture. Mais je ne sais pas à quel point ça marche dans des coins aussi petits et étroits
– Eventuellement couper le surplus de couture pour mieux le “redresser”.
J’espère que ceci vous aide.
Cordialement, Ramona de BERNINA International
I’m having a hard time printing this pattern. I can’t get it to print the right size. I can’t find on my printer where to select “print actual size”. This is the cutest pattern I’ve found for a lamb. Any help will be appreciated.
Hello Lisa,The “Print actual size” button is not on the printer. Depending on the browser, it is at a different place or is called differently. With the Adobe Acrobat Reader, after you click “print”, you have to choose the option “Actual Size” or 100 % After this, it should print in the correct size.If this still doesnt work, its actually not that big of a deal if its not the exact same size as intended. The Seam allowance is not included, hence you have to add it yourself. So the pattern pieces still match, even though the controlling square isnt 10cm!
If you need any more help, let me know.Best regards, Ramona from BERNINA International
Thank you very much!
Is it possible to get the pattern download in English? The last time I tried to translate pattern pieces with a translate program, the sewing terms didn’t come out exactly right and I ended up having to start the project over because I hadn’t figured it out correctly.
Hello Sue,
I just updated the article with a new link to the pattern in English. Or you can click here:
Pattern Cuddly Sheep
Happy Sewing!