 BERNINA Corporate Blog -
One of the fundamental building blocks in quilting is the versatile half-square triangle.
Whether you’re a novice quilter or a seasoned pro, mastering the art of creating perfect half-square triangles is essential for bringing your quilt designs to life.

It’s actually one of the first things I learned how to make as a young quilter and they can be surprisingly finicky.
After a lot of less than perfect HST’s, I’ve learned quite a few ways to make sure they’re perfect.
In this guide, I’ll take you through the step-by-step process of making half-square triangles and share some tips to ensure your quilts turn out beautifully.

Understanding Half-Square Triangles
A half-square triangle is a geometric quilt block made by sewing together two triangles, creating a square. These triangles are incredibly versatile and can be arranged in various ways to form intricate patterns in your quilt designs.
Knowing how to accurately and efficiently create half-square triangles will enhance your quilting skills and open up a world of design possibilities.
Rather than sewing two triangles together, sewing together squares and making HST’s 2 at a time (or 4, 8, 10 at a time!) is the preferred method for most quilters.
Materials Needed
Before diving into the process, gather the following materials:
- Fabric squares: Choose two contrasting fabrics for each half-square triangle.
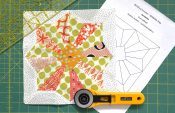
- Rotary cutter and mat: Essential for precise cutting.
- Quilting ruler: Ensures accuracy in measuring and cutting.
- Sewing machine: For efficient stitching.
- Iron and ironing board: To press seams and create crisp triangles.

Step-by-Step Guide
Cutting Fabric Squares
Start by cutting squares from your chosen fabrics. The size of the squares will determine the finished size of your half-square triangles. A common starting point is to cut squares that are 1 ⅞ inches larger than your desired finished size.

Pairing Fabrics
Match each fabric square with its contrasting counterpart. Place them right sides together, ensuring that the edges align perfectly.
Marking Diagonals
On the wrong side of one fabric square, use a pencil or fabric marker to draw a diagonal line from one corner to the opposite corner. This line will serve as your stitching guide.


Stitching
Set your sewing machine to a quarter-inch seam allowance. Stitch a quarter-inch away from both sides of the marked diagonal line. This will create two parallel lines.


Cutting and Pressing
Once you’ve stitched along both sides of the diagonal line, use a rotary cutter to cut along the marked line. You now have two half-square triangles. Press the seams open or to one side for a flat and tidy finish.

Trimming Excess Fabric
To ensure precision, you can trim the half-square triangles to your desired size using a quilting ruler.
I have a triangle trimming ruler, but you can also use the corner of a ruler.

Another way to trim is to iron the HST flat, and then line up the diagonal 45 degree line, trim the edges of the block, making sure the middle diagonal line is perfectly centered on the top and bottom right or left corner.
Align the ruler with the diagonal seam and trim any excess fabric.

Arranging and Sewing
Experiment with different arrangements of your half-square triangles to create visually appealing patterns.
Once satisfied, sew the triangles together to form rows and then join the rows to complete your quilt block or quilt top.
Some Tips for Success
- Precision Matters: Accurate cutting and stitching are crucial for perfect half-square triangles.
- Pressing Seams: Pressing seams open or to one side ensures a flat and professional-looking finish.
- Consistent Seam Allowance: Maintain a consistent quarter-inch seam allowance for uniform blocks.
- Experiment with Colors: Play with color combinations to add depth and interest to your quilt design.
Making Half Square Triangles: Last Thoughts
Mastering the art of half-square triangles opens up a world of possibilities in the quilting realm.

With precision, creativity, and a touch of patience, you can create stunning quilt designs that showcase the beauty of this classic geometric block.
Whether you’re a beginner or an experienced quilter, incorporating half-square triangles into your projects will elevate your craft and bring joy to your quilting journey. Until next time, Jess


0 Responses