 BERNINA Corporate Blog -
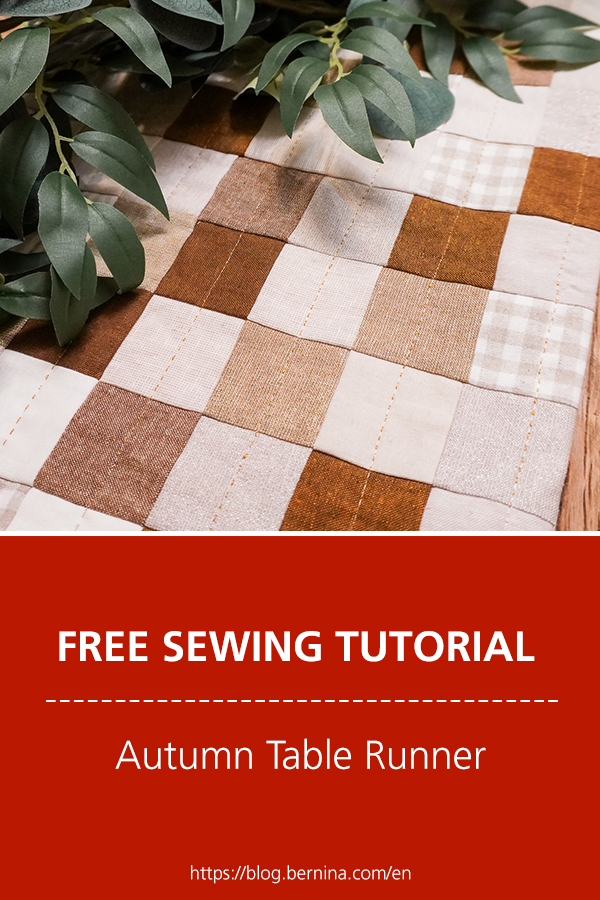
 Oh yes, it’s the perfect quilted runner! And it will be perfect for my Thanksgiving table.
I dreamed up this runner when I was planning out my Thanksgiving tablescape (yes that’s a thing) and I wanted something homemade, but elegant down the center of the table.
Enter the 9 (or 16 patch in this case!) patch runner of your dreams. I will admit.. it did take me longer than I anticipated but that’s mostly because I stopped too often to watch Christmas movies on Netflix (don’t judge).

The other fun element about this runner is the unique hand stitching (but so much easier!) effect down the rows.
Give this exclusive Bernina stitch a try, it was so fun! And now it has that really beautiful homemade feel. Perfect for the holidays!
When thinking of fabric, I really wanted linen, but just one color was too boring. So I went crazy (well as crazy as I can be) and used a Essex Linen bundle of Fat Quarters (FQ) from Missouri Star Quilt Co (you can find the same one here, this is an affiliate link!)
I didn’t use all of them, and I’m happy because I love having leftovers to use for other projects.

If you end up making this for the holidays, you probably don’t have much time, let’s get this tutorial going!
- You’re going to need a FQ bundle of some kind (to make it scrappy), I used the warm essex linen one from MSQC (Affiliate link here – also 15% off)
- Backing fabric, the amount depends on the length of your runner. Mine was about 7.5 yards
- Batting, the same length as your runner plus a few inches on all sides. I used up batting scraps from leftover quilts (you know those long strips from the sides of the quilt, totally perfect for this).
Cutting the Fabric
To make this even fast, we’re going to use strip piecing. Really I use strip piecing in almost every quilt project.
I’ve seen others create 9 patches with 9 squares and I wept for them on the inside, there is an easier way! And ours will be even bigger than 9!
Start by cutting 1.5” strips from your FQ’s, you’ll need a good amount. Keep them folded, and cut starting at the selvage going upwards.

Start pairing up the strips randomly. Sew 4 strips right side together, and repeat with the remaining strips.

I used approximately 44-50 for a long 7” runner (I wanted it to go past the ends of my table). Feel free to size this down!
Iron strips flat, seams going one direction.
Cut each strip set perpendicularly in 1.5” strips until you reach the end of the strip set.
Repeat this with all of the strip sets.
 Now comes the fun part, okay it was actually hard for me, I’ve never done anything scrappy, I’m too much of a perfectionist!
Start randomly paring strips together into squares or 4 strips at a time. I tried to randomize everything as much as possible (darks/lights/etc.)

Sew the 4 sub cut strip set strips right sides together.


Iron the squares flat, I ironed the seams in one direction.
Now you’ll lots of squares of fabric squares. See? Wasn’t that easier than you thought?

You can guess what comes next, pair the squares together. I tried to avoid having similar colors touch, so I turned them in various directions to get them to work.

Sew pairs of squares together right sides together and iron flat.
Start ordering the rectangles in order on the ground, again I avoided having similar colors match.
Pin and sew right sides together to complete a long column.
The length of the runner is completely up to you. I ended up making mine very long, I wanted it to go over both edges of my table.

Iron the runner flat.
Finishing the Runner
Lay out your batting, I used long pieces of leftover quilt batting that I sewed together using a zig zag stitch, it was the perfect way to use those up!
Lay your runner right side up on the batting and baste in place (I used a basting spray).

I chose to quilt the top and batting (not the backing) together using this faux hand stitch (1304) and it turned out SO cute.


Then I trimmed off the excess batting around the edges, leaving a few inches on every side.

Lay your backing fabric on top right side down, I used a very thin muslin fabric in one long piece cut in half.
Pin the backing to the top of your runner top and trim off the excess if there is any.


Because my fabric was pretty thin, it was easy for me to see through it to sew around the perimeter, if your backing isn’t see through, you may want to use a disappearing ink marker to mark the edges of the runner.
Sew using a ¼” seam allowance around the entire perimeter of the runner, making sure to sew on the inside of the edge of fabric so no batting shows when its flipped.


Leave a 4-6” hole, back stitch to secure.
Flip your runner right side out and iron flat.
Carefully fold the hole inward and hand stitch closed.
Optional: stitch around the perimeter to secure it and flatten the runner a bit.

And that’s it! Your gorgeous runner is complete! I hope you loved making it as much as I loved making mine – don’t tell my mom but I’m going to give her this one for the holidays!

What is the finished size of this runner?
Dear Judy,
She wrote the following: “I used approximately 44-50 for a long 7” runner (I wanted it to go past the ends of my table). Feel free to size this down!”