 BERNINA Corporate Blog -
You just got a new pattern and want to start sewing immediately – but taking the time to take a closer look at the pattern and its sizing before you start is totally worth it. Here are a few tipps on how to adjust your pattern to your preferences and body shape.
Wishes and ideas
In general, the first thing you should ask yourself is: What exactly do I have in mind? Do I like the length, as shown on the photo, at all on me? Do I like the width – or the closeness to the figure of the model ? In any case it is worth taking a closer look. Every change in proportions will make the finished project look different later on.
Material
Not every cut is suitable for every material. Even a tried and tested cut, originally sewn with a stretch material, will cause problems with a fabric that is equally heavy but not stretchy. Or vice versa, the model often looks too big. If a model features pleats or draperies, they will look soft and feminine in a fine fabric, whereas in a firmer fabric they will look stiff and might possibly stand out.
Size and figure
You are always a size 38 ? Probably only with your favourite brand ! It is not uncommon, for example, to find trouser sizes between 34 and 40 in your wardrobe, whereby 34 is wider than 38. But there are also differences from country to country. Size 38 in e.g. Spain or France may be 40 or 42 in another country. In addition, both the figure and the measurements change in the course of life – it is always worthwhile to measure again ! Two women with exactly the same bust size (which means they might have the same dress size) can still have totally different figures, as you can see in the drawing.
NOTE
The same bust size means the same size – but not in all places! Left in the picture the figure according to the table measurements.

When using a new cut, it is always necessary to first study the size table carefully. Do the measurements of one size match mine? Do darts have to be shifted in height, or am I willing to compromise? In most cases, two different sizes must be worked for the upper and lower part of the body.
Where are my problem zones ?
Abdomen, thighs, upper arms? The better you know yourself, the easier it is to judge a cut. It is helpful to measure a few tightly fitting favourite pieces from your wardrobe and compare them with the new cut. This is the quickest way to see where something might be too little or too much, and you can plan for more or less allowance in these places. If you are unsure, it is advisable to sew a prototype in a similar material to your original fabric. A big mistake, however, would be to take a cut exactly according to this table, or to adapt existing cuts to it!
NOTE
Each cut contains more or less comfort features, fashion/model-dependent adjustments, or in the case of trousers a deeper crotch and different waistband heights, to name just a few!
Taking the measurement
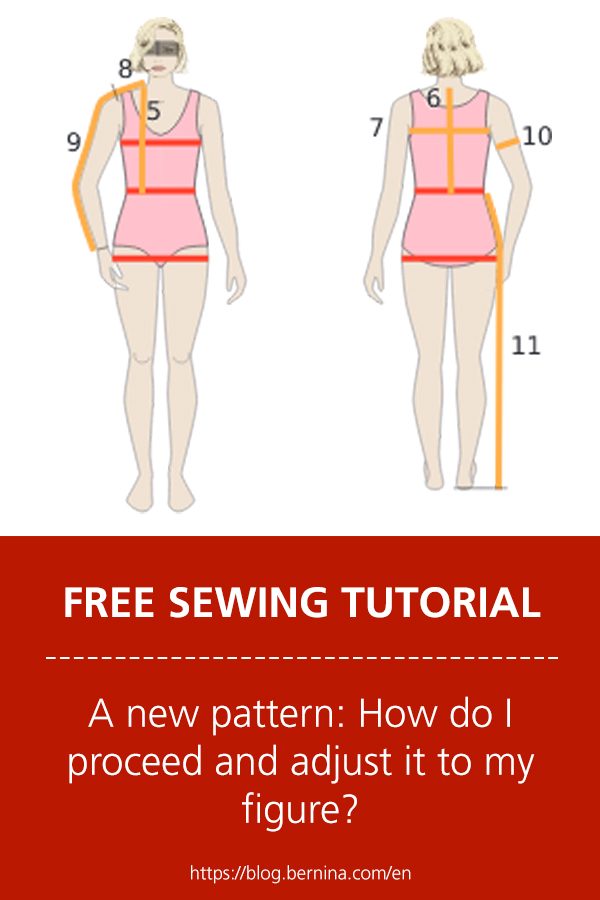
According to the main measurements ( 1–4 ) the size of the model is selected.


Measurements are taken in underwear in the places shown in the drawing, in normal posture – without holding your breath. It is enough to measure the main 1-4 measurements and only in case of fit problems, or knowledge of figure deviations, the remaining measurements should be taken into account. Here is a little description on how to take the measurements:
- Body Hight: From tip to toe
- Bust: Over the widest point, slightly raised at the back
- Waist: Slimmest body width
- Hip: Strongest part of the bottom
- Front length: From the base of the neck over the top of the chest to the lower edge of the waist band
- Rear waist length: From the lower cervical vertebra (protruding cervical vertebra, the one that is most prominent when the head is bowed forward) to the lower edge of the waist band
- Back width: With hanging arms from arm crease to arm crease
- Shoulder width: From neck base to arm ball (top shaping)
- Arm length: From arm ball to wrist
- Upper arm circumference: Widest part of the upper arm
- Side length: From lower edge waist band to the floor
Attention: These measurements are not to be remeasured in any cut ! There will always be comfort allowances and model-dependent changes.
My measurements
For comparison with the cut pieces, sometimes the half (for easier calculation) or quarter-width measurements are to be entered in the table. Larger measurement deviations from the measurement table must of course be taken into account in the cut. However, experienced sewers, who have sewn cuts of a brand many times, know exactly where something must be changed for their own needs. And all those who have table measurements are off the hook anyway. For all others, we will demonstrate here how sizes are adjusted.
What size for which model?
For tops, the size is selected according to the bust size, for trousers and skirts according to the hip size. If the measurements are somewhere in the borderline area, you have the choice whether the garment should be looser or tighter fitting. For dresses, the cut is selected according to the bust and hip size. If your hip fits a bigger size then your bust, then a smooth blending is drawn between the two size lines of the cut, as shown in the drawing (red line, Cut A). Our example shows a bust size of size 36 and a hip size of size 40.

Cut A
Cut adjustments
One size up?
The straighter and easier a model is cut, the easier it is to make one size larger from it. In general, sizes in the range between 36 and 46 change linearly, but changing the size is not so easily above and below those sizes, unfortunately. You have to proceed carefully there. After the new size has been drawn in, the seam lengths must be checked and adjusted, and the alignment marks may have to be offset. But be careful, a normal top shaping is always longer than the corresponding armhole, except for raglan sleeves, as in the drawing (Cut B). To scale up or down, the difference to the next size is measured at all corners marked in red and a point is placed at the appropriate distance on the red line. Then draw all lines in the same sequence.

Cut B
I am shorter/taller
As already mentioned, the size table refers to a height of 168 cm. Short sizes assume a height of 160 cm, tall sizes 176 cm. To adjust a cut to these sizes, the paper cut pieces are cut apart along the drawn lines and lengths are inserted or removed up to the specified difference. Some patterns even suggest where you can change the lenght of the pattern. Resulting “steps” are adjusted smoothly at the sides (Cut C). The final cut piece When the cut is completely copied out and the paper cut, the individual pieces are held in front of the mirror again or better put on the personal tailor’s dummy. This way, last changes before cutting your fabric can be considered. Admittedly, this all sounds quite elaborate. But once you get the hang of it, it’s easy to adapt a cut to your own needs. And you learn from experience, the more of it you have, the better – so let’s get down to business!

Cut C
Enjoy sewing! 🙂

Dreadful, surely Bernina can do better than this