 BERNINA Corporate Blog -
QUILTING JELLYFISH
MY INSPIRATION FOR THIS TYPE OF QUILTING
Doing the amount of free motion quilting that I do, I sometimes feel a little bored with using the same quilting patterns over and over again. A really good place to start looking for different quilting patterns, is in nature. Underwater scenes have always been one of my most inspirational places to go and this time, it didn’t disappoint!
WHERE TO START?
If you live close to an aquarium or somewhere where you can have a good look at underwater scenes (mostly tropical waters!) I would suggest go and have a look. Take your sketchbook along and do rough drawings of whatever you find inspiration in. Perhaps you don’t use it immediately but I know somewhere in the future, it will come in handy.

Quilting a Jellyfish is a good way to avoid boredom.
Having a good photograph and therefor a reference picture, is of utmost importance. From there one can interpret the work and use quilting patterns to express what one sees. A simple outline stitching is all one requires for a jellyfish.
TO QUILT LIKE I DID YOU WILL NEED:
A really good quality photograph or sketch of jellyfish. Practice on a smaller piece before you quilt on your masterpiece. I would suggest the following materials:
-
- 30 x 20cm 100% cotton fabric for quilt top.
- 1 x Loomtex batting a bit bigger than the quilt top
- 1 x backing fabric a bit bigger than your batting.
- Spray glue (or quilting safety pins)
- Machine embroidery thread. I used Glide Warm Grey #4 for the top as well as in the bobbin.

I used Glide Warm Grey #4 on top as well as in the bobbin for all the quilting.
- A Prym marking pen
- Foot # 24 or # 73
- Draw a simplified sketch on the background fabric.
Layer the top, batting and backing.
Use spray glue to keep the quilt top, batting and backing fabric in position.
Start quilting the body of the jellyfish first. Remember it is a transparent creature so do not over quilt. I often quilt upside-down as it is easier to reach those difficult places! Have a look at my Instagram feed @tillydeharde to see how I do this!
-
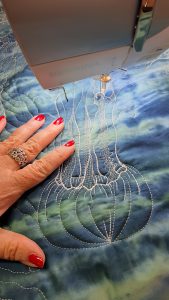
Working Upside-Down means that I can reach difficult areas much easier!
Do the tentacles once the body is done. I ‘feather’ the bottom parts of the tentacles but you can just let yours dangle down in a natural way.

Add pebbles (or rather bubbles) in this case, between tentacles.
- Fill in the spaces between the tentacles by quilting various size pebbles or in this case, bubbles.
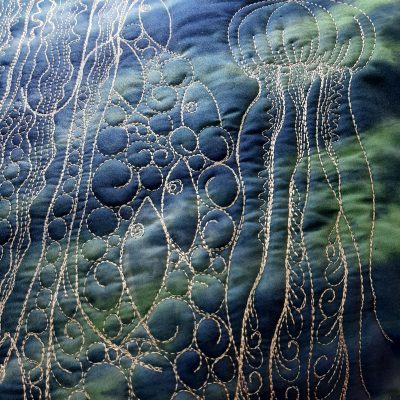
Quilt pebbles and little fish in spaces between tentacles.
Finish off in any way you like….remember it is your practice piece.
Once you are confident in your jellyfish quilting abilities, you can do the same on your masterpiece!
If you are passionate about textiles and want to learn more about how to incorporate my innovative techniques into your work, follow me on Instagram @tillydeharde and Facebook, Tilly de Harde Fibre Artist & Teacher and visit my website www.tillydeharde.com & subscribe to my mailing list. Please don’t forget to leave a comment in the comment box below


0 Responses