 BERNINA Corporate Blog -
Instead of using envelopes, I enjoy sewing small pouches to hold gift vouchers or money. The pleasure of the presentees is always great. And today, in the BERNINA Blog Advent Calendar I would like to show you how you can embellish such little pouches with Christmas lettering embroidery.

For this purpose, I have brought along various design ideas. I found the inspiration on Pinterest. A handwritten font is best suited as the letters are usually connected in a curved line. This allows the embroidery to be sewn continuously, which makes things much easier.

But first of all, we need a little pouch
I most like to sew these pouches using the following method:
- Cut a rectangle of fabric twice the width plus the seam allowance and the desired height that you would like the finished pouch to be.
- Cut a zipper at the corresponding length so that it slightly extends on both sides. This is necessary so that you can fit the slider later.
- Cut the zipper in half, as you will only need half of it, and you can put the other part aside for a second pouch. This means: one zipper equals twice the fun of sewing pouches!
- Cut the lining in the same way and reinforce the lining or the outer fabric as you wish.

Select a font for your lettering, print it out on the computer or write it freehand on a piece of paper.
The lettering can now be drawn directly onto the fabric either with an appropriate textile pen or very easily with a pencil. Alternatively, you can draw the lettering on an auxiliary material that you attach to the fabric when embroidering. This can be a water-soluble stabilizer or a piece of pattern paper. I prefer using glassine paper because it is wonderfully easy to tear out and remove after embroidering.

Decorating the pouch with lettering
Lower the feed dog: there is a button on the right-hand side of the sewing machine to do this.

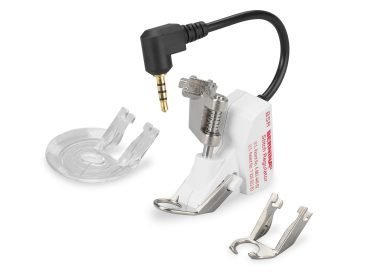
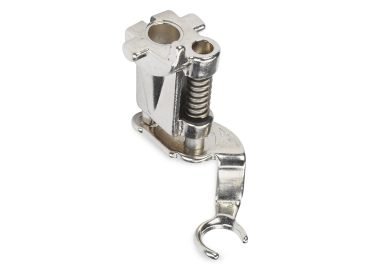
It is best to use an embroidery or quilting foot that is suitable for free-motion sewing, e.g. with the Free-Motion Embroidery Foot #24 or even with the BERNINA Stitch Regulator (BSR). I had to make do with a different foot, but I am sure that it will be much easier to work with a special foot.
The standard straight stitch can be selected. The stitch length does not matter as the fabric is moved by hand and not by the feed dog. The upper thread tension can be lowered slightly so that the bobbin thread is not visible later on.

Now you have to trace the lines of the lettering drawing with the sewing machine. Depending on your taste, you can sew along the lines several times and in doing so, you will vary the density of the letters. It doesn’t matter if you don’t hit the lines exactly because that is exactly what creates this special, beautiful look.
Finishing the pouch
Once the embroidery has been completed, the pouch is sewn together: Sew the zipper along the upper edge between the inner and outer fabric and topstitch the edge.
Then pull the slider open so that the sides are nicely aligned.

Afterwards, the pouch can be closed, making sure that the zipper is at least halfway open. Sew off the corners at the bottom if necessary. Do not forget to leave opening in the lining to turn inside out later! The zipper can then be shortened, and the pouch is turned inside out. Close the opening.

Of course, you can not only use lettering to embellish pouches; embroidery like this also works on cushion covers, shopping bags, tea towels and other nice things that can be given as Christmas presents, for example, and the size of the lettering can be scaled as required. The lettering can also be supplemented with embroidery by hand, which I consider to be a fantastic option.
Have fun with this idea!


0 Responses