 BERNINA Corporate Blog -
I hope you’ve had a lovely Advent season so far and have found lots of lovely projects in the posts of the Blog Advent Calendar up to now. Today we are going to embroider a beautiful gift bag – completely ITH, i.e. “in the hoop”. The bag can also be used as a light pouch. I am very fond of light objects like these in the dark season.

The bag is relatively quick to be embroidered and only needs a little preparation. The bag measures approx. 12 cm x 16 cm and has a bottom of 6 cm.
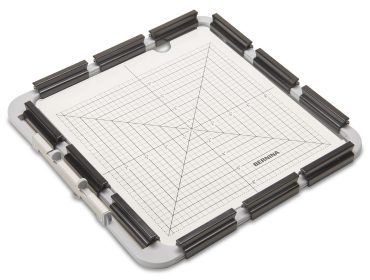
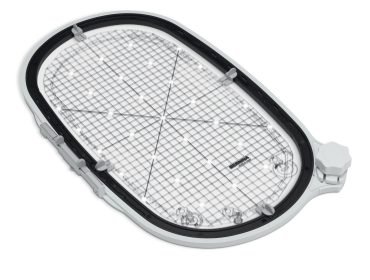
The embroidery design fits in the Maxi Hoop as well as in the Medium Clamp Embroidery Hoop.
Embroidering the gift bag – with embroidery file free to download
You can download the embroidery file for the gift bag or bag of lights as a freebie from the following link:
Download Embroidery File (ZIP)
Please use the embroidery files ONLY for personal purposes.
Click on the link to download a ZIP file directly to your computer. You can usually find it in the download folder of your computer; the exact location depends on your local settings.
Please unzip the ZIP file before transferring the data to your sewing machine or before opening it in the embroidery software.
Required material:
- Main fabric 21 x 34 cm: optionally woven cotton fabric, Lutradur 120, embroidery felt 1.2 mm
- Stabilization depending on the fabric: H250 or spray starch
- Tear-away stabilizer
- Sprinkles/glitter
- Approx. 10 x 14 cm tablecloth foil 0.3 mm
- Embroidery threads
- Textile adhesive or iron-on tape
- Masking tape
- Optional spray adhesive
Preparing the material
Cotton fabrics (flag cloth) and embroidery felt should be reinforced because these materials do not have enough stability and because it is easier to iron the pleats into these fabrics this way. You can either stabilize with Vlieseline H250 or with spray starch. I prefer using Avalon* or spray starch, which makes the fabric very stiff. In most cases, I make several bags at once and starch a larger piece of fabric in advance. To do this, I stiffen it in the sink and hang it up to dry overnight.
*Dissolve some Avalon remnants in the water and place the fabric in it, wring it out and hang it up.
Lutradur is stiff enough and does not need to be specially prepared.
Cutting the gift bag to size
With cotton fabrics, the upper edges must be ironed over. For this, a piece of fabric is cut to a size of 21 cm x 34 cm.

The embroidery felt and Lutradur do not fray and can therefore be cut to 21 cm x 30 cm.

Ironing the cotton edge over
Transfer the markings to the cut according to the illustration. Iron both short edges 1 cm to the wrong side. So 1 cm at a time and then another 1 cm. Fix the edge with either textile adhesive or iron-on tape.
Place the cut in front of you with the right side facing up and iron line 1 to the left (right side on right side). Then iron line 2 to the right (wrong side on wrong side) and line 3 to the left again (right side on right side). The previously ironed and stuck outer edges lie flush on top of each other, with right sides together. The fold in the middle looks like an “A”.

Ironing over felt or Lutradur
Transfer the markings to the cut as shown in the illustration and iron over lines 1 to 3 as described above.
Embroidering the designs on the bag
Regardless of whether you work with fabric, embroidery felt or lutradur, the design is embroidered in exactly the same way. The only difference is that the top edge of embroidery felt or Lutradur is different, i.e. it is not ironed over. For this blog tutorial I use cotton fabric for my embroidery.
I use the clamp hoop because it is the smallest hoop that fits my design. Hoop the stabilizer and embroider the placement line.

Place the fabric centered and flush with the top folded edge along the placement line and secure it with either masking tape or spray adhesive.

Embroider colors 2 to 5. You can find the color overview on the PDF color chart.

If desired, the deer can be painted a little with fabric markers.

Then spread a little glitter and sprinkles inside the ball and cover with the tablecloth foil. Secure with masking tape and embroider the next color. This fastens the foil with a triple stitch. The foil is then cut back as if it were an appliqué.

Now place the other ironed edge flush with the other edge. The fabric should be secured a little with masking tape so that nothing can fold over while embroidering.

The last sequence stitches the sides of the bag and embroiders a finishing zigzag stitch.

Take the project out of the hoop and remove the stabilizer. Cut the sides back down to the zigzag stitch without cutting the stitches.

Turn the bag inside out and work out the corners well.

If you like, you can fold the sides inwards like a paper bag and iron them a little so that the folds are nicely sharp-edged.


My tip: You can also turn these bags into an advent calendar. The numbers from this post are perfect for this. Sequences 3 to 5 are not embroidered and the respective number is inserted instead. Maybe an idea for next year?


If heavier gifts are placed in the bag, you can cut a piece of white cardboard (300 grams) measuring 6 cm x 12 cm and place it in the bottom of the bag.
I wish you lots of fun crafting and a Merry Christmas.
Kasia


Lutrador is new to me so thanks for that information.