 BERNINA Corporate Blog -
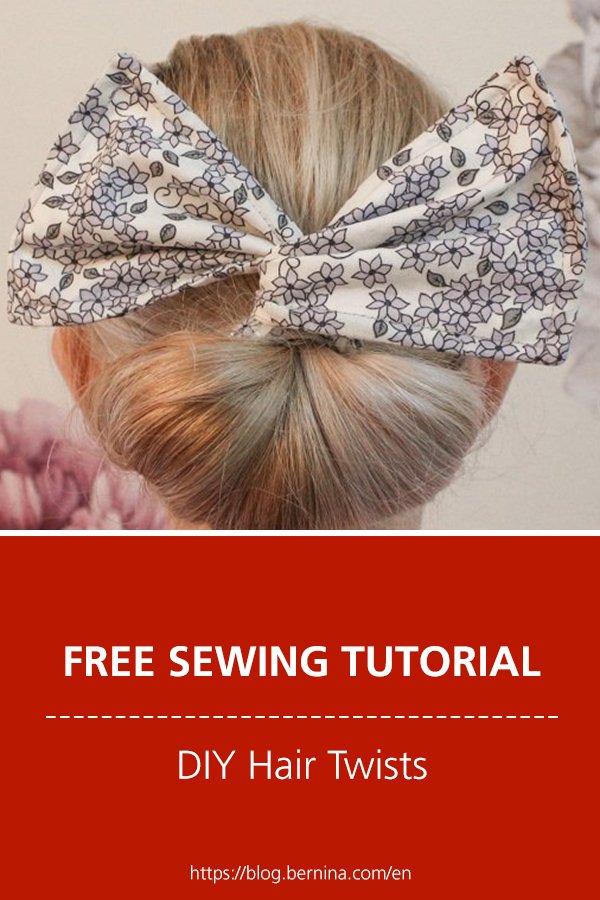
My hair has grown so long during the pandemic which has lead to me wear it in a bun most of the time. A bun is also best for when I wear a mask as not only is my hair out of my face but it also holds the mask ties perfectly in place.
I hardly go out these days, mostly just to get groceries, so it is nice to make some effort at dressing up when I do. An easy way is to add a hair accessory that matches or compliments your mask. They are a great way to further use up your fabric scraps.
I have previously made these scrunchies: Scrap Busting Scrunchies for Easter!
But recently I came across another great accessory specifically for buns.
What will be needed:
- Sewing machine
- Buttonhole Foot (preferably #3 or #3C but #3A or #3B will work too)
- Zipper foot #4
- 2 pieces of woven mid-weight fabric each about 11cm x 38cm
Fabric with a bit of texture works best so your hair has something to grip on to.
I suggest Linen or Cotton. - Thread to match
- 2 small strips of Vilene (each 12cm x 1cm)
- 1m Wire, bendable but stiff
If your wire is too thin/flexible I would suggest doubling it up - Pliers & Wire cutter
- Hand sewing needle
- Knitting needle/something pointy
Pattern
I have provided some patterns for the 2 style Hair Twists I made in this blog post. I made these patterns according to what I found to work for myself.
Please feel free to use them as is or adapt them to better suit your hair.
You could make the patterns narrower, shorter or try out different styles.
 Square & Wide Hair Twist Pattern

Pointed & Narrow Hair Twist Pattern
To assemble the pattern, cut out each piece and join together along the solid grey line.
Steps
Assemble the fabric pieces

- Iron a strip of vilene on the centre marking on the wrong sides of both pieces of fabric.
Use the pattern piece to check the placement.

- Pin fabric pieces with the right sides together.
Stitch around the edges with a 0.6cm seam allowance.
Leave an opening between the notches (red lines on pattern)

- Trim around the corners to remove excess fabric.

- Turn the item right side out.
Use a knitting needle or something pointy to turn out the corners.

- Give the item a good press.
Shape & insert the wire

- Shape the wire to fit the item.
Overlap the ends of the wire and cut off excess.
You may want to put a small blob of glue over the ends to prevent them from pricking though the fabric.

- Feel the wire through the opening you left.

- Hand stitch the gap closed.

- Create a channel for the wire
Pin the wire close to the seams.
Using the zipper foot, stitch all the way around the item, about 0.6cm in from the edge.
Create a large Buttonhole

- Use a removable marker to mark out the centre line on one of the right sides.
- Create a large buttonhole along the centre marking.
The button-hole foot #3 or #3C would be best as the buttonhole needs to be bigger than 27mm.
However you can make it work if you only have foot #3B or #3A.

11. 1. Choose a standard buttonhole stitch (like 51) and adjust the width to the maximum.
Select Man (manual) on the screen.
 11.2. Place the fabric so that the top of the marking is centre of the foot.
Stitch all the way to the end of the marking and stop.
 If you are using foot #3A or #3B:
Stop every time your needle reaches the end of the foot, put the needle down, lift the foot so that it bounces back, put the foot down and continue sewing. Repeat as necessary.
 11.3. Select the next step, sew and stop when you get back to the starting point.
 11.4. Select the next step, sew and let the machine create a bar tack. It will automatically stop.
 11.5. Select the next step, sew and stop when you reach the end of the marking.
 If you are using foot #3A or #3B:
Stop every time your needle reaches the beginning of the foot, put the needle down, lift the foot and push the foot backwards, put the foot down and continue sewing. Repeat as necessary.
 11.6. Select the next step, sew and let the machine create another bar tack.
 11.7. Select the next step, sew and let the machine create a few securing stitches before automatically stopping.
Remove the item from the machine and trim the threads.

- Carefully cut along the centre of the buttonhole without cutting through the stitches.


Here is how to put on your Hair Twist:
@hannah_rose.smith DIY Hair Twist sewing tutorial on the Blog, link in bio #mybernina #diysew #sewing #sewingtiktok #freepattern
@hannah_rose.smith DIY Hair Twist. Sewing tutorial, link in bio #mybernina #diysew #sewing #sewingtiktok #freepattern
Tips
- Practice makes perfect.
The first few times I used my Hair Twist weren’t the easiest with my long hair. However with a bit of practice I was able to make a neat bun. The trick is to make sure you pull the hair tight while twisting it. - When you remove the Hair Twist from your hair, you may need to reshape it.
- I found that putting my hair into a pony tail with a hair tie first made using the Hair Twist more manageable and made for a more secure bun.
- I should have used a thicker/sturdier wire but used what I had available.
- When making the buttonhole, you can press the reverse stitch button instead of selecting the next step on the screen.
- You could make each side of the Hair Twist a different colour.
- Try adding embroidery to ends of your Hair Twist.
I would love to see what you make, please feel free to share with me!
Instagram
Facebook
-Hannah-Rose


This is a very nice tutorial and pattern! Thank you so much. It is such a beautiful hair accessory.
I just find with heavy and thick hair that the bun does not want to stay in place. However, I am going to try again with a thicker wire.
Hi Susan
I’m so glad you gave it a go!
A stronger wire should do the trick, as long as you can still bend it when twisting it in your hair.
Also make sure the fabric you are using is sturdy but still lightweight. Something like quilters cotton would be great.
All the best! 😉