 BERNINA Corporate Blog -
 Smocking is a decorative & functional technique where a large section of fabric is gathered to create tight pleats held together in parallel rows and designs are embroidered over these gathers. It is traditionally done by hand.
Historically, smocking was a technique used to control the fullness of a garment in areas around the neck, bodice and cuff. It was also used to create a bit of stretch in a garment before the invention of elastic.
With Machine Smocking, the gathers are created by sewing long length stitches which are then pulled tight. Decorative stitches are then sewn over these gathers to hold them in place and the gathering stitches are usually removed.
What will be needed:
- Sewing machine (B 735)
- Overlocker (L460)
- Lightweight fabric (quantity dependent on your pattern)
- Pattern (refer below for a free pattern)
- Embroidery Thread
Pattern
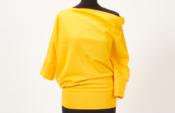
I combined 2 free patterns to create my blouse. The Isla Puffed Sleeve Top & Basalie Flutter Sleeve Top by Tiana’s Closet.
Some patterns that you could use for smocking are:
- –Isla Puffed Sleeve Top
Smock the gathers where they the join the bodice, around the sleeve head or the sleeve cuffs. - –Basalie flutter sleeve top by Tiana’s Closet
Smock the gathers where they the join the bodice or around the sleeve head. - – Imby’s Flowy Top from Karmme Apparel
Smock around the Front & Back yokes - –Veronica Blouse
Omit the drawstring and smock the neckline & sleeve cuffs. - –Shannon Puffed Sleeve Dress
Smock around the Front & Back yokes, around the sleeve head or the sleeve cuffs.
Pattern Alterations
When it comes to creating gathers for smocking, you usually need 3 times the final width.
If you want very tight gathers and your fabric is very thin, then you could even do 5 times the final width.
Ultimately it is up to you and the result you want to create. If you are using a pattern with gathers around the neckline and don’t want to increase the amount of gathers, that is fine too. The idea of the decorative stitches is to add a personal and fun touch so don’t stress about it.
For my blouse, I made my gathers double the final width as I didn’t want it to be too floaty/billow too much in the wind. Another reason for only doubling, is that even though I used a lightweight fabric, I didn’t want the Blouse to be too weighty with all the extra fabric.
I increased the gathers of the Lower Bodice pattern by adding to the Centre Front to make it twice the width of where it joins the Yoke.
As the patterns have their own instructions, I am rather going to share how I smocked my top with a sewing machine.
Steps
 Using a fabric marker, draw lines spaced 0.6cm to 1cm apart across the areas that you want smocked. The width of the spacing will depend on how close you want the decorative stitches to be.
Make the first line the seam allowance.
The number of lines to draw will always be 1 more than the number of smocked rows you want to create. Eg. I want to have 2 rows of smocking so I will need to draw 3 lines.
 Lengthen your stitch for gathers.
 Stitch along the marked lines. Do not back stitch at the beginning or end.
 Gently pull on a thread tail on either end of the stitched row to gather the fabric.
The fabric must become the width of the area it will be attached to.
Eg. My gathered fabric must be the same width as my Yoke.
 Choose a decorative stitch.
 Change the top thread to an embroidery thread.
Stitch between the gathered rows.
You might find it helpful to gently hold the fabric on either side of the foot and pull the gathers taut while stitching.
 Using the iron, give the stitched fabric a steam (do not press).
 You can remove the gathering stitches but I would recommend only removing the top row once the gathered fabric is sewn to the respective piece of the garment.


Tips
- Best fabric choices for smocking are soft, light weight fabrics like cotton, voile, soft linens, and silk.
Stiffer/heavier weight fabrics may be too bulky. - Use some scrap fabric to test the quantity of gathers as well as the decorative stitches.
- If you have a 2mm wide twin needle, you can create an interesting effect with decorative stitches. You could even use two different colour threads. Depending on the decorative stitch and stitch width, the needle will create overlapped or parallel stitches.
Remember to select the needle from the on-screen menu so that the machine is aware of it.
I would love to see what you make, please feel free to share with me!
Instagram
Facebook
-Hannah-Rose


Love the smocking post, want to try it! So many projects, need more time! 🤣
I love these posts. It gives me the opportunity to learn new things. Not to mention the great free patterns I find here. Thank you so much!