 BERNINA Corporate Blog -
Quickly sewn Tea Light Bags
Just before Christmas, it is often the case that you want to sew a cute little gift for one or two of your loved ones. Or the festive table is to be decorated with a great detail from the domestic sewing room. That’s what these little tea light bags are perfect for! They are quickly sewn and can be embroidered with a mini design or a word as desired to match the motto of the BERNINA Blog Advent Calendar 2023. And they can be color-matched with any festive table. Last year, Dennis’ entire Courleys team had a small tea light like this in their workplace – so it’s perfect for the workplace too!

Remnants of woven fabrics that might otherwise only be used for appliqués are excellent for the small tea light bags, as are smaller pieces of embroidery stabilizer that only fit into the small hoop.
Material supplies for a tea light bag

- Two squares of different cotton woven fabrics in the size of 15×15 cm, including the seam allowance of 0.75 cm
- Thin cut-away stabilizer, for example SulkySoft N`Sheer plus or Weblon plus by Madeira
- Embroidery threads in any desired colors
- LED tea light and possibly a tea light jar
- Spray glue
- Some sand or rice to fill and a bit of cotton wool
- Textile glue or Wonder Tape (double-sided water-soluble adhesive tape for sewing)
- The standard sewing and embroidery utensils such as embroidery needles, scissors, marking pen etc. The marking pen should be water-soluble or dissolve in some other way. No permanent marking is allowed to remain – very important

Download free embroidery files
For this project, we have provided you with five words in micro lettering as an embroidery freebie. The bags don’t offer that much space for embroidery, but a very small font or another small design gives the whole thing a particularly personal touch.
As the lettering is very small, the contrast between the embroidery thread and the fabric should be quite high so that it is easy to read. It also makes sense for the outer fabric to have a calm print so that the lettering stands out well.
You can download the embroidery files in all formats at the following link: Download Embroidered Words
Special features for small embroidery fonts
Modern sewing machines already come with many embroidery letters included. Is it not possible to simply downsize them on the machine as much as you like?
This is not to be recommended. If the original size of a letter is 4 cm and we reduce it to 1 cm, the original number of stitches is pushed together too much or the stitches will overlap. The embroidery becomes too dense and details disappear. An O would no longer have a hole in the middle, an i-dot would disappear and much more. The embroidery density would be far too high. The denser the embroidery in the smallest space, the more likely it is that the machine will get stuck and be damaged. As a rule of thumb: Embroidery designs should only be scaled up or down by 10 percent on the machine.
If a micro lettering is included with a machine, it does not have to be downsized any further and can therefore be wonderfully embroidered. The structure of this type of micro lettering is exactly the same as that of the lettering used, i.e. it is digitized with fewer stitches and very narrow elements so that it is easily recognizable even when embroidered in small sizes and can be stitched without any problems.

Metallic threads can only be used here with utmost caution. The thread is fairly inflexible. Due to its texture, it is unwilling to lay itself in small loops, which quickly leads to slings, knots and thread breakage. I therefore do not recommend using metallic threads in this case. If you still want to try, use the Thread Lubrication Unit and embroider very slowly.
Preparing the fabric for the tea light bags
We now cut a 15×15 cm square from each of two different fabrics and mark the seam width of 0.75 cm with a small dot at the four corners on the wrong side of one of the two squares.
This works particularly well with a patchwork ruler. Also mark an opening for turning inside out later of approx. 5 cm on one of the four sides.

The square that will later be on the outside is marked with a line at a 45-degree angle to a corner of the fabric on the right side of the fabric. Draw a dot 5 cm from the corner and draw another line across it. The intersection of the two lines is the center of the embroidery.

Why cut-away stabilizers are often a good choice
Now hoop the stabilizer tightly in the hoop and apply a touch of spray adhesive. This is the reason why Dennis doesn’t like working with tear-away stabilizers. Because they often tear while being hooped. However, the embroidery will only look really beautiful if the stabilizer or stabilizer/fabric sandwich sits tightly in the hoop. If you like, mark the center on the stabilizer either beforehand with the template or with a ruler. Now place the marked fabric on top.

Now that the fabric is prepared, it’s time to get to work on the machine. Dennis has worked here on theBERNINA 770 QE PLUS and used the yellow Bobbin Case with high thread tension.

The higher thread tension of the yellow bobbin case gives the embroidery a clear outline because the upper thread is pulled further down towards the underside. This makes the stitch formation particularly beautiful.
The desired design is transferred to the USB stick and selected via the menu:

In the display on the left, click on the embroidery hoop and select all 3 sections. A grid is now shown on the display, the center of the design is indicated and the hoop automatically moves with the embroidery module once the embroidery is positioned in the hoop. That makes it easy to find the exact center of the design.

By turning the handwheel, the needle tip can be used to check whether the needle hits the exact center of the design.

The design can now be embroidered. As the font is so small, embroidering is done in no time at all.

Afterwards, the stabilizer is trimmed back narrowly on the wrong side. The following picture is only intended to show the trimmed stabilizer.

Sewing the tea light bags
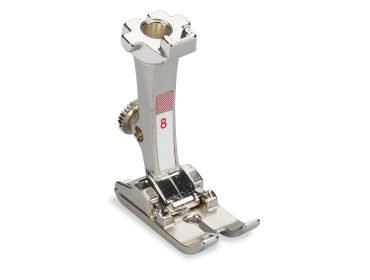
Now place the two squares (one embroidered, one unembroidered) right side on right side on top of each other and sew them together except for the opening. f you want to sew directly along the foot edge, the Jeans Foot #8 is an ideal helper. Among many other uses, but especially when sewing with the straight stitch plate for a perfect stitch pattern, it offers a distance of exactly 0.75 cm from the edge to the center needle position.
It is best to work with the needle stop down which means that the needle can hold the fabric, especially at the corners, so that the direction can be changed exactly at the marked point.

Now cut the corners back diagonally and turn the piece inside out. The corners are worked out and the opening is placed neatly on top of each other. It helps to steam the fabric briefly afterwards. Now narrow-topstitch once all around. You can use contrasting thread or thread the upper and lower thread to match the respective fabric side. One of our favorite presser feet was used here, the Edgestitch Foot #10


Now fold the sewn square in half, with the embroidered part on the inside, and fix it in place with a few fabric clips. Draw a diagonal line to the right and the left of the edge, starting 1 cm from the bottom corner and ending 4 cm from the bottom corner.

This line is now being sewn. The beginning and end must be well secured. The other two edges are sewn in the same way. This creates the desired shape. The two pictures show how the previously flat part becomes three-dimensional.


Now the part can be turned inside out and a small strip of adhesive tape is attached to all edges, as shown below. This makes the corners look nicer afterwards. The protective film is removed and the corners are pressed down. Alternatively, a drop of textile adhesive will also work.

How the bag becomes the gift
First fill in some sand or something similar to make the bag a little heavier. Then add some cotton wool and finally place the tea light, possibly in a jar. The great thing about these electric tea lights is that there is no risk of accidents. However, standard tea lights can also be used, in which case we recommend using sand to fill them completely. Please do not use cotton wool in this case! It is also essential to use a jar to protect against heat!

We wish you lots of fun embroidering and sewing. But beware, you may become addicted to these pouches 😉
Manu with the Courleys team


0 Responses