 BERNINA Corporate Blog -
Andrea from Quiltmanufaktur and author for the German BERNINA blog is your guide for this fantastic quilt-along over the next 12 months. Together, you will sew classic patchwork blocks and combine them into a sampler. The completed quilt will be traditional, yet modern! The next part has been written and we are delighted that you join this quilt project.
Hi, my dear participants in the “Old Block Quilt-Along”! Today I’m going to reveal the “secret” of the layout for the Old Block Sampler.
The layout for the Old Block Sampler
In our case, you can use one of the following layouts that I am presenting to you today as the basis for arranging your patchwork blocks. Now is also a good opportunity to think about whether you want to make all the other blocks still to come or if you prefer only to make a certain number and/or certain sizes of blocks. As you will soon see, as we progress through this quilt-along, we will be using even bigger blocks that aren’t exactly a piece of cake.
If you would like to take a shortcut and leave out these blocks, I can give you some ideas about how to design your layout without these blocks.
Of course, you don’t have to make up your mind right away, but you can use the different layouts as a basis to plan how you want to proceed. Or you can simply sew all the blocks and see at the end how you want to arrange the them.
The different block sizes in the Old Block Sampler
You’ve probably wondered why there are different block sizes in this quilt-along.
So far, we have already made blocks measuring 9″, 10″ and 12″. In the further course of the Old Block Quilt-Along, the sizes 6″, 18″ and 20″ will be added.
In the introduction in the first post of the quilt-along, I mentioned that there would be different block sizes. I also promised that everything would fit together beautifully at the end – and I’m keeping my promise, as you’ll soon see!
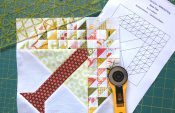
Old Block Sampler, suggested layout no. 1
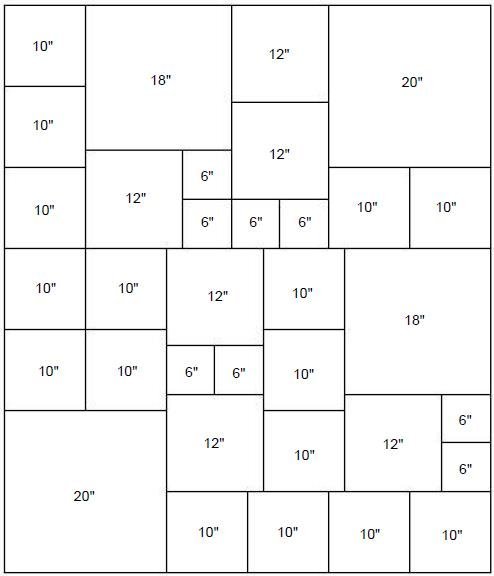
When I planned the sampler, this was the basis I worked with when choosing and arranging the blocks. The layout is designed to be approx. 150 x 180 cm (60″ x 70″) in size.
You can also see from this layout how many more blocks I have planned and will present to you by the end of the project next year. There will be 34 blocks in total! For comparison, the “Skill Builder – 6 Heads 12 Blocks” (German content) quilt-along included 42 blocks that were made within a year ;-).
- 6″ – 8x
- 9 / 10″ – 16x
- 12″ – 6x
- 18″ – 2x
- 20″ – 2x
You are probably wondering why it includes 9″ blocks when there aren’t any here. The answer is that if you would like to do this layout, but the 18″ blocks are too difficult or you don’t like them, you can sew 4 more 9″ blocks and use them instead of the 18″ blocks. The same result can also be achieved by sewing two 6″ blocks onto the sides of an additional 12″ block and another three 6″ blocks underneath. This also gives an area of 18″.
Similarly, a 20″ block could be replaced by four 10″ blocks. As you can see, there are endless possibilities…
During the course of the previous quilt-along, you will already have seen how varied the interpretations of the blocks can be and that the same block can look completely different. It would therefore be possible to sew the blocks again without it being immediately noticeable in the finished quilt.
Otherwise, the 9″ blocks are enlarged by one inch in this layout and then included in the layout as 10″ blocks.
To enable you to download the patterns as a PDF, I have created a PDF for each layout. Here is the PDF for the first layout:
Old Block Sampler, Layout No. 1
Old Block Sampler, suggested layout no. 2
The second layout has the same number of blocks, they are just arranged differently. In this option, the focus is on the four large blocks which are positioned at the center. Here too, the size is once again approx. 150 x 180 cm (60 x 70″).

The PDF for download for this layout is provided below:
Old Block Sampler, Layout No. 2
Old Block Sampler, suggested layout no. 3
The following design is another version using all the blocks:

As you may already have realized, all three layouts always feature a longer collection of 10″ blocks. In this option, this is located in the middle. If the quilt is too short for you at 180 cm, you could increase the length by adding another row of 10″ blocks. This would give the quilt a size of approx. 150 x 200 cm (60 x 80″). You can just repeat the blocks you particularly liked!
Here is the corresponding PDF for download: Old Block Sampler, Layout No. 3
Old Block Sampler, suggested layout no. 4
We now come to an option that allows you to sew just two of the large blocks (or to replace them as described above) and still gives you a size of approx. 150 x 180 cm (60 x 72″). The trick here is to increase the size of all the 9 and 10″ blocks to a size of 12″. This gives you a grid of 6 rows made up of 5 blocks per row.

There is also a PDF to download for this suggested layout: Old Block Sampler Layout No. 4
Old Block Sampler, suggested layout no. 5
You have to cheat a bit with this layout…
I will be presenting a total of sixteen 10″ blocks, including the four 9″ blocks. Then there are six 12″ blocks and the eight 6″ blocks. Once these are all converted into 12″ blocks, you get 22 blocks. To make a layout as in the previous option, you need another six blocks measuring 12″. You can either make some of the blocks twice again or you can quickly hop over to “6 Heads 12 Blocks”(German content) and choose some from there to include in this sampler ;-). The blocks you will find there are just as old and we go into the history of all the blocks there too!

Here is the download for the fifth layout: Old Block Sampler Layout No. 5
As you can see, there are many different ways of laying out your quilt! Your choice from the options I’ve presented – or whether you create your own unique layout – depends on your taste and is entirely up to you!
Layout for 12 blocks
Just a quick reminder: To take part in the prize draw for the BERNINA 570 QE at the end of the quilt-along, joining 12 blocks together to form a quilt top is sufficient.
If that is enough for you, you may want to look at the layouts for “6 Heads 12 Blocks” from 2017 again. In that project, we sewed 12 blocks each measuring 12″ and then arranged them in completely different ways. You can see the sizes of each of the quilts in the links(German content) over the layouts:
Dorthe Niemann, Lalala Patchwork – “6 Heads 12 Blocks” layout, 2017

Gesine Brüning, allie and me – “6 Heads 12 Blocks” layout, 2017

Katharina Märcz, greenfietsen – “6 Heads 12 Blocks” layout, 2017

Nadra Ridgeway, ellis and higgs – “6 Heads 12 Blocks” layout, 2017

Verena Schmidt, einfach bunt Quilts – “6 Heads 12 Blocks” layout, 2017

Andrea Kollath, Quiltmanufaktur – “6 Heads 12 Blocks” layout, 2017

But of course I hope you all stick with me and keep making all the blocks I’m going to show you!
You don’t have to decide on your layout yet, or whether you want to sew all the blocks. It also makes no difference what order, how and when you sew your blocks. Your taste is all that matters and – as I keep repeating like a mantra – that you have fun.
I am interested to hear what you think about the suggested layouts! And of course I hope that each one of you finds the right option for you. But maybe you already have or will come up with your own completely different layout ideas for the Old Block Quilt-Along. Either way, it will definitely be exciting!
Overview of all the posts
Have you only just discovered the quilt-along? No problem! You can join at any time. Registration is not required, and you can win a BERNINA 570 QE! All the posts will remain permanently available:
In the first post, which was the invitation to participate in the quilt-along, you will find the important initial information about our joint project:
Old Block Quilt-Along – who’s in?
You can find the rest of the blocks from the quilt-along that have already been published here:
Old Block Quilt-Along – overview of all the posts
I’m glad you’re taking part and I hope to see more wonderful pictures of your blocks!
See you soon for the next block,
Andrea
These blocks look wonderful!
Hi, I’m still working at catching up with all the fun piecing and thinking about a set layout now. Do we have to stick exactly to one of the given layouts or are they just suggestions for these blocks?
Dear Deborah,
Love to hear you enjoy catching up with everyone! You do not have to stick to one of the given layouts. As long as we can see all your wonderfull Old Blocks in your Quilt Top, you will be part of the raffle! Feel free to use creative freedom when combining all of them 🙂
Kind regards, Ramona from BERNINA International
Just wondering how we’re going to increase the size of the 9″ blocks? By adding 1″strips of fabric?
Hy Laura,
Yes, you can increase the size of a Block by adding strips around it, be it only on two sides or add 1/2 an inch to each side of your block. Layout 4 and 5 demonstrate how this might look. Just make sure you consider the sewing allowance. It also doesnt have to be a strip – feel free to be creative and maybe even repurpose the fabric scraps from your OldBlock QAL to create these frames? Thats at least how I would do it. I’m curious to see if Andrea will show us next year how to increase the 9” blocks sizes.
Kind regards, Ramona from BERNINA International
I like layout number 3 I am going to give this a try I have been saving and printing out the instructions for each block
Dear Kim,
That means you are planning to do all blocks then? Amazing! Very curious how yours will look!
Happy sewing, Ramona from BERNINA International
Thank you for all the different layouts, I will decide on one when we do a few more blocks. They all look great.
Dear Karen,
Thank you, I will forward your comment to Andrea. We are excited to see your finished quilt next year!
Kind regards, Ramona from BERNINA International