 BERNINA Corporate Blog -
Background knowledge about Coverstitching, part 2
Using the BERNINA L 890 a combined overlock/coverstitch combo machine, I will show you in a short series of articles how beautiful coverstitch seams can be made and I will answer important questions about Coverstitching. Part 1 of the series focused on the behavior of the seam when we stitch a sweatshirt fabric combined with a single jersey, and therefore, the effect is achieved through changing the thread tension. Also, this article is about thread tension.

We will look at how everything changes if we just take 2 layers of single jersey. But before that, we will take a closer look at the top side of the stitch, on the needle threads.
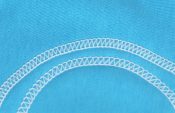
The needle thread picture when Coverstitching
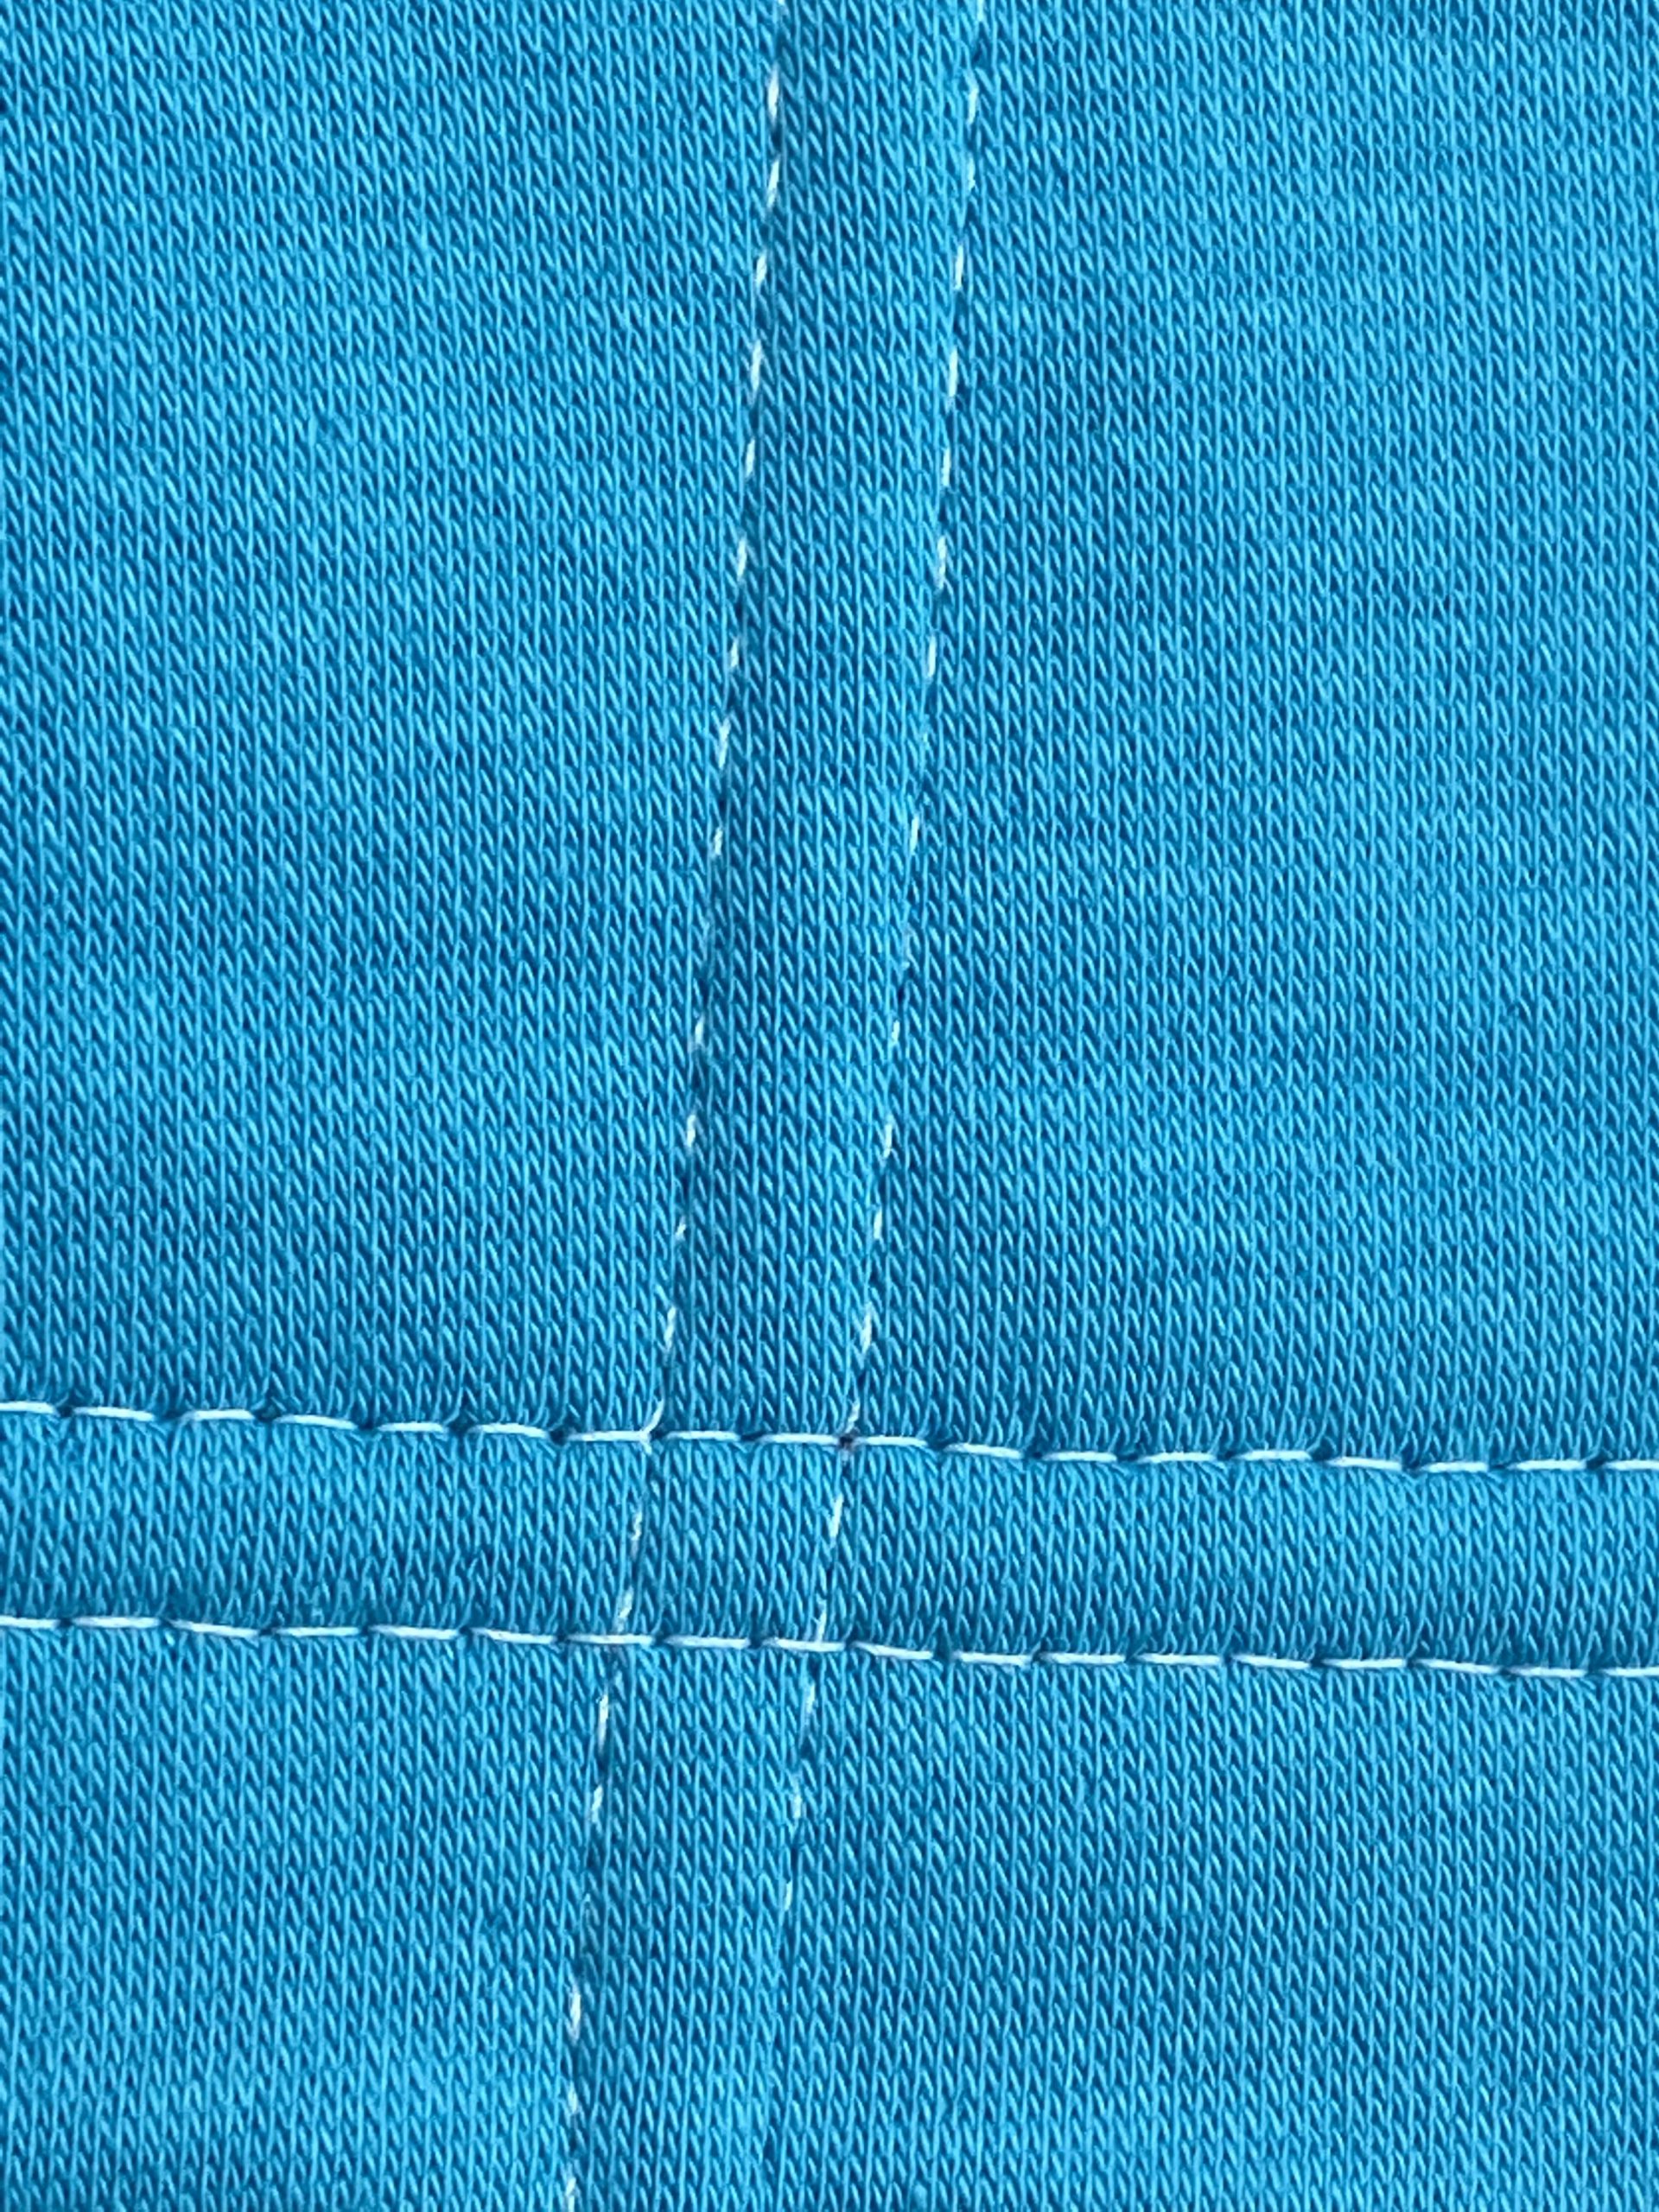
In the picture above we have two seams that look visually completely different on the needle thread side, but both were sewn with identical thread tension. Why do the seams look so different?
The vertical seam goes with the straight grain of the fabric, the needle threads sink into the fabric. That’s why you see them less.
The horizontal seam goes across the grain of the fabric. That’s why the stitches can’t sink in but lie on top.
When we sew coverstitch, usually at hems, we are stitching across the grain of the fabric. Thus, we have needle threads that rest on the fabric. Infrequently however, we coverstitch along the grain of the fabric, e.g. when we cut in bias or length grain for a better stretch, or when we topstitch seams or when we do any other things that hobby sewing enthusiasts come up with.
Often, I read tips somewhere, that in that case you should reduce the needle thread tension. However, if the needle thread tension is reduced in such situation, the resistance with which the looper thread on the wrong side is pulled to the fabric is also reduced. Thus, the looper thread is loosed and there is a risk that we no longer find our coverstitch seam beautiful on the looper side. Or everything becomes so loose that it blurs when you loosen the tension more and more.
The solution is as simple as it is hidden elsewhere:
The little helpers: Washaway stabilizer

If you are familiar with embroidery, you will know wash away stabilizers. Avalon for example is a wash away stabilizer that you can lay on top of an embroidery so that the stitches do not sink in. In high-pile fabrics, the thread likes to sink down. Then the “hairs” come through the embroidery. Even decorative stitches in high-pile fabrics, sometimes even in very thick jersey, often become prettier if you add a layer of wash away stabilizer on top of the fabric in addition to the embroidery stabilizer underneath.

In our case, we have the same effect. I put a layer of wash away stabilizer on top where I sew when Coverstitching. Usually, I cut the wash away into strips, which are waiting next to the machine. I just keep placing the strips under the foot as required.
Afterwards, when I wash my finished sewing piece, the wash away is gone, but the seam lies nicely on top of the material.
Why? Because the wash away additionally stabilized the seam. Thus, the machine was virtually forced to give additional needle thread into the stitch. The stabilizer increased the thickness of the seam, thus more needle thread.
By the way, the same applies if we want to see the looper side better, e.g., for example in fabrics with a piled texture. Then simply place the wash away between the fabric and the stitch plate!
Of course, it is also the case that the yarn also lengthens when you stretch a seam very strongly. It has to, otherwise the seam would break. Whether and how the fabric relaxes back to its original shape when not stretched is solely due to the fabric and the degree of stretch. If the stretch was strong, the needle thread may also slip between the fabric again and will not come back to the surface when relieved.
Tunneling
By the way, a form of tunneling is created exactly the same way. If we stretch strongly, needle and looper threads stretch out. The extent to which the looper thread can now relax depends on the needle loops. Again, this depends on the fabric quality and elasticity.
I am often asked – in front of me a piece of hemmed fabric, stretched to the double-length, why it is tunnelling when stretched and afterwards when relaxed again. That is physics, because we sew with thread and not with rubber; O).
Thread amount in the stitch
What do we learn from this? We can’t handle physics with every tool. If you stretch strongly, you need enough thread for the entire stretch. No machine, no matter how good it is, can conjure up the threads from a qualitatively rather poor fabric afterwards.
I know that some sewists think: The better the machine, the less you have to do yourself. In some cases that may work, but certain conditions cannot be detected by the machine… you are in control.
Let’s get back to our single jersey experiment:
Setting the tensions right
If we now look at our BERNINA L 890 and at our last shots from part 1 of this series, then we had the tension on the left needle at 5, and on the right needle at 7. With the looper thread we bypassed the air threading path partially; the tension was at 0.
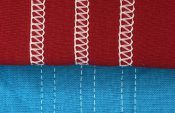
If we select the same settings for our single jersey, the result looks like this:

I am reluctant to increase the needle thread tension. Why? Because then the seam most likely starts tunnelling. By using our knowledge of stitching with stabilizer, let us add wash away. We then have the following result, without even touching the tension:
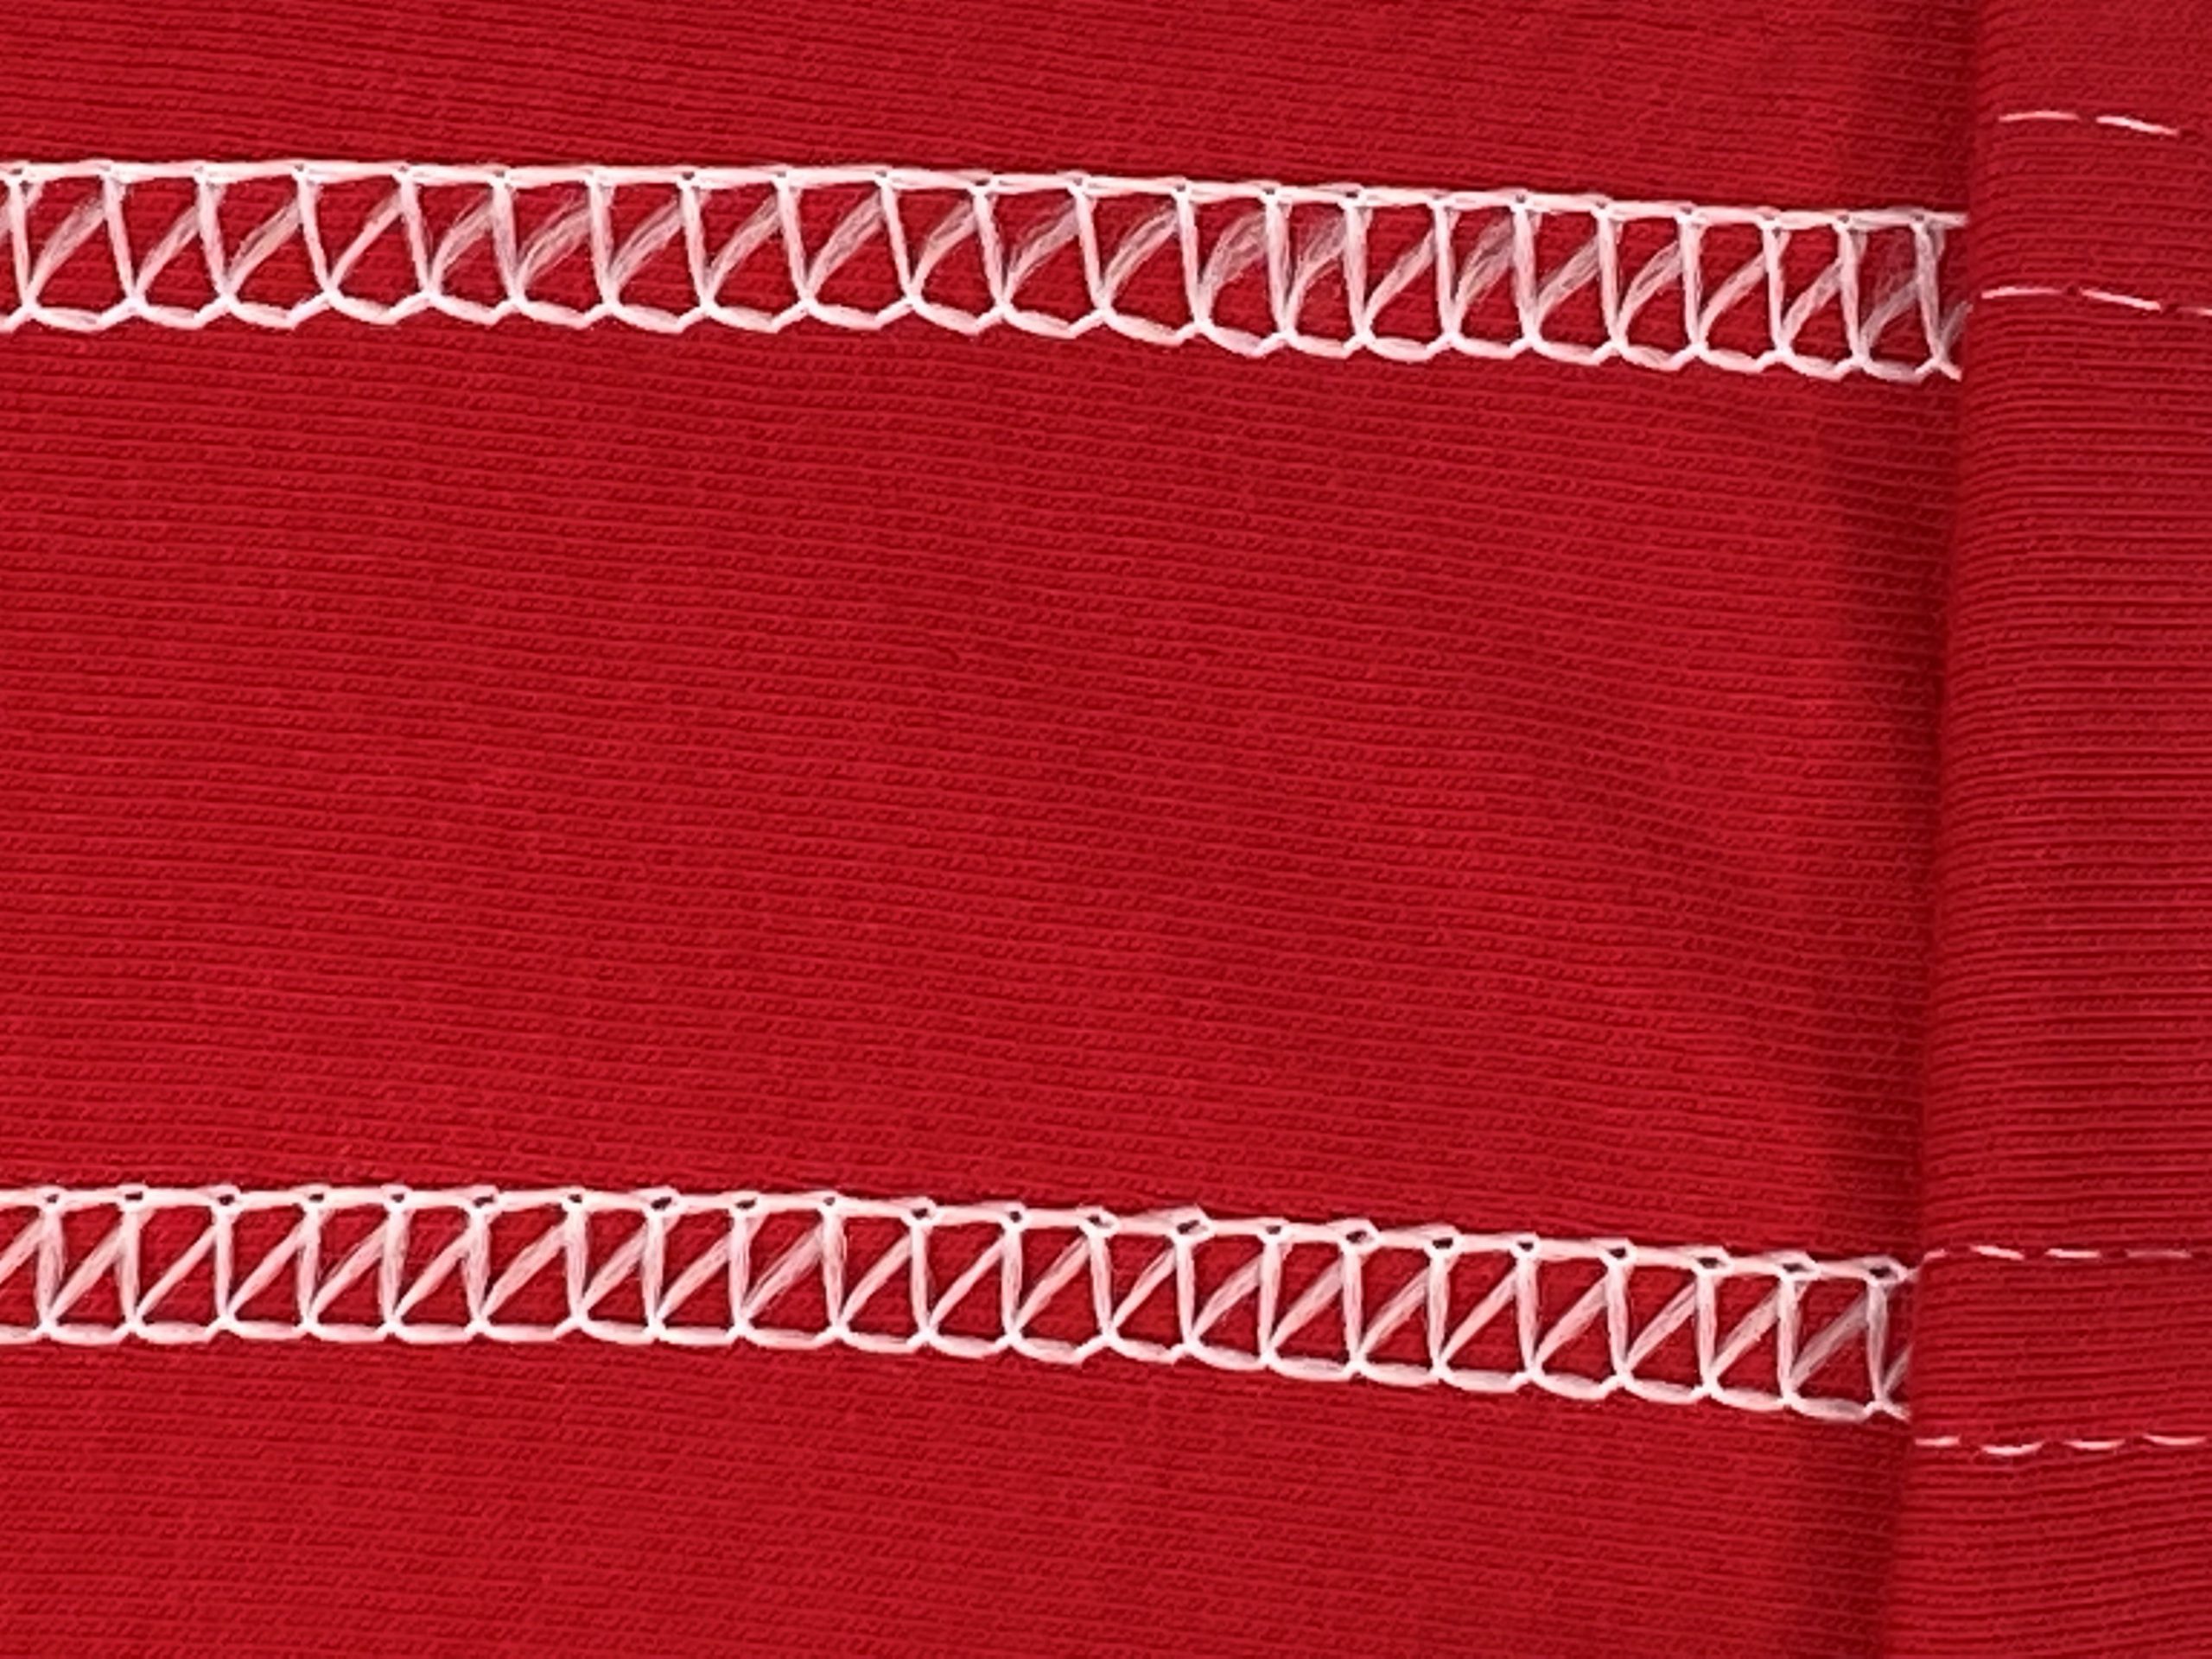
You can see it immediately – the upper seam is the one sewn with wash away. Why?
On one hand, we have absolutely no loops on the right needle thread, the seam edge is perfectly smooth. And we even have a little too much looper thread in the seam because it lies nicely soft between left and right needle thread. We could now increase the tension of the looper thread a bit or just increase the tension of the left needle. I mean “or”, not “and”. Because if we increase the tension for both, the looper thread and the left needle thread, then we have less looper thread and less needle thread.
Consequently, the tighter needle thread pulls the equally stronger looper thread more into the fabric, which leads to possible tunnelling. That is why always either-or. In such situation, you should first increase the tension of the looper thread. After test sewing, check the tension of the left needle thread, maybe it needs fine-tuning.
Selecting the suitable seam to the fabric
In the overlock world, the rule is: the finer the fabric, the narrower the stitch may be, and the stronger the fabric, the wider the stitch may be. You wouldn’t sew silk with a seam width of 7 mm or denim with a seam width of 3 mm.
There is no reason to not apply this rule to Coverstitching too. The finer the fabric, the less able it is to hold large quantities of thread stable, which consist in wide seams. In two layers of single jersey, a narrow coverstitch does certainly better than a wide one – but a wide one with two needles is still better than a wide one with three needles. Why? In two needles plus looper there is less yarn than in three needles plus looper.
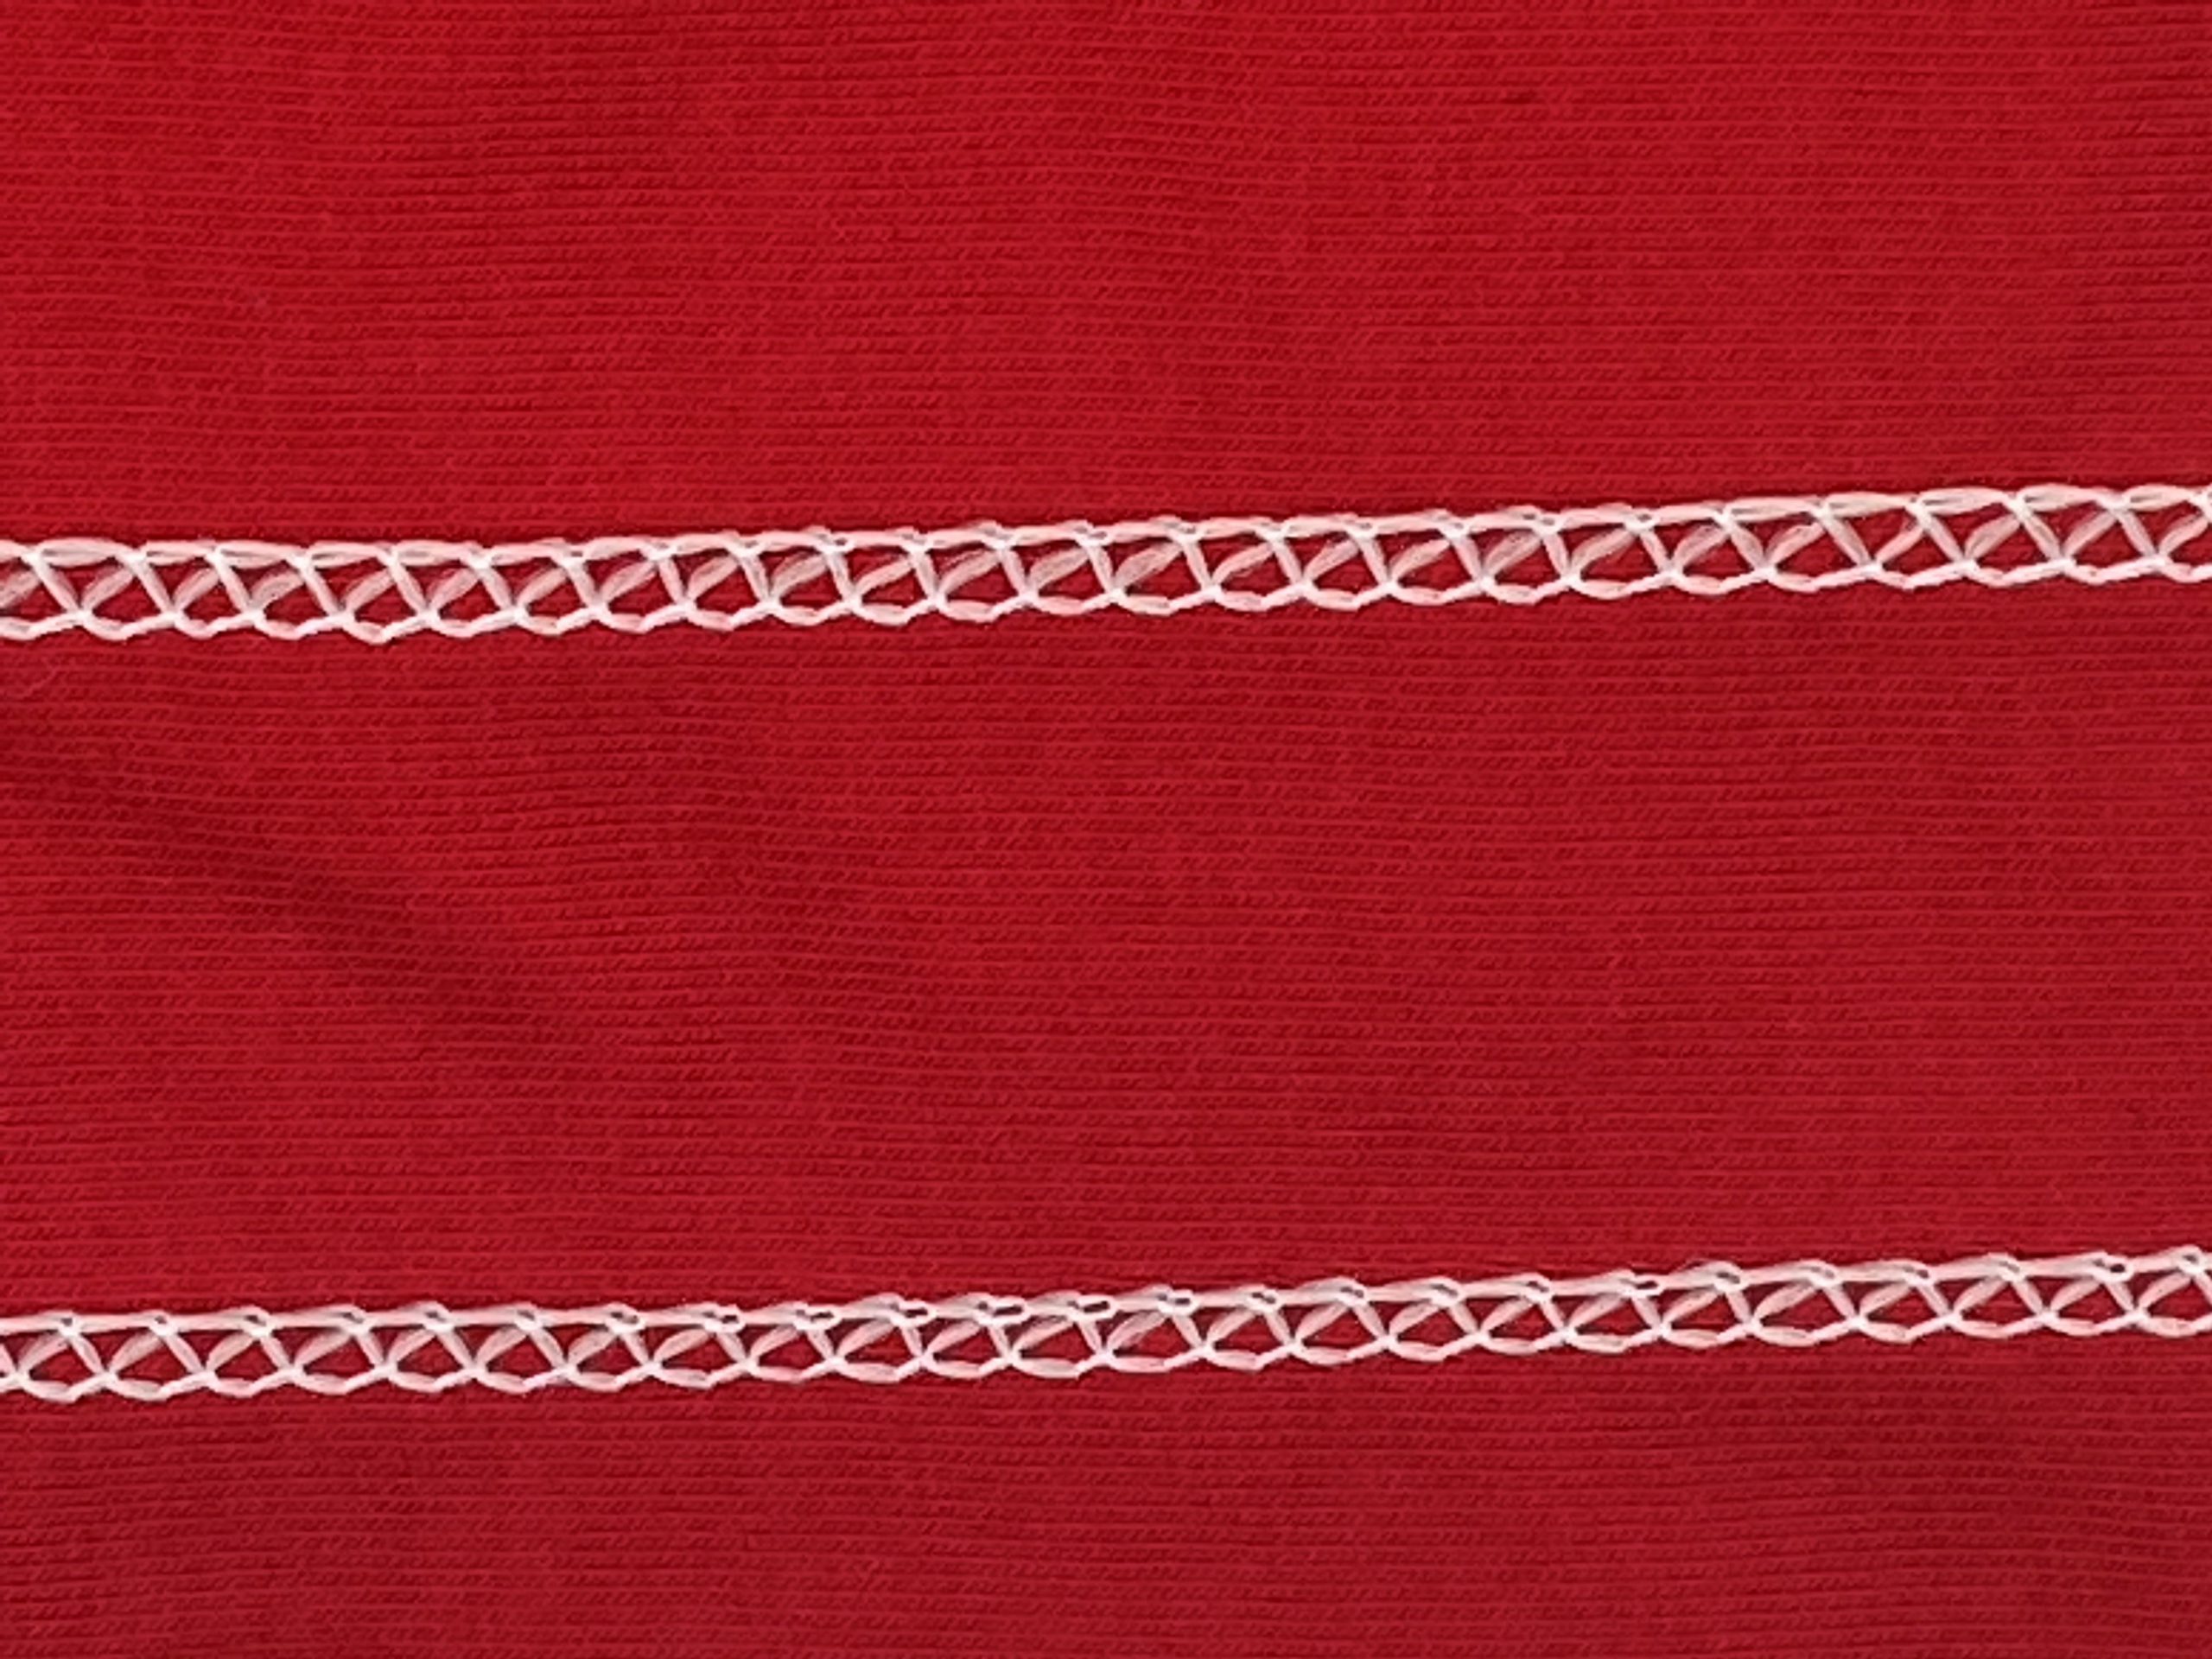
Now I would like to look again at the narrow stitch. If I take out the left needle and use the center and right one, the machine indicates a tension 4.5 for the center needle, the right needle has tension 6.0. The looper thread is still in the circumvent of the air threader, its tension is at 0.
The upper seam is with wash away, the lower one without:
Learnings
So, what do we learn from this example? We have three variables for our coverstitch seam:
- Thread tension
- Looper thread circumvent
- Supporting materials like wash away stabilizer
The alternative “looper thread circumvent” can be assigned to the topic “thread tension/friction”, because the alternative looper thread path reduces friction, thus results in lower tension.
The supporting material, stabilizer, keeps the fabric stable and reduces puckering or tunnelling.
Why does my coverstitch seam break?
In fact, I sometimes read: “I want to have my seam tighter, but somehow it always tears!” Here is usually the rule, that the physically possible limit has been reached.
If I only have 30 cm of looper thread in a seam of 10 cm length, how should this seam stretch to 40 cm length?
If I only have needle threads in the 10 cm long seam that are 10 cm long, how can I pull the seam to 20 cm? Needle thread loops and Vs on the looper side are necessary to allow to stretch the fabric to its max.
Of course, you can use wooly nylon as alternative. This is exactly one of the reasons to use wooly nylon: a higher stretchability! But even wooly nylon can not do the magics, as one or the other may wish for.
That means that the seam is perfect even without wash away stabilizer. It is wonderfully stretchy. And if it tunnels because the child’s head is simply too big for the narrow cut-out, then I must pull the seam back into shape afterwards. Because physics doesn’t stop at the child’s head. That’s a very good thing.
So far so good! In the next part, we’ll look at how we can influence the elasticity with adjusting stitch length and differential feed. Klick here to read Part 3:
Coverstitching Background Knowledge Part 3
Your Manu


Thanks for writing this article. I am a novice at coverstitching, and although I’m using a Bernette model, this information is beneficial.