 BERNINA Corporate Blog -
 In my previous blog post DIY Underbust Corset, I spoke about an exciting short film I was involved in and shared how I made an underbust corset to wear to the premier.
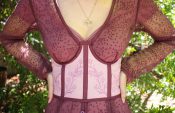
In this blog post I share a variety of interesting techniques I used to make a sheer jacket dress to pair with my corset.
This garment was inspired by some of my favourite garments I made for the short film Dear Beloved.
You can learn more about the film and see the garments I created on my website.
What I love about this garment is its versatility. I dressed it up for the premier with the underbust corset, heels and an underdress. But I can wear it with jeans, sneakers and bralette for something more casual. Or even a summery dress.
The overall look changes depending on the colour of the undergarments and it can be worn open as a jacket or buttoned up as a dress.
What will be needed:
- Sewing machine 735
- Pattern for the garment you want to make
- Sturdy sheer fabric like soft tulle/veiling or mesh
- Bias binding
This jacket dress is self drafted.
I used a bodice block for the bodice & sleeves and drafted the skirt part. I kept the shape slightly A-line and then flared out each panel from the knees.
You can find tutorials online to draft your own bodice block. But there are basic patterns available that offer the same base to build on such as the bodice of the Georgie Dress by Alice & Co.
This pattern has bust darts as well as front & back waist darts. It also comes with ¾ sleeves which you could lengthen or shorten. It finishes in your natural waist.
The bodice is a wrap but can easily be altered to your pattern needs. You could cut along the centre front line to remove the wrap and cut the front on the fold. Then add a seam allowance for a zip to the centre back to create a basic bodice.
Exposed Darts
 Pin the darts on the right side of the fabric.
Sew as per usual.
 Cut along the fold, stop a little bit before reaching the apex.
I cut my dart to match the 1.5cm seam allowance rather than keeping it a triangle shape.
 Press the dart open and press the apex flat.
Exposed Seams
I used 1.5cm seam allowances to ensure that there was enough fabric in the seam to make a statement.
 Pin the seams on the right side of the fabric.
 Sew the seam as per usual.
 Press the seams open.
French Seams
Here is a sneaky and quicker way to sew French seams.
I would recommend testing this technique on some scrap fabric to see if it will work with your fabric. This version of French seam may cause some fabrics (the type to fray easily) to be messed up by the feed dogs. Slightly studier fabrics like tulles, mesh and some thin cottons may work well with this technique.
For this technique I used a total of 1.6cm seam allowance (0.6cm + 1cm).
 Pin the seams on the right side of the fabric.
 Stitch with a 6mm seam allowance.
(I wouldn’t recommend using a smaller seam allowance as the fabric may be pulled into the feed dogs)
 Turn the garment wrong-side out and fold along the seam you just sewed.
The fabric will encase the raw edges of the seam.
Press along the fold.
 Sew with a 1cm seam allowance.
Bias Bound Finishes
I didn’t add seam allowances to the hem of the sleeves or the neckline of my garment as I wanted to bias bind the edge.
 Pin the binding to the right-side of the fabric, along the edge.
Sew along the fold line.
 Fold the binding over, encasing the raw edge of the garment. Ensure that the raw edge of the binding is folded in too.
The binding must be a bit longer on the underside so that it will be caught when sewn.
Stitch in the ditch from the right-side to secure the length of the binding.


Tips
- It is very important to cut the fabric neatly for the French seam and Exposed seam. If your edges are jagged the seams will not look neat and trimming them will add more time to the project.
- Keep in mind the fabric choice when doing the exposed seams or exposed darts. If you use a fabric like chiffon or georgette, the raw edges will fray. This will create a beautiful effect but may affect the longevity and wash-ability of the garment.
- If you are binding sleeve hems that are narrow like mine, you may want to bind the hem before sewing up the sleeve. That way you can sew it flat.
I would love to see what you make, please feel free to share with me!
Instagram
Facebook
-Hannah-Rose


0 Responses