 BERNINA Corporate Blog -
In the second part of this blog post we will get a chance to explore the 10 Tips For Sewing With Vinyl and make a really functional, practical & pretty project bag. See Part 1 of this series here.

Explore the Best BERNINA Presser Feet to Work With Vinyl
Steps for Sewing:
- Insert a non-stick size 80 needle in your machine.
- Fuse interfacing to the wrong side of all lining pieces & zipper tabs.

Interfacing the Lining & Zipper Tabs
Making the Zipper Gusset
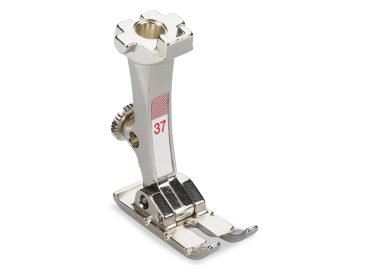
1. Fold the prepared zipper end tabs in half wrong sides together as shown and sew right sides to the end of the zipper on both sides with fold towards the center of the zipper & a ¼” seam allowance using Patchwork Foot #37 . Sew back & forth with 2 lines of sewing to secure (as this is a zipper stop) with matching thread. Press the zipper tabs out away from the zipper.

Double Line of Sewing on the Zipper Tabs

Zipper Tabs Completed
2. Place the right side of the zipper gusset accent fabric down on top of the right side of the zipper, place the lining right side against the back of the zipper and clip all raw edges as shown. Sew with a #4 Zipper Foot with the needle position to the left of the foot. Do this with both sides of the zipper.

Sewing the Zipper Gusset
TIP: Engage needle down function, stop & slide zipper slide out of the way as you stitch along to ensure even seam allowances.

Zipper Gusset Pressed Away from the Zipper
3. Press all accent fabric & lining away from the zipper & top stitch using the Zipper Foot #4 & needle position to the far left, matching accent & lining fabric and foot against the edge of the accent fabric as shown.

Top Stitching Close to the Zipper with Zipper Foot #4
4. Trim fabric around the zipper gusset & insert Embroidery Foot #39 with Clear Sole & zigzag all raw edges.

Starting The Bag Construction With Vinyl
- Lay the zipper gusset long side, right side down against the 16” side of the vinyl, clip & sew with the Roller Foot #51 & the needle position to the far right. This foot has 3 rollers for the best possible feed, it is fantastic for materials that tend to stick like plastic, vinyl, leather etc. and it’s compatible for both 5.5mm & 9mm machines. Sew the second piece of vinyl to the other side of the gusset in the same manner.


Sewing the Zipper Gusset to the Vinyl with Roller Foot #51
TIP: use tissue paper under the vinyl if the kind of vinyl you have sticks to the sole plate of the machine. Also, do not iron the vinyl, as it will melt.
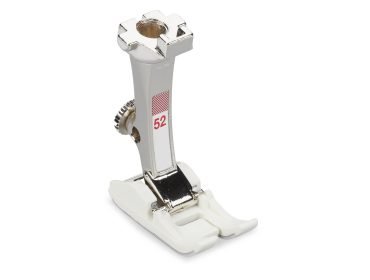
2. Finger press the zipper gusset away from the vinyl and decorative stitch the edge with the Zigzag Foot with Non-Stick Sole #52 foot with non stick sole top stitch along the edge of the edge of the gusset fabric. The #52 foot has the same characteristics as the #51 foot except works great with zigzag & decorative stitches. I used stitch #77 & a bright turquoise thread to decorative top stitch. It’s a back & forth stitch that kind of looks like a thicker top stitch. You could also use any another decorative stitch but audition it before trying it on your project.

Zipper Gusset Attached to the 2 Pieces of Vinyl & Top Stitched

Top Stitch With #77, Has a Dense Quality Suitable for When You Want the Top Stitch to Show
Making the Bag Bottom
- Lay the bag bottom accent fabric right side down against the right side of the vinyl bottom. Lay the lining piece right side, on the other side of the vinyl with the vinyl sandwiched in between. Clip & sew with the Roller Foot #51 & needle position to the far right. Finger press both fabric layers away from the vinyl and use the #77 or other decorative stitch as was done with the zipper gusset close to the edge of the accent fabric.

Clipping Fabric Ready to Sew Bag Bottom
2. With the #52 foot zigzag around all bottom raw edges.

The Base of the Bag is zig zagged ready to be sewn together
3. Make box corners by marking a 1.5” square on all 4-bag bottom corners on the lining side. Cut these squares out as shown. Zigzag the edges of all the squares.

Measuring & Cutting out a 1 1/2″ square to box the bag corners
Sewing Up The Sides
1. Open up the zipper to the middle, clip & sew down the sides & bottom right sides together, use a 3.0 stitch length & the #51 Roller Foot with the needle position to the far right, do not sew the squares yet.

Bag is Clipped, Ready to Sew Sides & Bottom

Remember for best vinyl sewing to set a 3.0 stitch length, showing on my BERNINA 350 Special Edition
2. Finish sewing the boxed corners bringing together the bottom seam & side seam and matching raw edges, clip & sew as shown.

Clipping & Sewing The Seams for the Boxed Corners, Match Bottom & Side Seams
3. Turn the entire bag outside gently through the zipper, if the bag has wrinkles, use a blow dryer heat to remove the wrinkles. Add a zipper pull, watch a free zipper pull tutorial here.
TIP: If you need a recap of the 10 Tips For Sewing With Vinyl, click on the link to Part 1 of this series here.

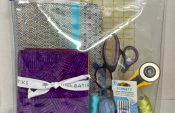
The Vinyl Project Bag Holds Some Treasured Fabric
Admire your creation. I’m sure you are seeing with clear vision now as well!
I hope you enjoyed these vinyl sewing tips and will now feel comfortable to give vinyl sewing a try, it opens up a whole realm of possibilities.


0 Responses