 BERNINA Corporate Blog -
Today I have the pleasure to open the eleventh door in the BERNINA Blog Advent Calendar for you – we are sewing a cushion and will embroider it with a Trapunto snowflake! You will receive the embroidery file free of charge until the end of December.

In the trapunto technique, the back of an embroidery or quilt design is usually cut open from the back and filled by hand with batting or the like. If you use a corresponding Trapunto embroidery file, the 3D effect can be created a little more easily using the embroidery module and volume fleece. There are various Trapunto embroidery files available at OESD, including this charming snowflake. This snowflake decorates a patchwork cushion in my home. But other projects with this snowflake are also great options.
Free download of the embroidery file
In order to enable you to embroider the Trapunto snowflake, all readers of the BERNINA blog will receive the file free of charge from the OESD webshop until the end of December. Here is the link to the file:
Add the file to your shopping cart and enter the discount code SNOW2023 in the “Coupon / Gift Certificate” field during the checkout process.
And now I’ll take you with me into cushion sewing with trapunto embroidery!
Sewing a cushion with Trapunto snowflake – material supplies
I used the following materials for a patchwork cushion with a size of approx. 40 cm x 40 cm:
Fabrics
- Three different matching Christmas fabrics – approx. 15 cm each
- A remnant of plain fabric for the center square – in a color that matches the Christmas fabrics. This fabric should not be too thin, possibly reinforced with a woven interlining
- Fabric for the back of the cushion front, approx. 45 cm x 45 cm
- Fabric for the back of the cushion 45 cm x 45 cm
Stabilizers
- Tear-away stabilizer (approx. 25 cm x 25 cm)
- Laminated foam, e.g. Style-Vil by Freudenberg (approx. 15 cm x 15 cm),
- Quilting batting, e.g. 276 Natural Cotton White Freudenberg (approx. 45 cm x 45 cm)
Thread
- Standard sewing thread, matching the color of the fabrics: Silk Finish Cotton 50
- Thinner thread: Silk Finish Cotton 60
- Thinner bobbin thread: Bobinette
- Embroidery thread: Metallic

Sewing the cushion top
First, I sew the cushion top with the so-called “courthouse step” pattern, i.e. I sew three frames, each made from one fabric around a square.
Cutting:
| Dimensions | Quantity | |
| Plain fabric | 6.5“ x 6.5“ | (1) |
| Fabric A | 2.25“x 6.5“ | (2) |
| 10“ x 2.25“ | (2) | |
| Fabric B | 2.25“ x 10“ | (2) |
| 13.5“ x 2.25“ | (2) | |
| Fabric C | 2.25 x 13.5“ | (2) |
| 17“ x 2.25“ | (2) |
If you use fabrics with a motif direction, make sure that you cut the strips accordingly (the cutting dimensions must be swapped for the vertical strips).
The seam allowance is 1/4″.
I lay out the patchwork pattern: in the center the plain square, then the shorter strips of each fabric on the right and left, the longer strips at the top and bottom.

First, I sew the shorter strips of fabric A to the right and the left of the square. I iron the seam allowances together towards the sewn-on strip.

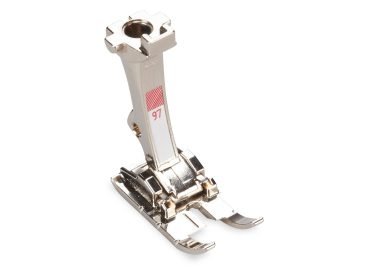
The Patchwork Foot #97 helps a lot to maintain the correct 1/4″ seam allowance.

I then sew on the two longer strips of fabric A at the top and the bottom.

Continue with fabric B: first sew on the shorter strips on the right and the left.

Then the two longer strips of fabric B at the top and the bottom.

With the strips of fabric C in the same way: First the shorter strips on the right and the left, subsequently the longer strips at the top and the bottom.

Now I iron the front of the cushion well and leave it for the time being.
Embroidering the Trapunto pillow
The next step is to embroider the trapunto batting, the so-called trapunto pillow. To do this, I carefully hoop the tear-away stabilizer in the Small Clamp Embroidery Hoop.

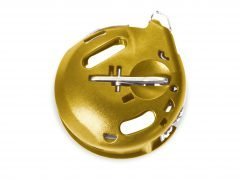
As I will be working in embroidery mode from now on, I use a special thinner thread, a so-called bobbin thread (e.g. “Bobinette” by Mettler ), in combination with the yellow HTTBC bobbin case. I also use a thinner thread as the upper thread, the Silk Finish Cotton 60 by Mettler.

I load the embroidery motif onto my machine. It consists of two files. The file with the ending “A” is required for embroidering the trapunto pillow. The file with the ending “B” later embroiders the actual snowflake.

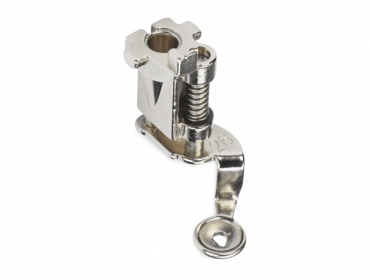
I select the file with the ending “A”, attach the embroidery module, fit the Drop-Shaped Embroidery Foot #26 and the straight stitch plate, select the appropriate embroidery hoop and lower the feed dog.

Now the small clamp hoop is attached to the embroidery module, and I embroider the first sequence – the outline of the snowflake.

Before embroidering the second sequence, I place a piece of foam stabilizer on top.

It is not absolutely necessary to stick it on, as the foam can easily be held in place with the first stitches. The second sequence embroiders the foam within the snowflake outline.

Now I take the hoop off the machine and remove everything from the embroidery hoop.

The snowflake is cut out close to the edge. I found it easier to cut from the back.

The result is a snowflake made of foam fleece – the so-called “trapunto pillow”, which serves as a base in the next step.

Completing the Trapunto snowflake
In this third step, the individual parts are stitched together. The cushion is made like a classic quilt: There is a back side, a quilt batting and the cushion top.

I place the back side right side down in front of me. The quilt batting is placed on top followed by the cushion top. I cut the back side and the quilt batting evenly all around approx. 1 cm or 1/2″ larger than the cushion top.

The cushion top is now placed to one side again, and I mark the center point: both on the cushion top…

… as well as on the quilt batting including the back side underneath. The diagonal, vertical and horizontal lines are important here!

First I clamp the quilt batting and back side into the small clamp hoop.

It is important that the center point just drawn is accurately below the center of the enclosed template.

Then I fix the clamps.

Now the template is removed and embroidering can be started. I upload the embroidery file with the ending “B”.

In the first sequence, the outline of the snowflake is embroidered onto the quilt batting.

I place the foam snowflake, the trapunto pillow, exactly within the outline.

Here I use a touch of spray adhesive or a fabric glue stick to place the snowflake exactly inside the outline and to prevent it from slipping.

I take the clamp hoop out of the machine – but the fabric must not be removed from the hoop!
The cushion top is now placed on top.

Use the template of the clamp hoop to place the center of the cushion top exactly in the middle again.

I remove the template and carefully fix the cushion top to the quilt batting underneath with pins in the corners.

Finishing the embroidery of the Trapunto snowflake
Now it’s back to embroidery – in the second sequence, all the layers are sewn together by embroidering the outline of the snowflake. But now that the trapunto pillow is underneath, you can already see how the snowflake is becoming three-dimensional.

As I want to embroider the snowflake with metallic thread, the upper thread is changed for the third and final sequence.
It is easier to embroider with metallic embroidery thread if it runs through the Thread Lubrication Unit. The metallic thread is pulled through a pad soaked with silicone oil.


Before I start embroidering, I bring the bobbin thread up so that I get a neat start.

First the outline is embroidered with a triple stitch, then the details of the design are stitched out.

It is important that the cushion top is placed exactly in the middle over the quilt batting including the trapunto pillow. The reward is a magnificent three-dimensional snowflake!

The finished cushion
I made the cushion cover from my Trapunto cushion front, a piece of fabric for the back of the cushion and a zipper.
The finished cushion can now spread a festive snowflake atmosphere!

A happy and creative Advent season to you all!
Warm greetings
Ines


0 Responses