With my post, the 13th door of the Blog Advent calendar, I would like to sew a mug warmer with you and decorate it with embroidery thread in free-motion style. If you wish, you can even sew a small pocket on the front and put a message inside.
BERNINA has declared 2023 to be the Year of Embroidery. Many of my projects this year have followed this motto, alternating between free-motion and machine embroidery. In my tutorial today, I will show you how I decorated and sewed this mug cuff using different embroidery threads. During the Advent season, it’s okay to have a little sparkle, which is why we used a metallic embroidery thread here. I’ll tell you how to achieve the best results with the thread later in this post. Embroidering with metallic is not difficult if you pay attention to a few things.
Mug Warmer – Mug Cuff – Mug Sleeve
This project has many names and the great thing is that sewing these mug warmers is wonderfully suitable for beginners.
Decorating in freestyle, i.e. with the free-motion technique, is a great opportunity to practice free patterns on a sewing project and to draw from the stock of collected buttons.
This sewing project is perfect for upcycling jeans and beautiful fabric remnants. You can design the front fabric in one complete cut or create a patchwork.
I have used remnants of printed fabrics for three of my mug sleeves. I painted the motifs with acrylic on canvas and then had them printed on the fabric by Spoonflower. You can use jeans or other fabric from your existing supplies as the backing fabric for the mug warmers. Decorations with metallic yarn make the cuffs sparkle beautifully. After all, Christmas is coming soon, so some glitter is just perfect.
Sewing mug warmers – Material supplies
- Fabric remnants or fabrics of your choice
- Stabilizer: Soluvlies or Stabilizer or Solufix,
- Volume fleece: Thermolam by Freudenberg
- Sewing thread
- Glitter embroidery thread; I used Metallic by Mettler
- Thread Lubrication Unit
- Standard embroidery thread, here POLY SHEEN by Mettler
- Universal sewing needles 70 -90
- Embroidery needle
- Metallic embroidery needle
- Marker pen
- Paper for a template if necessary
- Pencil
- Paper scissors
- Fabric scissors
- Rotary cutter, ruler and cutting mat
- Button
- 2 mm wide elastic, 17 cm long
Cutting pattern for the mug warmer
- 25 cm long x 9 cm high
My mug has a capacity of 330 ml, is 95 mm high and has a diameter of 80 mm. It is a common mug that is ideal for me to use when I want to create of my own motifs.
I created the cutting pattern based on these measurements so that I still have a narrow blank edge at the top of the mug. I have noticed that the beverage is easier to drink this way. If your mug is larger or smaller, you will need to adjust the cutting pattern accordingly.
You can easily create your own template as a cutting pattern for this mug warmer by cutting a paper rectangle measuring 25 cm x 9 cm – or you can print out my template, which I have made available for you to download here:
When printing, please make sure that your printer is set to 100% without scaling!
How to sew the mug warmer
Either prepare a template in the size 25 cm x 9 cm or you can use a ruler for measuring. Here I have cut a larger piece of Thermolam and placed my piece of fabric on it.
Then I stitched the fabric onto the stabilizer all the way around using a 3.0 straight stitch.
Decorating with metallic yarn
Next came the preparation for decorating the front of the mug warmer with the metallic yarn. After having constant thread breaks on my test piece, it occurred to me that I have this great accessory that is specially designed for this type of thread. This is the Thread Lubrication Unit. Lo and behold: There were no more thread breaks thanks to this support!
The spool net which is placed over the spool is also very important so that the thread can unwind without friction.
On my machine, you can see how the metallic thread is running through a felt pad that is soaked with silicone fluid. The silicone fluid really improves the gliding properties of the thread. Just make sure that the felt does not dry out, so add a few drops every now and then.
Preparation for embroidery
For the first mug warmer, I tried the Solufix by Freudenberg, which I haven’t known before, as embroidery base. Please read the manufacturer’s information on this great product.
To do this, I ironed the adhesive part of the Solufix onto the wrong side of my front fabric, then scratched the paper layer twice with a pin and removed the backing paper from the stabilizer.
Prepared in this way, I went to the sewing machine and the fun of free-motion embroidery was about to begin.
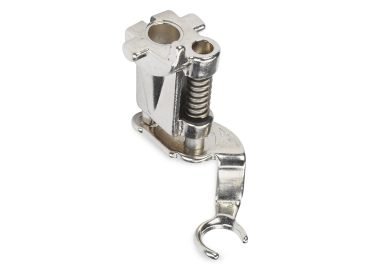
Using the Free-Motion Embroidery Foot #24, I intuitively embellished a design with metallic thread on the front fabric. It is important here that you reduce the pressure foot pressure considerably! That’s why I always recommend sewing a small test piece first. You can use this to try out the appropriate settings and only then start sewing your project.
Back side of the mug warmer
For the back side, I cut a piece of discarded jeans roughly to size, placed it right side on right side on the front side and fixed it in place with a few pins.
On one of the narrow sides, an opening for turning inside out needs to be marked; it is important to consider beforehand which side the elastic is to be attached to and on which side the button is to be placed.
You can see what I mean in the photo. But don’t worry, if you’ve swapped the button and elastic, it’s not bad, it is just different. 😉
But now let’s get back to the reverse side. After sewing it together, cut the corners off at an angle and cut back the excess in the same way.
Button and elastic
Have everything ready you need for the closure. In this case, it is the elastic and the button. If you have the Button Sew-on Foot #18, it will be a great help.
First, the button is sewn onto the closed narrow edge of the front, centered at a distance of approx. 1 cm.
To adjust the length of the elastic precisely, I put the cuff around the mug again, place the elastic as a loop in the opening and secure it with two fabric clips.
If everything fits, I detach the cuff from the mug again and sew the elastic in place. In the same step, I sew once around the entire front side.
When sewing on the elastic loop, make sure that you use a thicker needle and, if necessary, use the Height Compensation Tool on thicker corners.
Finally, I always sew over the area of the elastic two or three times with a zigzag stitch to make sure everything is held firmly in place.
Done!
The first mug warmer is completed, and I do like its subtle embroidery decoration.
For the next mug warmer, I used normal tear-away stabilizer and a stylish black embroidery thread. For the third mug warmer, I tested the standard soluvlies as embroidery backing.
All three stabilizers did a great job. I will definitely work with Solufix more often because I really appreciate the fixation for free-motion embroidery.
Do you have a favorite embroidery stabilizer?
Needless to say, you can also decorate the back of the mug with an embroidered or written message or a patch. Let your imagination run wild, because the important thing with this sewing project is to have fun!
I hope you like my sewing idea for decorating the mug warmers and maybe you have found a nice gift inspiration for Christmas.
With this in mind, I wish you all a peaceful Advent season. Stay safe and have fun sewing and being creative!
Yours, Katharina
from RaabArt

 BERNINA Corporate Blog -


0 Responses