Please raise up your hands if you like a tidy house. And please raise up your hands again if tidying up the house is made easy…
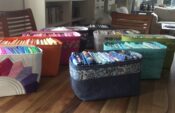
And one of the most disorganized places of the house (at least in mine) is usually my kids´room. They have their toys and games and they love playing around with them, but Oh Gosh, when it comes to put everything back in order, they just don’t do it…
So I thought that making baskets would help to have a tidier room. To start with, I made a big one, so my kids´ Playmobil could all fit in. You can follow this tutorial to make one like this and also adjust the measurements to make smaller ones.
I think that baskets are perfect for any place in the house, they keep things more organized without taking too much time to put things in, and they are cute both inside a wardrobe or on shelves.
And us, seamstresses, we are lucky enough to have the choice of the fabrics and colors we want to use. These baskets can also be a fabric scrap buster as you can use different pieces to make the baskets.
Here are the simple steps you have to follow to make this big basket. One advice, if you want to make it tighter, you can add interfacing in between the 2 layers. Use one that can be ironed to one of the fabric layers, and it will look awesome.
I used canvas fabric for this basket, and I didn’t add any interfacing.
Materials neeeded…
Fabric: 1,50 meters outer fabric and 1,50 meters inner fabric
Interfacing (optionnal): 1,50 meters
Cut 5 pieces of the main fabric and 5 pieces of the inside fabric, you’ll get 10 in total.
Please note that this basket is totally reversible.
Measurements…
The measurements are as follows:
– 2 squares of 50×50 cm + 1 cm seam allowance all around on the main fabric (or outside). Cut the same pieces for the inner fabric.
– 3 rectangles of 50×70 cm + 1 cm seam allowance all around. Cut these pieces on the main fabric (or outside). Cut the same pieces for the inner fabric. 2 of this rectangles are the sides and 1 is the base (same regarding the inner fabric).
Here is what you’ll have (plus the interfacing if you decide to add it).
My outer fabric is the ice cream one and the inner is the green one.
Place one of the squares and one of the rectangles right sides facing, sew the side seam at 1 cm.
Iron the seams open and top stitch (from the right side) at 0,5 cm from the previous seam. This will reinforce your seam and make the basket sturdier.
Keep sewing the other square and rectangle the same way till the four of them are sewn together.
Once all the 4 pieces that make the sides are sewn together, pin the base of the basket to them, right sides facing.
Sew the base to the sides with 4 straight lines of stitches (end each line and start a new one for the other sides, instead of turning the stitching on the corners).
You can overlock (or do a zig zag stitch on the edges) the four base seams to make it sturdier too.
Place the inner piece inside the outer, right sides facing, and sew them together, leaving a 20 cm opening.
You can overlock the seam (without closing the gap left).
Turn the pieces inside out, through the gap left in the previous step.
Make sure all the corners are nicely out.
Iron flat and turn in the seam allowance left in the gap. Top stitch all around at 0,5 cm from the edge, closing the gap.
You can turn the upper part for a nicer look.
And here you go, you can now put all the toys inside! And repeat the process to make more baskets.
What do you think? Super easy to make and so useful and cute!
MJ WEditEditing comments on the BERNINA blog is only possible after logging in with a blog user account. Sign up now or create a user account if you do not have one yet.
This project turns out to be exceptionally large, much larger than the picture makes it look. I also found that my basket didn’t stand up on its own, even with really strong interfacing, due to the heaviness of the fabric. I was disappointed to have spent so much time making this for it to not work and be too big. I love the idea though so am going to try making two smaller ones out of the same fabric.
 BERNINA Corporate Blog -


This project turns out to be exceptionally large, much larger than the picture makes it look. I also found that my basket didn’t stand up on its own, even with really strong interfacing, due to the heaviness of the fabric. I was disappointed to have spent so much time making this for it to not work and be too big. I love the idea though so am going to try making two smaller ones out of the same fabric.