 BERNINA Corporate Blog -
Hello Bernina lovers!
Do you remember this tutorial I shared with you to make padded fabric from fabric scraps? Well, if you haven´t seen it yet, go see it because it is super easy to follow and you can make a fabulous padded fabric that you can use afterwards.
That is exactly what I did, I made the padded fabric because I wanted to make a case with it.
Since I knew the case was going to be super cute and everyone else would like to have one, I thought of making this tutorial (so whenever one of my friends will ask me to make case for them, I´ll tell them to take a look here and make them themselves ,-) )

So if you also want to make this case, just follow the steps below.
Please note that this tutorial was made for double faced fabric, like the padded fabric I made in the tutorial mentioned above.
Materials needed
– 30 cm height x 70 cm width double sided fabric
– 30 cm height x 34 cm width normal fabric
– 8 cm height x 23 cm interfacing (or another fabric that will give some thickness to the handles, like the double gauze used in the pictures below)
– 1 zipper of 34 cm at least.
Follow these steps to make this case
You can download the free pattern on my website by clicking here.
Cut the fabric as per the instructions below, you´ll get 4 pieces for the straps, 2 pieces for the pockets and 2 pieces for the outer case (if your fabric is not double sided and you want to add lining, you´ll have to also cut 2 pieces for the lining).

Once you´ve cut the pieces…
The handles…
Take the 4 pieces you cut to make the handles. If it´s interfacing, just iron it to the wrong side of the fabric. If, like me, you cut another piece of fabric, place the outer and inner fabric wrong sides facing and pin the 2 layers. Do the same for the other handle.
Fold in the side seams and fold again in half. Sew all the layers at 2 mm from the edges, on each side.


The pockets…
Now, take the 2 pocket pieces and fold in the seam allowance twice (first 5 mm and then 1 cm).


Pin and sew. Do the same with the 2 pieces.

Pin the pocket pieces to the outer side pieces, wrong side of the pocket piece to the inner side of the case. You can do a stay stitch to keep them in place and avoid having the pins…

The zipper…
Now, we´ll proceed to sewing the zipper. Place the zipper head down, facing the right side of the outer piece of the case.
If your zipper is longer than the fabric it doesn´t matter, we can always cut it!


Using the zipper foot, sew one side of the zipper to the fabric.

Once one side of the zipper is sewn, we´ll sew the other side, placing the zipper head down facing the right side of the fabric.
Again, using your zipper foot, sew this side of the zipper to the fabric.


You´ll have the 2 pieces united by the zipper by now.
You can press the seams flat and top stitch the zipper and fabric at 3 mm from the previous seam, to keep it in place.


Before sewing the outside seams of the case, you can stitch the pocket and outer pieces to make smaller pockets. I did one line in the center to divide the big pocket in 2.
Please note the pockets are quite high so that things don´t fall when inside…

Closing the case…
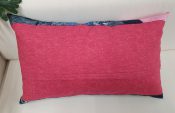
Now, place the 2 pieces right sides facing and sew the bottom seam together.
Iron the open seam.

Fold the case as you can see in the below picture. Open the zipper so you can turn the case right side out once you´ve sewn the pieces.
Pin the sides, right sides facing. Sew the seam being careful when crossing the zipper as your needle can break.


Giving it the 3D shape…
Trace a square of 6 cm X 6 cm on the corners.

Fold the case to match the square lines and stitch all the layers together. Trim off the angle at 1 cm from the seam.
Repeat on all the corners.

If your zipper is longer than the opening you can trim the excess. I suggest you leave 2 extra cm so you can hand stitch it to the case to keep it in place.
Turn the case right side out through the opening left in the zipper.
Place the handles on each side of the case and top stitch them by folding 2 cm and twice, the edges.

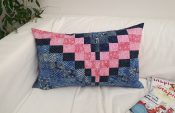
Isn´t this case super super super cuuuuuute?
As said, I had many friends who wanted it, but I am going to be honest, I liked it sooooo much that I kept it for myself (#selfish).

And you can also follow this video tutorial to see all the steps in action!


0 Responses