 BERNINA Corporate Blog -
Don’t you love those large designs? I really like them, but sometimes it is not possible to embroider everything in one go. The answer is ‘Multi-Hooping’.
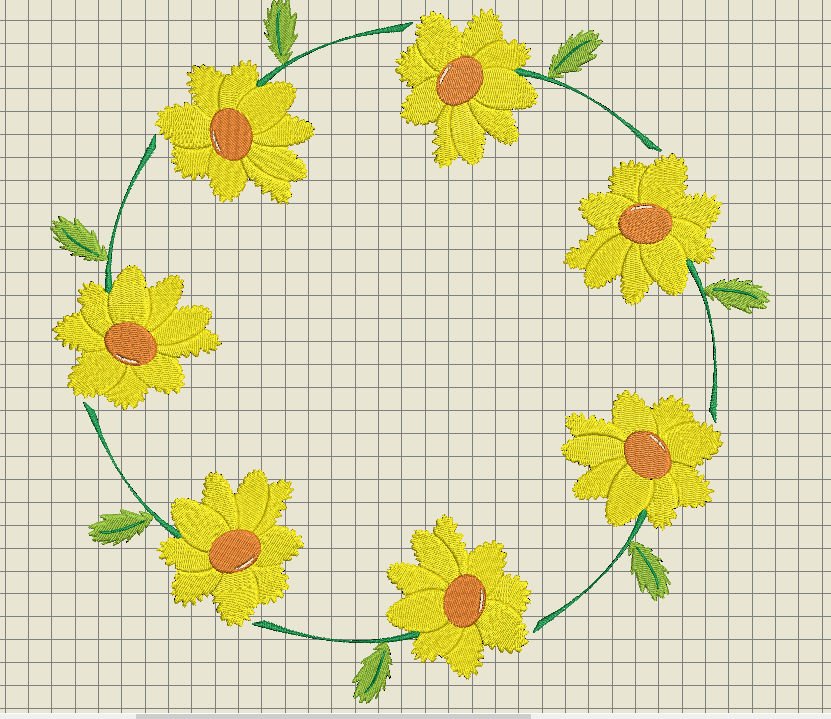
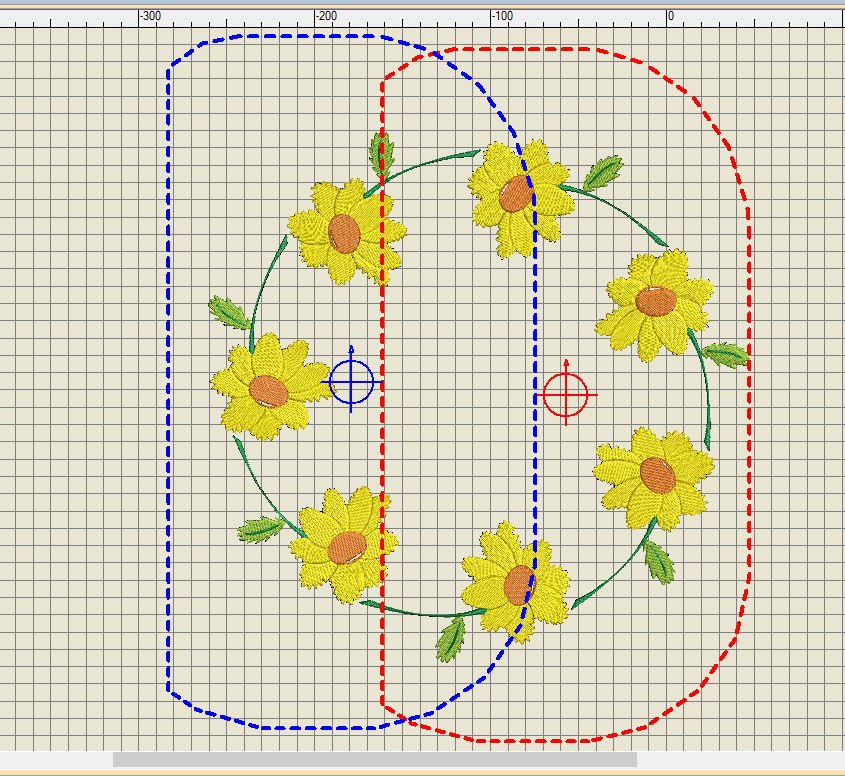
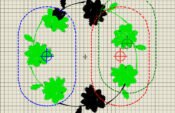
I have made wreath of 7 flowers, that I want to embroider on a large pillow case. The design is too large for even the Jumbo Hoop, so I have to embroidery it in two successive hoopings. One of the reasons to do so is that I am working with the BERNINA 770QE: I can use the Jumbo Hoop, but 5 cm on the left is not usable, because of the limited space between needle and the machine (25cm). If you are using a BERNINA 8-series machine, you can use the entire space of the Jumbo Hoop. So…. if I still want to make this oversized embroidery wreath, I have to ‘cut’ it in two.

Normally when choosing the largest hoop (Jumbo Hoop), the size of it should be enough to make large designs. But my wreath/design is 307.7×307.1mm, and could not fit even when I had an 8-series machine with the full space of the hoop. The size of embroidery which could fit in the hoop is 256x400mm, so even if I had the entire space of the hoop to my disposal, it wouldn’t be enough. As you can see, ‘Automatic centering’ is not yet checked: that’s what you should do to center your design before using ‘OK’ to set.
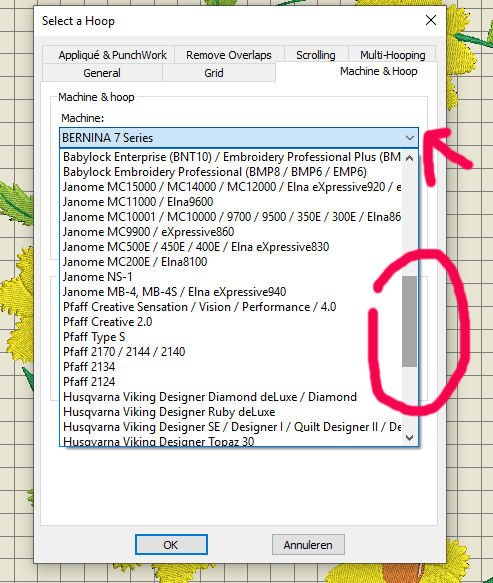
If you don’t own a BERNINA machine, but one of a different brand, you can choose from a large number of machines, then choose the largest available hoop for your machine and check ‘Automatic centering’. Just browse through the list by scrolling, until you find you machine and hoop. This is a wonderful service of BERNINA, to allow you to work with the software and transfer the design(s) to the most known brands of machines.
 With BERNINA machines it is important to check if your machine is set on ‘Automatic start and end points’. Check settings via the screen of your machine, if this is available. With different brands: just check if you can set this too.
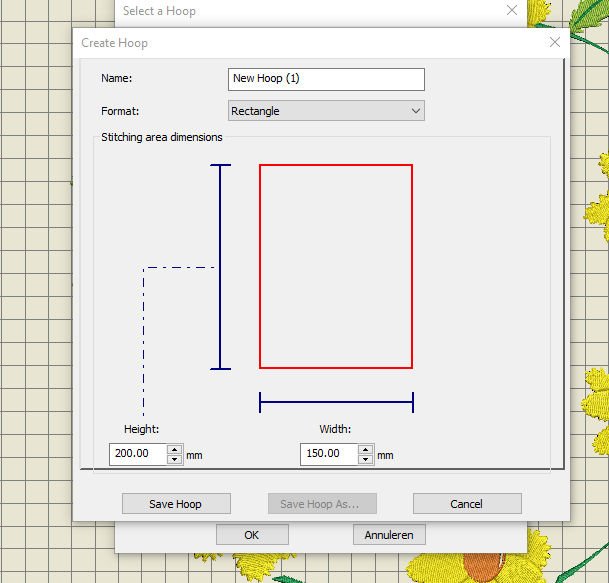
If you own a machine with a larger embroidery area = space between needle and side of the machine – and cannot find the type of hoop on the BERNINA list? You can customize your own hoop type and size. Click on ‘Custom Hoops’ (right of Hoop Position), use ‘Create’ to make your own hoop.

You can name your new hoop, for future reference, format the shape by using the down-arrow and choosing the shape: Oval, 3 Position, Sliding, Square, Circle, Round Rectangle and Rectangle.
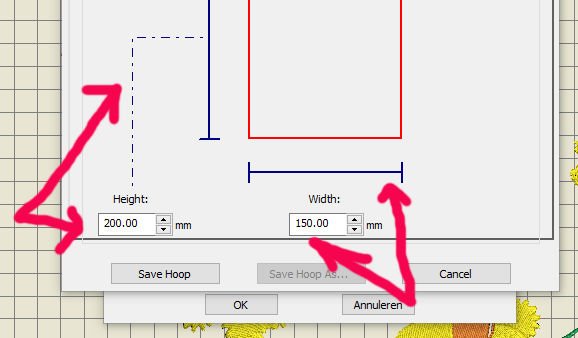
Even the height and width are adjustable. Use ‘Save Hoop’ to save the settings, or ‘Cancel’ if you want to return to ‘Select a Hoop’.
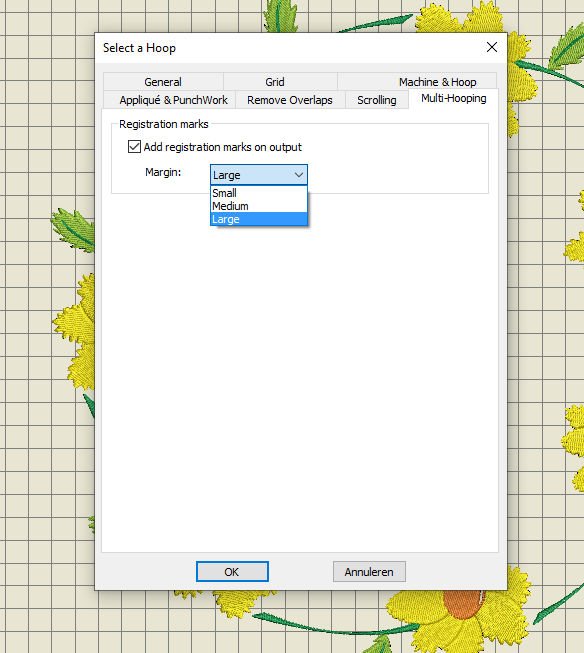
With ‘Select a Hoop’ you will find a Tab (upper right): click on this Tab to open this option, where you can add registration marks on the output. You will need these registration marks for combining the hoopings the right way. Choose from ‘Small’, ‘Medium’ or ‘Large’. Use ‘OK’ to set.
 You can specify multiple hoopings manually or automatically by V8. Manual hooping is always better, because you’re in control. With every step, you will decide what to do, in contrast to V8 = the computer software, which has standard settings. This is especially true with complex designs: with simple designs it will not be too much effort to manually specify it all. But in that case, it is important to understand the processes of design and production.
Very important is to understand the stitching order with a design: this is the order in which objects are sewn. Objects in the background should be embroidered before objects in the foreground, which sounds logical. But even if something seems logical, you should be aware of these facts, to know how it all works.
The goal of Multi-Hooping.
- Making an embroidery design with a minimum number of hoopings: it is important to see if you can have just two hoopings instead of three, so try every position first, before setting the amount of hoopings.
- Maximize overlaps between successive hoopings. This is also the best way to avoid having too many hoopings.
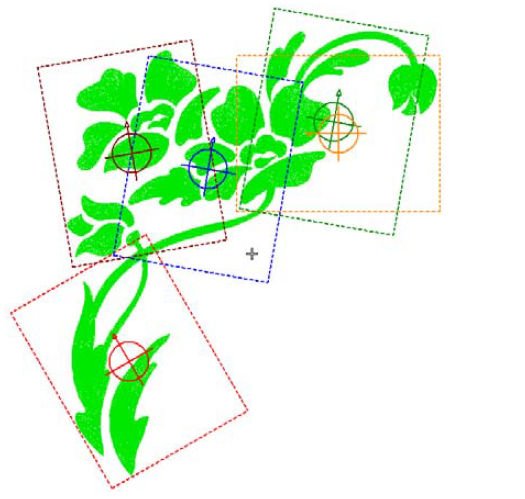
- Hoop the design within the maximum registration mark margin: these ‘red’ margins can be found on the inner side of the hoop on your screen when using V8, having the hoop selected. You cannot embroider anything outside these margins: they are for safety purposes.
- Set splitting lines, in overlapping areas, where an object cannot be accommodated within a single hooping.
Understand that it is important to be aware that ‘hooping’ is not the same as ‘hoop position’: there can be more hoopings than hoop positions, but there can never be less. A single hoop position may involve more than one hooping in order to preserve the design sequence.
Rules with Multi-Hooping.
With calculating multiple hoopings, the BERNINA Embroidery Software V8 tries to include WHOLE objects. Not just when there are two hoopings, but with every next hooping (three, four etc), in sequential order. The software will not split them up if there is a possibility to keep them as they are. If objects will overlap, the object that will be overlapped should be stitched before the object that is overlapping: does that make sense? Again, the object underneath should be embroidered before the object that will be on top. So:
- Hoopings should be placed as near as possible to the order of the actual design object sequence: so try to keep the sequence the same without disturbing it too much.
- Each successive hooping overlaps a previously stitched hooping: that’s the sequence that is correct. You cannot hoop a part to the far right, next a part to the far left when in between there are parts to be embroidered also.
And again: it is important to always use the largest available hoop there is for your type of machine, or the largest hoop you own, which is not necessarily the same.
Characteristics with Multi-Hooping.
- All your objects are automatically split with the original design, for a better result with embroidery.
- Registration marks are made: 1) you don’t have to manually create these marks. 2) when changing hoop positions, V8 automatically recalculates these registration marks – you don’t have to do that yourself. 3) the registration marks are not a permanent part of the design, even when they are automatically calculated.
- When objects are too large to be embroidered in a single hoop, even if that’s a very large hoop, they can be manually split. There will be no additional needle penetrations, which could change the appearance of the object.
- The underlay is also recalculated by V8, to give the spit objects the right stabilization. This is done automatically after splitting.
- Designs can be saved as a single ‘master’ multi-hooping design, with all hoops.
- If you don’t need the registration marks, you can turn this off if you want to digitize your own.
The time to calculate design hoopings depends on the number of objects and hoop positions, rather than on stitch count: it all depends if you convert designs from .EXP, .PES, .HUS, etc. or from a native BERNINA design (.ART80), which can be found in the BERNINA Embroidery Library. But even with these (pure) .ART80 files it can take some time to calculate multi-hooping, if they are large and complex, which can result in many hoop positions. But I think taking time is what this type of embroidery needs: to be sure to do it the best way.
Options with Multi-Hooping.
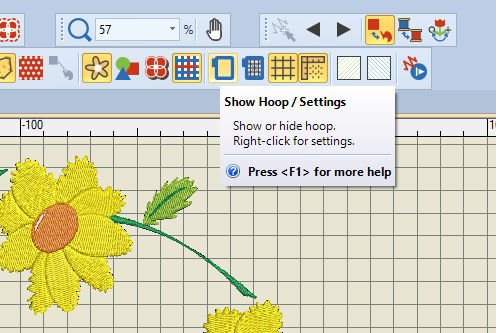
To be able to work with multi-hooping, use ‘Show Hoop/Settings’. If you are not using this option, the icon is grayed-out, inactive. After clicking, the button background turns to yellow = active. You need to have the largest hoop set, before using the Multi-Hooping options.
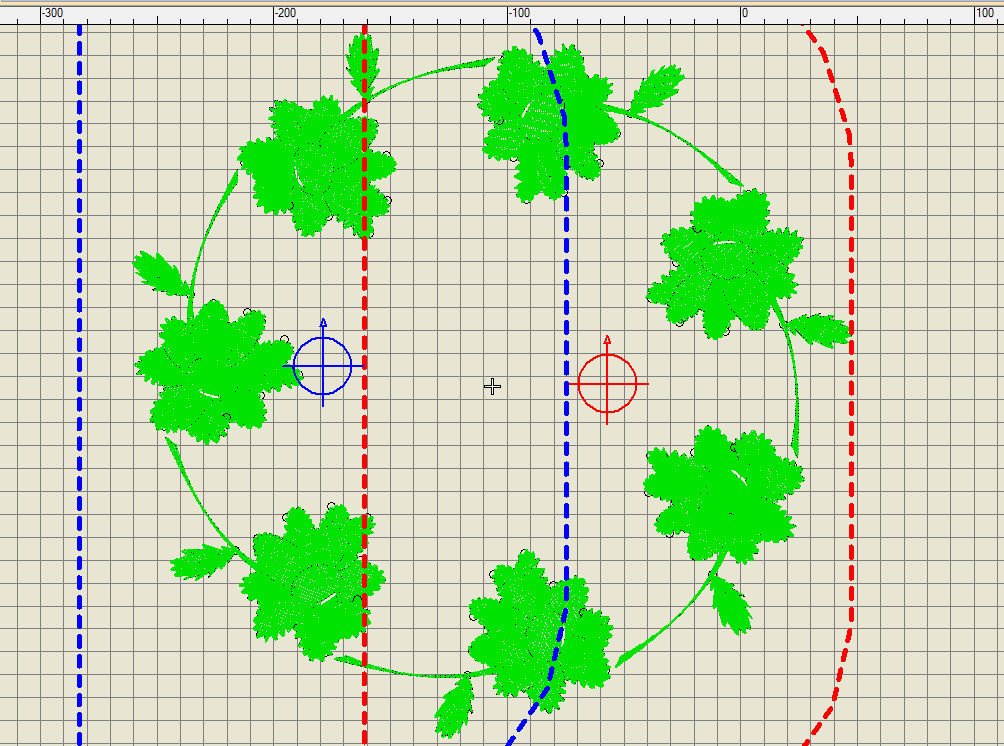
Which options are available with Multi-Hooping? Check this button with the ‘Toolboxes’ toolbar on the left: click on the button to find 14 options. The minute you click, there will be dashed lines surrounding your embroidery design, to indicate there will be multiple hoopings already, all automatically calculated by V8 because of the selected embroidery hoop: red for the first hooping and blue for the second hooping; both with center markings. So V8 has done the math for you at this point, which is not always the right way to do the hooping, but it is a start.
Not all options are already available at that time: some are grayed-out and will not be activated until certain actions have been taken. Let’s take a look at it all.
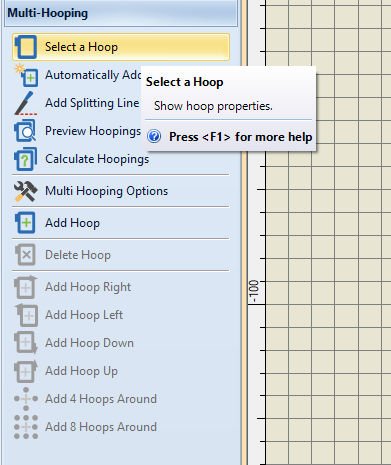
Select a hoop – show hoop properties.
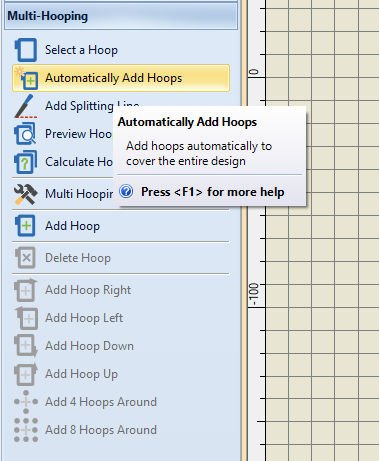
Automatically Add Hoops – Add hoops automatically to cover the entire design. This is the easiest way to calculate the positions of simple designs with multi-hooping. Remember that they are placed in order of object sequence.
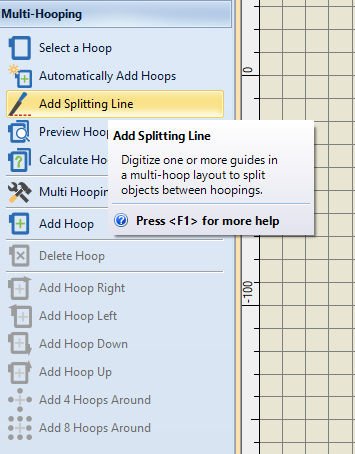
Add Splitting Line – Digitize one or more guides in a multi-hoop layout to split objects between hoopings.
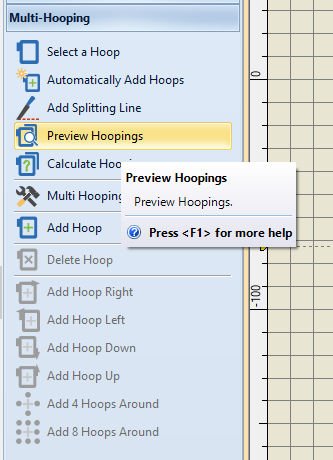
Preview Hoopings – Preview hoopings by placing a docker ‘Hooping Sequence’ to the right of your workspace, which gives you the opportunity to find out which objects are placed in a certain hoop.
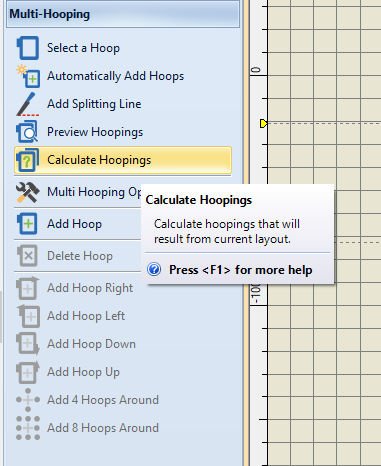
Calculate Hoopings – Calculate hoopings that will result from current layout.

Multiple-Hooping Options – Use this option to check the settings for hooping.
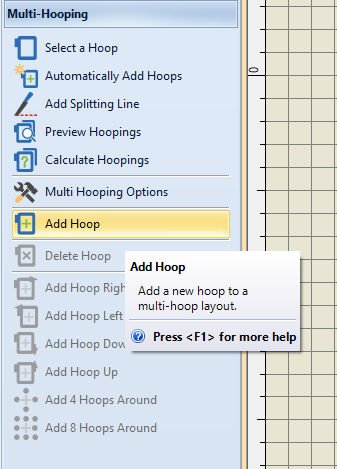
Add Hoop – Add a new hoop to a multi-hoop layout. It is not until these options is activated and used, that all options below are activated. A third hoop is added; with a new colored dashed line. You can add up till a certain number of hoops, if V8 calculates that this is necessary. Once you have added the maximum number of hoops, the color of the dashed line of the last hoop will only change, but no more hoops are added.

Delete Hoop– Remove selected hoop from a multi-hoop layout. If you don’t select a hoop, the last placed hoop will be deleted.

Add Hoop Right – Place a new hoop to the right of the selected hoop. Allows a 10mm overlap between sewing fields. If you don’t select a hoop, the new hoop will be placed to the right of the last hoop you’ve added.
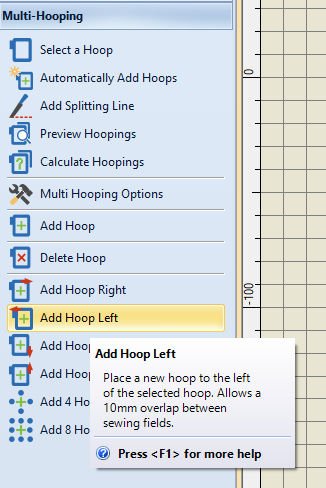
Add Hoop Left – Place e new hoop to the left of the selected hoop. Allows a 10mm overlap between sewing fields. If you don’t select a hoop, the new hoop will be placed to the left of the last hoop you’ve added.
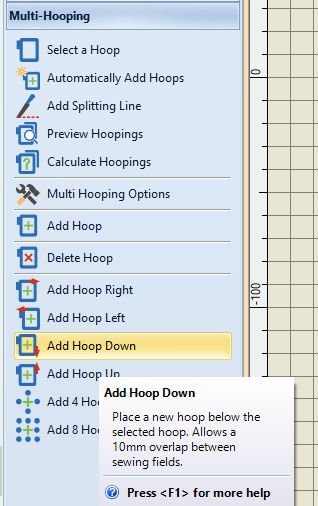
Add Hoop Down– Place a new hoop below the selected hoop. Allows a 10mm overlap between sewing fields. If you don’t select a hoop, the new hoop will be placed below the last hoop you’ve added.
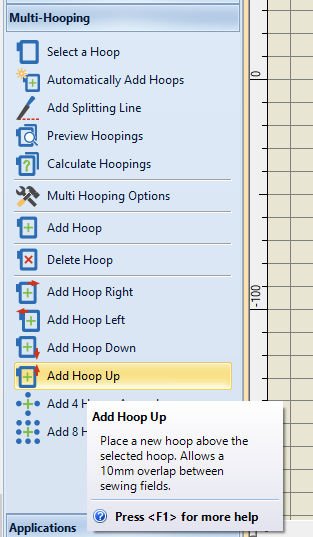
Add Hoop Up– Place a new hoop above the selected hoop. Allows a 10mm overlap between sewing fields. If you don’t select a hoop, the new hoop will be placed above the last hoop you’ve added.
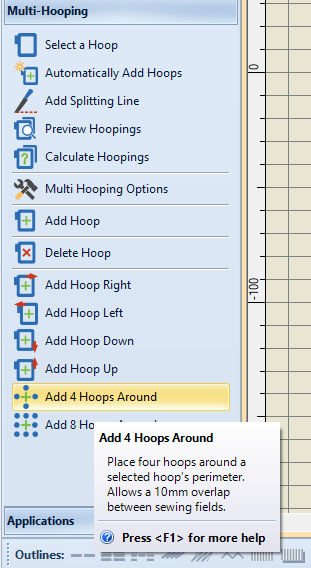
Add 4 Hoops Around – Place four hoops around a selected hoop’s perimeter. Allows a 10mm overlap between sewing fields.
Add 8 Hoops Around – Place eight hoops around a selected hoop’s perimeter. Allows a 10mm overlap between sewing fields.
This is what you need to know about Multi-Hooping before actually start. Next time I will show you to prepare my wreath design via Multi-Hooping, before bringing it actually to my BERNINA770QE. See you then!
Happy Stitching!
Sylvia Kaptein
Sylvia’s Art Quilts Studio

Je n’arrive pas à utiliser le méga-hoop avec ma Bernina QE 440 Aurora, pouvez vous m’expliquer, Merci de me répondre en Français.
Salut Doret,
Multi Hooping est plus difficile d’explique en francais pour moi. Je vous suggère de contacter un marchand de BERNINA près de chez vous.
Ann, you’re welcome. It is not that difficult once you know how to do it.
Wonderful, yet again. A complex subject, so well explained. Thank you xxxx
I am very happy to find this post. Your post helps me a lot..!!
Blogger at https://supergiftcart.com
Happy to serve, Sakshi Sharma,
Hope you like all lessons, we’re here to help and inspire
Sylvia