 BERNINA Corporate Blog -
CutWork (and StumpWork) is an option in the BERNINA embroidery software V8, to cut shapes from fabrics/materials with a special presser foot. This feature opened a new world of possibilities for me to work with special objects: making holes, cutting out shapes, using different fabrics and other materials and even cut patchwork for me, like hexagons. 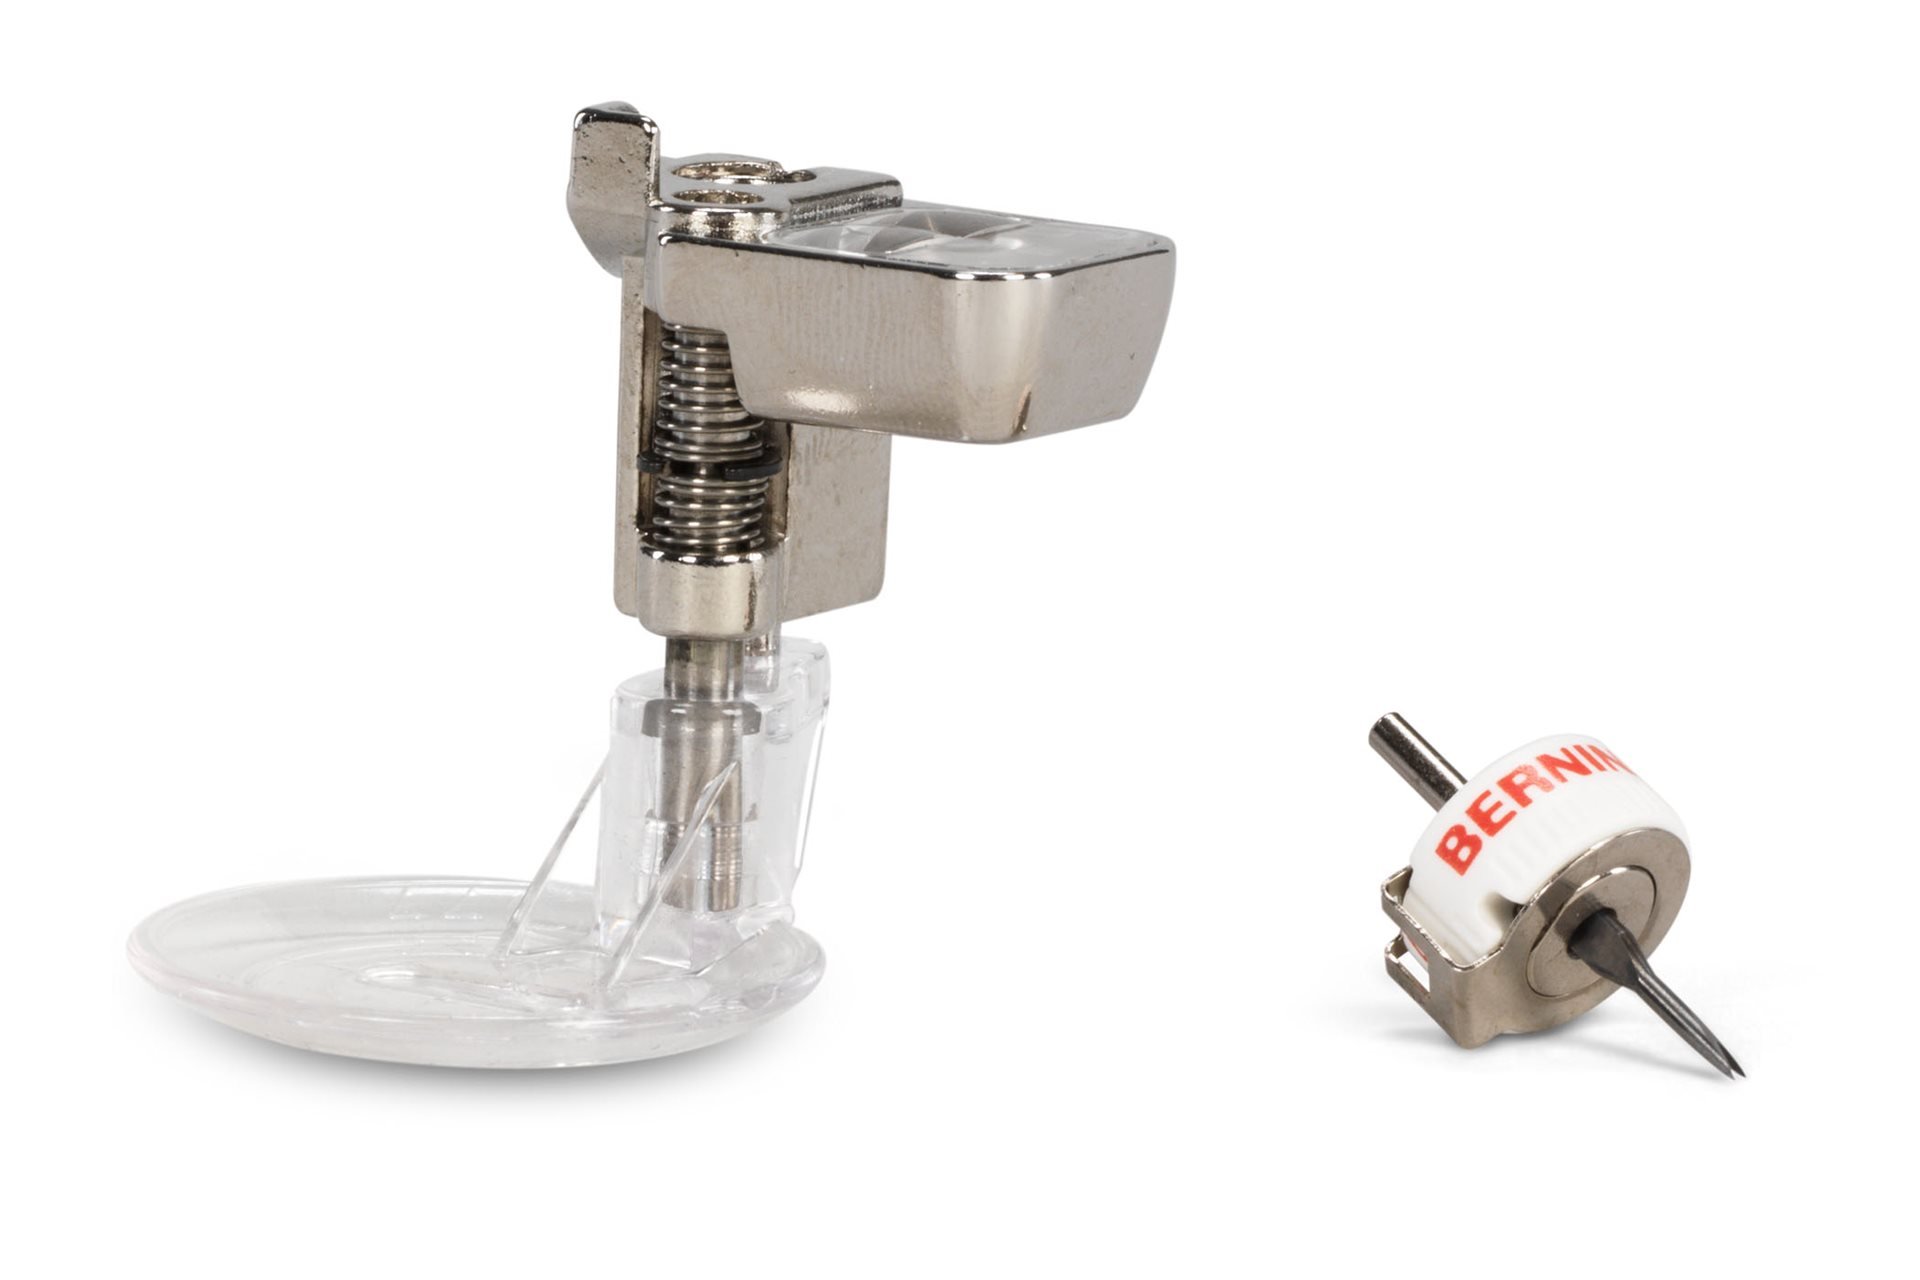 CutWork is available via separate DesignWorks software, (I will work with this software more often this year), but is integrated in V8 too, which gives you the possibility to make your own embroidery designs with this built-in feature : a reduced version, for which you will need the Cutwork Tools plus the Straight- and CutWork stitch plate.
There is no needle involved, but a very, very sharp knife and a special presser foot (#44C – since the last update, this presser foot is included with the ‘Select a Hoop’ option.). You can design machine embroidery using the regular presser foot (#26) and machine thread, in combination with the CutWork tools, replacing the needle and threads before cutting. The machine will cut through multiple layers if you want to, or through a single layer, depending how you have designed it all in V8, and how much layers there are in the embroidery hoop.
Use materials that don’t fray, like felt, cork, thin leather etc, but also regular quilt fabrics with a stabilizer., or quilt fabrics without stabilizers to emphasize the frays for special effect. The BERNINA Reference Manual mentions working with up to 15 layers of fabric if they are thin, and I’ve cut through 8 layers with thicker material. I have made a hexagon quilt, using just the CutWork tool to cut the shapes, which worked just fine for me.
When repeating a shape, cutting by hand would give you differences in size, while cutting with the CutWork tool results in multiple shapes which are exactly the same.
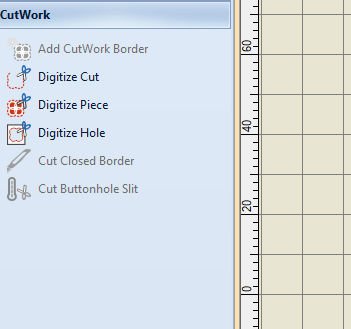
Via the left toolbar ‘Toolboxes’, you can use ‘CutWork’. 6 Options of designing cuts, pieces, holes, borders and even Buttonhole Slits: it is all there for you to use, some are grayed-out when nothing’s at your workspace, some are already activated.
Let’s take a closer look.
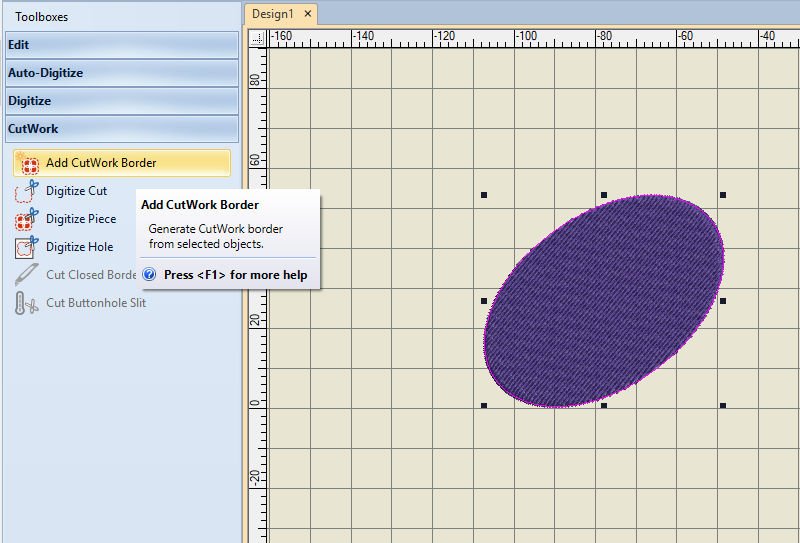
1) Add CutWork Border – generate CutWork border from selected objects.
Activated after you’ve placed and selected a shape or line on the workspace. I’ve drawn an ellipse, selected it and this option was activated.

2) Digitize Cut. Digitize an open or closed shape creating a cut in the hooped fabric using the settings shown in the docker. To close a shape, digitize the end point over the start point or use Close Curve commands. Right-click for settings.

3) Digitize Piece. Digitize a closed shape that cuts a piece from the hooped fabric using the settings shown in the docker. Right-click for settings.
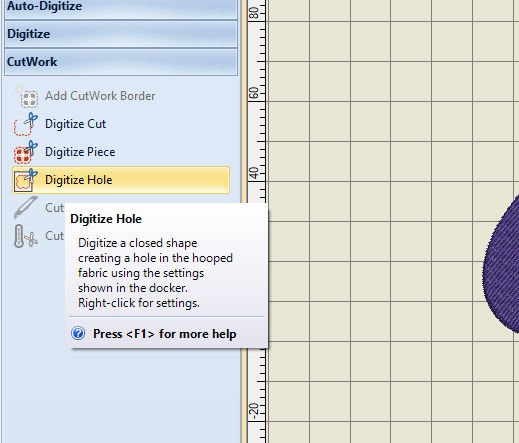
4) Digitize Hole. Digitize a closed shape creating a hole in the hooped fabric using the settings shown in the docker. Right-click for settings.
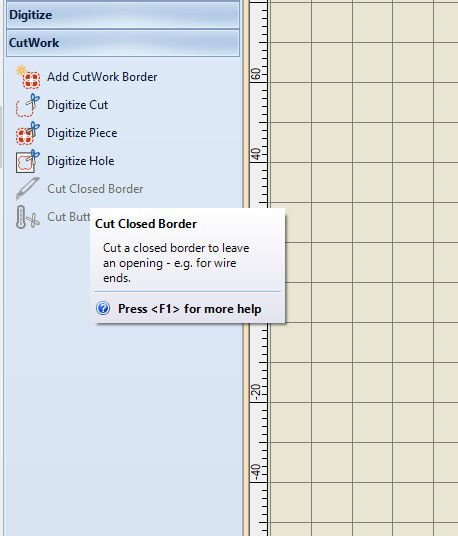
5) Cut Closed Border. Cut a closed border to leave an opening – e.g. for wire ends. So this option can be used for StumpWork, where raised parts will give your embroidery and cuts a 3D look.
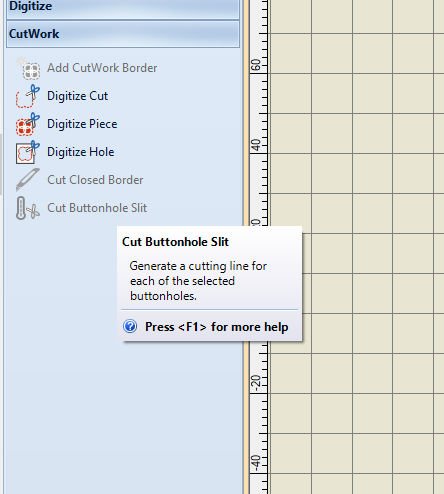
6 ) Cut Buttonhole Slit: Generate a cutting line for each selected buttonholes. So no more cutting with scissors or seam ripper, but digitizing the slit via this option.
And how about StumpWork in V8?
There are 4 different options for StumpWork too, you can find it on the same toolbar, below CutWork. Objects can be designed on a different fabric and transferred to the basic/ground fabric for a wonderful effect. To be sure the extra pieces will stay 3D, a wire is often used through borders, otherwise these pieces will lie flat, which will reduce the effect. It is important to visualize this effect before making the design, to be sure the desired end result is achieved.
Three options are grayed-out at first too, when there is nothing yet to digitize. There has to be something placed on your workspace.
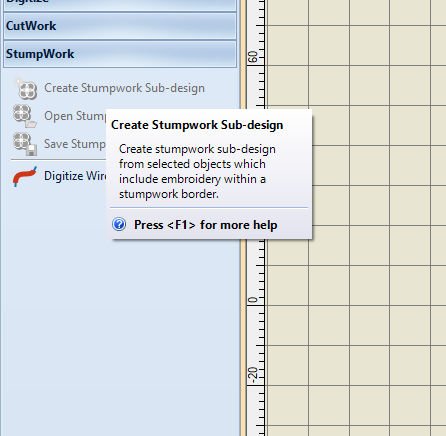
1) Create StumpWork Sub-design: create StumpWork sub-design from selected objects which include embroidery within a StumpWork border.
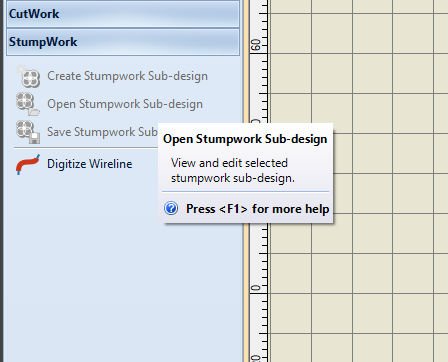
2) Open StumpWork Sub-design: view and edit selected StumpWork sub-design.
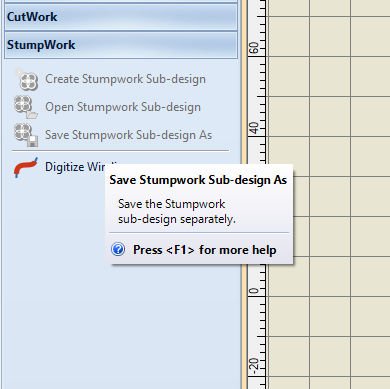
3) Save StumpWork Sub-design as…: save the StumpWork sub-design separately.
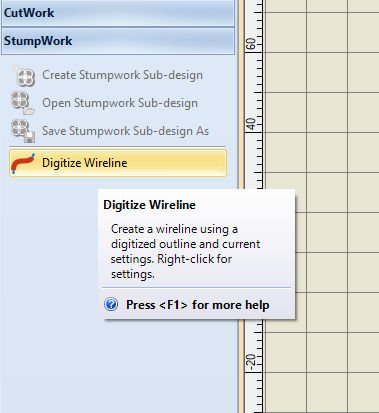
4) Digitize wireline: create a wireline using a digitized outline and current settings. Right-click for settings.
Using the CutWork docker.
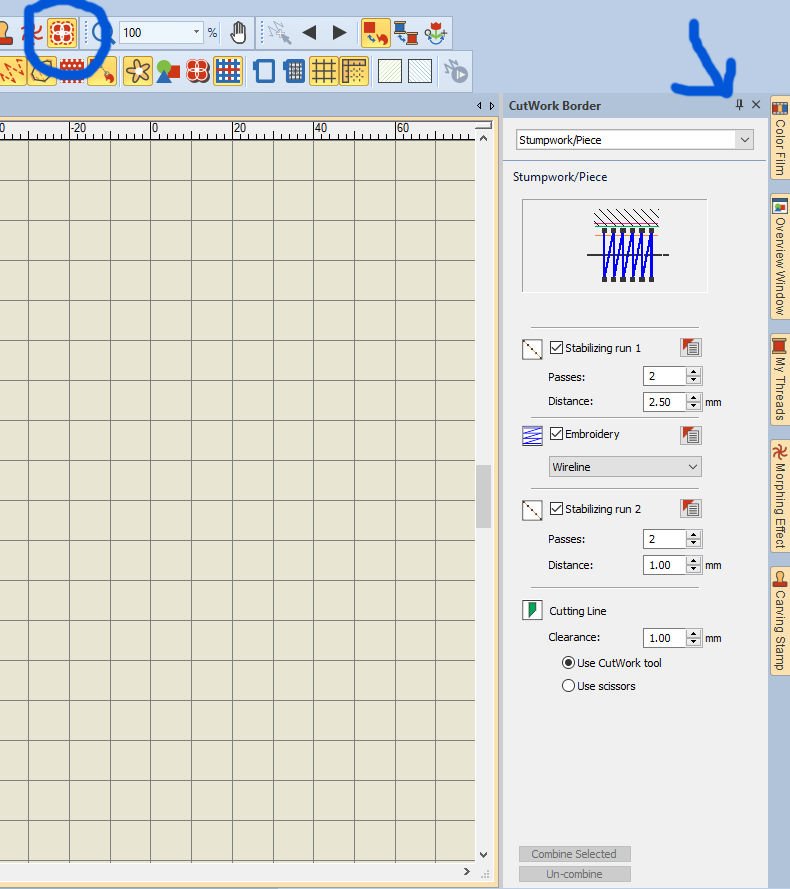
For both options, you can use the docker ‘Cutwork Border’. If there is no tab with that name to the right of your workplace, click on the icon ‘CutWork’ on the View Toolbar: click on the ‘pin’ to set the docker.
There are a lot of features to cut and/or embroidery. With CutWork, parts are cut – on the outside but sometimes – if you want it – also as holes inside your design. Border can be embroidered etc. With StumpWork – using the same docker – the cut out is used to add to another embroidery, once that is in the hoop, to give your design a 3D effect, using wire in the borders. Or: using a lace effect, for Victorian style.
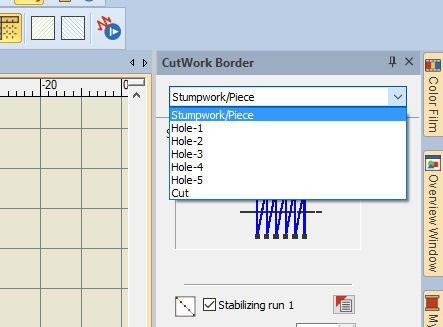
Clicking on the down-arrow, next to ‘StumpWork/Piece’ will give you more options, like Hole-1, Hole-3, Hole-4, Hole-5 and Cut.
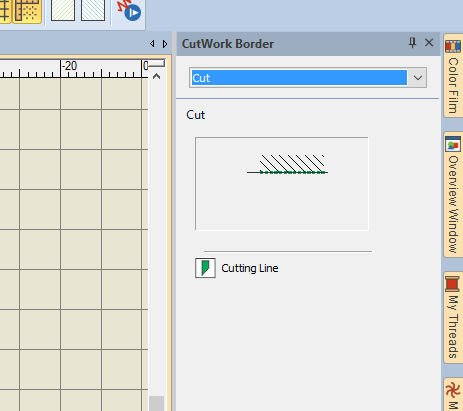
Setting ‘Cut’, the docker gives you just a cutline to work with. The other options are not available.
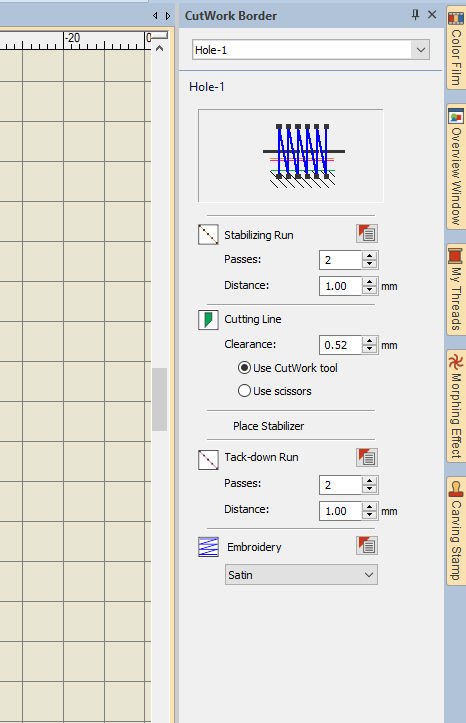
Choosing ‘Hole-1’, will show much more features, to edit your embroidery. Stabilizing Run, Cutting Line, Place Stabilizer, Tackdown Run and Embroidery from top to bottom, with different settings for width and stitches.
Hole-2, Hole-3, Hole-4 and Hole-5 will give you each different options, so how do you know what to choose for your embroidery design?
The three categories with Cutwork Border are:
1) Cutting– Open or closed cutting line without any embroidery. This can be used to create a simple cut-out piece to be sewn on as stumpwork. But also to cut shapes (hexagons etc.) or flowers, birds and parts for appliqué. It is the entire shape you are interested in to cut out.
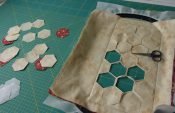
2) StumpWork/Piece – The cut-out piece is what you are after: you will use this for raised embroidery = 3D effect. It can contain embroidery if there should be an effect with color and stitches, but you can also just cut out shapes, f.i. wings of a butterfly: the body of the butterfly will be embroidered on a separate piece of fabric/material, the wings are cut-outs, whether or not provided with wire around the edges. The remainder of the fabric will not be used.
3) Hole – Use this if you want to cut holes in a piece of fabric in the hoop, or perhaps cut holes inside embroidery designs. You can decide to also digitize cutlines around the embroidery shape, to use that for appliqué or button, or adding exciting extras to fabrics, to use them in quilts.
There are 5 icons for special options, depending on the choice of category: if you click on ‘Hole-3’, you can see all five.
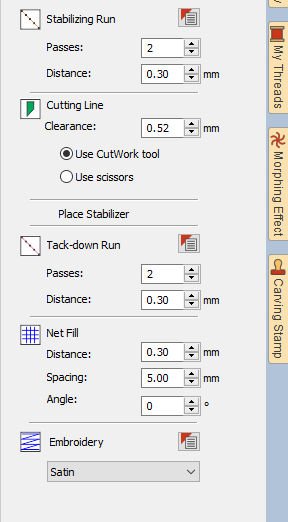
1) Stabilizing Runs: these stitches are used to reduce deformation of the material prior to cutting or stitching. You can make several stabilizing cutwork runs, change the number and distance. You can change the number of passes and the distance.
2) Cutting Lines: this is an option for just cutting, but since the knife of the CutWork Tool cannot turn, you will have to follow standard cutting angles: -0°, 45°, 90° of 135°. The mode of operation is to complete all cuts in one direction at the time, before moving the numbers on your CutWork Tool to the next. By default the ‘Use CutWork Tool’ is checked, but if you want to cut by hand/scissors, check ‘Use scissors’.
3) Tackdown Runs: used to attach the stabilizer after a hole has been cut. They are simple runs, not required for cutwork pieces. You can change the number of passes and the distance .
4) Net Fills: These are stitched onto the stabilizer inside a cut hole, made after the holes are cut and stabilizers are tacked down. Mostly using a Satin or Stem Stitch line, the edged are covered, but you can also choose different stitch types. The stabilizer – which will be water soluble – has to be dissolved in water to leave just a net of stitch within the hole. You can change the distance, spacing and the angle.
5) Embroidery: this can be used to cover the edges of the hole, depending on the border type. You can be used before or after the material is cut, using a Satin Stitch, Blanket Stitch, Zigzag or Stem Stitch.
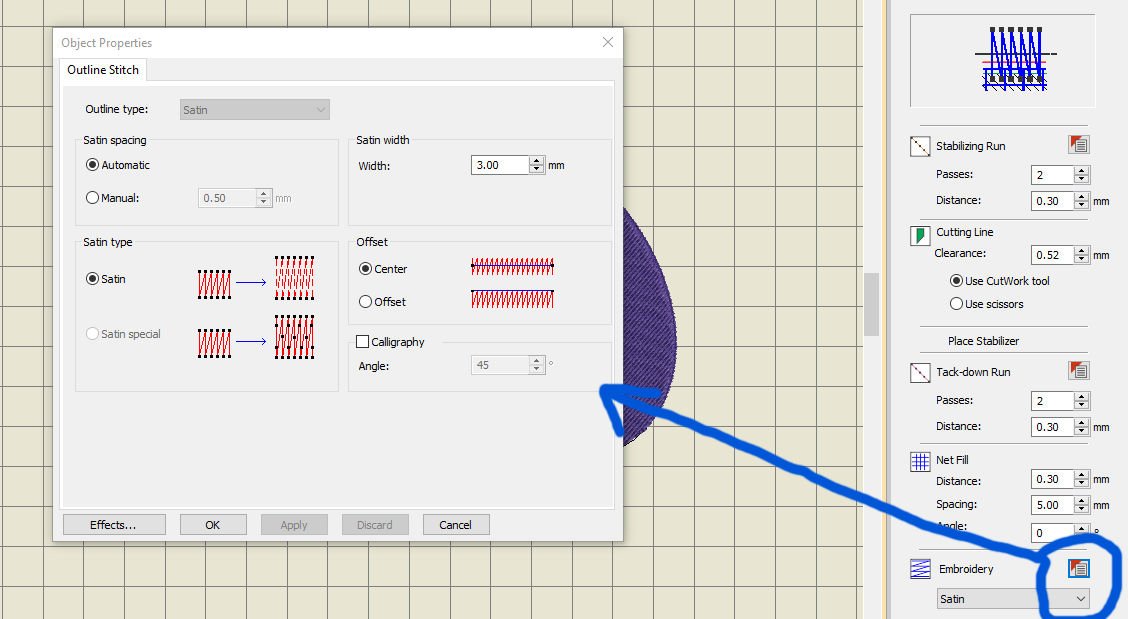
If you want to see more options, click on the icon to the right of ‘Embroidery’, to open ‘Object Properties.
Try it all, change settings, play with options, see what happens when you do this, and familiarize yourself with everything, before making an actual CutWork or StumpWork design.
Next time, this topic will continue, because there is much to discover. See you then!
Happy Stitching
Sylvia Kaptein
www.sylviasartquilts.nl
Happy new year. Great to have your lessons back
Hi Ann, same to you, thanks again for your enthusiasm. There is so much more to discover with the BERNINA Embroidery Software V8. And lots more to post about.
Thank you Sylvia,
Will you be showing us how to do the file for a cutting machine..?
Also, is it possible for you to show us how this is stitched out on the machine and when the tools should be attached and how this process is done? thank you so much..Joann
Hi Joanne,
Next couple of lessons will continue about this topic. Eventually I will show you how to cut out shapes and make a pillow case.