 BERNINA Corporate Blog -
Andrea from Quiltmanufaktur and author for the German BERNINA blog is your guide for this fantastic quilt-along over the next 12 months. Together, you will sew classic patchwork blocks and combine them into a sampler. The completed quilt will be traditional, yet modern! The next part has been written and we are delighted that you join this quilt project.
Welcome to the second block of the Old Block Quilt-Along. Today I will introduce you to the “Quilter’s Delight” patchwork block.
First I want to thank you from the bottom of my heart for your abundant and very beautiful Bride’s Bouquet patchwork blocks. I was continuously amazed! Above all, I was delighted that many of you dared to sew a patchwork block for the first time. The block was quite difficult and yet it didn’t seem to deter anyone – BRAVO!
If you are on Instagram and follow our hashtag #BERNINAOldBlockSampler, you may have already seen that the quilt-along is being organized by BERNINA worldwide! The respective country divisions provide support for the quilt-along, so that I can concentrate completely on this blog. Nevertheless, I am delighted about receiving so much encouragement and about the great results of my work here on the blog :-).
After this euphoric introduction, we continue with the quilt-along.
New here?
Are you just now discovering the quilt-along? No problem! You can join at any time. Registration is not required, and you can win a BERNINA 570 QE! All the articles are available and will remain at the following link:
Old Block Quilt-Along – all posts in the overview
In the first post, which was the invitation to participate in the quilt-along, you will find the initial information about our joint project:
Old Block Quilt-Along – who’s in?
I introduced the first block to you in the post at the beginning of April:
Old Block Quilt-Along, Part 1: “Bride’s Bouquet”
But now let’s move on to the second block for our mutual sampler:
We will sew the “Quilter’s Delight” patchwork block
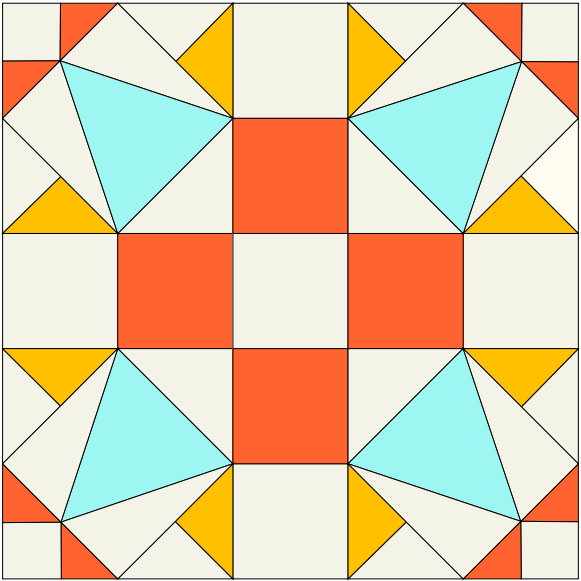
There are several different patchwork blocks under the name “Quilter’s Delight”. The block I’m showing you today was first published in 1936 by Nancy Cabot in the Chicago Tribune.
Nancy Cabot was Loretta Leitner’s ghostwriter name. She started writing the column “Grandmother’s Favorite Quilt Pattern!” for the Chicago Tribune in the early 1930s. The column was designed so that readers could imagine sitting at the table with Nancy Cabot and chatting with her about patchworking. The blocks were solicited and if you wanted to copy one, you mailed in 5 cents plus postage to the Tribune and the instructions were mailed to you. Numerous patchwork blocks that are widely used today originated from the talent and imagination of Loretta Leitner!
Download the patchwork templates
For cutting out, I have created three PDF documents to download:
- The first is a coloring sheet. This allows you to try out colors and designs for this block first to see what they look like.
- The cutting templates are on the second PDF.
- And on the third PDF you will find the four templates for the foundation paper piecing.
On each of the two PDFs with the templates, I have placed a control square with a side length of 1 inch so that you can check whether your printout of the templates is the right size. If you set “Actual size” in your print options, the printout should automatically be correct.
Here are the downloads:
Coloring Sheet “Quilter’s Delight”
FFP Templates “Quilter’s Delight”
Cutting out the templates
Remember my tip from the last block: Use spray starch before cutting into the fabric!
You will need to cut out the following number of parts:
- Template A: 4 x background fabric
- Template B: 8 x sample fabric
- Template C: 8 x background fabric / 8 x sample fabric
- Template D: 5 x background fabric / 4 x sample fabric
- Template G: 4 x background fabric
The foundation paper piecing technique
Cutting out and working on, Option A: with solid-colored background fabric
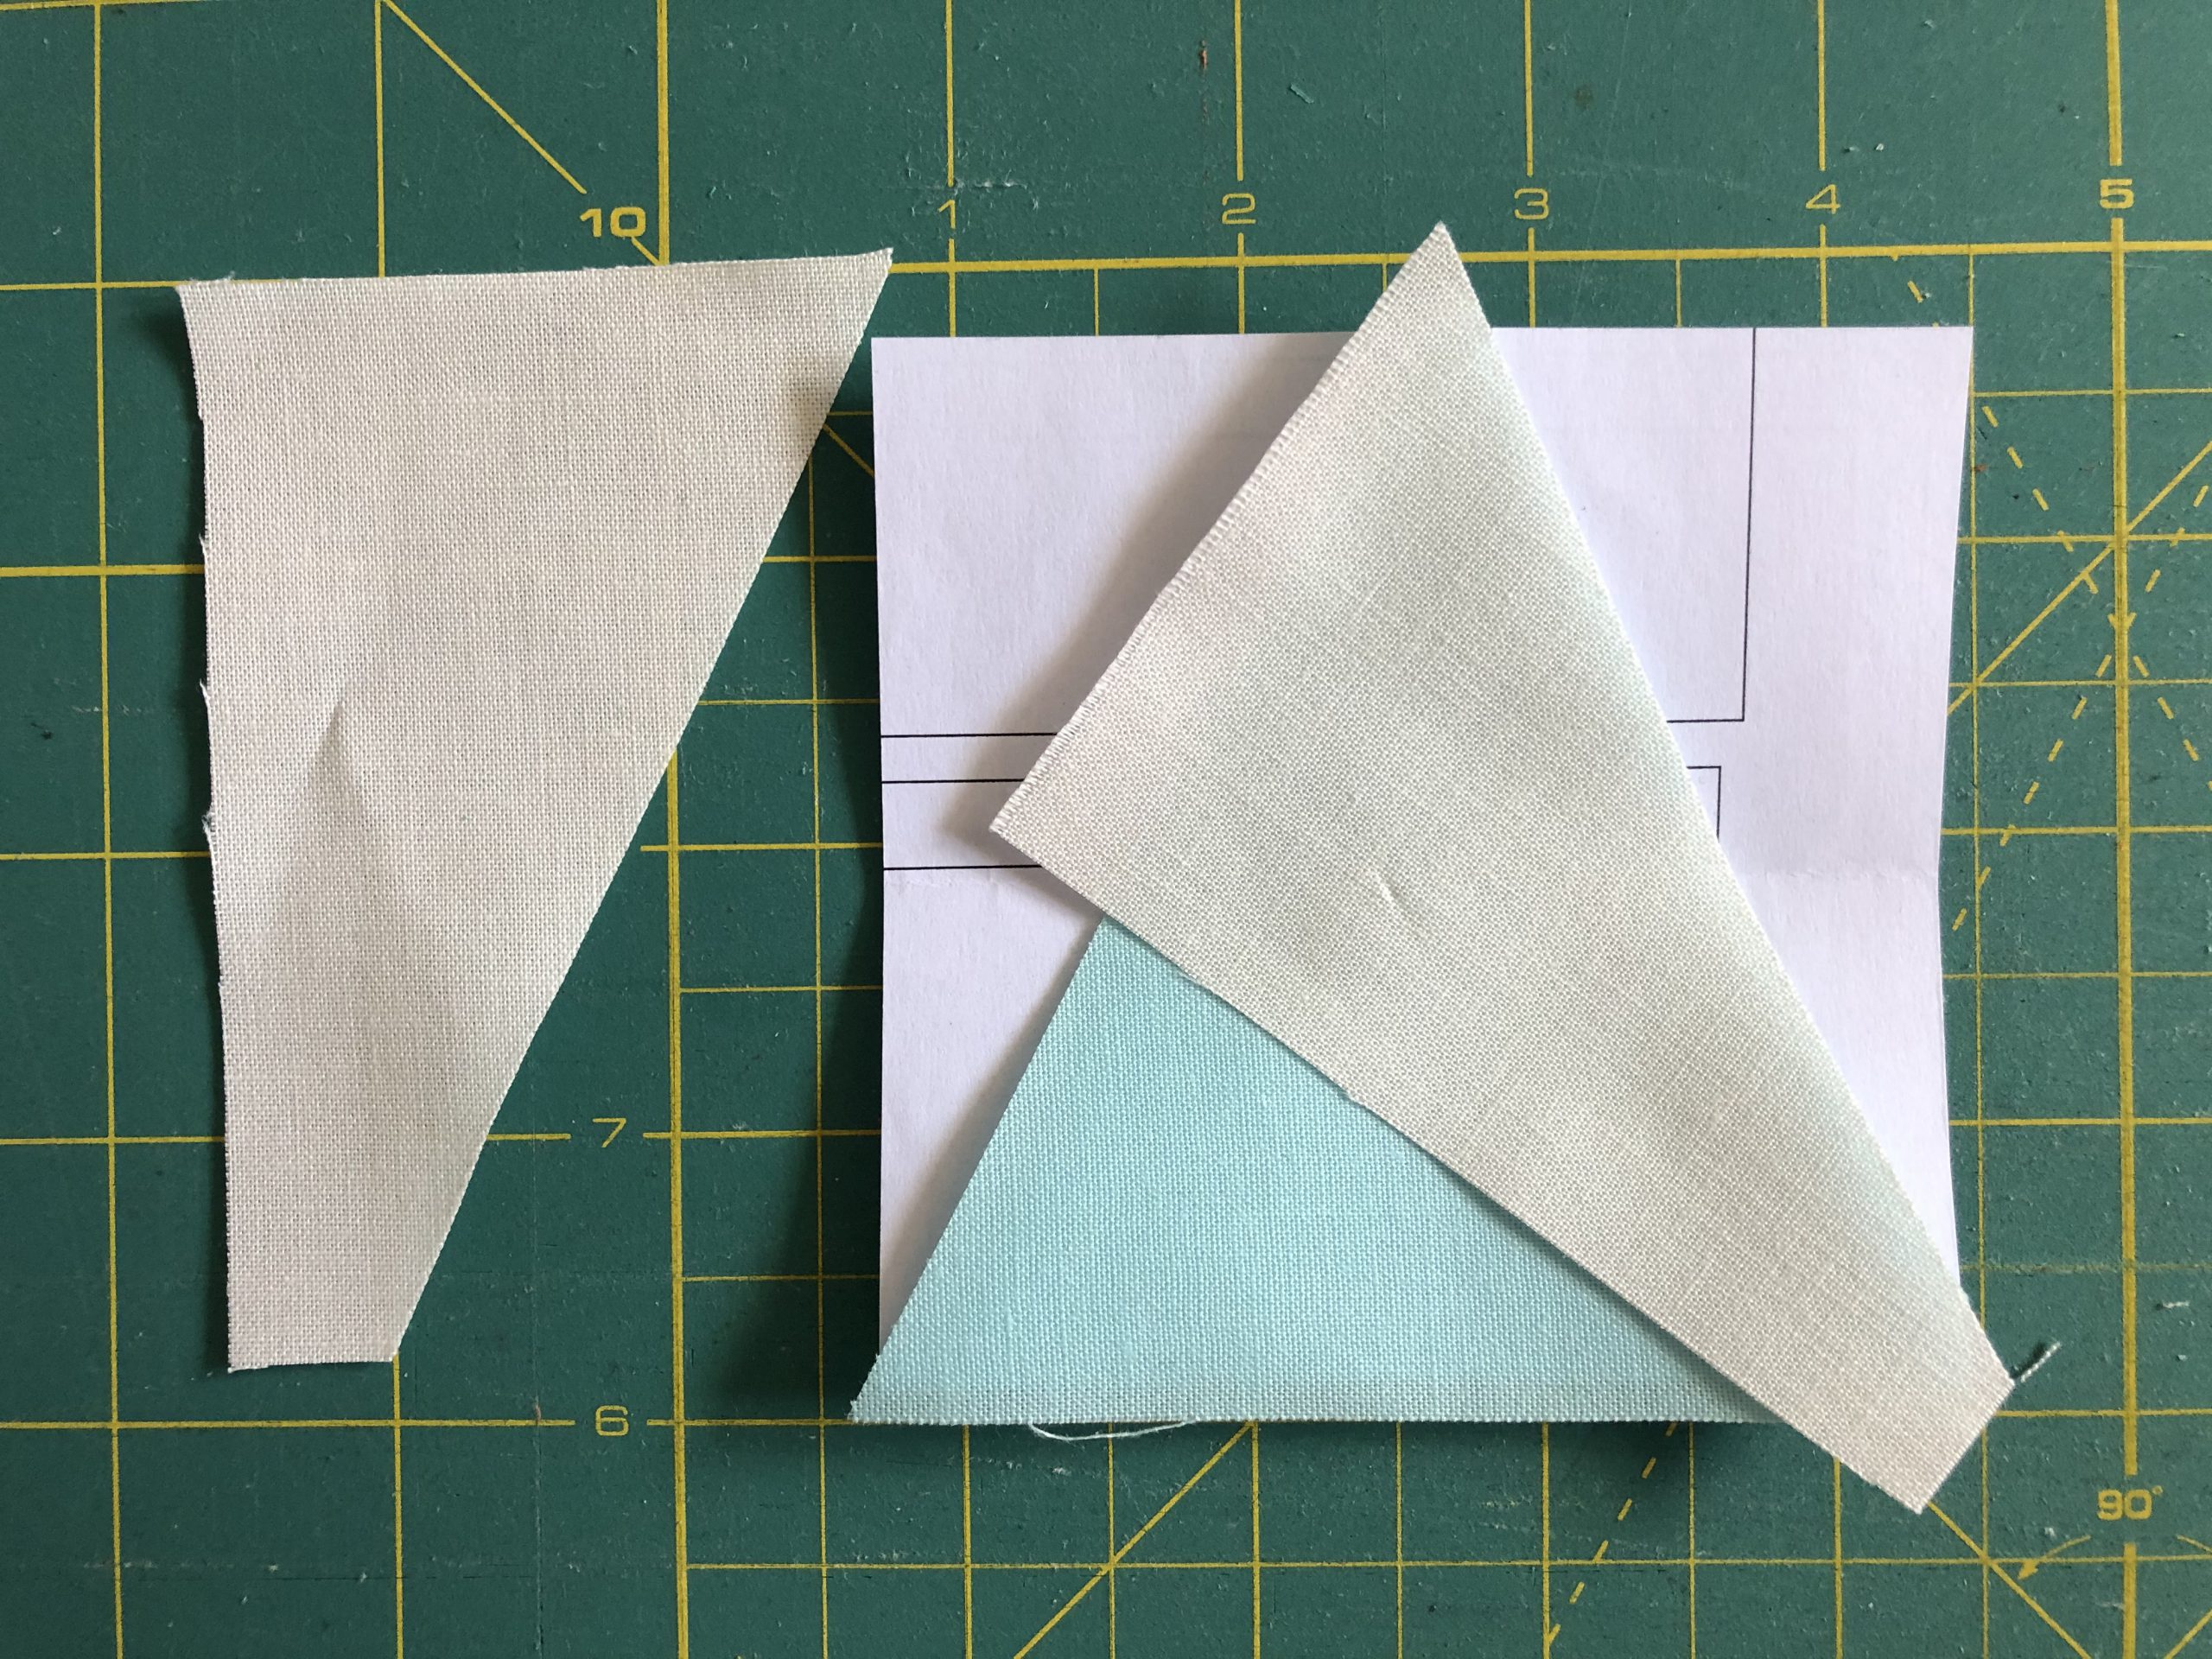
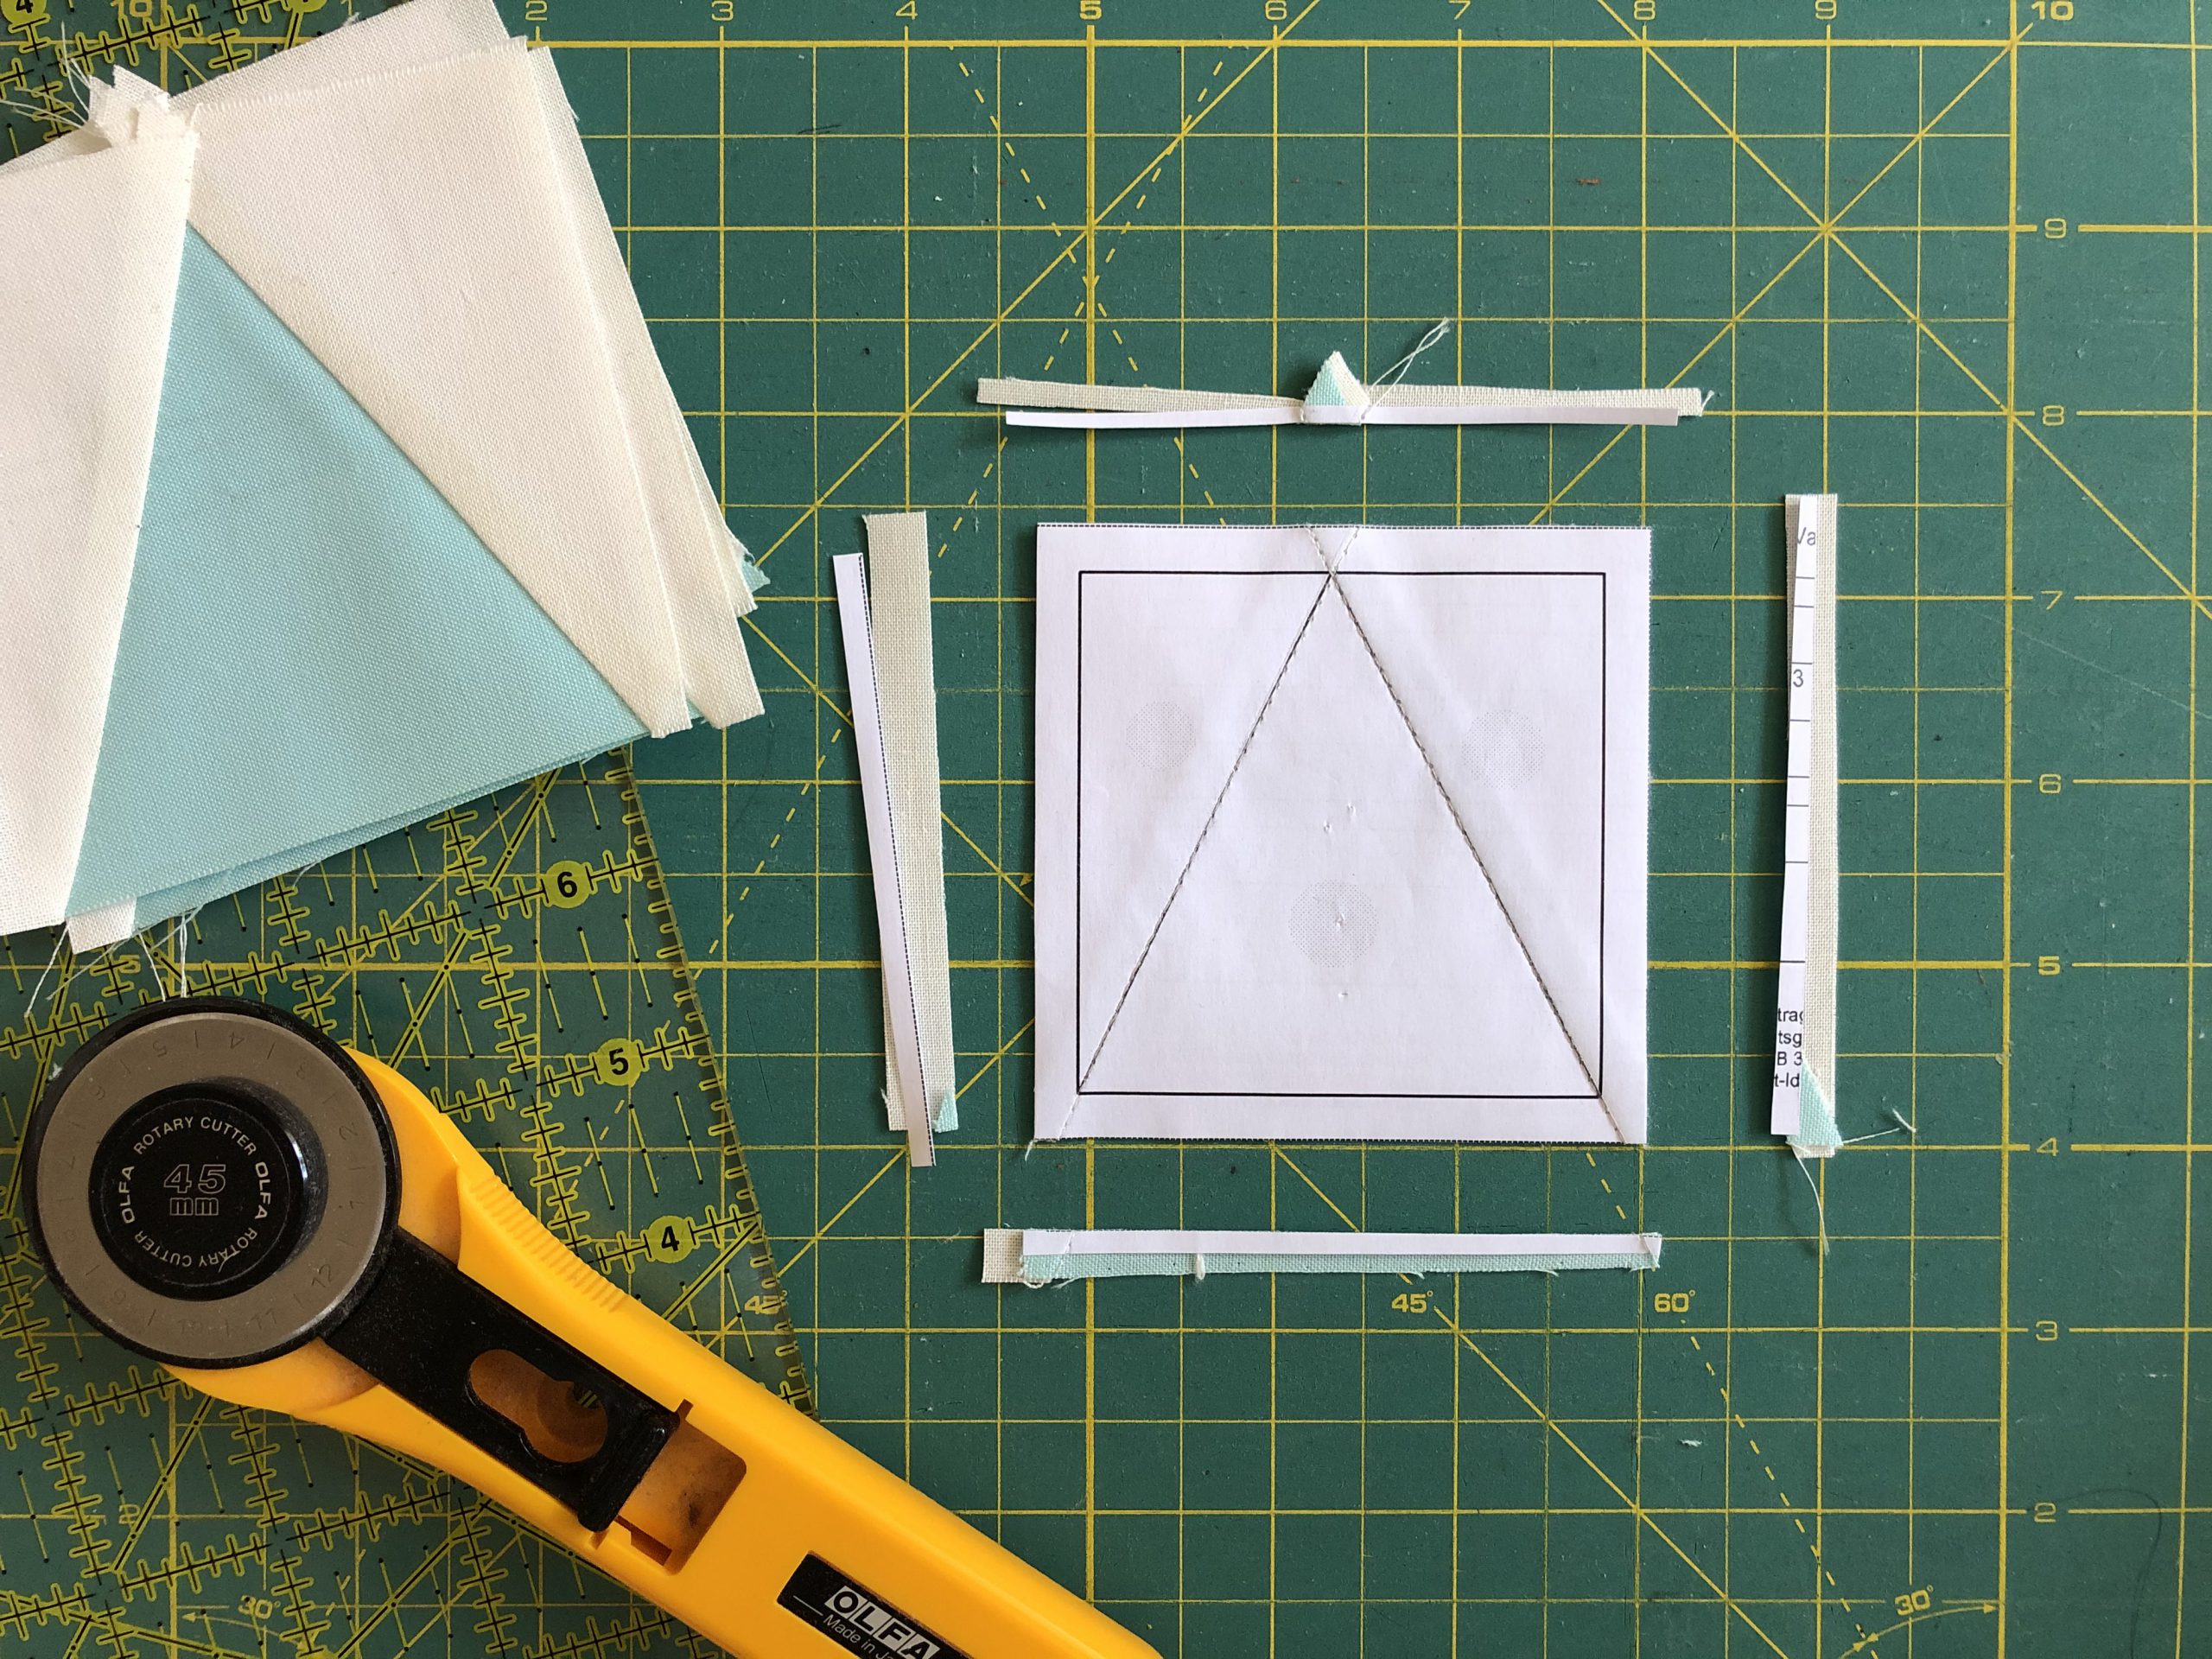
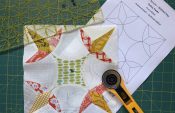
Roughly cut out the four squares for the paper foundation piecing parts and fold the parts along the marked lines. Then pin the paper inside the triangle on the back of your sample fabric with pins.
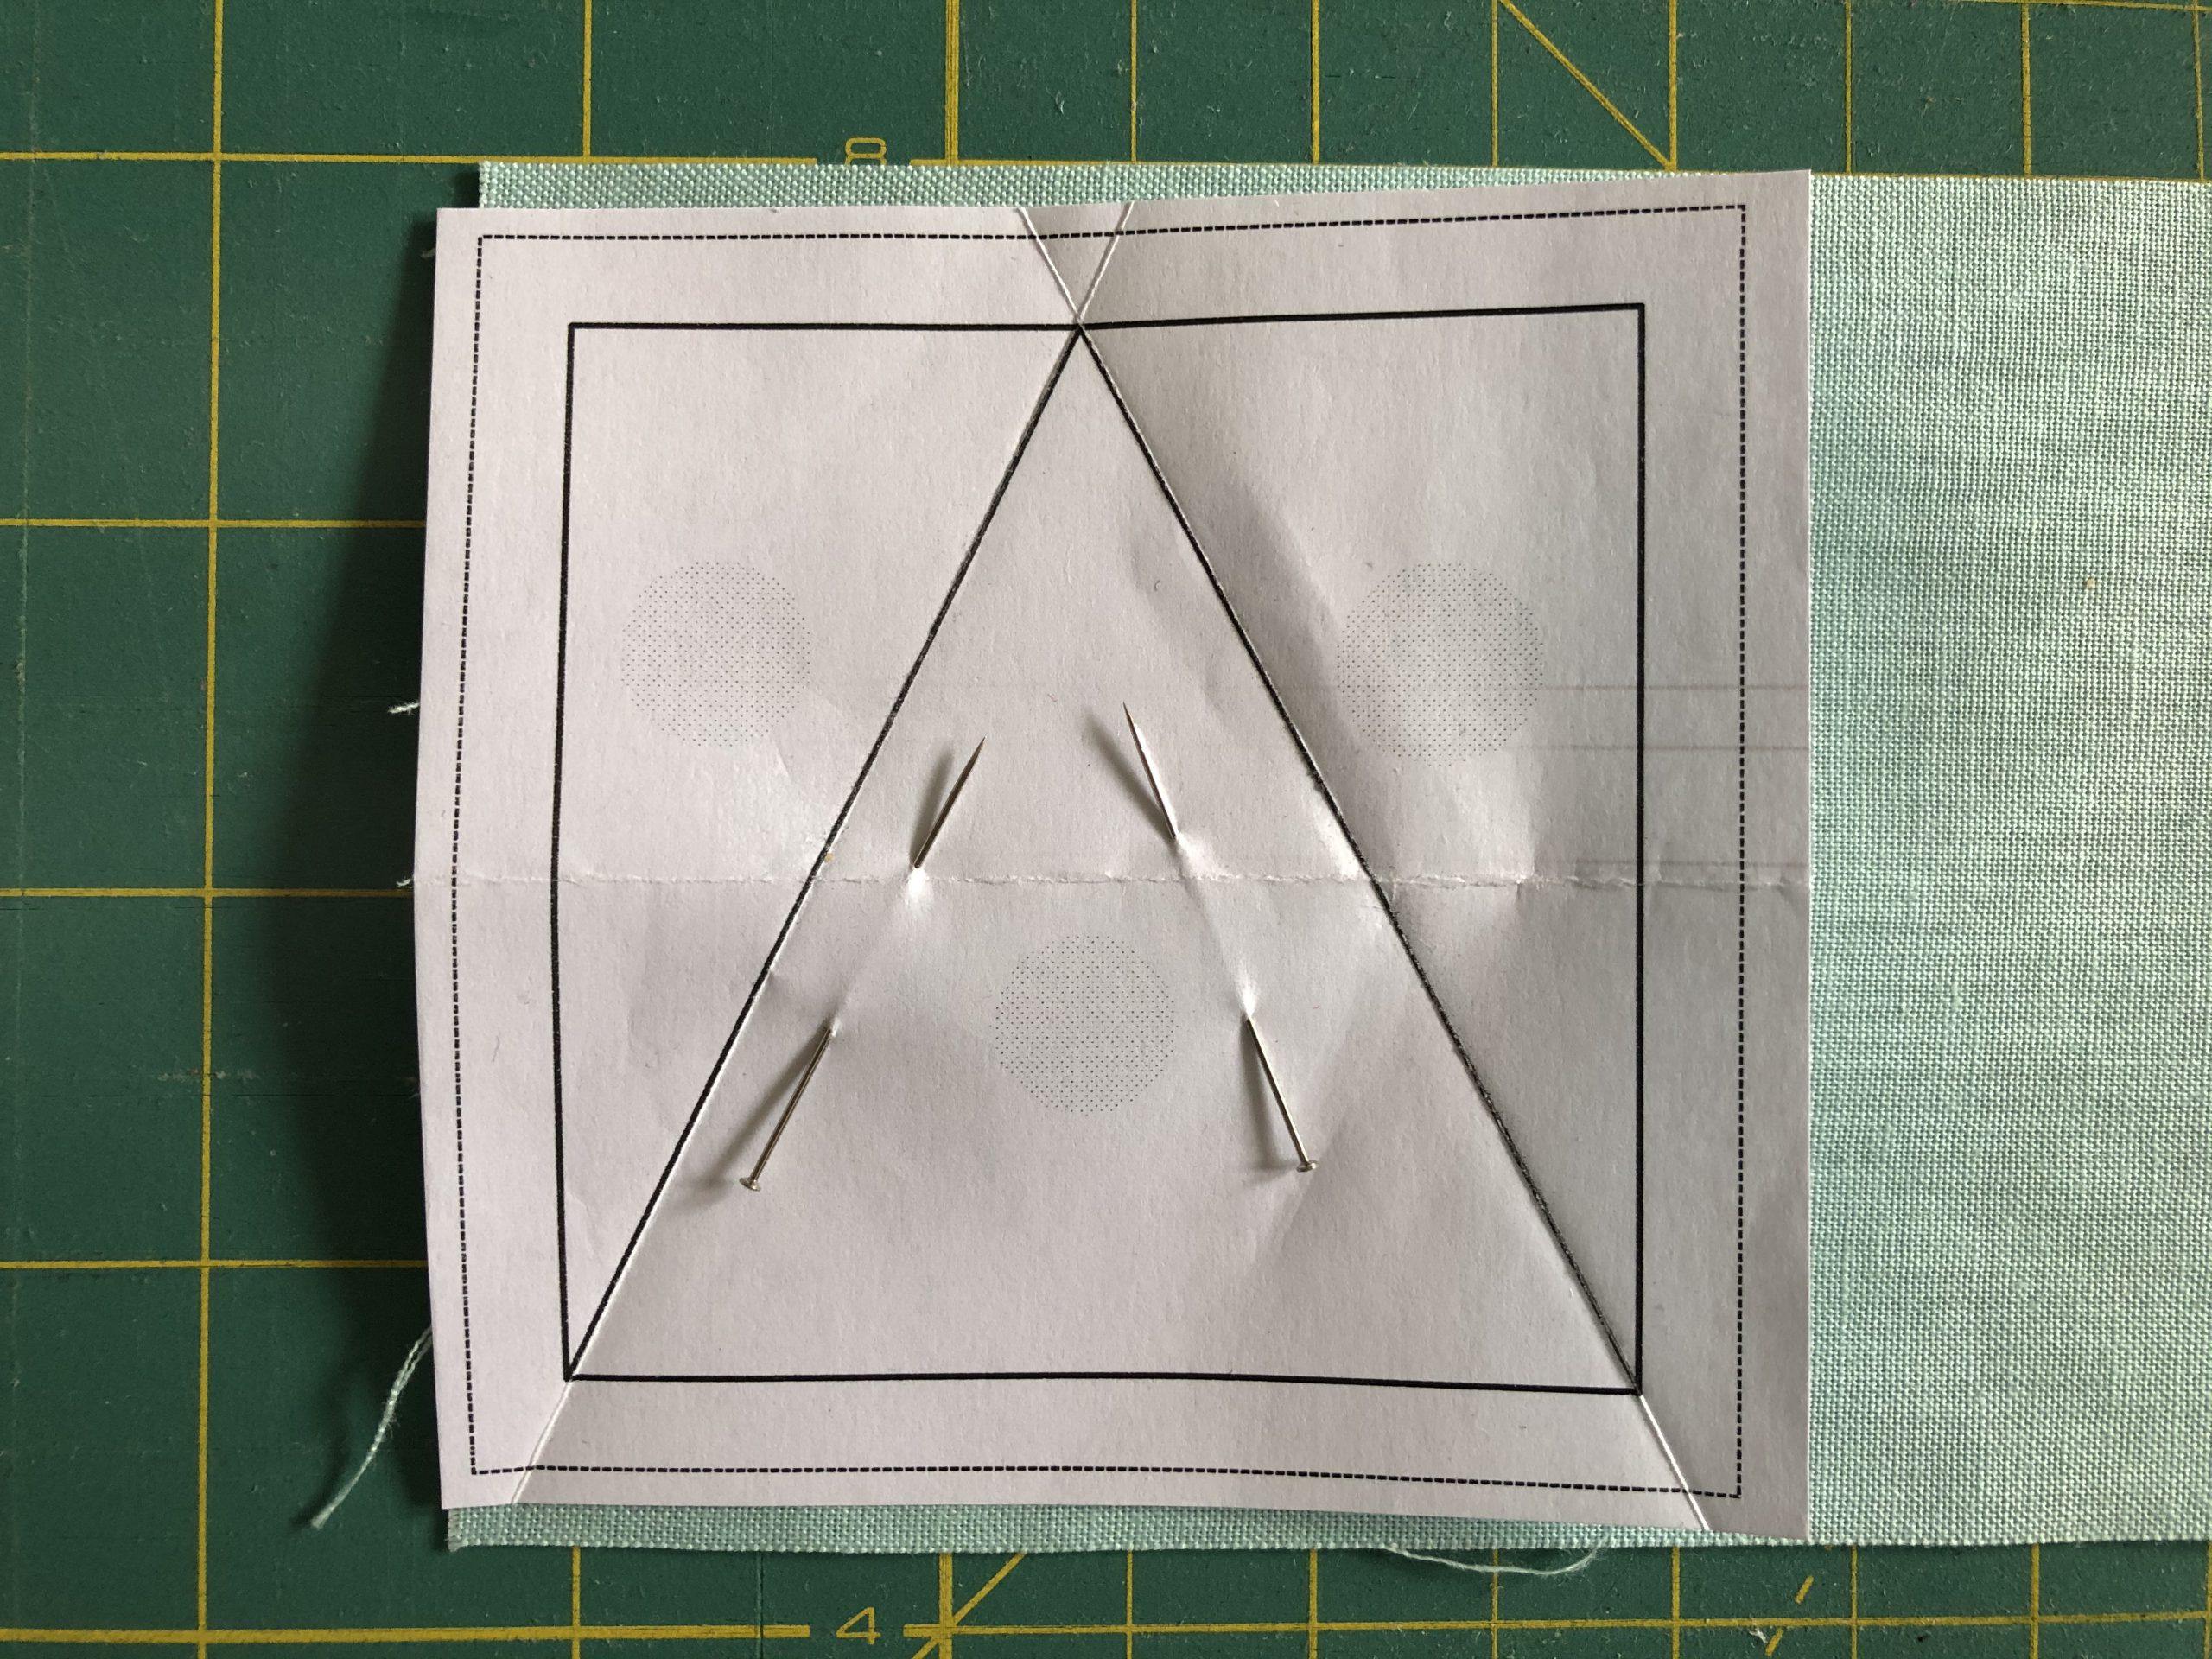
Fold one side over at the fold and cut the fabric back 1/4″ from the folded edge. The 1/4 inch is the seam allowance that you will need later!

Then fold the other side over and also cut the fabric back so that the 1/4 inch seam allowance is maintained.
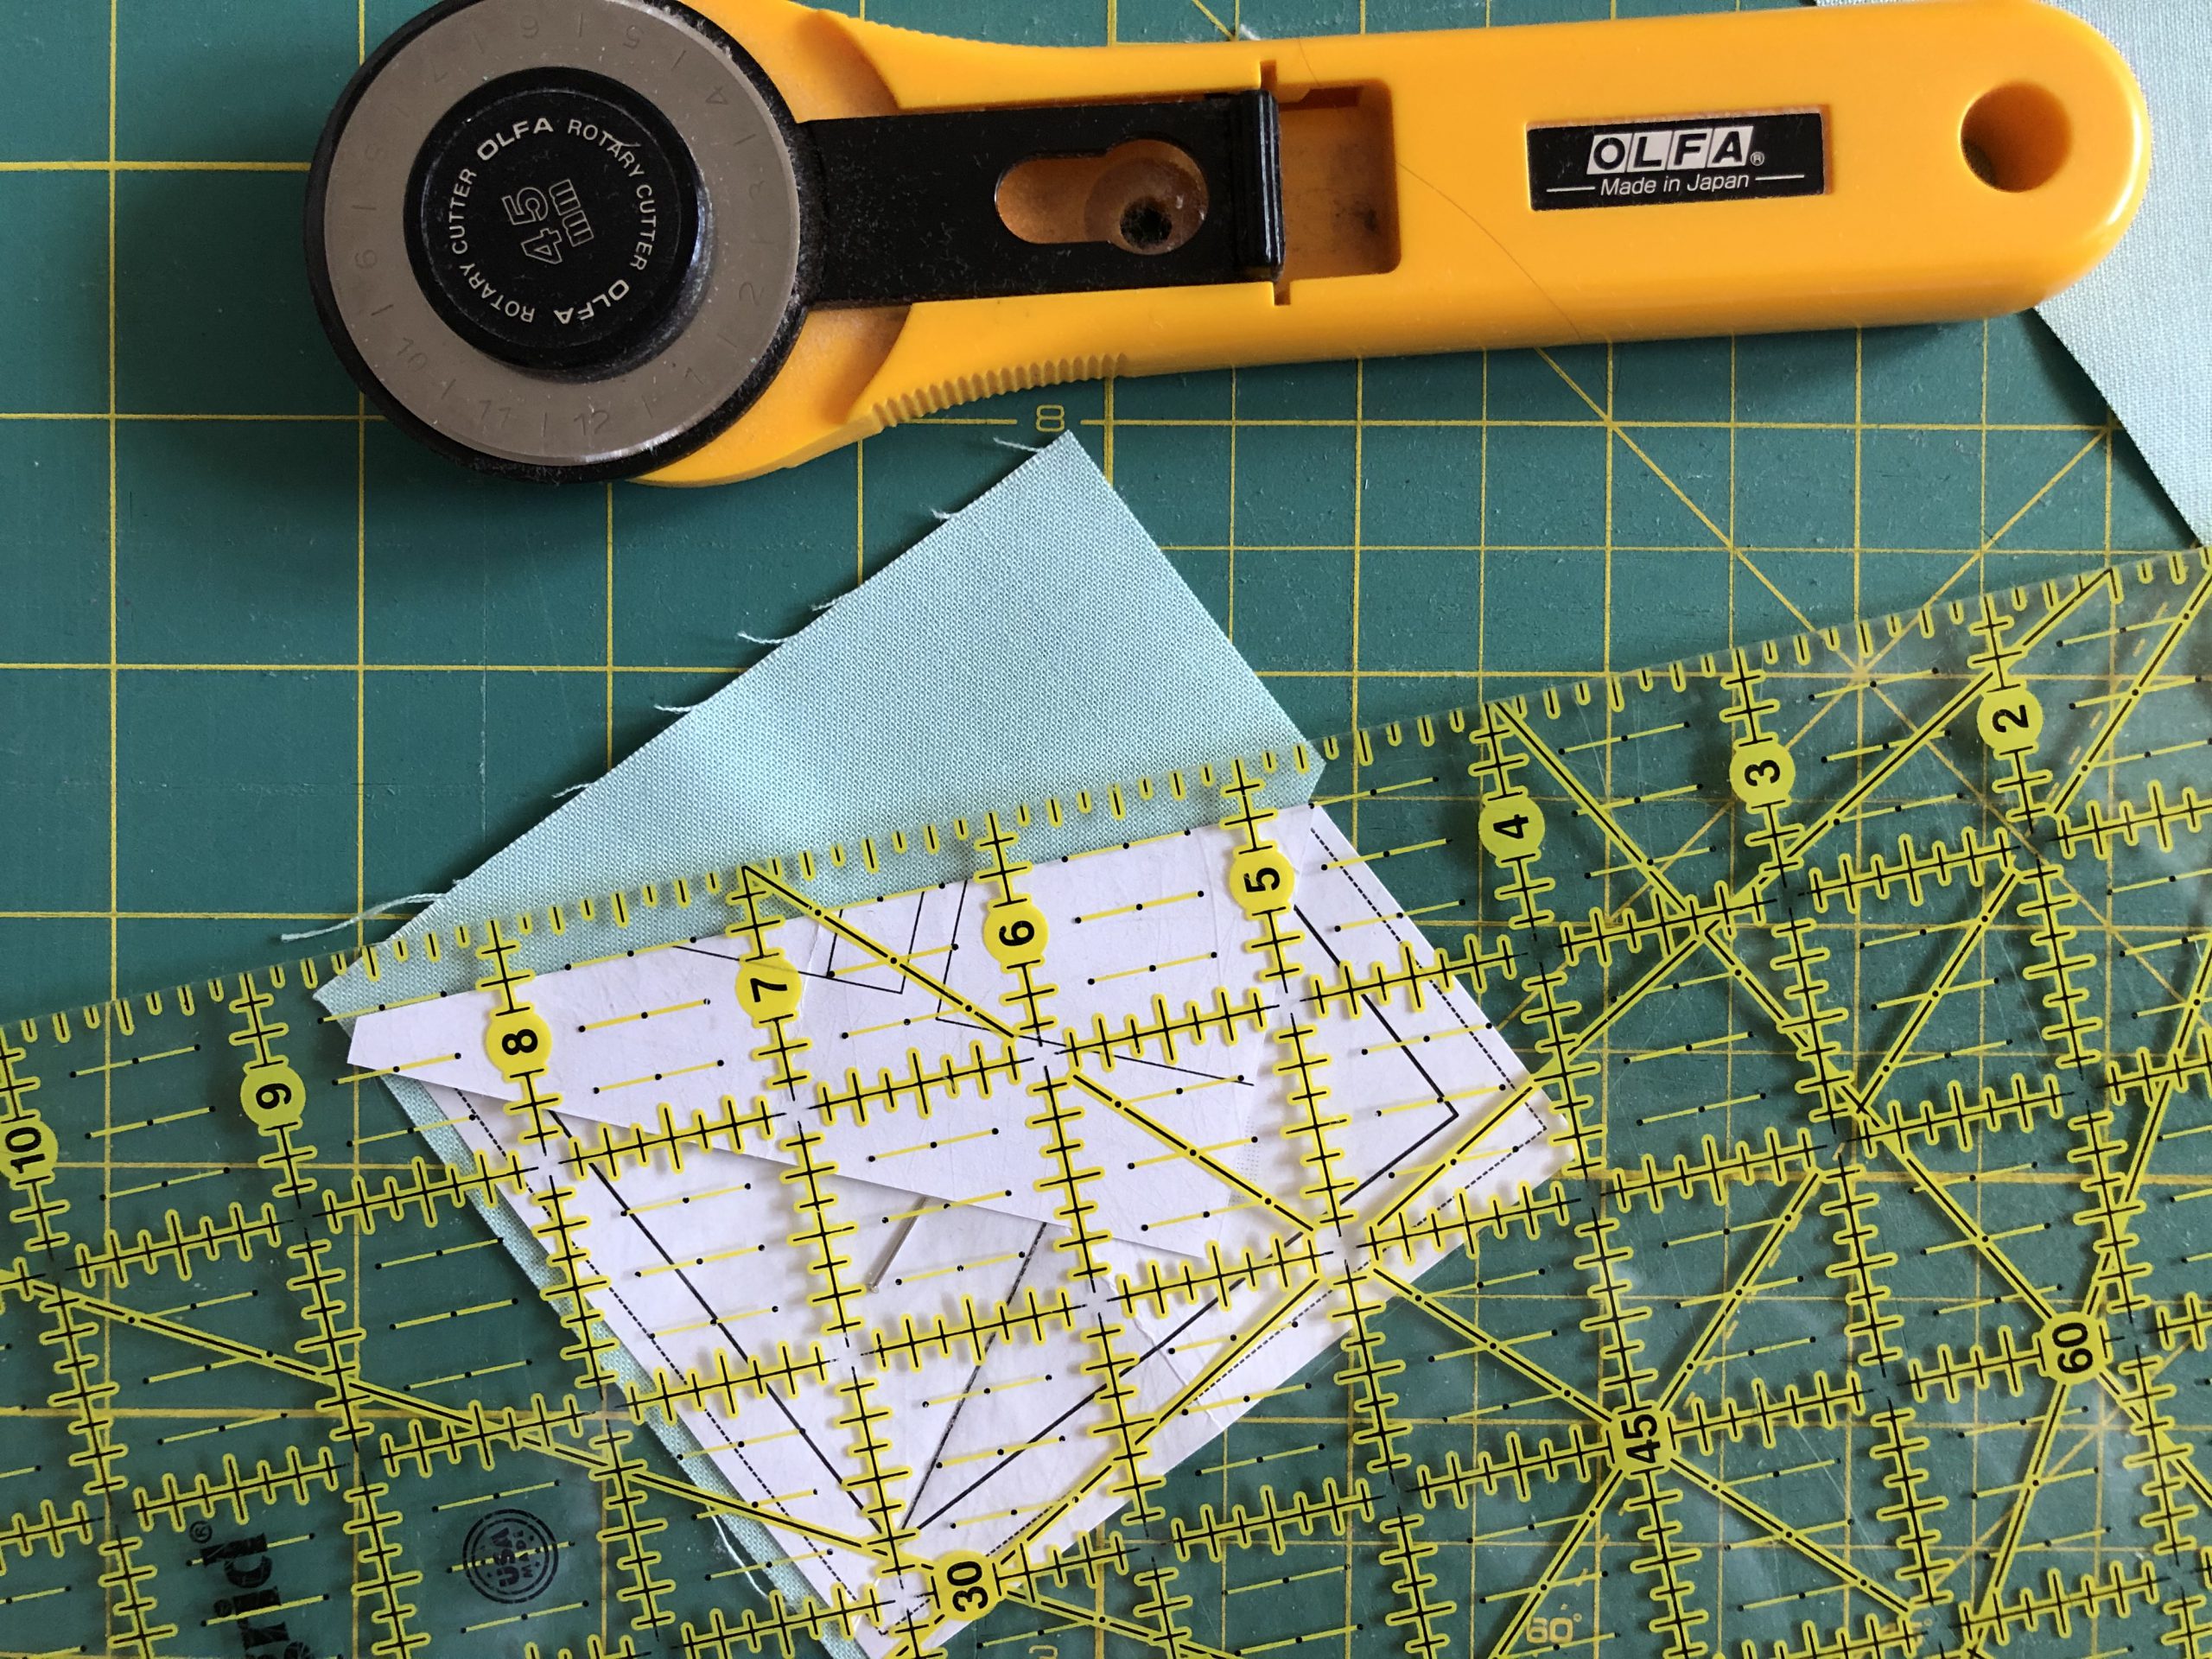
This is especially important now, and only applies if you are not using a printed sample fabric for your background:
Cut four 3″ x 3 3/4″ rectangles. Place this rectangle on your cutting mat (as shown) longitudinally:
Measure 1/2″ from the top left edge and mark this on the fabric. Do the same from your lower right edge. Place your ruler along the two markings and cut through the four layers. Now you have eight triangles.
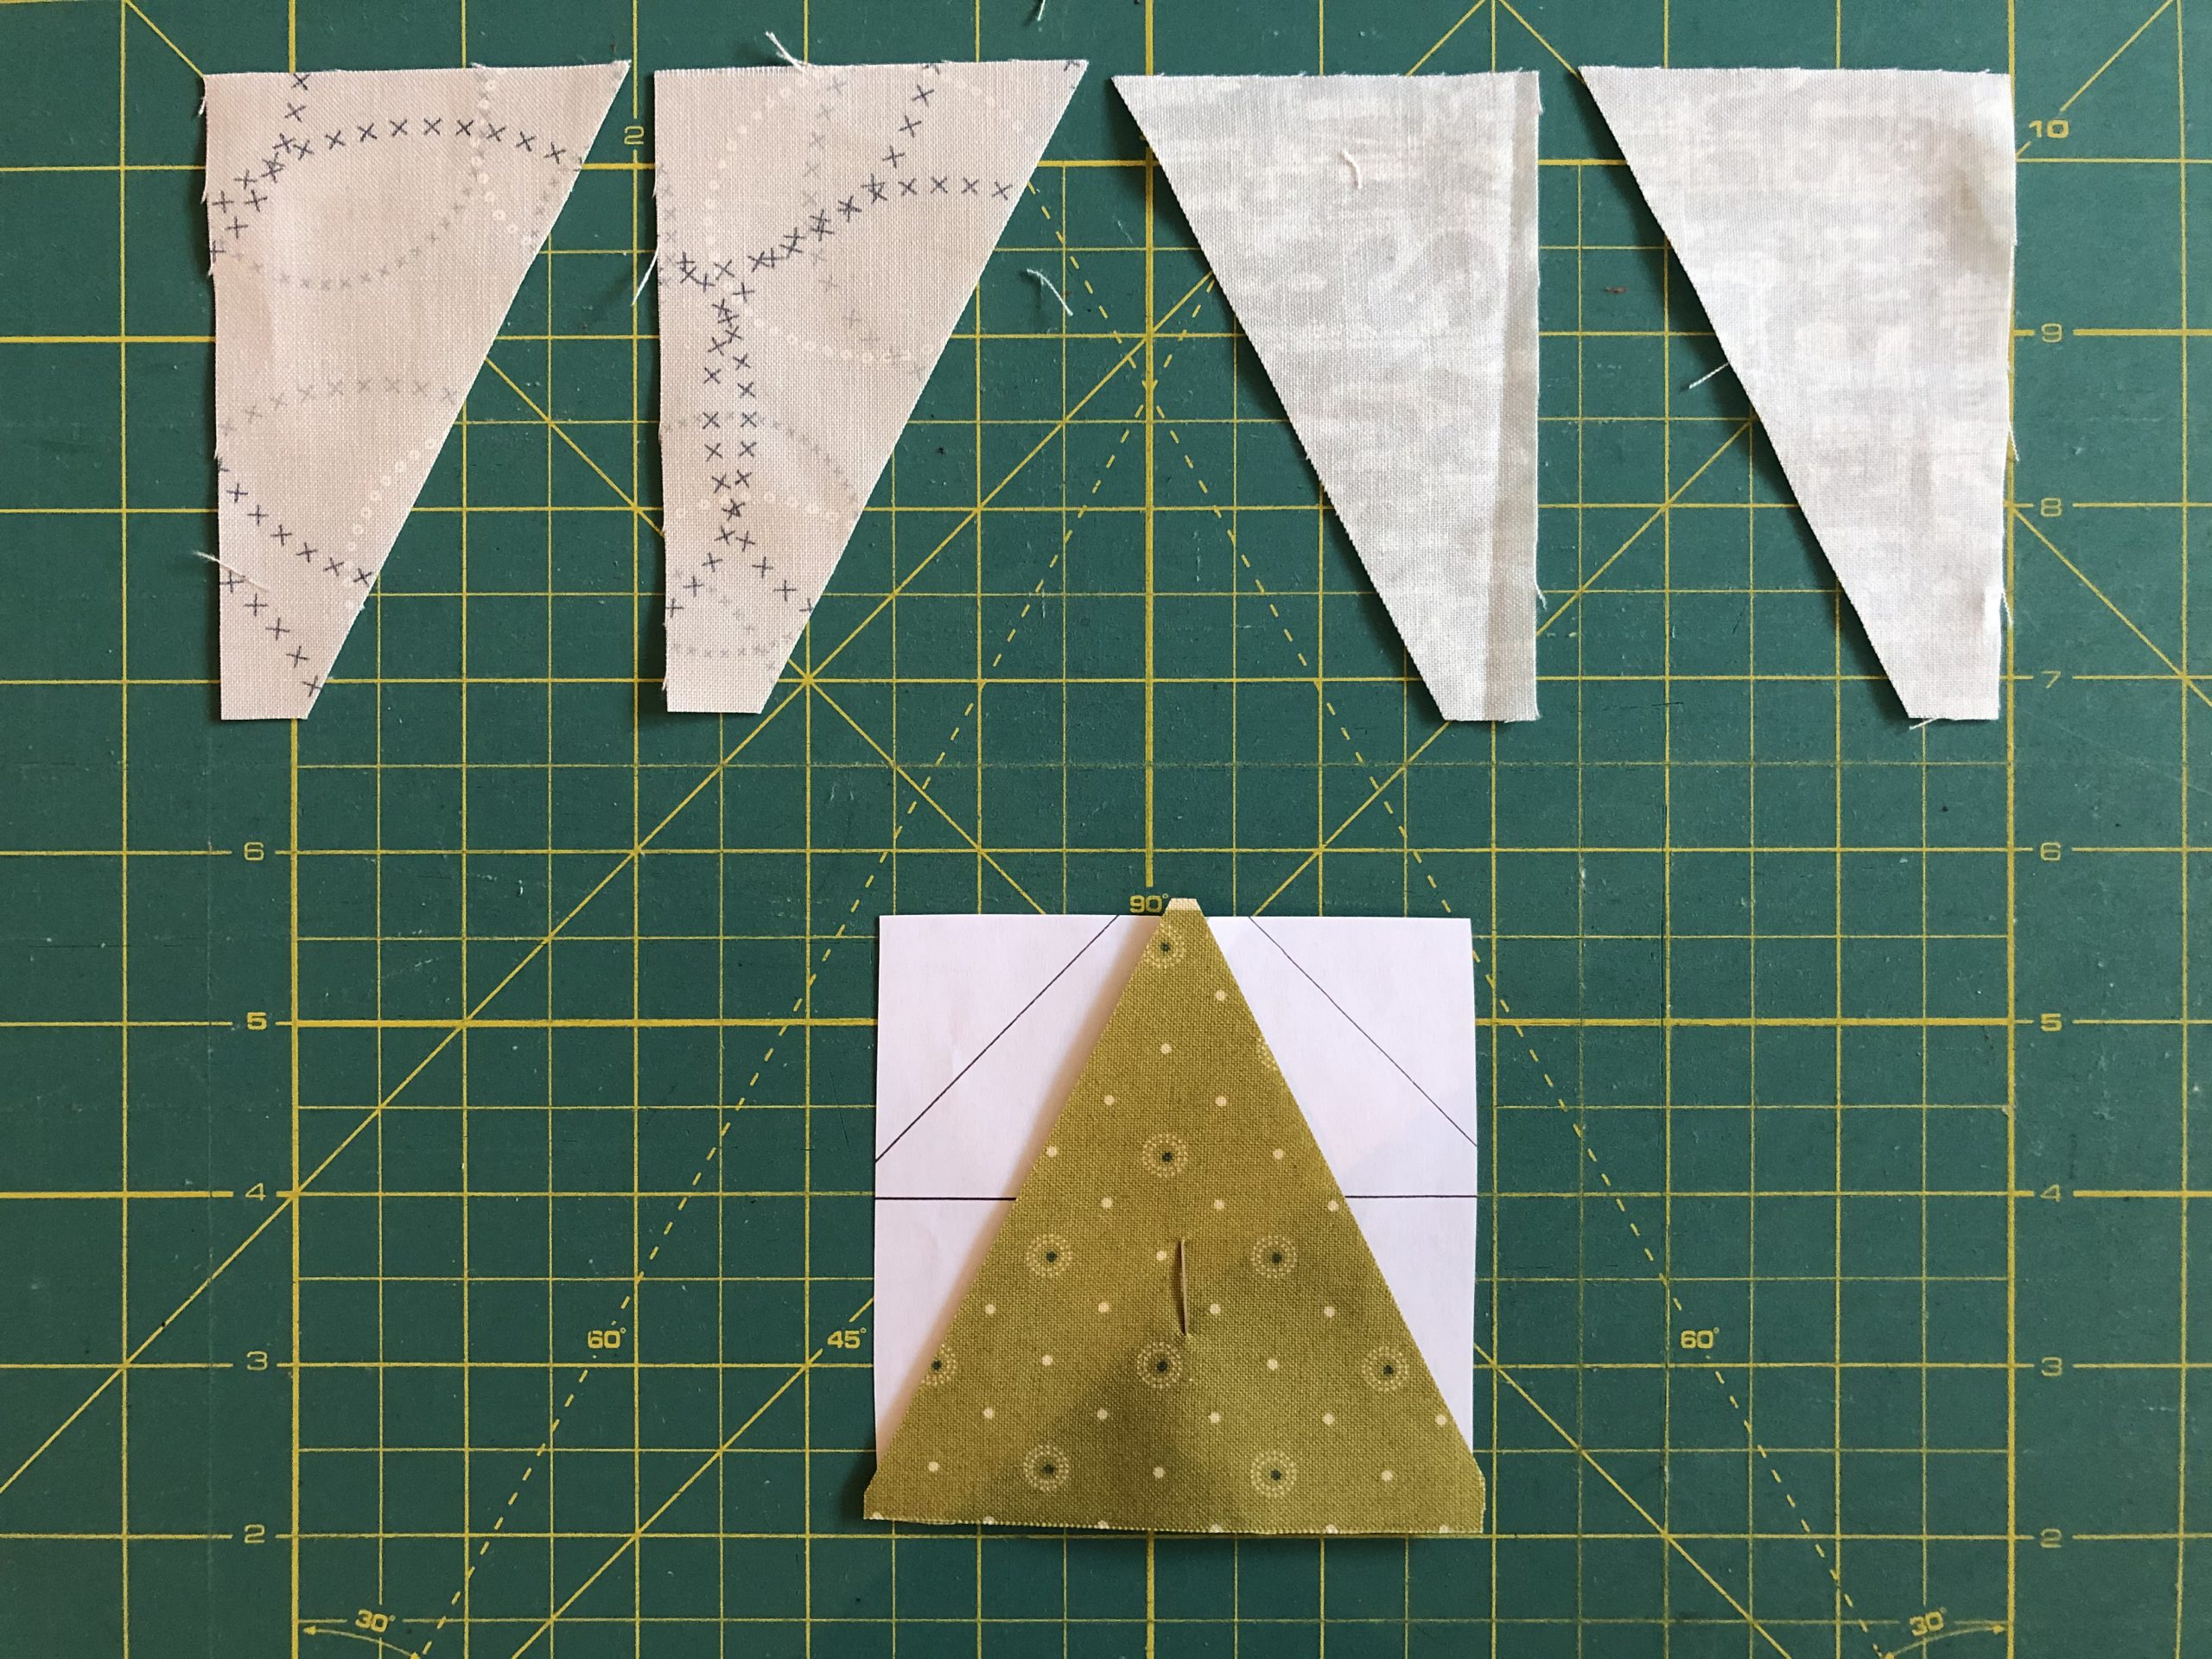
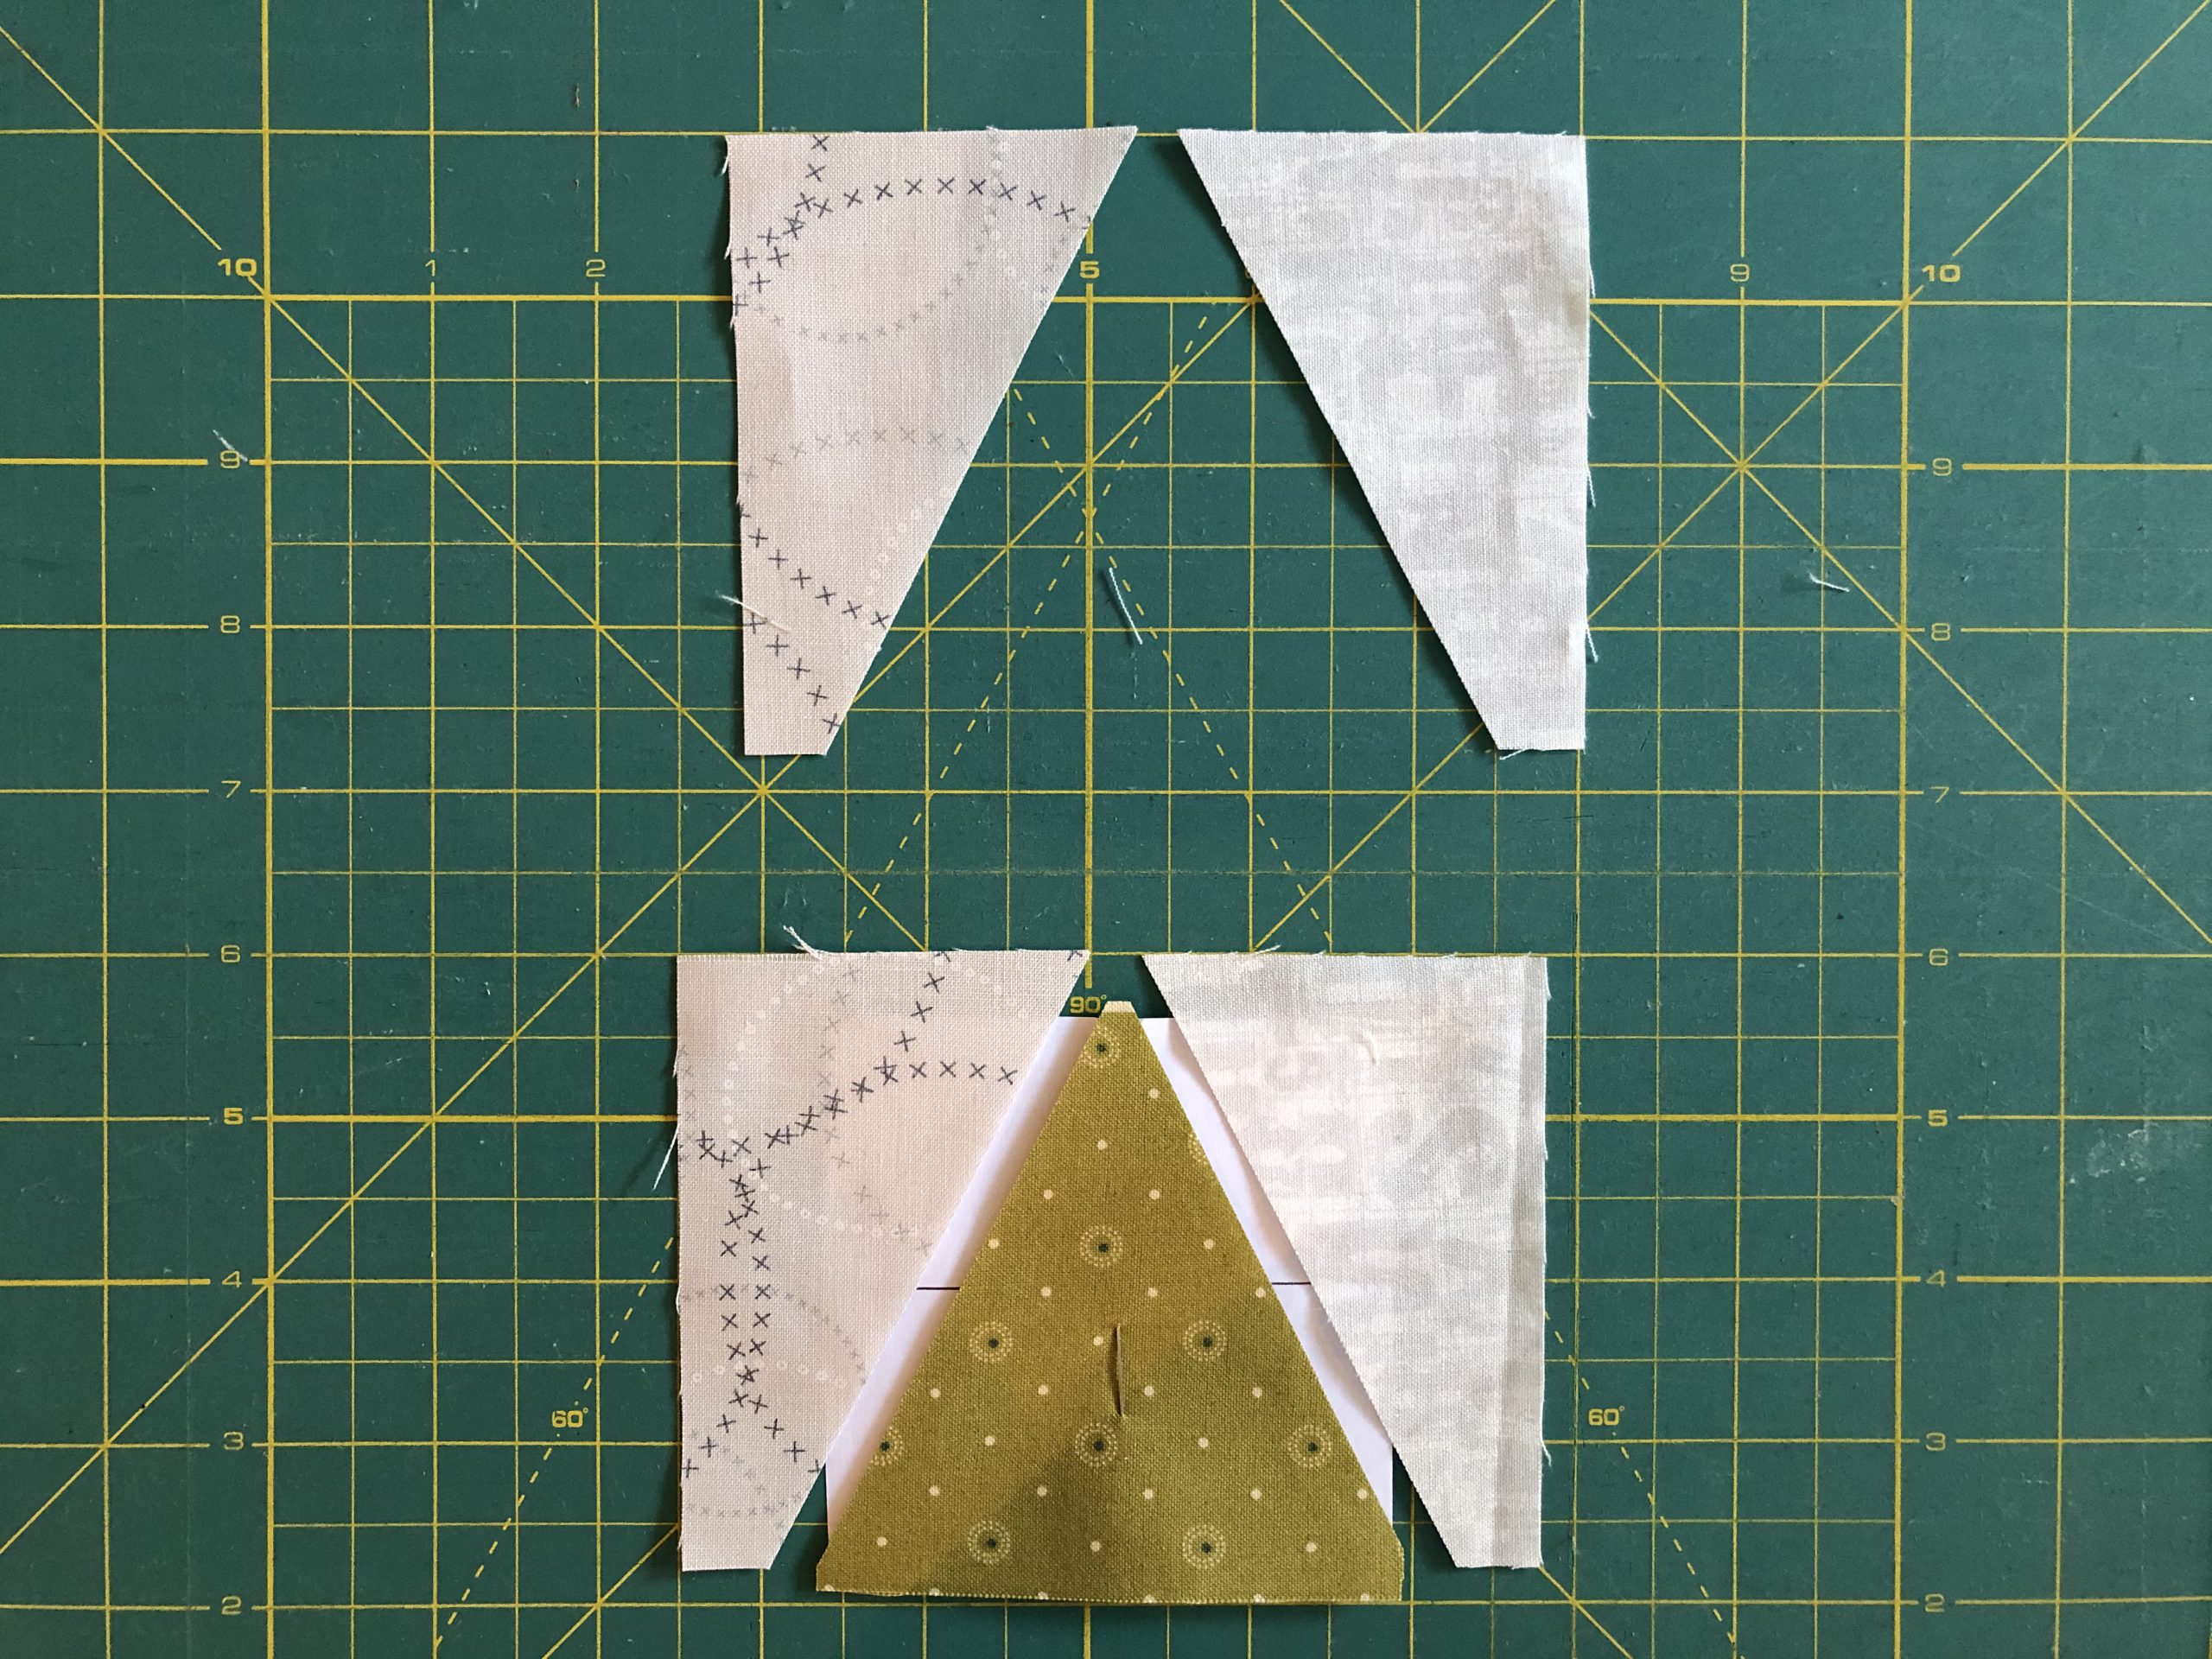
In the next step, place the triangle of the cut edge along the edge of the large triangle.
Now sew along the line from the paper side.
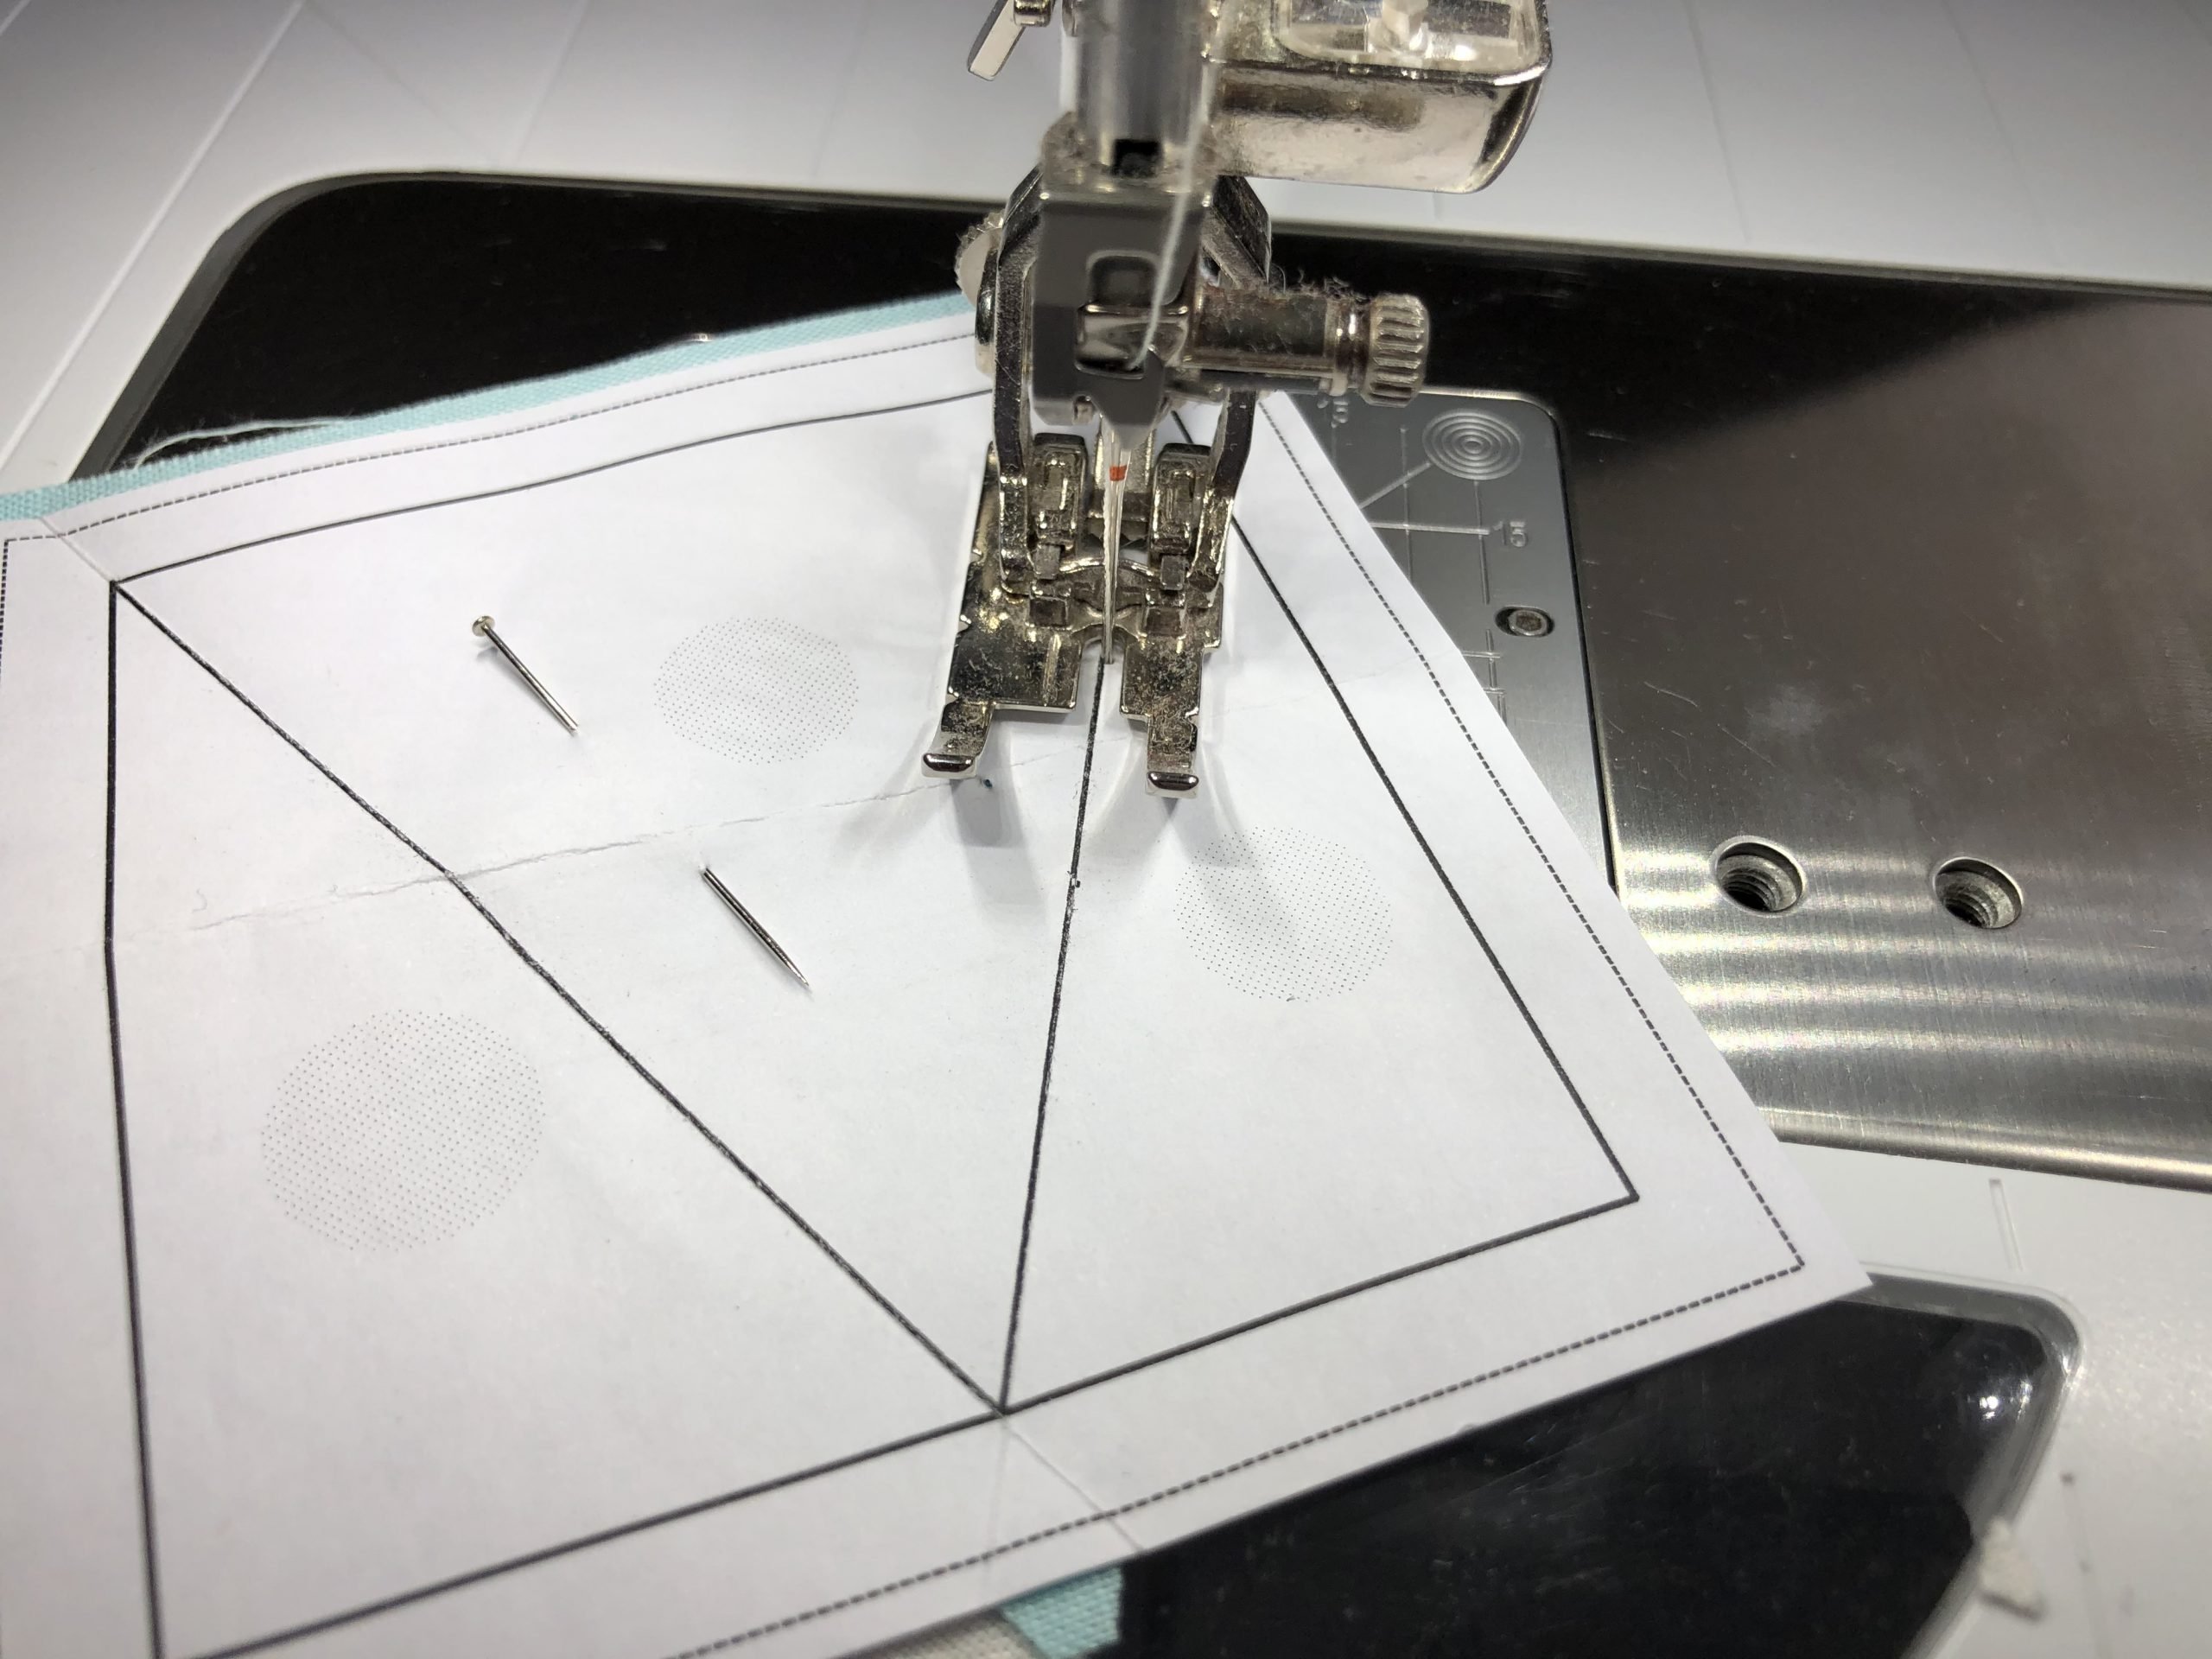
Press the seam allowance over – with FPP you cannot iron the seam allowance apart, at least at this stage. Then, on the other side, place the fabric on the cut edge as shown in the picture…
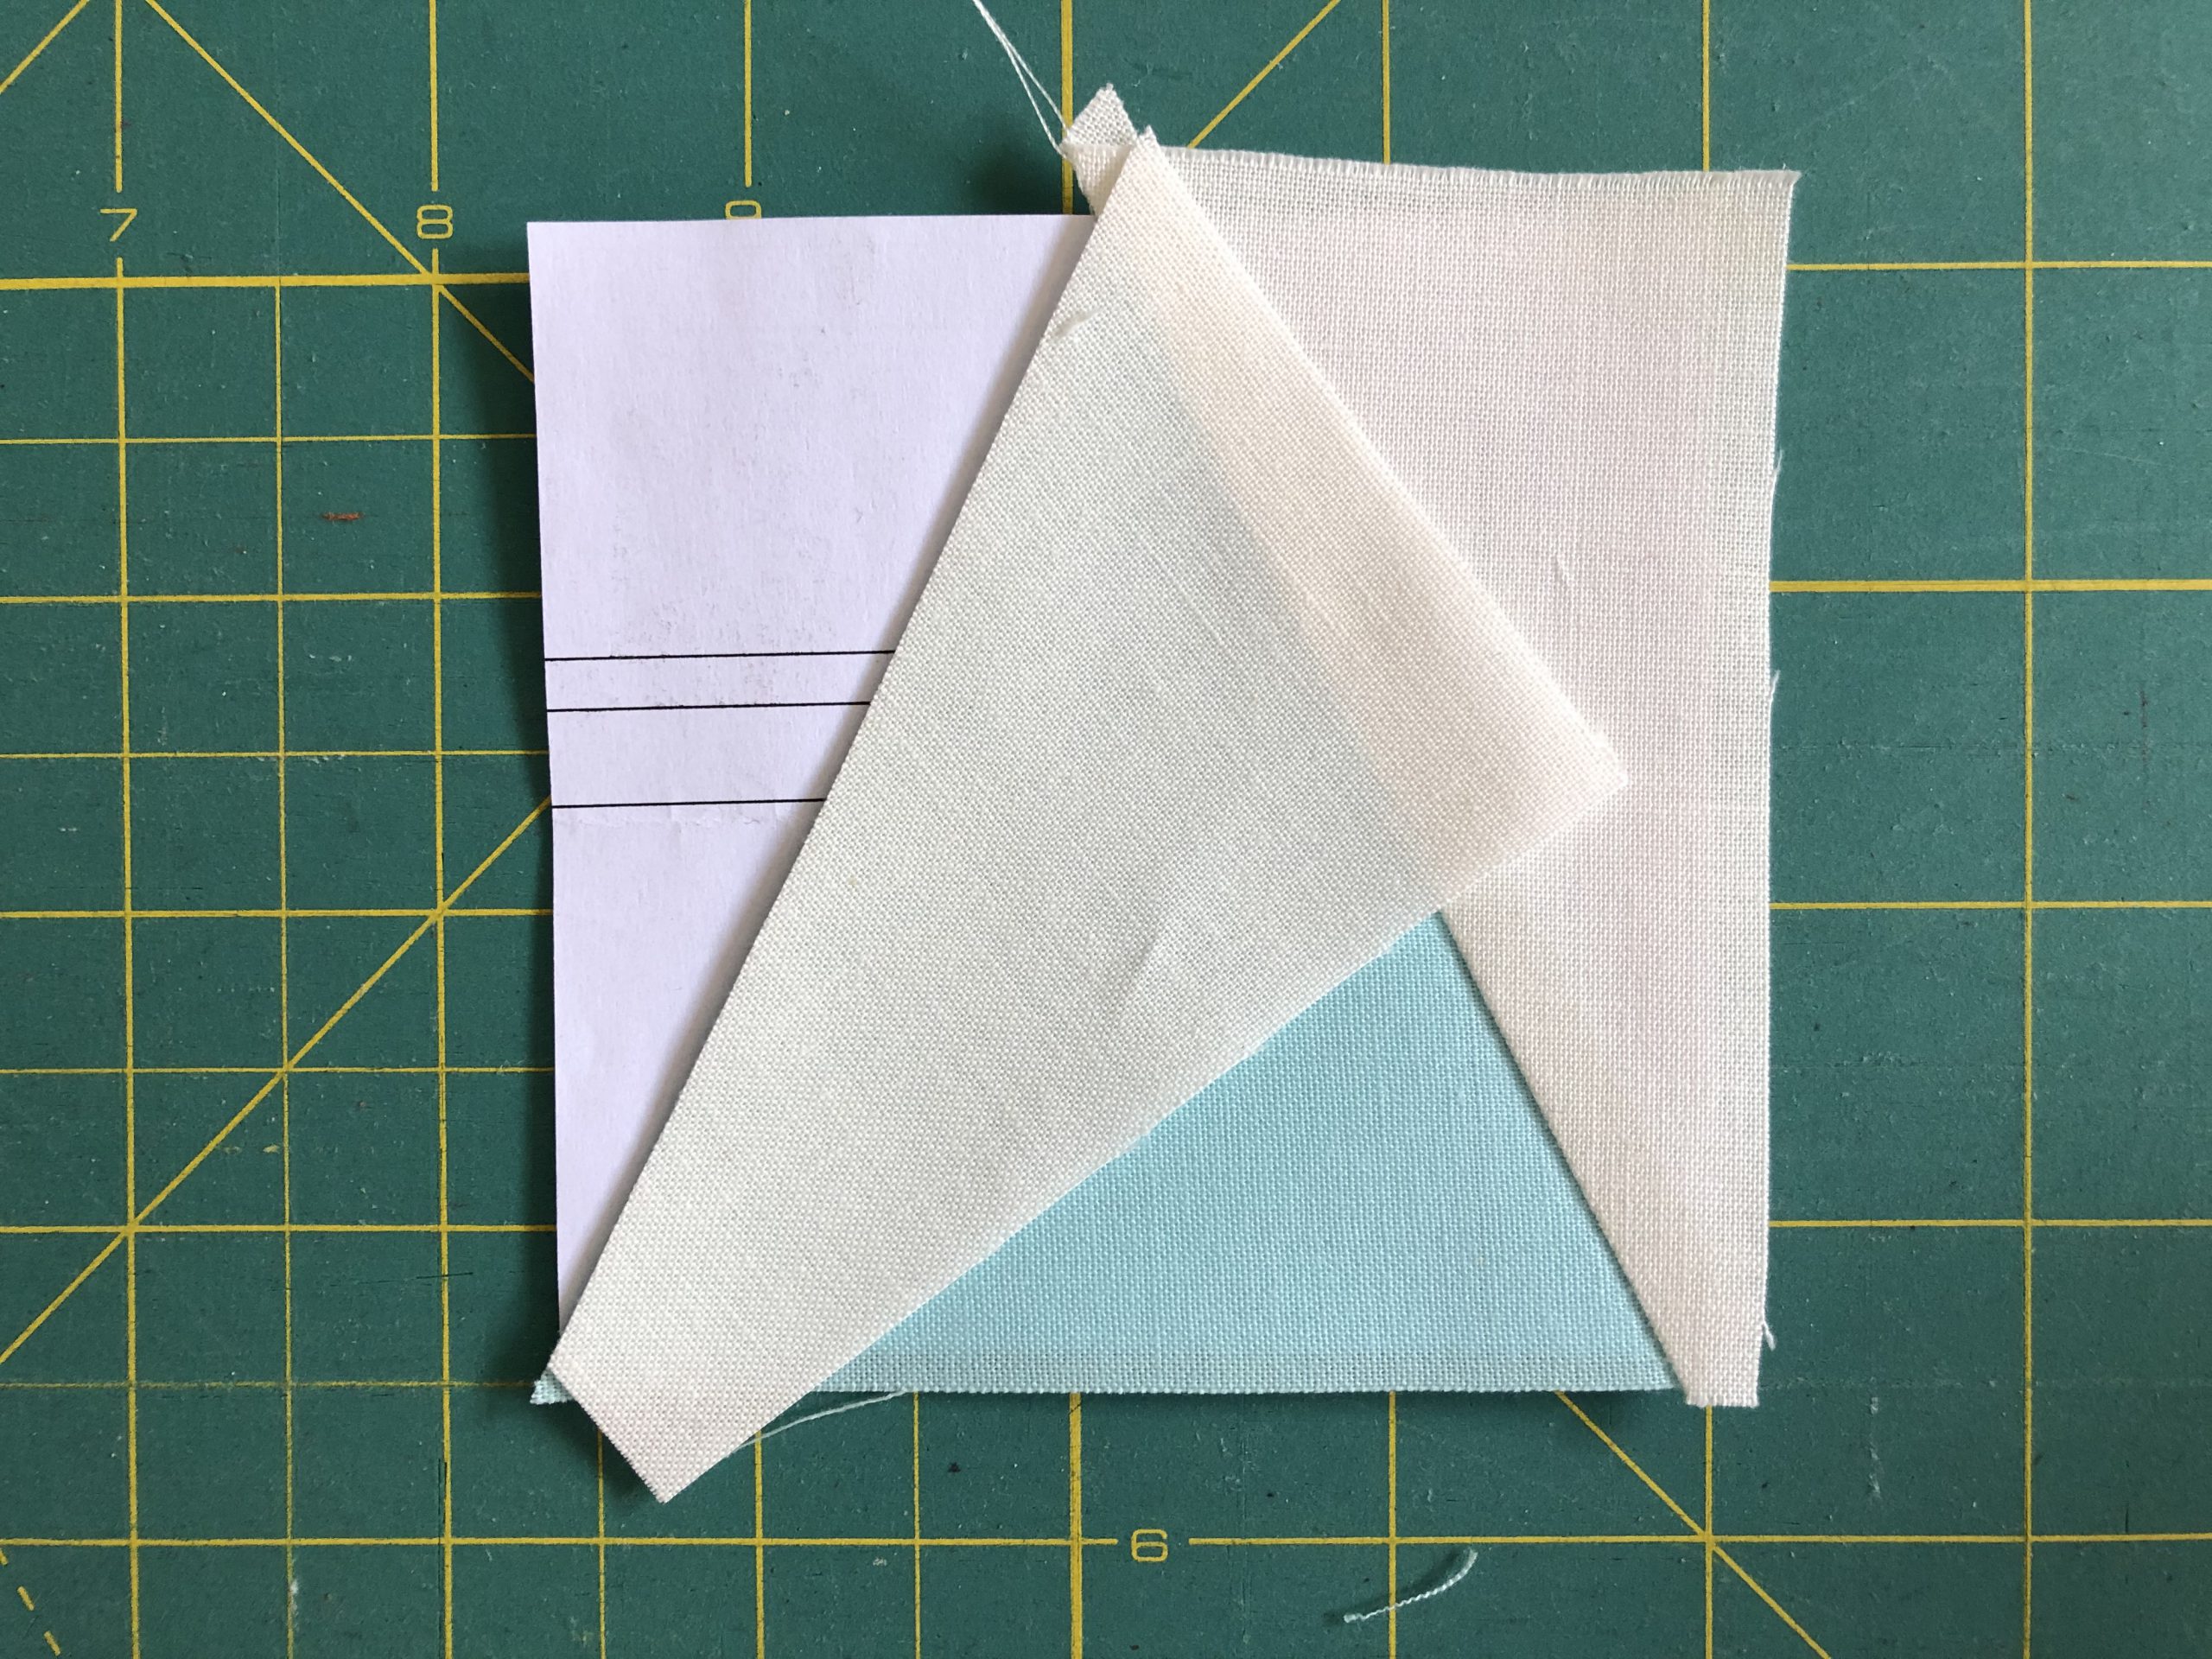
… turn to the paper side and sew along the line. Iron the seam allowance here as well.
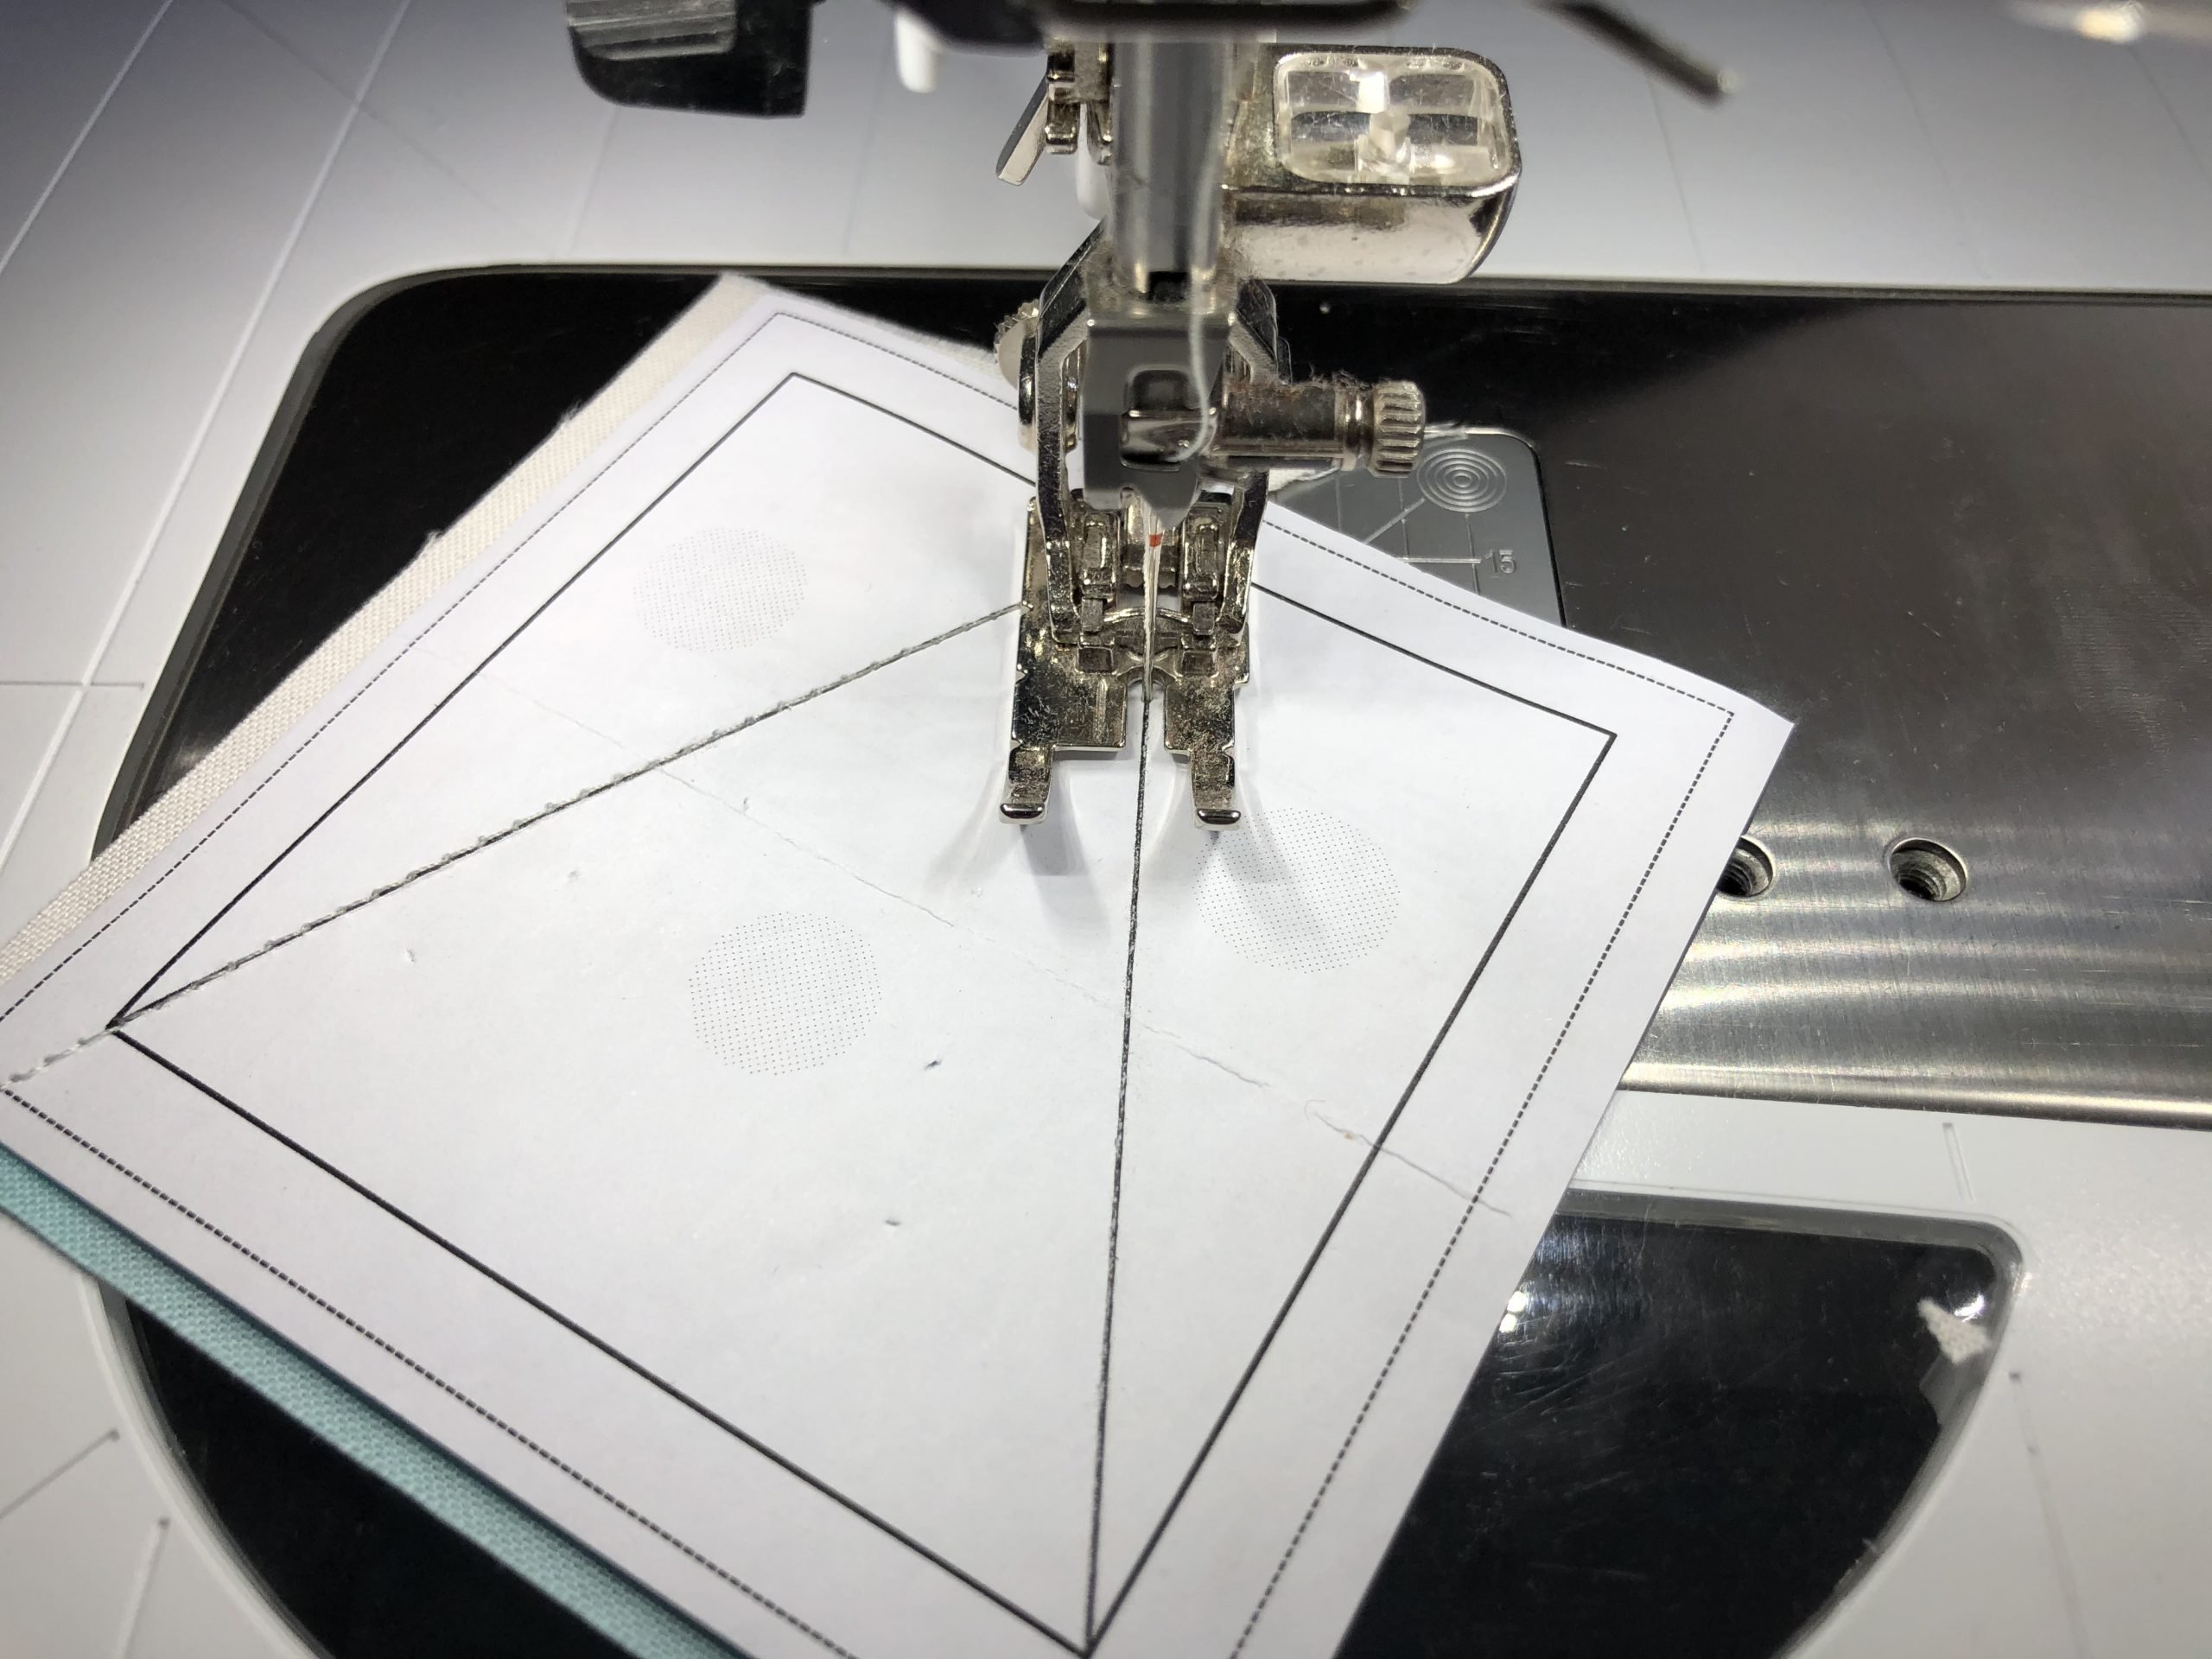
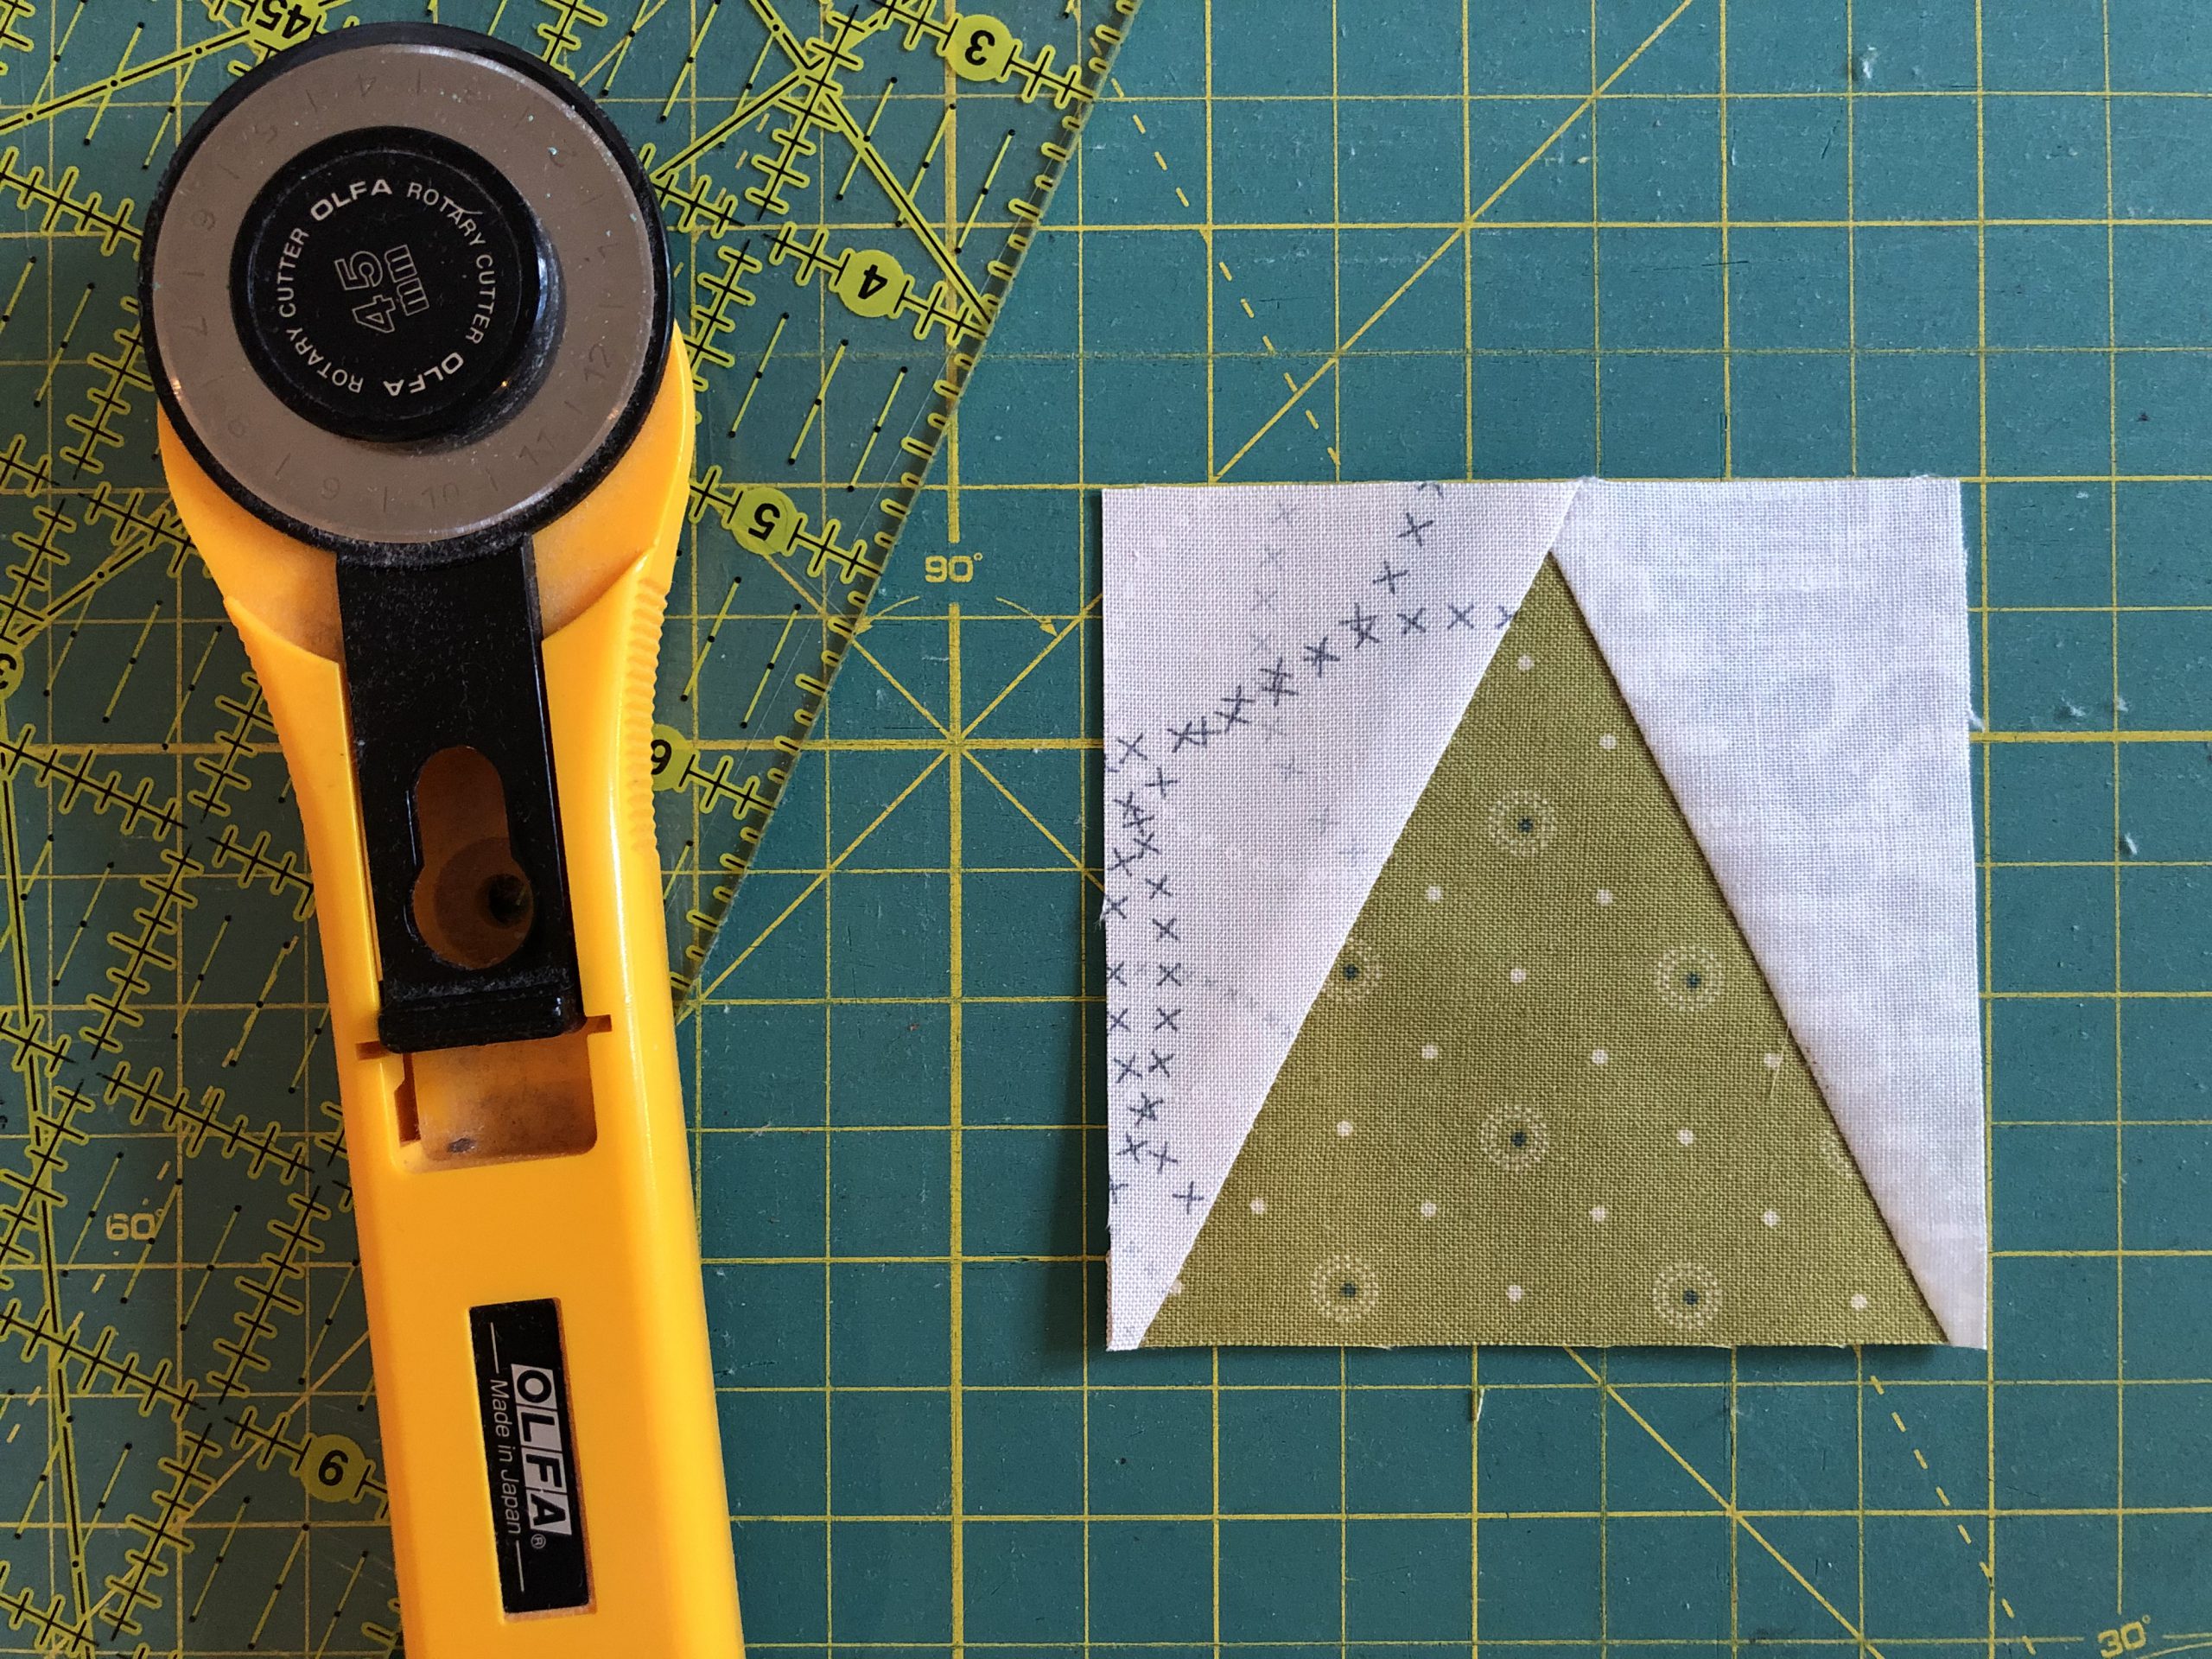
When you have finished sewing all four FPP pieces, trim the pieces by cutting back the excess length along the dotted line. Afterwards you can carefully tear out the paper along the seam lines.
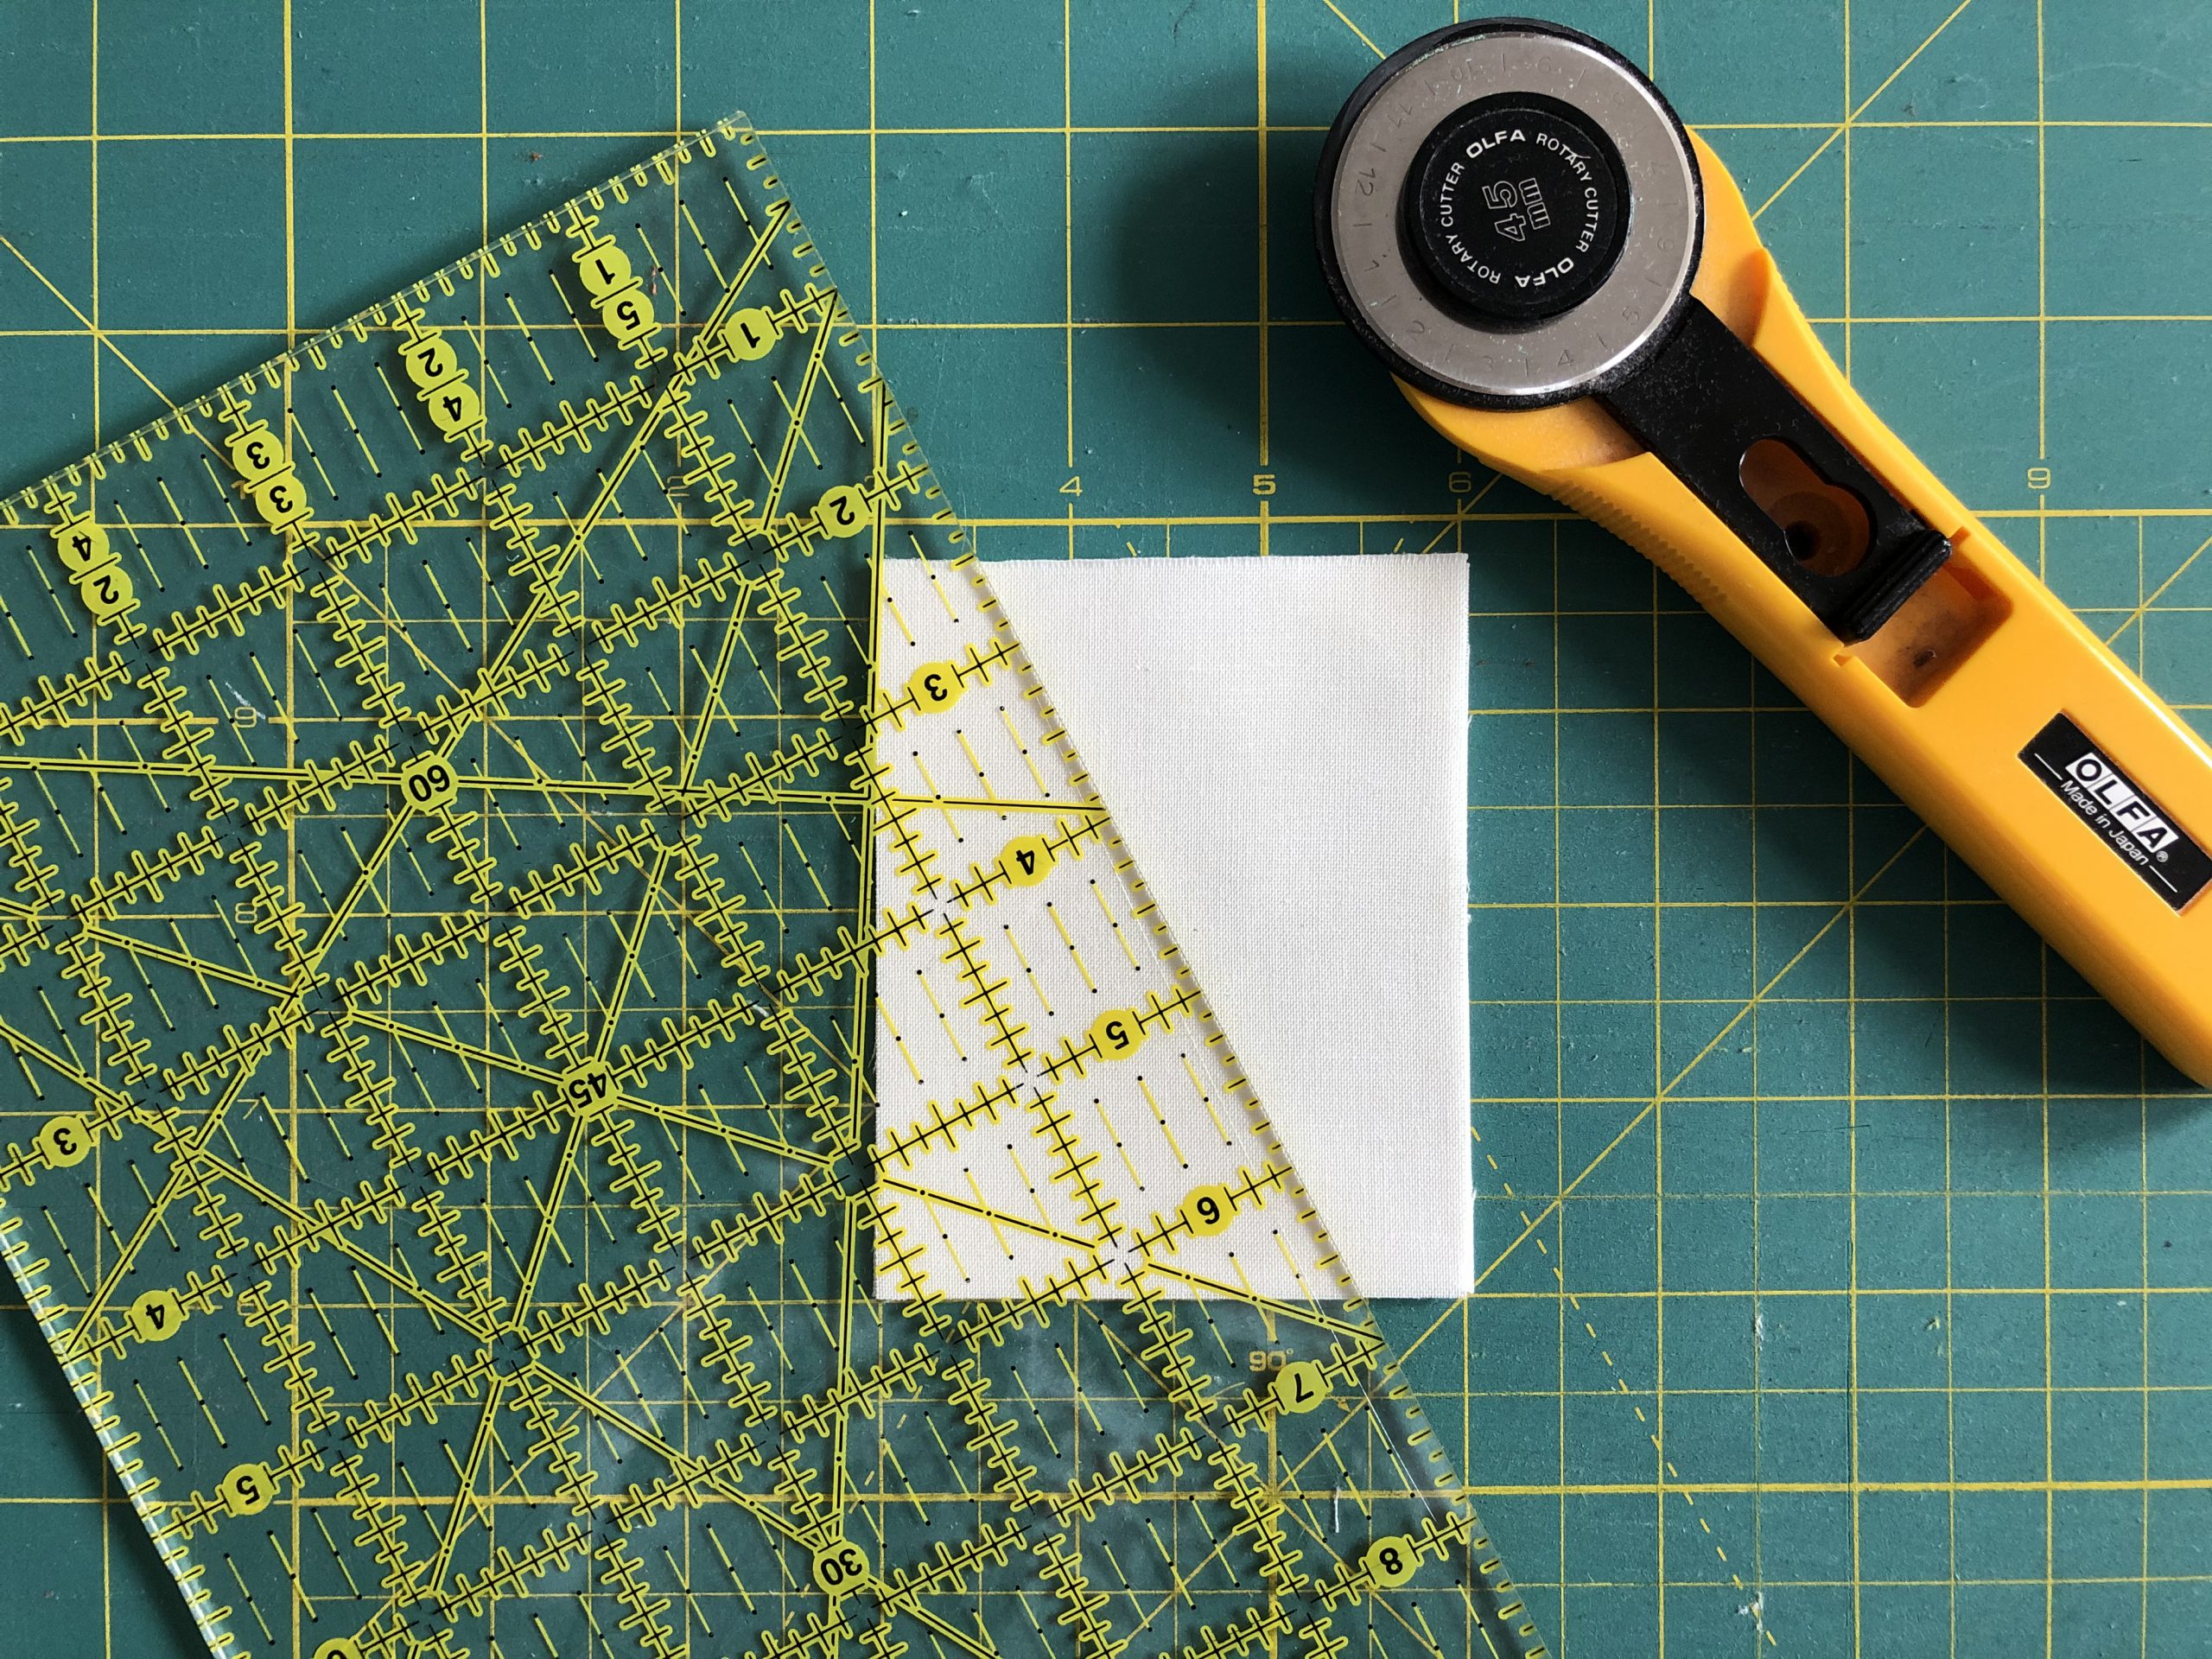
Cutting out and working on, Option B: with patterned background fabric
The technique and steps remain the same for sewing the FPP parts. A different approach is only required when cutting out the background material:
As before, cut out four 3″ x 3 3/4″ rectangles to start. Then lay two rectangles on top of each other. Cut one set from the top left to the bottom right, as mentioned in the example above. The other two rectangles have to be cut exactly the other way around, i.e. from top right to bottom left. Take a look at the picture:

As you can see in the following picture, with patterned fabrics you get two identical background triangles, depending on the direction of the cut! Therefore, for patterned fabrics, it is important to mirror the cut.
This way the two different background triangles can be used for different FPP parts.
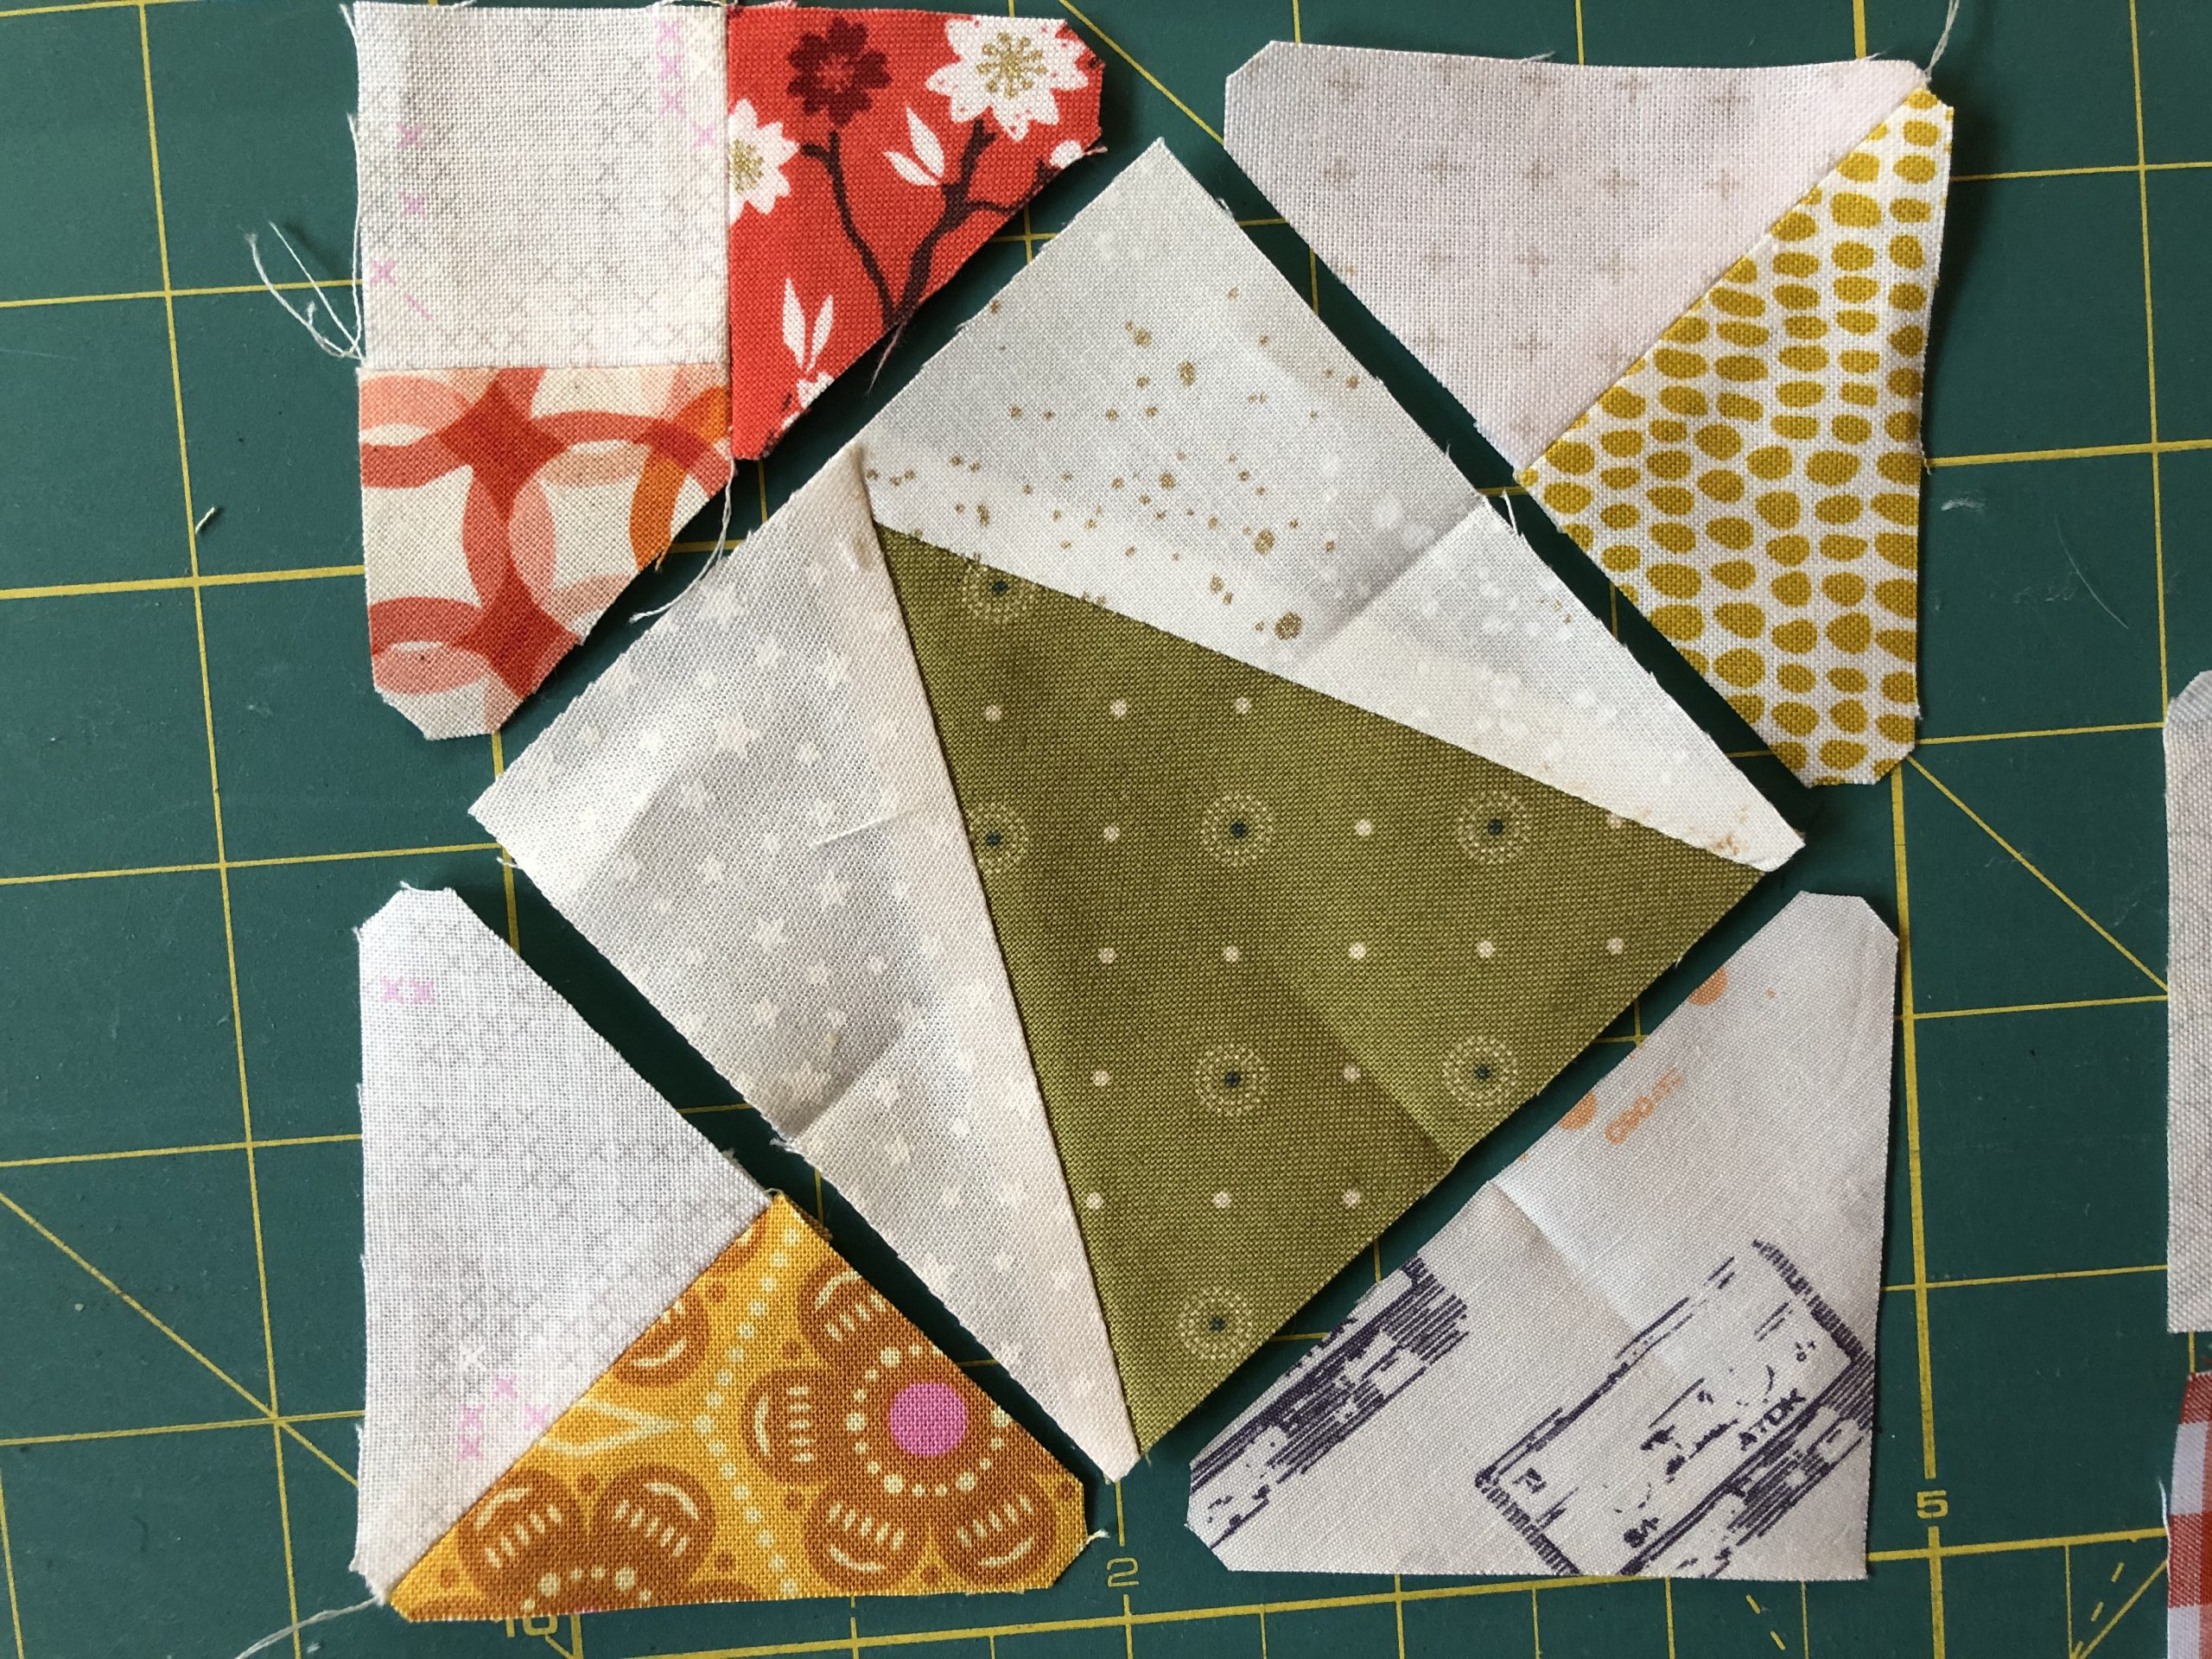
Ta-da! Your FPP part is finished. We need four of these for the Quilter’s Delight block.
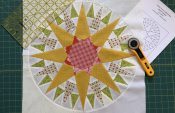
We will sew the “Quilter’s Delight” patchwork block
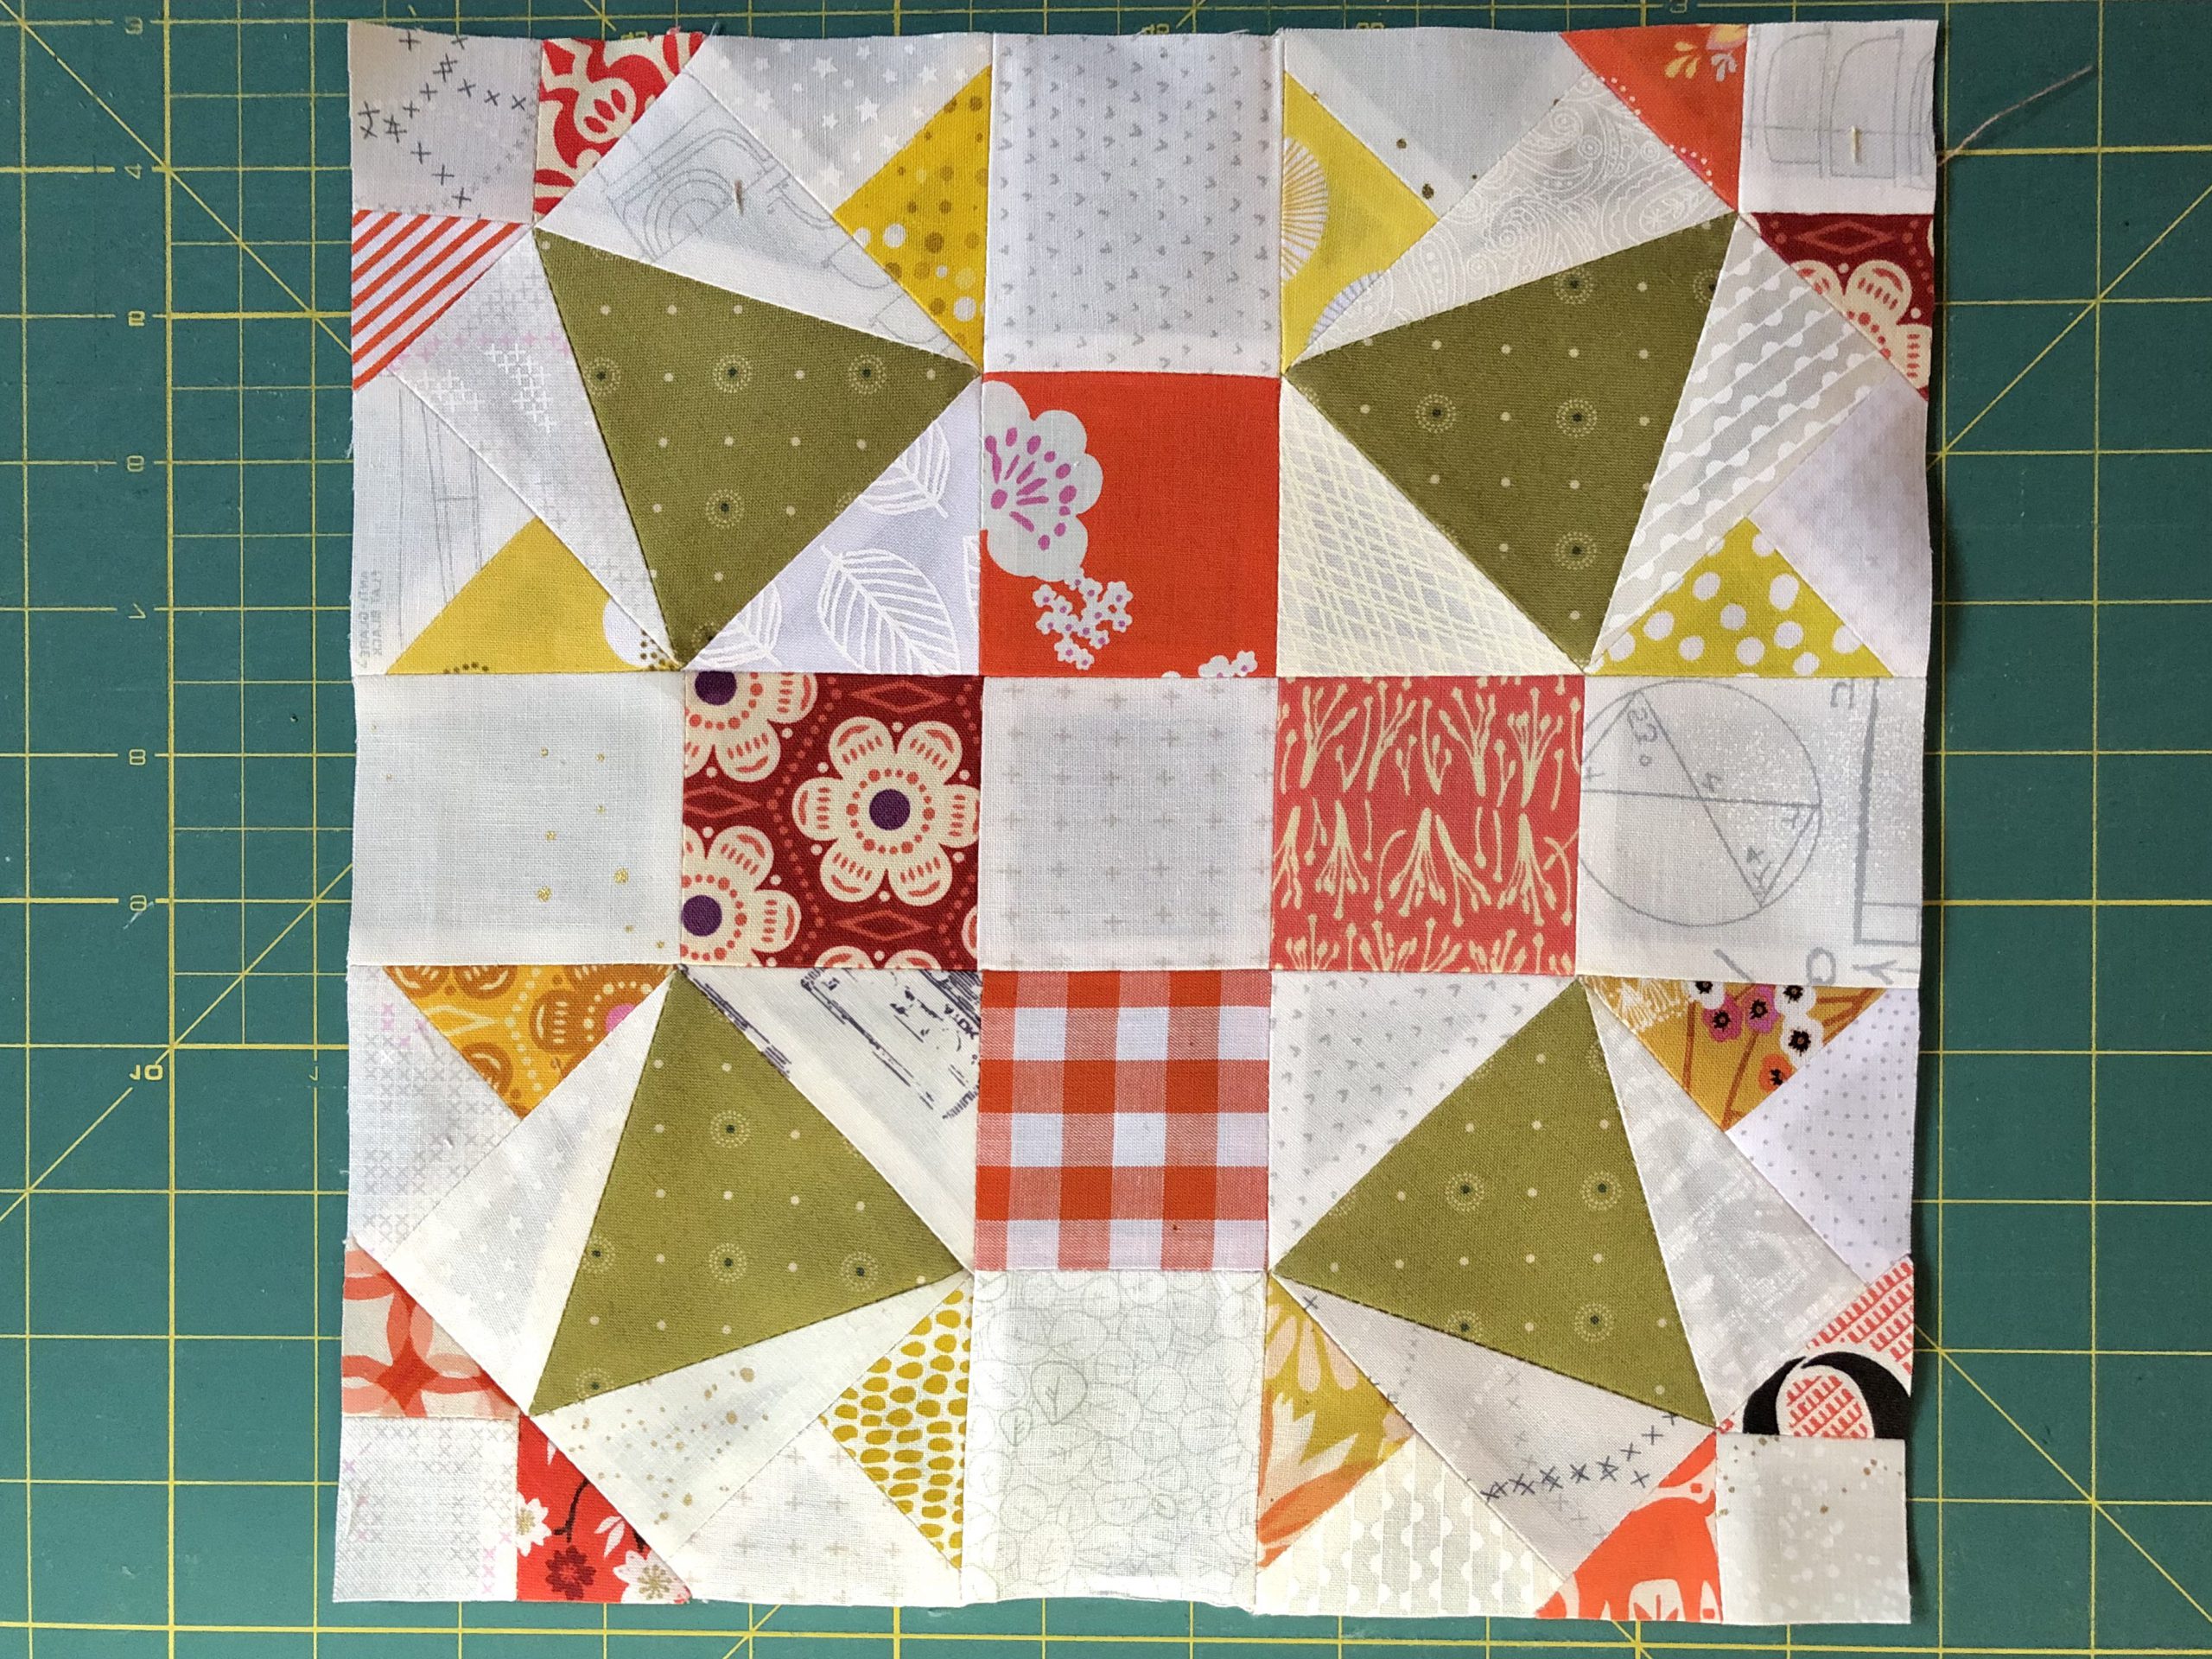
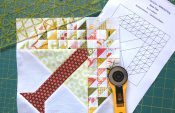
Just a note before we start: this block is smaller (10.5 inches) than the one from the first part of this quilt-along, so don’t let yourself get confused. As I already demonstrated in the last block, I lay out the cut parts in such a way that I have an overview of how, what and where the parts belong together. On the picture, you can see the already completed FPP parts in their position:
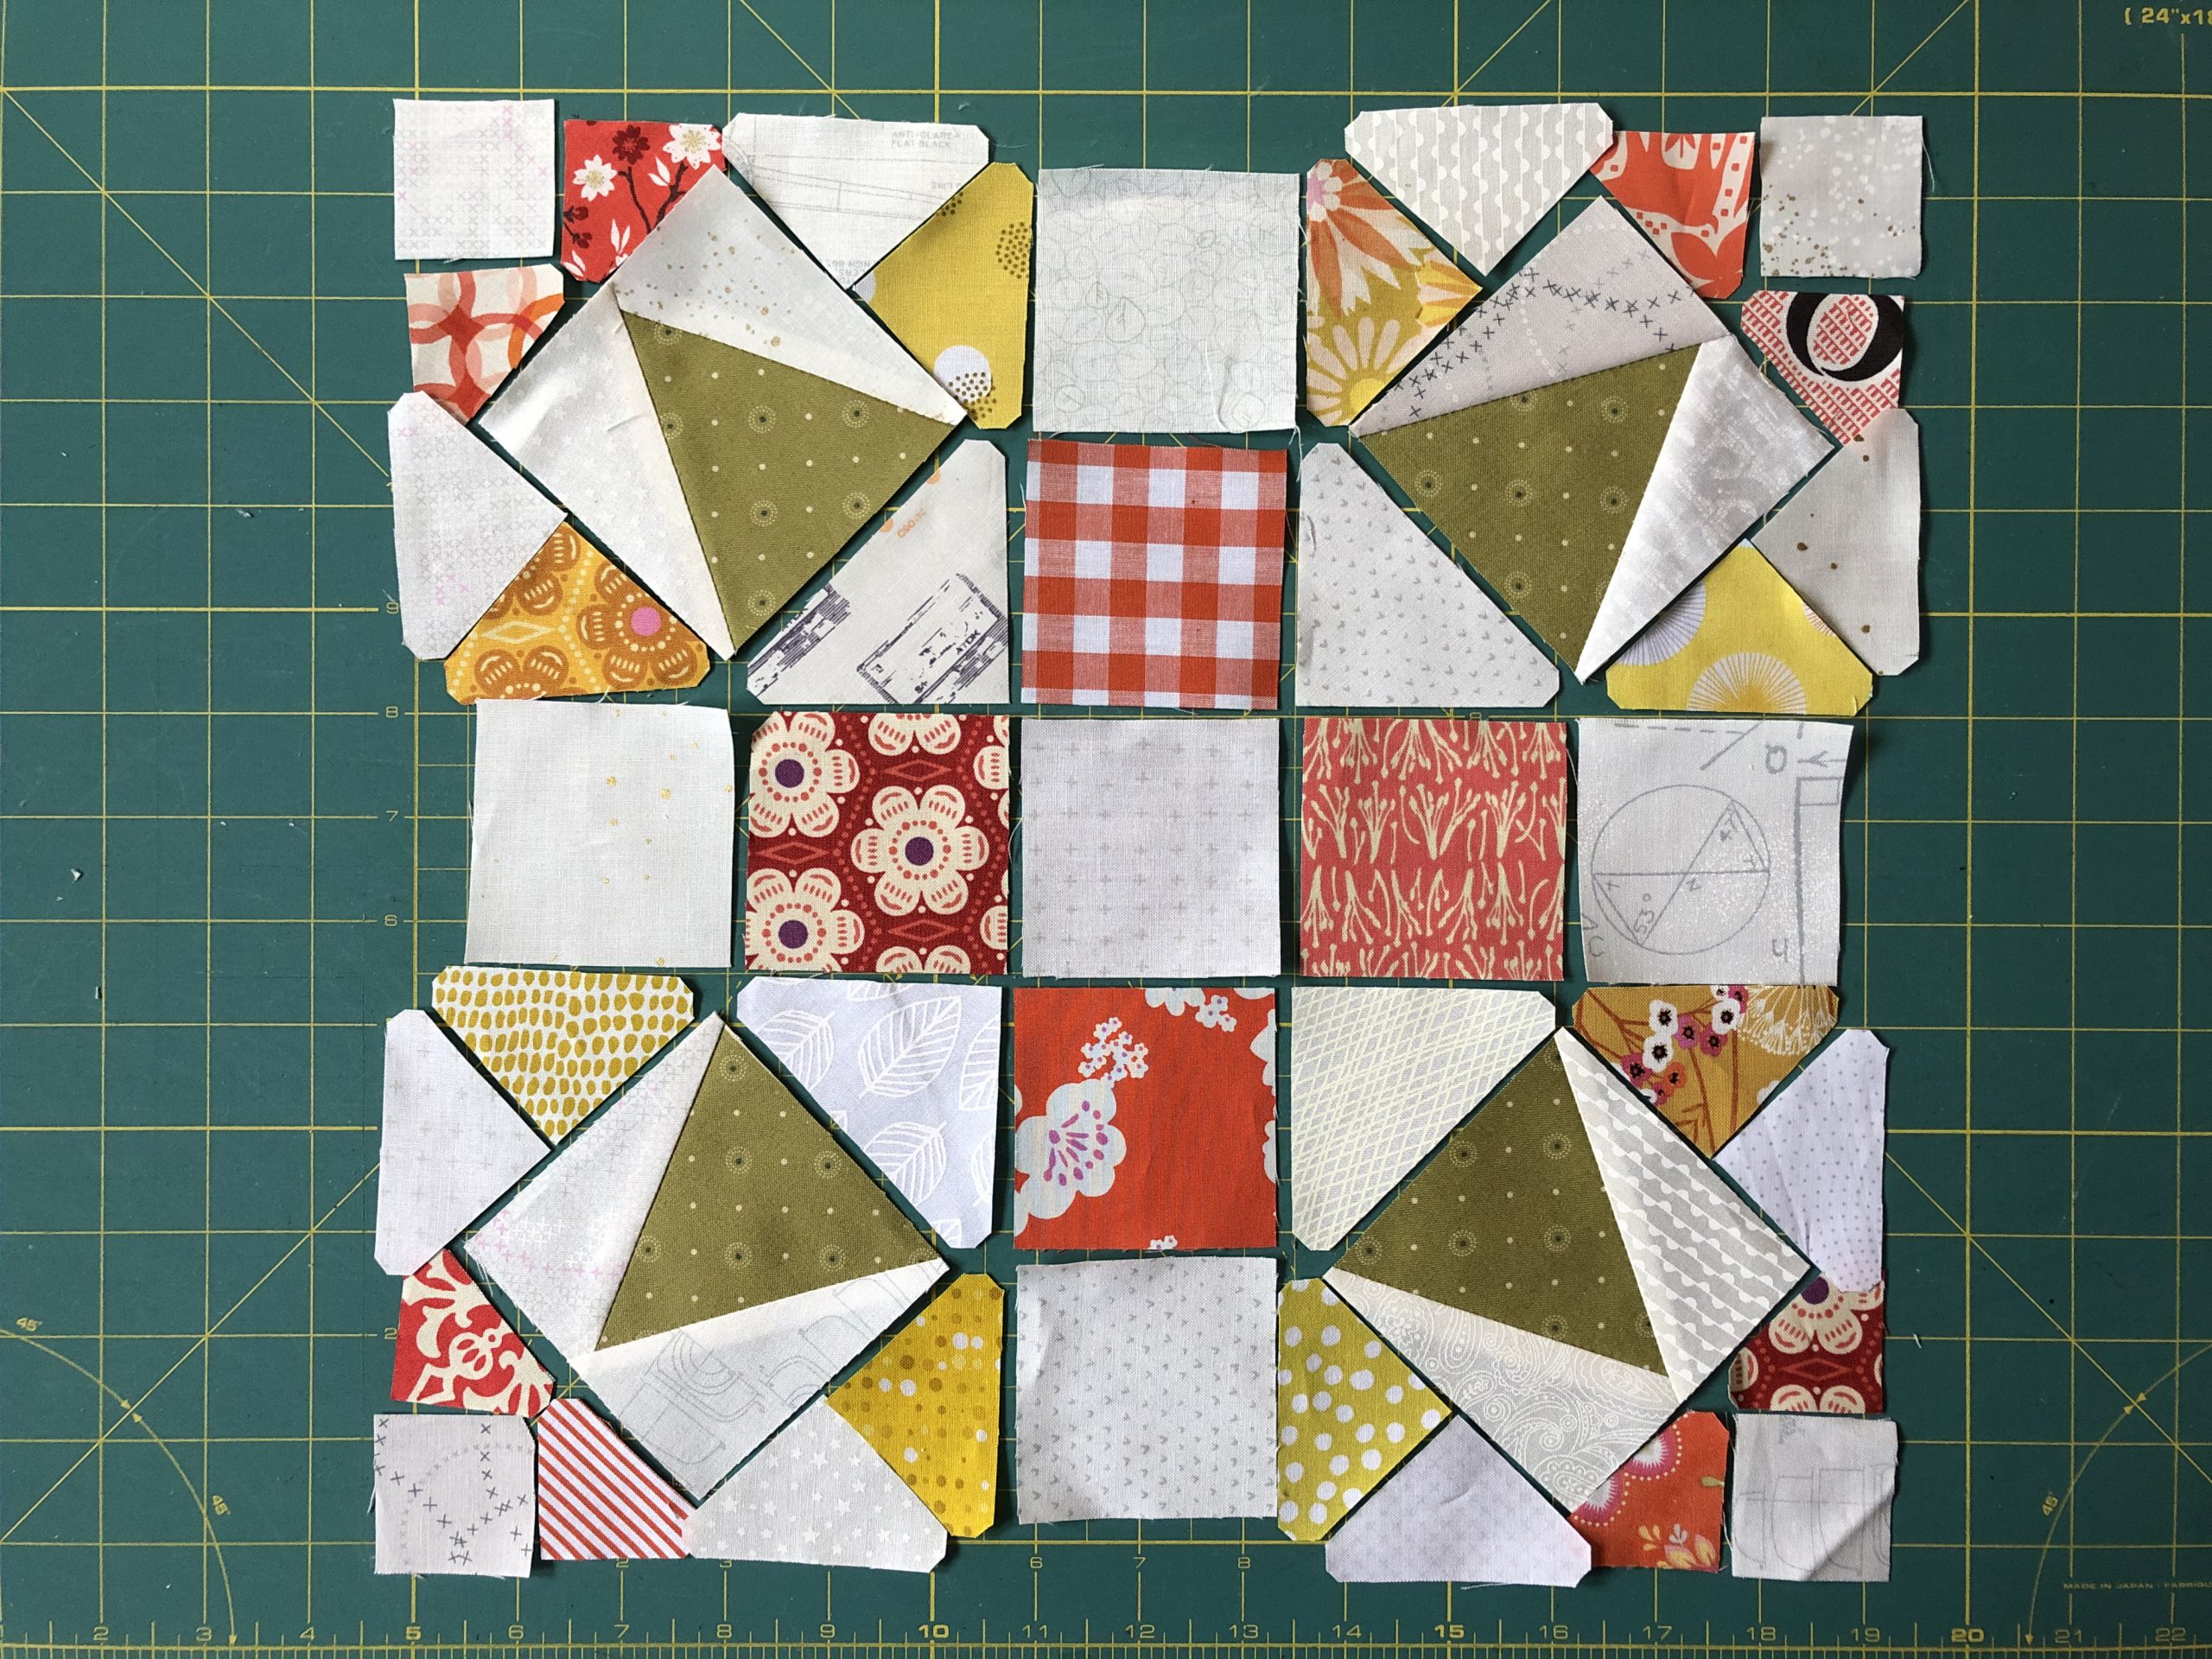
A tip: Sew the same steps for each block at the same time. e.g. first sew the outer parts (pattern part A and the two pattern parts B) together at all four corners. In the next step, join all C parts (one background and one patterned fabric) together. After you have ironed all the seam allowances, put the newly created parts back in their place.

Now join together the four square corner pieces. To do this, you must first mark the respective middle on your FPP part on the left, right and on the lower cutting edge. It is up to you whether you fold it with a textile maker or – like me – with your fingernail. The middle of pattern part G must also be marked.
First, the two left and right triangles are added to the FPP part. Then the top and bottom triangles.
For the upper triangle, you can put the two tips together by using a pin (triangle tip from the FPP part and the tip from the background fabric square). This way they fit exactly on top of each other when you are sewing them together.

Repeat these steps for all of the other three squares.
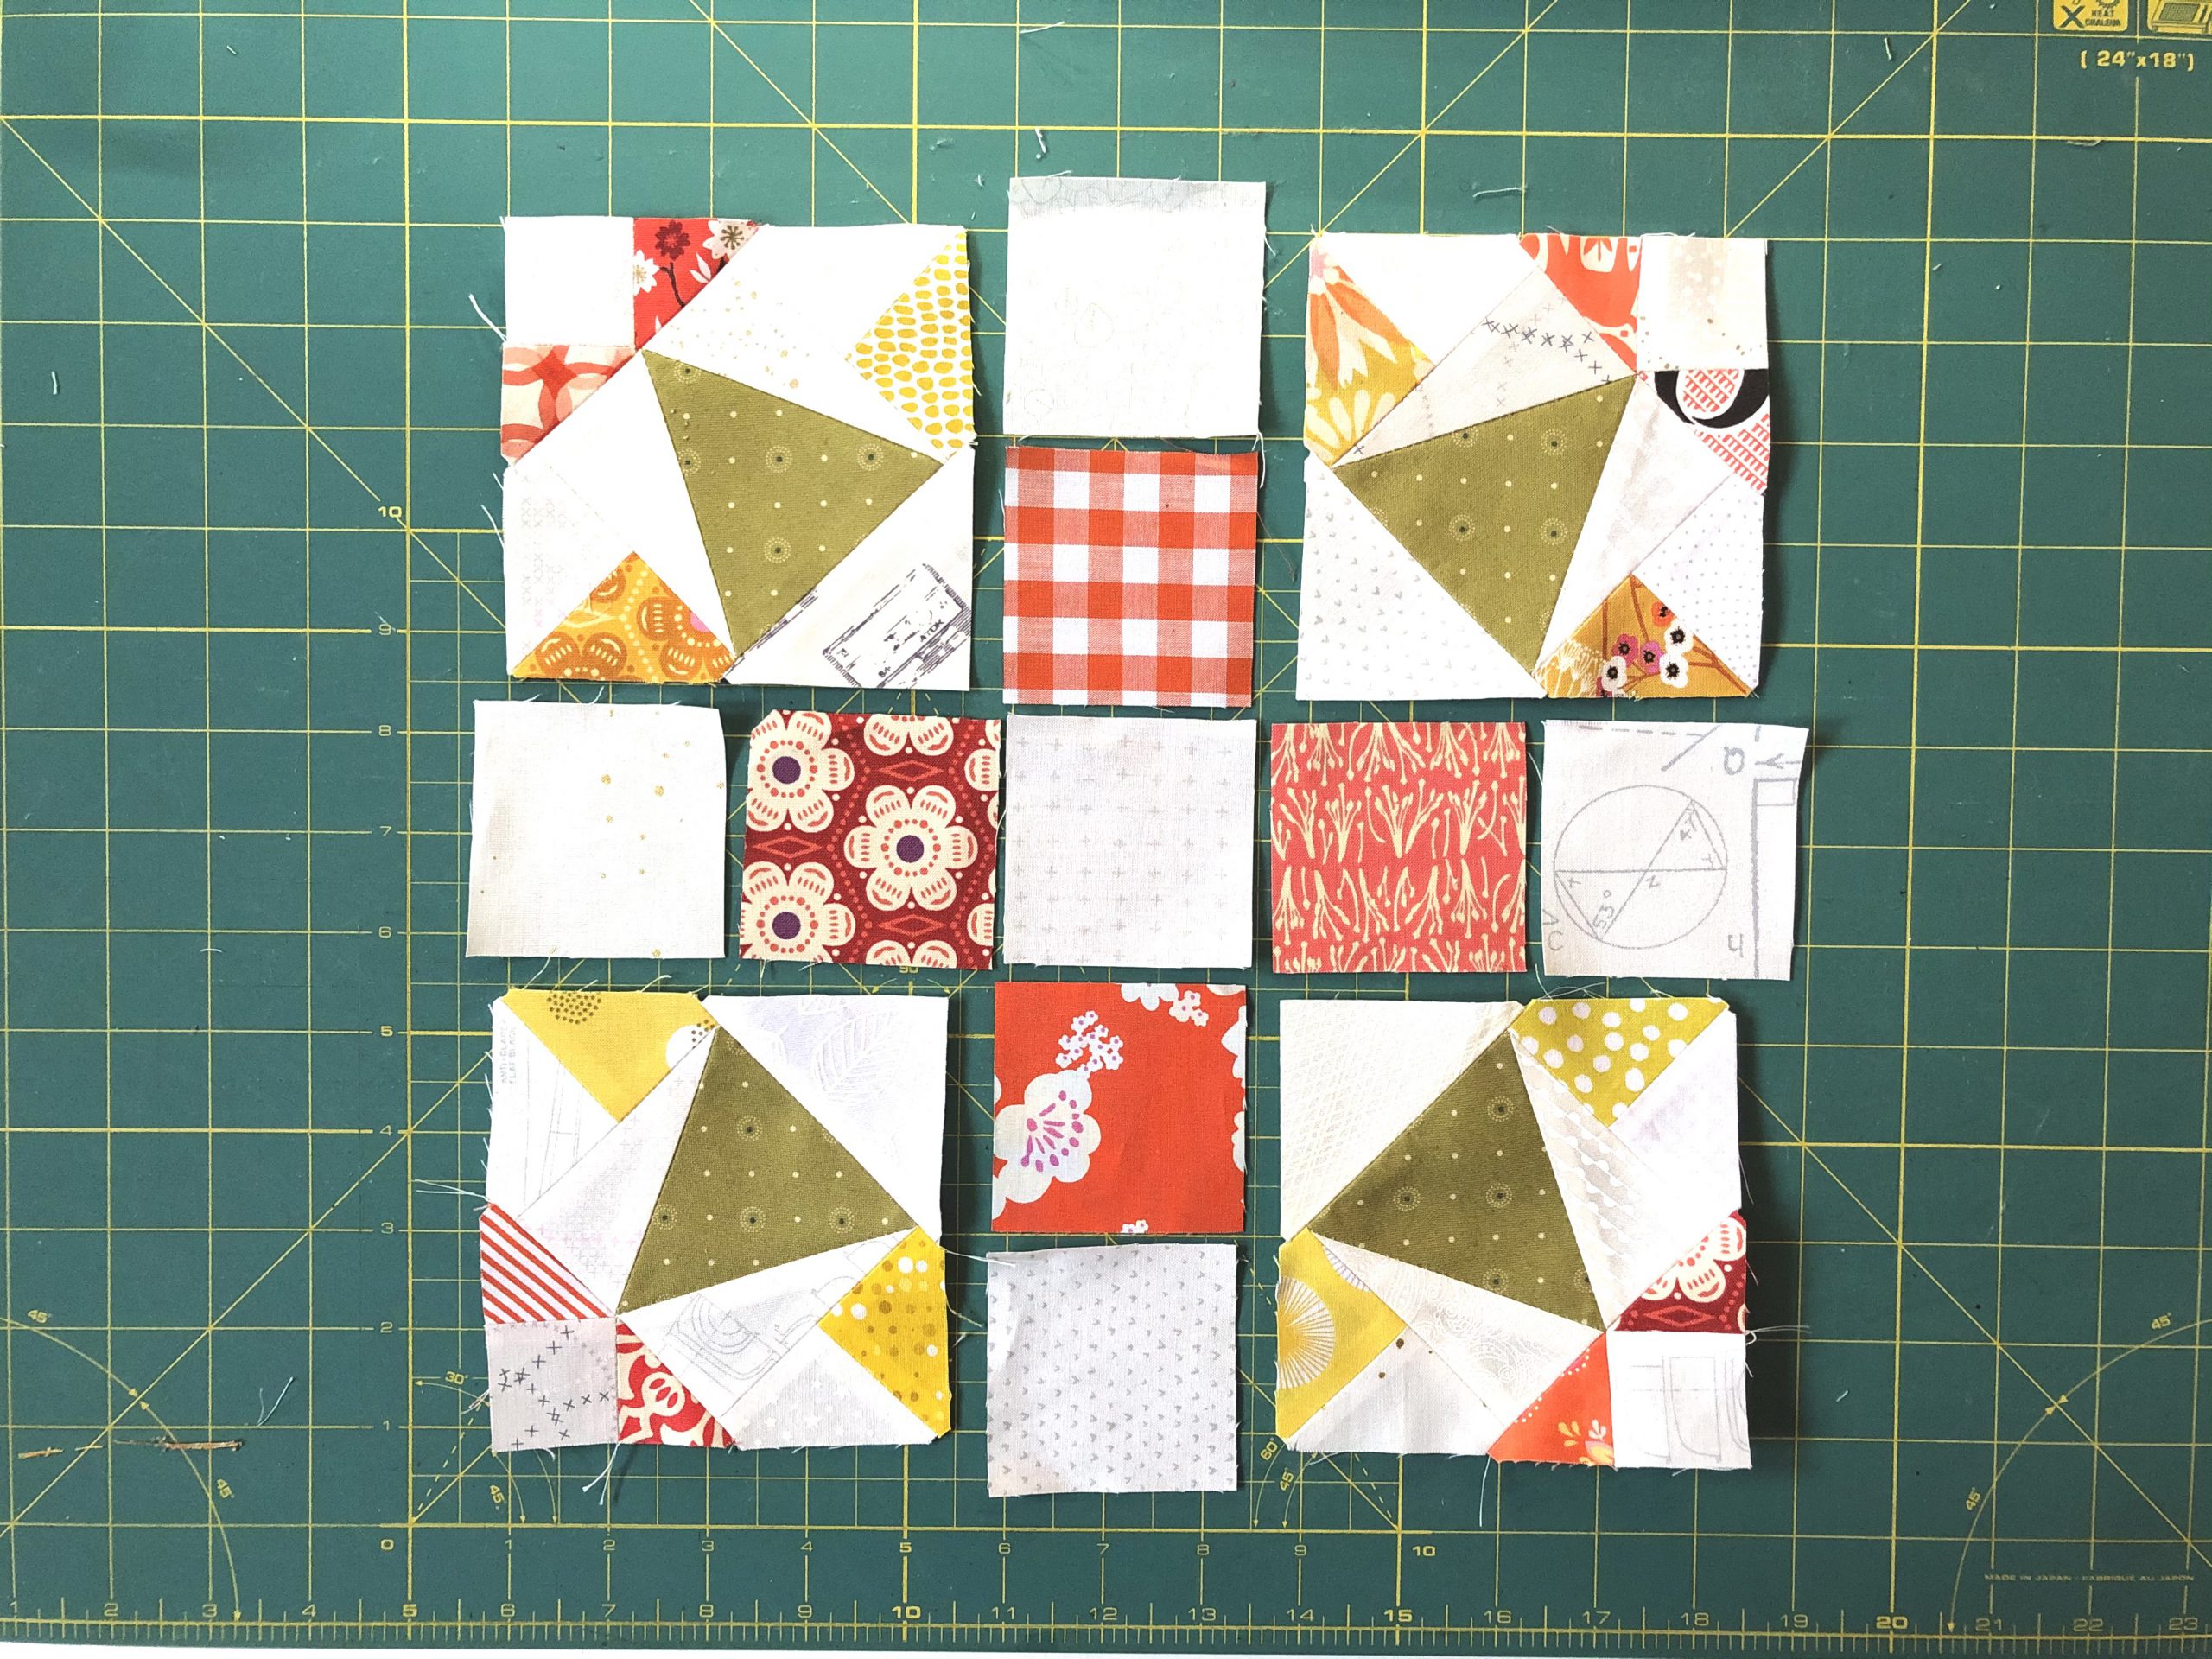
Now join both the upper and lower middle squares together. Then sew the five squares of the middle row together:

Sew the top and bottom rows, consisting of the two large squares on the side, and the middle row together.
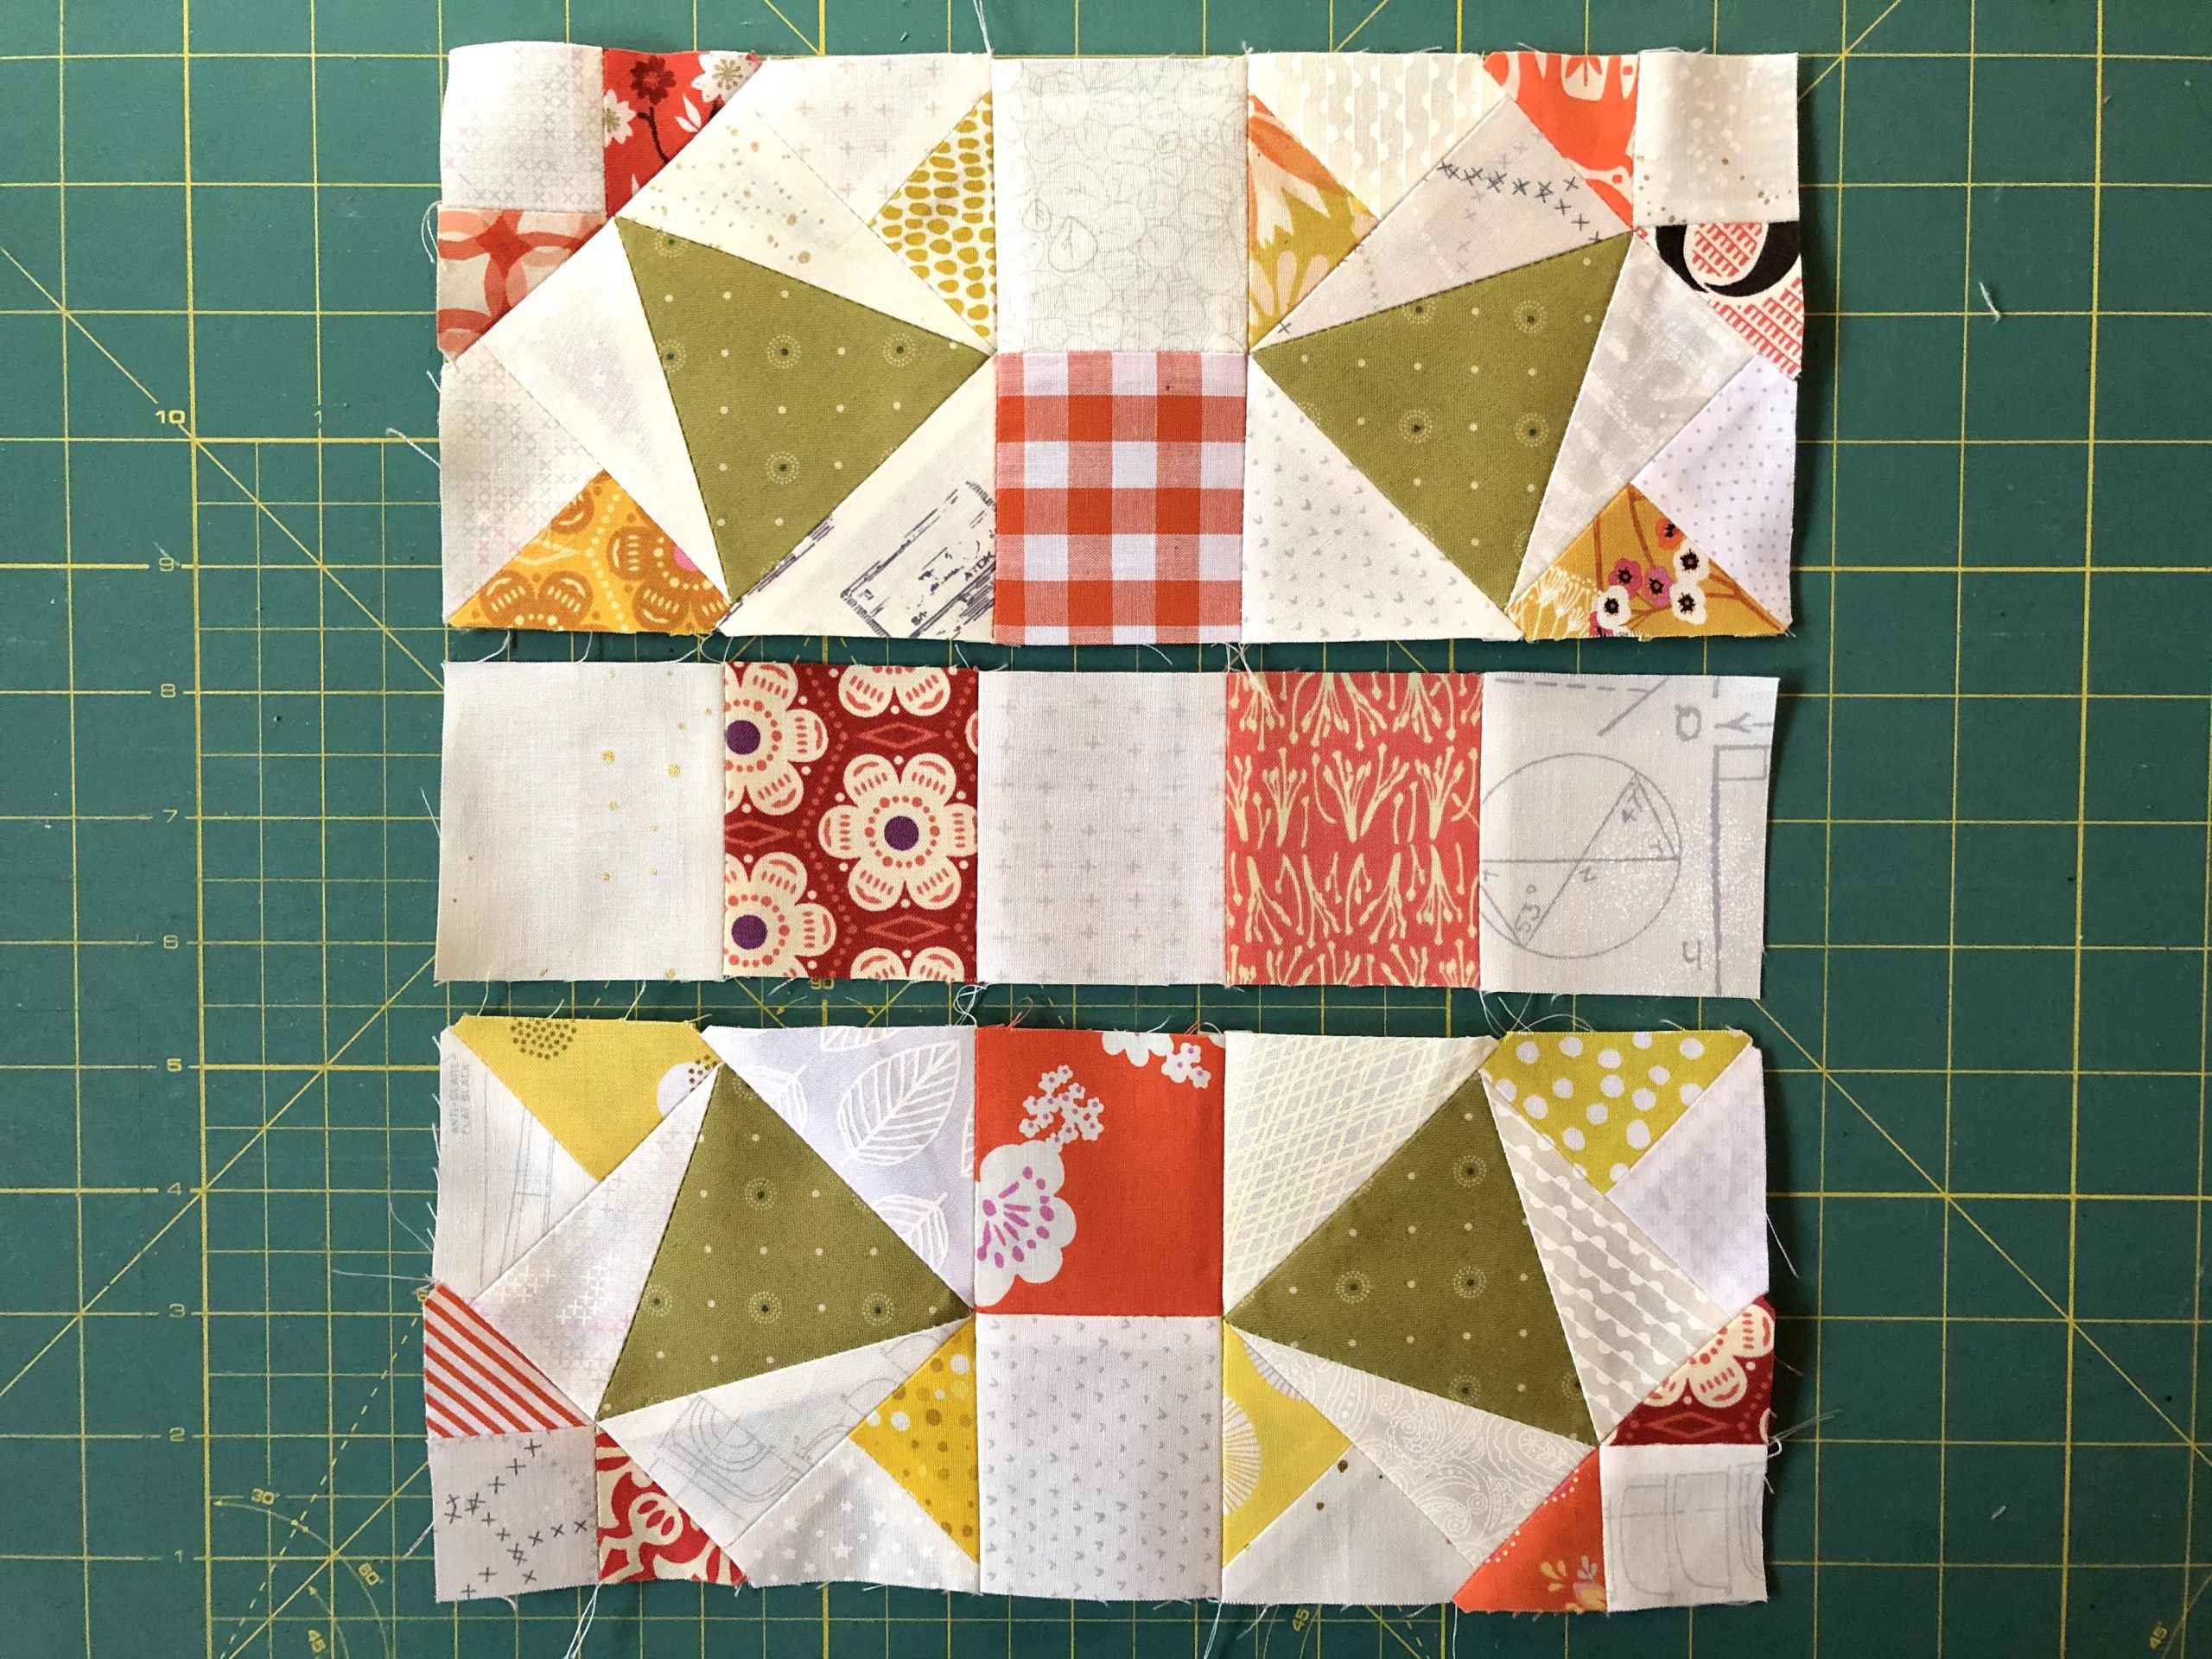
As a final step, close the dividing seams between the three rows. Your very own Quilter’s Delight block is complete!
Options for varying the Quilter’s Delight block
In contrast to the first block – “Bride’s Bouquet” – the “Quilter’s Delight” is not a solitary patchwork block. Instead, it is designed to show its full effect in interaction with several blocks.
Here are two layout examples that show how great such a block can look in combination and repetition:
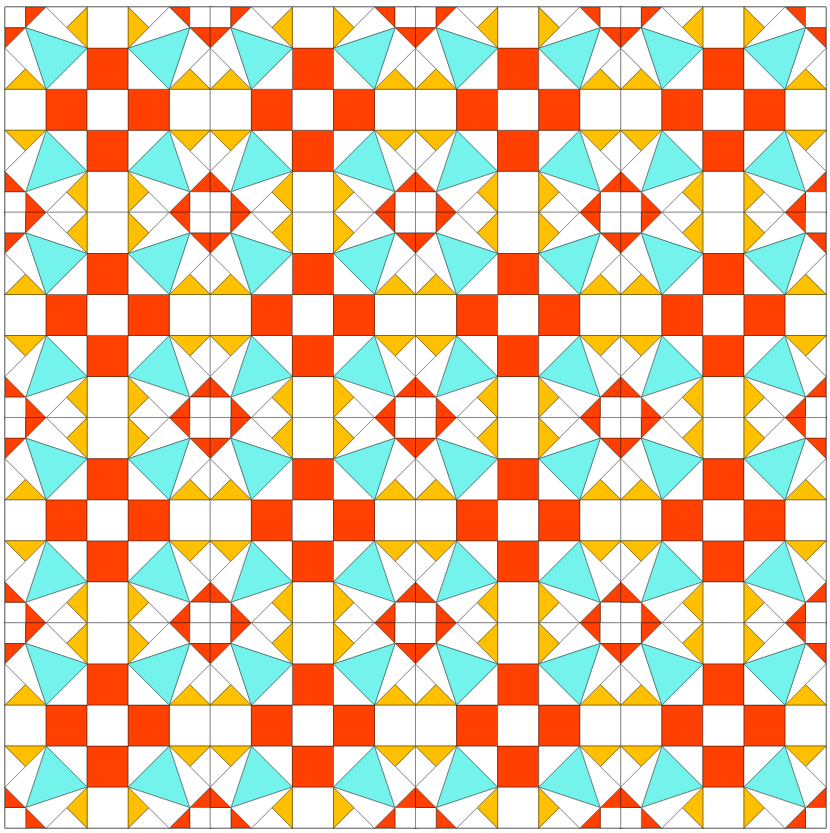

The effect is completely different depending on the orientation of the block. By designing the individual blocks with different colors and prints, you get a completely new impression!
As you can see, such blocks not only invite you to try them out for our sampler, but also offer a great opportunity to create entire quilts from them. I am very curious to see if anyone dares to tackle such a project :-).
Show us your finished blocks!
When you’ve finished sewing your blocks, please share them with the rest of us. To do this, you can use the following hashtag #BERNINAOldBlockSampler on social media.
We will then be able to see our work on Facebook and Instagram at the following links:
Instagram: https://www.instagram.com/explore/tags/berninaoldblocksampler
Facebook: https://www.facebook.com/hashtag/berninaoldblocksampler
If you are not on social media, you can still show off your blocks – in the Community section of the BERNINA Blog.
The most important thing is that you participate in our “Old Block Quilt-Along.” This is what it looks like:
When uploading your pictures to the Community section, select the “Old Block Quilt-Along” category.
If you would like to learn more about me and my work, please take a look at my website Quiltmanufaktur, my Instagram account or my Facebook page!
Enjoying patchworking the “Quilter’s Delight” patchwork block!
All the best from Andrea
I am coming in on this fun looking project late! I have a lot of catching up to do. I’m getting busy immediately! I will be posting some photos soon, hopefully. Thanks for putting this together for all to enjoy!
In the initial post you stated that we would need roughly 5 yards of background fabric. I took this to mean one fabric but it looks as if you are using multiple white background fabrics. Does this mean 5 yards total of random fabrics of our background color choice?
Dear Melinda,
This is what Andrea wrote in the initial post:
For the top, you will need around 18 to 20 different fat quarters; that’s about 4.5 to 5 m of fabric (or 5-5.5 yards)
For the background fabric, I would also recommend around 4.5 m (5 yards) of fabric (for a width of 110 cm/43¨).
The Quilting at the end needs 3 layers: A top, a middle layer with stuffing of some sort and a background fabric. The background fabric often is just one piece of Fabric. So the background fabric with 5 yards is the background of the whole quilt, not the white fabric in the blocks. The blocks white fabric belongs to the Top, so I am guessing she uses about 5 different white fat quarters or more out of the 18-20 she mentioned.
Hope this helps!
Best regards, Ramona from BERNINA International
So the 5 yards is the quilt backing? Got it! Thanks for the reply, now I can get started. So excited!!
You are welcome and happy sewing 🙂
Getting started on block two quilters delight