 BERNINA Corporate Blog -
Avon bath cape: tutorial
It’s vacation time again, time for our kids to enjoy 2 months of free time, do what they feel like (in moderation ;-)) and relax.
Time for mom to provide the girls with new bath capes, which they can easily put on after a dip in the pool or after a bath/shower.
I always use the Avon cape pattern for this, free to download for members of the Bel’Etoile patterns facebook group.
You can use the pattern for sewing capes in sizes 80 to 164 and in less than an hour you will have a freshly sewn bath cape ready 😉
For this tutorial I will sew one in stretch terry cloth fabric.
This is a lovely soft fabric that absorbs water and is comfortable to wear.
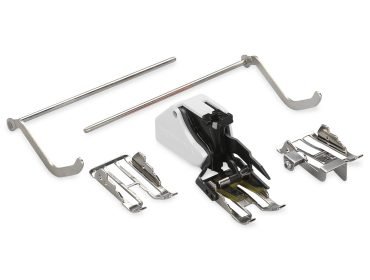
Sewing this fabric can be challenging, so I always choose to use the Three-Sole Walking Foot with Seam Guide #50 on my BERNINA 480
That walking foot ensures that the layers of fabric are transported evenly and you get a beautiful result.

For the finishing of the seams I use my overlocker, the BERNINA L 890

Ready to dive into this fast sewing adventure?
Requirements
-Avon pattern (free download in this Facebook group)
-fabric (see pattern for recommendations and requirements)
-thread
-sewing machine
-overlocker (optional)
Tutorial
1.Shoulder seams
Pin shoulder seams of front and back together, right sides facing and stitch.

Finish seams with your overlocker or use a zigzag stitch.
Press seams towards the back.

Walking foot detail. It transports both layers evenly to get a nice and clean result.

2. Preparing the hood
Pin the two mirrored hood pieces together, right sides facing.
Pin the rounded seam.


Stitch the rounded seam and finish with your overlocker or use a zigzag stitch.

Press seam and turn hood right side out.

Finish hemline of the hood with your overlocker or use a zigzag stitch.
Don’t finish the neckline of the hood (yet)

Press hemline of the hood 2cm inwards.
Stitch into place and press.


I don’t use pins when sewing simple straight seams with the three sole walking foot. The layers are perfectly kept together.


3.Attach hood to cape
Pin your hood to the cape, right sides together.
Align center back of hood to center back of neckline and pin.


Keep pinning towards the front until the hood pieces overlap each other by 1cm at center front.

Stitch hood to neckline.
Fold hood into place and finish the seam with your overlocker or use a zigzag stitch.


4.Hemming
Finish all seams, all the way around, with your overlocker or use a zigzag stitch
Press all seams 2cm inwards, all the way around.

Stitch all the way around and press.

5.Closing side seams
Place side seams of front and back pieces together, wrong sides facing.
Measure your cape from shoulder to seam and mark the center of that line using a pin.


Pin and stitch side seams at 5cm from the side edges.
Start at the hem and stitch towards the marked center
Secure by backstitching.


Press your finished cape and you’re done!

Happy sewing,
Isabel
Feel free to visit me on Instagram 😉

0 Responses