 BERNINA Corporate Blog -
I love adding special touches to the items I make, especially when the item is for someone else.
I am making a custom shirt for my boyfriend and wanted to include a hand written note hidden inside. With Bernina’s Embroidery Software 9 I realized that I could create my own handwritten font and embroider a unique little note like a label.
In the beginning of our relationship, when we were in our early teens, one of our favourite bands was Plain White Tees. I quoted their song 1, 2, 3, 4 in my note in Matt’s shirt. So much has changed since first listened to the song 10+ years ago but the sentiment is the same.
What will be needed:
- Bernina Embroidery Software 9
- Handwriting samples
- Scanner/digital camera/smart phone
- Sewing machine (B735)
- Embroidery Module
-Embroidery Hoop
–Foot #26
-Embroidery Thread
-Stabilizer
Keyboard Design Collection Feature
Bernina’s Embroidery Software 9 includes a feature called the Keyboard Design Collection.
Bernina created it as a way to be able to map 3rd party embroidery character designs to your keyboard.

Usually when you purchase/download special embroidered alphabets, you have to individually insert and place each letter which can take a while when you have a long word to spell out.
With the Keyboard Design Collection you are able to match each character to a key on your computer’s keyboard. This means that you can easily type out the word(s) on your keyboard and the respective embroidery letters will be typed out. Essentially, the embroidery designs will become a font!
The process of mapping may be a bit time consuming but the end result makes using these embroidery characters more convenient. I would recommend only doing this if you are planning on using the special embroidery characters often.
I figured that as each character is an embroidery design, I could digitize a sample of my handwriting, turn each letter in to an embroidery design and follow the same idea of mapping the letters to my keyboard using the Keyboard Design Collection feature.
Steps
Handwriting Sample
Using a black pen on white paper, write a panagram in all lowercase and again in all uppercase.
If it helps, you can draw a line to write on in pencil and erase it afterwards

After taking this picture, I realized I had mistakenly written ‘jumped’ instead of ‘jumps’ and later corrected it.
A panagram is a sentence that contains all the letters of the alphabet such as: the quick brown fox jumps over the lazy dog.
It will help achieve a more natural style of handwriting.
You can also write out numbers and punctuation to include in your font. If it feels too overwhelming to do all the characters, you can always add them to your collection over time and just start with lowercase case letters.
Import Sample
Scan or photograph the samples and import them in to Bernina’s Embroidery Software 9.
Scan
Steps to scan and import a physical document are available in the blog post Custom embroidery designs for an underbust corset
Photograph
As I don’t have access to my scanner at the moment I photographed my handwriting samples with my phone. You could also use a digital camera.
Take as clear a picture as possible
Lay the paper on a flat surface.
You need the phone to be as parallel to the paper as possible.
Use the grid feature on your phone’s camera to help you get an accurate level photo..
Upload the photo to your computer.
Edit the Sample
In order to easily digitize the handwriting in the software, I recommend editing the picture (sometimes even the scanned image may need editing).
The goal is to create contrast between the characters and background, ideally making the background as white as possible but keeping the characters as crisp as possible.
Here is how you can edit within the embroidery software using CorelDraw.
 Import the image in to the Embroidery canvas.
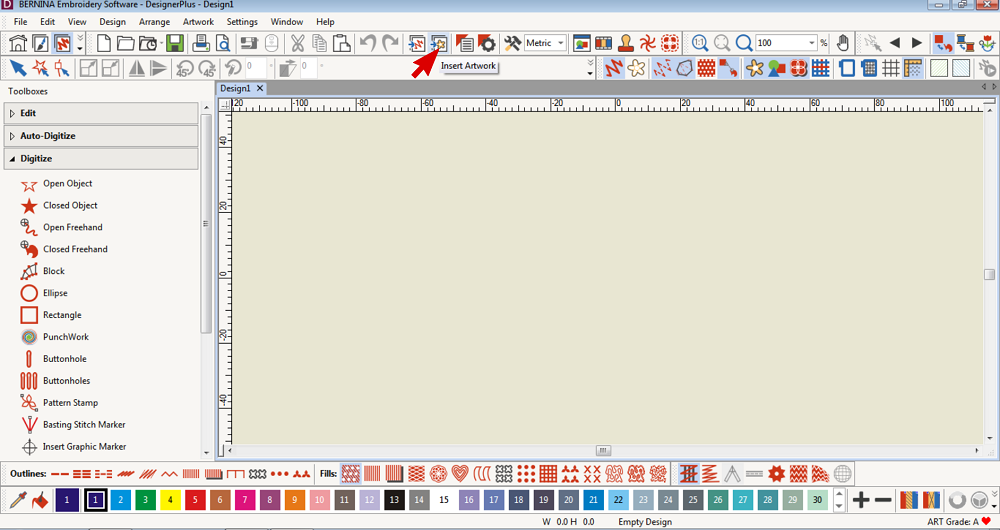
Insert Artwork and navigate in the pop up window to where you have saved the photo.
 Select the Artwork and click on Touch Up Bitmap in the Auto-digitize Toolbox.
The Artwork should open in Corel PHOTO PAINT.
If not, right click on Touch Up Bitmap and select Corel PHOTO PAINT in the pop-up menu and click OK.

 Select the Adjust tab and click on Brightness/Contrast/Intensity.
 Move the sliders to adjust the image.
Use the Preview feature to assess the adjustments.
Click OK when you’re happy.
 Crop the image.
 Save the image.
 I like to increase the DPI to 1200 for a crisp image.
You can close Corel PHOTO PAINT once the image has saved.
Auto Digitize
 Click on the Auto-digitize Toolbox, select the Artwork and if necessary, Crop the Artwork.
Drag the shape over the area you want to crop to and release to crop.
 While the Artwork is selected, click on the Auto-digitize Tool.
 In the pop-up window, use the sliders to adjust the detail and reduce the quantity of colours.
You can merge similar colours:
Click on the coloured square, hold ctlr on your keyboard and select the colour or colours you want to merge, let go of ctlr and select the Merge button.
Select OK to continue
 Choose what colours to omit.
We don’t want the background to be converted to embroidery so omit that colour.
Select Centerline under the Stitch Details Tab.
Select OK to continue.
 Delete the Artwork, select the letters and change the thread colour(s) to black.
 While the characters are selected, you can change the stitch type too.
Create a keyboard design collection
 Open the Keyboard Design Collection Tool and click the New button.
 Type in a name for your collection and specify a reference height.
You can either type in your desired height or click the Use Selection button.
This will use the digitized height of the selected character. Round it off.
“The reference height does not resize designs while mapping. It is meant as a reference when sizing lettering and becomes the default letter height in the Object Properties > Lettering dialog.” – BERNINA Embroidery Software 9 Help
I wanted my font to be similar in size to my handwriting so I kept it relatively small.
 You can adjust the character spacing.
“This is specified as a percentage of height. It may vary with the style of source characters. Again, this value can be overridden in the Object Properties > Lettering dialog when using the character design font.” – BERNINA Embroidery Software 9 Help
 You can also enter a recommended height range.
“Scalability depends on the quality of the original characters. Rules of thumb:
Grade A designs: ±20%
Grade B, C, D: ±10%
For example, a Grade B font with a reference height of 150mm might have a recommended size range of 135mm to 165mm.” – BERNINA Embroidery Software 9 HelpAs you have digitized the artwork within the software, it should be Grade A quality. The software will tell you the quality of the design in the lower right corner.
I measured the height of some of my handwritten characters for reference with determining the height range.
 For letters like y, j, g… you will need to edit the baseline so that their tails fall the line.
Select the letter’s slot and click on Adjust Baseline & Spacing.
 Move the lower line up to where you feel is best.
Map the characters from the design workspace
 While a character is selected:
-type the corresponding character in the mapping window
-choose the category it belongs to from the drop down window
-click Map.
Repeat for each character.
 If you make a mistake, click on the slot and select Remove Mapping.
 Once you are done mapping the characters, you can close the Keyboard Design Collection Tab.
Adding to the collection
Repeat these steps if you want to add characters to the collection over time:
Create the Handwriting Sample,
Import it to the software
And Auto-digitize the characters.
 Then open the Keyboard Design Collection Tool and select your custom font from the Collection drop down menu.
Repeat the steps to Map the Characters.
Using your new font
 Open the Lettering/Monogramming Toolbox and select the Lettering Tool.
 Click in the design workspace, type out your wording and press Enter on your keyboard.
 Double click on the wording to open the Object Properties window.
Select Keyboard Design Collection under Font Type and choose your custom font from the drop down window.
Click OK when done.
 You can resize the wording to fit within your chosen hoop.
 Save or export the design as usual.
Embroidering the design
 Set up your machine and embroider as you normally would.
I embroidered on the inside yoke piece with an iron on stabilizer.
In this blog post: How to sew Flat-Felled seams you can learn more about the Linen Shirt I make with this yoke.


I would love to see what you make, please feel free to share with me!
Instagram
Facebook
-Hannah-Rose


0 Responses