 BERNINA Corporate Blog -
 My boyfriend has been wanting a Linen Shirt and it turns out they are not easy to come by.
When I saw the Cala Shirt Pattern from Bernina’s Fashion Looks Collection, I knew it would be perfect for making a Linen Shirt myself.
Matt liked the casual, oversized style with the ‘grandpa’ collar.
We found some well-priced Ramie Linen at our local fabric store. It is off-white and lightweight which is perfect for our hot summers.
What I love about Ramie Linen is that the Ramie fibre is similar to Silk so it brings a subtle lustre to the Linen. The ramie fibre holds its shape well so when blended with Linen it creates a Linen that doesn’t crease as much as Pure Linen. I also like how it softens with wash and wear.
What will be needed:
- Sewing machine (735)
- Shirt Pattern
- Linen fabric
- A thread to match
- Buttons
- Iron-on Vilene/Fusing
- Button sew-on Foot #18
- Button hole Foot #3A
- Edge-stitch Foot #10
Pattern
I used the Cala Men’s Shirt Pattern from Bernina’s Fashion Looks Collection. I would say it is a somewhat advanced pattern.
I made a few adjustments to the original pattern, here they are if you are interested in replicating them in your Cala Shirt: Cala Shirt Adjustments
Bianca Weber provides instructions for sewing the Cala men’s shirt in her blog post: Cala men’s shirt – Fashion Looks
Instead of repeating the steps I’m going to share how easy it is to sew Flat Felled seams and add a slit.
This technique creates strong, secure seams which are important when sewing Linen.
Flat Felled Seams
I used this technique on the Sleeve Heads.
 Pin the Sleeves to the respective Armholes. Keep in mind the Placket sits towards the back.
Pin with right-sides together and match up any notches. Sew together with 1.5cm seam allowance.
 Press the seam towards the Bodice.
 Trim the seam allowance closest to the Bodice down to half.
Fold the longer seam allowance over the short seam allowance to the stitch line.
Fold them over to the Bodice, covering the raw edges.
Press.-

Right side

Wrong side
Pin the folded seam in place.
I prefer to sew from the right side so I pinned on the right side.  Secure the folded seam with top stitching.
I moved my needle 3 points to the right and lined up the seam with the edge of my foot.
 Here is a comparison of the right and wrong sides of the fabric.
Flat Felled Seams with Slits
I used this technique on the Side Seams.
 With right-sides together, pin the Front and Back Bodice pieces as well as the Sleeve.
 Sew together with 1.5cm seam allowance.
Sew from the edge of Sleeve to the notch for the Slit on the Bodice. 1cm above the notch, make a horizontal cut through the seam allowance.
Do not cut through the stitch line.
As seen in the picture, I made mine 2cm but would recommend rather doing 1cm. Above the cut, press the seam towards the Back Bodice.
 Trim the seam allowance closest to the Back Bodice down to half.
Only do so above the cut notch. Above the cut notch, fold the corner towards the stitch line to create a triangle.
Fold the longer seam allowance over the short seam allowance to the stitch line.
Fold them over to the Back Bodice, covering the raw edges.
Press. Pin the folded seam in place.
I prefer to sew from the right side so I pinned on the right side.
It will be easiest if you sew in the direction towards the Sleeve. Start sewing from the Slit notch.
I placed a pin at the notch so that I could see it from the right side.
I moved my needle 3 points to the right and lined up the seam with the edge of my foot.
 The fabric will need to bunch up when you get to sew the Sleeve.
 Following the line of the side seam, press the flaps for the Slit open.
 Fold a corner towards the fold line to create a triangle.
Fold the raw edge to the fold line.
Fold along the fold line, covering the raw edge.
Press and repeat for the other side of the Slit. Pin in place.
 On the side of the slit that lines up with the flat felled seam, sew straight up and join the existing stitches.
 Use a pin to mark the base of the triangle created at the top of the Slit.
Sew across the top of the Slit, from where the pin meets the stitch line then sew down alongside the Slit.
Bar-tack Stitch
 Select a decorative Bar-tack.
I chose #26 which is recommended for strengthening Flys, Pockets and Slits.
I tested the stitch on some scrap fabric to find the best settings for my garment.
Take note of the direction in which the triangle will be stitched. It will start with the base. Place the opening of the foot just above the horizontal stitch line above the Slit.
Press the green start button on your machine or press your pedal down until a STOP icon appears on the screen.
 I added a special touch to the inside of the shirt. You can learn more about it here: Turn your handwriting in to an embroidery font


Tips
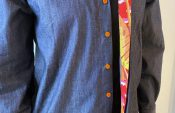
- Buttons & Buttonholes:
As you look at the shirt, the Buttons will go on the Front left and the Buttonholes on the Front right.
Sew your Buttonholes with foot #3A and stitch on the Buttons with foot #18
https://www.youtube.com/watch?v=HOK20viFUmw&t=138s - You can create a mandarin/grandpa collar from a shirt pattern with a regular pointed collar. A mandarin/grandpa collar is basically just the collar stand so you would just need to omit the pointed collar.
I would love to see what you make, please feel free to share with me!
Instagram
Facebook
-Hannah-Rose
Thank you to Bernina Schweiz for the Pattern


0 Responses