 BERNINA Corporate Blog -
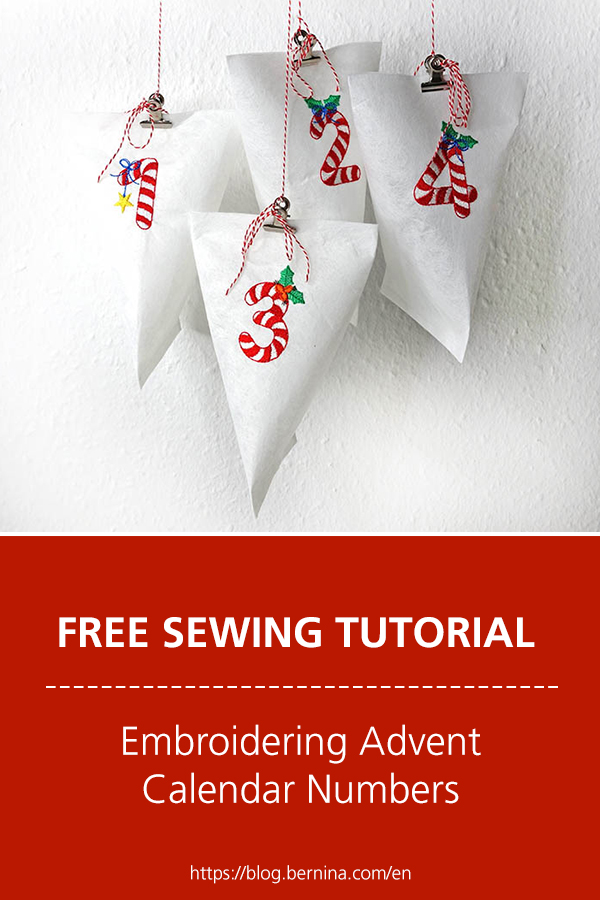
It’s about time! Time to embroider the Advent calendar. I have been using a home-made calendar for many years. It is beautiful, made with lots of love and environmentally friendly. This year it’s time for a new one, as my child is almost grown up. Almost. At 15, my daughter no longer wishes for a calendar with blocks or other small things. As she has bigger wishes, I have decided to make a weekly calendar with only one bag per Advent week.
Below you can see my teenagers new calendar with the numbers 1 to 4. I assume that your calendars are more extensive and that you would like to embroider all the Advent calendar numbers. That’s why I have digitized the numbers 0 to 9 and am giving you the embroidery files as a freebie! You can put these together to make the numbers up to 24 and use them to create a large calendar. You can find the free download below.


How about you? Do you buy a calendar with handicrafts or sweets? Do you fill paper bags? Or do you embroider and sew a calendar according to this article? I would love to see your calendars in the comments!
Embroidering Advent calendar numbers – download embroidery files for free
You can download the embroidery file for the Advent calendar numbers 0 to 9 as a freebie with the following link:
Please use the embroidery files for personal use ONLY.
Clicking on the link will download a ZIP file directly to your computer. You will usually find it in the downloads folder of your computer; the exact location depends on your local settings.
Please unzip the ZIP file before transferring the data to your sewing machine or opening it in the embroidery software.
Assemble Advent calendar numbers in the BERNINA embroidery software
You can embroider the numbers 1 to 9 directly. The numbers from 10 onwards can be quickly put together in the BERNINA Embroidery Software 9. I will show you how to do this step by step below.
You don’t have the BERNINA embroidery software? Then you can download a trial version here, which can be used free of charge and without obligation for 30 days: https://www.bernina.com/v9-free-trial.
It also works without software. Below I will show you how to put the numbers together directly on the machine – in my case on the BERNINA 700.
Assembly the number 10 for embroidery
Let’s put together the number 10 as an example.
To do this, open a new file – File / New or CTR + N. As you see my screenshots are in German, but I am sure you will be able to follow along!

The number “1” is inserted as follows: Click on “Insert embroidery”…

… and select the file on the data carrier. Then select and confirm “Grade D” under Options and only then click on “Open”.

The software displays a warning. We are opening a converted file, so this is ok and is confirmed with “Ok”.

Repeat for the number “0” and move the number into place.

Currently, the numbers “1” and “0” are embroidered one after the other. So we still need to adjust the embroidery sequence. To do this, simply select everything (CTRL + A) and click on “Sequence by color”. Confirm the list which just appeared with OK.

First embroider the white of the two letters, then the red, followed by the green leaves and the bow.

Now we center the embroidery. To do this, select everything again (CTRL+ A) and set everything to zero in the Display position at the top and confirm with Enter.

The hoop is then set. To do this, simply right-click on the hoop and set and confirm the appropriate embroidery hoop.

Now remember to save the file! Click on File – Save and enter the file name. The file will be saved in ART format. If you do not want to make any further changes to the file, you can export the file as a machine format instead. To do this, click on File – Export machine file and select EXP.
Another option is to send the file directly to the machine via WiFi or transfer the design with a USB-stick. In this case, the file is automatically converted to EXP format.

Assemble Advent calendar numbers on the machine
I work with the BERNINA 700, so the interface may be slightly different on other machines. Please refer to the manual for your machine. All embroidery designs are loaded onto a USB-stick, which is attached to the machine. Open the number “1” on the machine. Then click on the plus in the columns with the layers on the right and add the number “0”.


The number “0” still needs to be moved – this can be done by clicking on “i” and then on “Move embroidery design”. Use the multifunction buttons to move the number.

If the position is correct, select the “10” (lowest layer in the design combination) and click on the “Center embroidery design” icon.

Currently, the numbers are embroidered individually. So first the number 1 with white and then red and only then the number zero with all its colors. On BERNINA machines that have this function, you can ungroup the individual patterns and change the embroidery sequence. If this does not work for you, you can also skip the sequences using the arrows.
Both numbers are ungrouped. To do this, click on the number, then on “Group embroidery designs” and click on “Minus”. Repeat for the zero.

Now we can see all the layers or sequences of the embroidery file.

Now select the “0” in white and click on “Change sequence of embroidery design combination”. The sequence can be moved down using the arrow; the order is now correct.

White is embroidered first, then red and finally everything else.

If you wish, you can group the white and red sequences. However, this is not necessary for embroidering. It can, however, provide a better overview for embroidery designs with many colors.

Embroidering Advent calendar numbers
There is not much to say or show about the embroidery process. The patterns are embroidered like all normal patterns.
I have made the density a little less dense so that you can embroider well on thinner cotton. However, because the pattern has many stitches and stitch directions, you should still hoop and stabilize well. I made my four bags from spunbond 120 (Lutradur).

By the way, you’ll be seeing the embroidery numbers here on the blog again soon. They will be used as preview images for the Advent calendar posts in December. I’m looking forward to it!


I wish you lots of fun embroidering your Advent calendar and very little stress in the run-up to Christmas!
Kasia


Brilliant article and explanation. Thank you. 🎄
merci pour ce fichier et surtout pour les explications