 BERNINA Corporate Blog -
Hi all
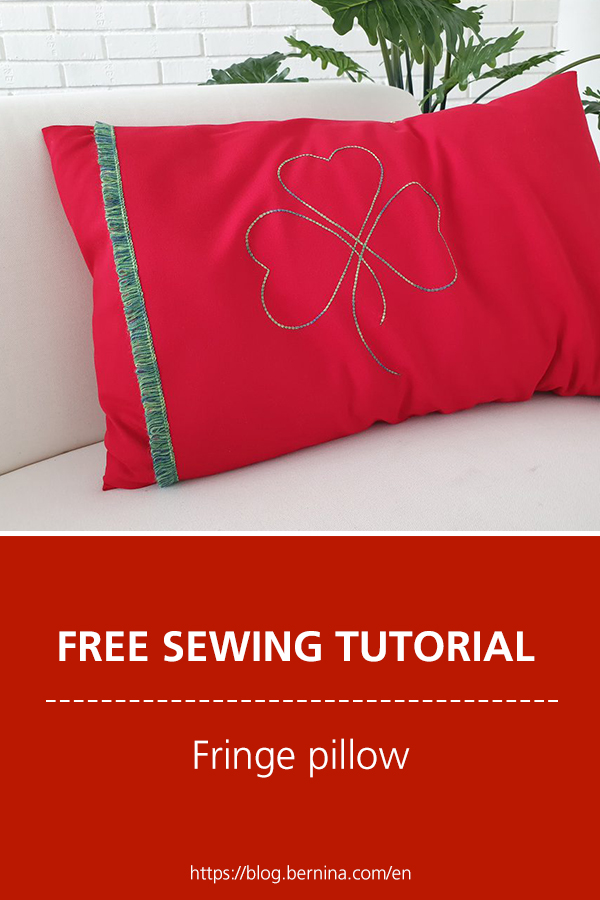
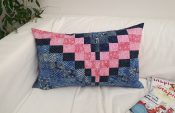
A pillowcase with fringe? Fringe with the overlocker? Yes, that is possible, easily, but it is a bit time consuming and involves some cutting by hand, but the result is something to be proud of, isn’t it?

Instructions: sewing fringe pillow with overlock
Please find here how you can sew a pillowcase and decorate it for example with fringe and decorative chainstitch. The procedure is as follows:
- 4-thread overlock for the pillowcase edges
- 2-thread wrapped overlock for the fringe 1/2
- 2-thread chainstitch for the fringe 2/2
- 2-thread chainstitch for the shamrock
- 4-thread overlock (or 5 thread combo stitch) to complete the pillowcase
For the fringe I recommend using thread that is kind of “rough”. Ideal is Madeira Lana 12. With that I achieved the best results.

Optionally, the Lana can also be mixed with a decorative Mettler Silk Finish Cotton 28, but I am happy to describe how this works in detail here.

Ideal is to use the BERNINA L 890.

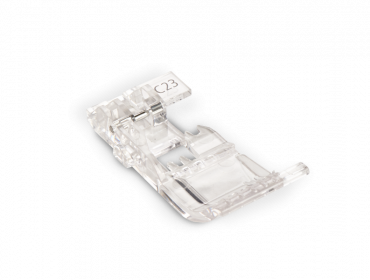
For the shamrock I recommend using the Curve Foot #C23 (optional accessory).
All descriptions refer to sewing with the L 890, as we need the 2-hread wrapped overlock wide, stitch 9, as well as the 2-thread chainstitch, stitch 16.


Stitch 16 is also used for the shamrock.

The visible narrow edges of the pillowcase are neatened with a 9 mm wide 4-thread overlock, stitch 1.

The pillowcase itself is can also be completed with 4-thread overlock or with a 5-thread combo stitch, stitch 17, that depends, if you like a 9 mm wide seam or an 11 mm wide seam allowance. This example shows a 17 mm wide combo stitch, sewn with left coverstitch needle LC.

Materials for a pillowcase, finished size 42 x 58 cm / 16 ½ x 23”
- Fabric romanit 45 cm x width of fabric (or comparable material quality with some stability, for example denim or felted wool.
- Approx. 15 cm spare fabric of the same quality for sewing tests.
- Overlock thread in 5 colours.

Decorative threads, for example:
- Madeira Lana 12
- Madeira Lana 12 Multicolor
- Mettler Silk Finish Cotton 28
- Mettler Silk Finish Cotton 40
- Gunold Sulky 12 wt Cotton Mercerized (an alternative to above mentioned threads)

- Embroidery stabilizer tear-away, for example Stitch-n-Tear from Vlieseline, for the shamrock template
The template with the shamrock (this is inspired by a celtic design and already mirrored) can be printed on A4. I have been able to print it directly on stitch-n-Tear. However, if your printer will not make it, print on paper and copy manually onto the Stitch-n-Tear.

Here the link to the template download: Template Shamrock A4.
Cutting
Cut the romanit to a width of 45 cm x width of fabric. The 15 cm wide strip can be cut to 30 cm long pieces for the sewing tests.
You will not find these decorative stitches pre-set in your machine; I recommend a sewing test for each stitch by making the fine adjustments based on your thread-fabric combination. The settings of my L 890 are noted, but each machine has its own character, and you may have to use other settings.

Preparations
Mark folding lines on your sampler at 41 cm from the narrow edges by clipping notches in the fabric edge (making the marks visible on right and wrong side of the fabric). The middle piece will be the decorated front of your pillowcase.

With wrong side up, mark the middle. This is the approximate middle of your shamrock template placement.
With right side up, mark a line across the sampler, approx. 8 cm from one of the folding lines. This is the line for the fringe, which will be sewn on a fold.

Decorating the fabric edge
On your L 890, select and set for 4-thread overlock. Deviating from the default settings, set the cutting width to 9.

For the decorative 4-thread overlock I use 2 x Mettler Silk Finish Cotton 28 in the upper looper. For the second spool, you can use the spool pin and thread antenna of the lower looper. Both threads will therefore be threaded separately in the antenna guide, also called retractable thread guide, they will meet only at the blue pre-tension guide. This is important for a regular stitch.

Most possible, depending on the thread, threading with the Air Threader will not work. Therefore, use the alternative threading method with a thread craddle. How to handle this is shown in details in our video tutorial about “alternative threading methods”:
The lower looper thread is therefore set onto the chain looper pin and going though the chain looper retractable guide. However, it is using the usual pre-tension guide red. Thread the lower looper with a decorative thread or Seracor 120.
For the left and right needles, I used Seracor 120.
With cutting width 9, test sew and finetune where necessary. On my L 890 tension settings were: left needle LN 4, right needle RN 3.8, upper looper UL 1.6, lower looper LL 3.5.
Important when sewing with decorative threads: apply a reduced but regular sewing speed. I recommend using between 600 and 700 rpm. This example shows the difference, that only resulted from the sewing speed! The left seam is stitched with 1350 rpm, the right one with 600 rpm.

You will also notice that it can make a difference whether your spool is full, half full or nearly empty.
Tip: keep the reduced sewing speed for all upcoming decorative stitches, it is worthwhile.
When the stitch suits your requirements, neaten both narrow edges of the sampler with this decorative 4-thread overlock while trimming approx. 3 millimeters.

Fringe, step 1
Set and thread the machine for a 2-thread wrapped overlock wide, stitch 9.
Set cutting width at 9.
Set mtc at +2, that will bring more thread into the stitch.
Thread the lower looper with three decorative threads, for example three times Madeira Lana or two Madeira Lana and one Mettler Silk Finish Cotton or a combination with Gunold Sulky 12wt.

As you can see in that picture, also here I used one spool holder pin per spool. Again, the thread antenna is threaded separately. The threads only meet at the pre-tension guide, for this stitch at the red guide. Experience for yourself how positive this is for your stitch.
Thread the left needle LN with Seracor 120.
My experience shows, that using wool threads, or a quality with some “roughness”, makes the stitch more durable and helps avoiding the fringe to be pulled out of the stitch too easily.
Attach the seam guide and set it to cutting width 9.
Deactivate the upper knife.
The thread tension settings for this stitch were on my L 890 as follows: left needle LN 3 and lower looper LL 2.

For the fringe it is necessary that the needle thread is loose, approx. 4 mm clearly visible!

Only this will allow you to stitch the chainstitch in the middle of the loose needle thread, which will look as follows:

Because in the third step, the needle thread will be cut open. But more on this later.

I therefore recommend, make two sewing tests with the 2-thread wrapped overlock, so that you can keep one and use the second one to be topstitched with chainstitch and labelled.

When the stitch suits your needs, fold the sampler at the marked line for the fringe stitch, wrong sides together. Place the fabric with middle mark up under the presser foot (that will allow the fringe fold to be pressed towards the side of the pillow). Stitch along the fold, using the seam guide.
Fringe, step 2
Set and thread the machine for 2-thread chainstitch, stitch 16.

Thread the chain looper with Madeira Lana 12. I recommend using one thread only.
Thread the right coverstitch needle RC with Seracor 120 in color of the fabric or chainlooper thread.
Set stitch length to 3.
The thread tension settings for this stitch were on my L 890 as follows: right coverstithc needle RC 3.3, chainlooper thread CL 1.

Test sew and finetune where necessary.
For topstitching, first the sewing test, place the wrapped overlock with the right side down under the presser foot C13. While sewing, the right edge of the foot helps holding the looper threads at the right, so that the stitching is in the middle of the visible needle threads. It is important that the looper threads that are now lying on top are not stitched down. You will notice that they are stitched in place on the underside.

If that fits, topstitch the wrapped overlock on your pillowcase sampler too.
Fringe completion, step 3
For the fringe completion, cut the needle thread of the 2-thread wrapped overlock, this will release the overlock loops to create the fringe. Small but not to pointy scissors work best. Alternatively use applique scissors.

As usual, pressing the stitch makes it more durable.
… and yes, it will take a while to have all bits of needle thread out of the project, but then…
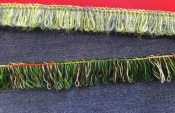
Fringe completion option: Cut the looper thread instead, forming what I call a “fringy fringe”.

Find here the difference: left “fringy fringe”, right “loopy fringe”.

For more on fringes, please refer to my separate blog article with some additional tips.
Shamrock with Decorative Chainstitch
The chainstitch is already set.

If your shamrock needs a different looper thread, now is the moment to re-thread and make a sewing test.
Attach the Curve Foot C23, it eases exact guiding, not only in curves, but also in corners.

If you did not yet attach the slide-on table, now is the moment. Same applies for the knee lifter lever. Decorating flat pieces is much easier if the fabric can be guided with both hands.
For the sewing test I recommend to draw some curves and corners on the sample fabric. I used a heart which is more or less a third of the work of the shamrock. Of course, the heart would be an alternative for the pillowcase decoration.

Use it to practice curves and corers. For more on sewing curves, refer to our video tutorial for the Curve Feet C23 and L 23.
The procedure in sewing corners with chainstitch is the same as when using your sewing machine. That means, stitch until the corner. Needle stop down or back-kick to lower the needle. Use the knee lifter to raise the presser foot only slightly, so that the project can be turned under the presser foot. Lower the presser foot and continue stitching.

It may need some practice with the L 890, but when you succeed, you may want to use these techniques not only for decorative stitching but also for practical topstitching in more upcoming projects.
Place the shamrock template on the wrong side of the fabric, at the middle mark, or where you like it to be. Secure in place with (safety) pins, middle and the corners.

Stitch along the template with 2-thread chainstitch. Stop after approx. 20 cm and make sure to bring the starting looper thread to the upper side, before crossing it and stitching it into the following stitches.

When done with your shamrock, use a tapestry needle and bring all threads to the wrong side, secure with a knot or a few stitches.

Pillowcase completion
For the completion I recommend using a 5-thread combo stitch, stitch 17. Alternatively, also a wide 4-thread overlock can be used, stitch 1. Important for me is that the fringe and the decorative edge stitch is secured in the seam allowance easily. In case you use a 4-thread overlock, set the cutting width to 9.
If you use stitch 17, consider for more seam allowance using alternatively the left or center coverstitch needle. The threading procedure is the same as with stitch 17, only the last bit, from the RC guide until the needle eye. When using the center coverstitch needle, use the black CC guide, when using the left coverstitch needle, use the black LC guide.

So, select the coverstitch needle to your liking, RC, CC or LC. Seracor in all threading paths. Here again, test sew and finetune where necessary until the stitch fits your requirements.

Fold the sampler at the notches, wrong side out, to a pillowcase (size suitable for your cushion). Yes, the pillowcase will be a bit smaller due to the fold of the fringe, it will still sit nice and tight. Pin/clip the sampler. Make sure the fringe fold is towards the side you like it to look.

Stitch the pillowcase with 5-thread combo stitch (or 4-thread overlock), while having a thread chain at seam begin and end, to be secured.
If needed for a neat seam begin on heavy material, use a leader cloth or the Height Compensating Tool (optional accessory).

After securing the thread chains with a knot or a tapestry needle, press the seams.

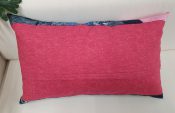
Then form the corners out nicely, turn the pillowcase right side out, stuff it and love it.

And wouldn’t it be nice if your pillow gets company?

The fish is also an ideal design for the chainstitch, in case you like to try it.
Find here the link to the template download: Template Fish A4.
With this I wish you happy stitching and a lot of joy with your overlocker!
Doris

0 Responses