 BERNINA Corporate Blog -
Dear Reader
Decorative overlock stitches can be produced in different ways – most popular is certainly the use of decorative threads and yarns. Today I’m going to show you the special, sometimes surprising effects you can achieve on the overlocker by playing with the thread tension.

Alternatively, you can thread several decorative yarns through the same hook. This allows you to combine several threads – which should not be too thick – to create a new multi-yarn. Perhaps you have read the blog article “Combining threads for decorative overlock stitches”? In it, I show you how to combine threads.


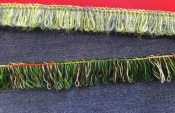
An example for this technique is fringe, which really comes to its best when combining threads.

Playing with thread tensions
Another variation is to play with the thread tensions. Be inspired to try this. In this article you will find 4-thread flatlock, 3-thread flatlock bicolor, drop stitches with 2, 3, and 4 threads, 4-thread wrapped overlock and more.

First of all, forget about the perfect stitch – any stitch, if you like it, is perfect! Even if it looks not as it is commonly understood. Remember, you are the most critic person looking close at your creations.

What on one hand can be judged as stitch that needs to be optimized, can on the other cand pass for a decorative stitch. Here you need a creative eye.

Or let me put it another way: everything is possible, everything is allowed.

Threading and test sewing is the basis. Then we optimize if needed, a common procedure.

But what if we do not want to have the optimal stitch?

What if by incident we discover something likeable? Thumbs up without optimization!

Let’s consider every result to be a “new development”, or better yet, we simply claim that we are creative.

Look at it as a goal to try new things, may be for an upcoming project.

We can create our own stitches, deduce them from the 16, 18 or 27 already implemented stitches on an overlocker or a combo machine.

Many of the following examples are sewn on the BERNINA L 860 and BERNINA L 890, but they also work on the L 850, L 460, L 450 and bernette machines. Look at the recommended settings as a guideline but remember they may differ slightly for other models. Just try it using your thread and fabric combination and consider the character of your machine.
4-Thread Flatlock / Ladder Stitch
You know, the flatlock is produced by a loose needle thread. It works the same whether you use 2 threads, 3 threads, or as here 4 threads.

A 4-thread flatlock is an example of such a thread tension play.

4-Thread Overlock is the basis. Then do the following:
- Change needle thread tensions to 1 (or where possible to 0).
- Set lower looper thread tension to 7.
- Set cutting width to 9.
- Make a sewing test and fine tune where necessary.
- If the needle threads do not reach the edge, reduce cutting width to 8, 7 or 6.
- If necessary, continue test sewing.
- If a 9 mm wide stitch is desired but the needle threads do not reach the edge, use the Decorative Threads Guide for the needle threads.
- Pull the stitch as flat as possible.
If it can’t be totally flat, remember that the three-dimensional effect depends on the cutting width.

This example shows simple flatlock within the fabric, changing with the ladder stitch.


Here an example where I used the 4-thread flatlock for the edge of a pillowcase. The fabric is folded like a faux cuff or faux blind hem.


My preference is using Mettler threads wherever I can. Using the five colors of the threading paths already gives many options. For the ladder stitch choose your needle thread colors wisely for a more contrasting effect to the fabric you use.

In case you use decorative threads in the upper looper for the flatlock, such as Madeira Lana 12 or Cotona 30, then remember to decrease the upper looper tension too. With my L8 it was set ok at 1.6.

And as usual when sewing with decorative threads, reduce the maximum sewing speed, for example down to max 600 stitches/minute.

This sample shows the 4-thread flatlock with Glamour 12 in the loopers and Silk Finish Cotton 50 in the needles.

And if you read my blogs, you know which tip is next – after sewing comes pressing, that stabilizes the seam for more durability.
3-Thread Flatlock, bicolor
A 3-thread flatlock that is out of its regular balance can create a bicolor effect – again, especially with decorative threads – more so with contrasting threads.
The example black-white-red shows YLI wooly nylon extra in the upper and lower looper.

A stitch like this is easy on your L8 as well as on your L4, you will benefit from 9 mm stitch with. On the bernette machines your stitch will reach a max. width of 7 mm.
- 3-Thread Flatlock is the basis.
- Set the lower looper thread tension to 4.
- Set cutting width to 9.
- Make a sewing test.
- The two looper threads shall equally show on the top side.
- Pull the seam flat.
- If no flat stitch is achieved, reduce cutting width to 8, 7 or 6.
Continue test sewing if necessary.

The example green-orange shows Madeira Cotona 4 in the upper and lower looper.

The settings on my machine were: LN 1, UL 2, LL 3, SL 4.5, Diff 1, CW 9, mtc 0, max sewing speed 600.

And here an example with thread combinations, consisting different Madeira Glamour 12. The settings can be verified during the sewing test, as it depends on your thread and fabric combination.

Remember, on the L 860 and 890 you can save your creative stitches into the Personal Memory.

3-Thread Flatlock, bicolor, wavy
Color-waves, a tricky one. This example requires a machine like the L 850, L 450/460 or the bernette. With the individually adjustable thread tension dials at the front of the machine, changing the tensions while sewing is much easier as with an L 890/860. This sample was produced in 2017, it was sewn on one the first L 850 I got hands on. I was curious about the effect of the individual thread tension adjustments.

The looper thread used here is YLI wooly extra. Cutting width was set to 9. Once I played with UL tension dial. Once I played with LL tension dial. I personally think the difference is clearly visible. YOU guess which is which – or try it yourself!

How to achieve the effects:
- sample on the left, while sewing, play with the upper looper tension dial.
- Sample on the right, while sewing, play with the lower looper tension dial.

And no, this technique can not be stored in an L8 Personal Memory, I simply use a paper label for my sewing sample.

2-Thread Drop Stitch
I learned about this stich during BU 2023 – look at it closely – what do you see?

How to achieve this look:
- 2-Thread Overlock LN is the basis.
- Use a size 90/14 needle or a topstitch needle.
- Thread the needle with a decorative thread, suitable for a size 90/14 needle. I used Mettler Silk Finish Cotton 28. Mettler Seralon 30 or Mettler Extra Strong Polyester No 36 or Gunold Sulky 12wt Cotton Mercerized are good alternatives.

The following settings are suitable for above threads:
- Needle thread tension 1.
- Lower looper tension 5 or 6.
- Cutting width 8.
- Stitch length 4.5.
Make a sewing test fabric wrong side up and evaluate right side of the fabric and the wrong side of the stitch.
If the drop does not reach the edge, reduce cutting width to 7 or 6. If a 9 mm wide stitch is desired and not achieved, use the Decorative Threads Guide for the needle threading path (once more).

In the example below, the needle thread does obviously not reach the edge. Here I accepted the needle thread tension and used a loser looper thread on purpose, helping me putting the stitch near, but not directly on the edge. I like this for the effect of “lying on the fabric” but not being a flatlock or ladder stitch.

3-Thread Drop Stitch
Of course, you can also play with the 3-thread super stretch stitchand achieve a double drop. Remember, wrong side up when sewing, right side showing the decorative threads.

And here the procedure:
- 3-Thread Super Stretch is the basis.
- Use size 90/14 needles or topstitch needles and on bernette 60 100/16 needles.
- Thread the needles with decorative threads, suitable for the needle size (for example Mettler Silk Finish Cotton 28 or Mettler or Mettler Seralon 30 or Mettler Extra Strong Polyester No 36 or Gunold Sulky 12wt Cotton Mercerized).
- Change needle thread tensions to LN 1 / RN 2
- Set lower looper thread tension to 6.
- Set cutting width to 8.
- Set stitch length to 4.5.
Make a sewing test fabric wrong side up and evaluate the stitch.
If the drops do not reach the edge, reduce cutting width to 7 or 6. If a 9 mm wide stitch is desired and not achieved, use the Decorative Threads Guides for the needle threading paths.


4-Thread Drop Stitch
Same procedure, but with 4 threads:
- 4-Thread Overlock is the basis.
- 4-Thread Flatlock / Ladder Stitch is the same stitch construction.
- Use size 90/14 needles or topstitch needles. Thread the needles with decorative threads, suitable for the needle size.

- Change needle thread tensions to LN 1 / RN 2.
- Upper looper thread tension 4, lower looper thread tension 7.
- Set cutting width to 8.
- Set stitch length to 4.5.
Make a sewing test, fabric wrong side up and evaluate the stitch.
If the drops do not reach the edge, reduce cutting width to 7 or 6. If a 9 mm wide stitch is desired and not achieved, use the Decorative Threads Guides.

Here the sample where the stitch does not reach the fabric edge. On my machine the upper looper thread tension was set at 3 and the lower looper thread tension at 5.5. But as usual, test sew and fine tune where necessary. Play with your thread colors and thread tensions to experience different effects.


A project proposal for the drops – plant pot covers – so that I don’t forget to water – the project is still on the list of unfinished sewing. Right, this is no drop stitch, but these are no real plants either.

Alternatively, here a faux plant with a drop stitch:

Of course, on your BERNINA overlockers you profit from a cutting width of 9 mm and a stitch length of up to 4.5 mm. That makes this stitch so distinctive.

A question, what is the max. stitch length you can set on your bernette 60?

Next question – what are the needle sizes your bernette 60 is working with?

80 – 100! Not bad, right? Although for these stitches I used a 90/14 needle and got very niche results. This sample shows punta di roma with a folded edge.

Imagine the effects, you can achieve there! Here an example on denim, on the fold.

In LN I used Madeira Metallic 15 and in RN Glamour 12. The loopers were as usually threaded with Seracor 120.
Settings used on my b64 AIRLOCK: LN 0, RN 0, UL 3, LL 6, SL 5, Diff 1, CW 7, mtc +

The drop stitches can be used well on cut and folded edges. As with the fringe, if the fabric is frying a lot, I recommend sewing a hem first. Non-fraying fabrics are easier to work with:

4-Thread Wrapped Overlock
Inspiration is everywhere. I found the 4-thread wrapped overlock in an instagram live, looking at the demo of b64 Air Threading. What can you verify in this stitch?

Despite all the enthusiasm about the ease of threading, the adjustment of the thread tensions was forgotten.

Like or dislike it, I liked the stitch when I saw it. And this is what I copied (using the L 860):

And this is the procedure:
- 4-Thread Overlock is the basis.
- Thread the upper and lower looper with contrasting threads.
- Set upper looper tension to 7 and the lower looper thread tension 2.5.
- Set cutting width to 9.
- If using very decorative threads, reduce the max. sewing speed to 600 spm and select a longer stitch.
- Test sew and fine tune if necessary.
- If the LL does not reach the right needle on the upper side, decrease the LL thread tension and increase the UL thread tension.
- Or reduce cutting width to 8 or 7.
- Continue test sewing.
If a 9 mm wide stitch is desired… you know what to do with the Decorative Threads Guide.


And just a tip: on air threader machines, if you cannot decrease the looper thread tension enough, remember the threading circumvent. Bypassing part of the looper pipe reduces friction and the stitch gest more looper thread. For details refer to our video tutorial about “alternative threading methods”.
Simply 3-Thread Overlock
And here is a stitch where “only” the thread tension does not correspond to the usual settings. Both looper threads are decoratively meeting on the upper side:

The sample is also sewn with YLI wooly nylon extra, but the effect will work with any decorative thread in the loopers, for example Madeira Cotona 4 or Lana 12, etc.
My L 890 settings were:
LN 4, UL 3, LL 1, SL 3.5, Diff 1, CW 8, mtc 0

4-Thread Narrow Seam
My favorite for hemming my stretchy garment lining. Ok, this is not a thread tension play, but the combination of different stitch settings.

4-thread overlock is the basis but the stitch finger is set to rolled hem. That allows the fabric to roll in, but the stitch is a bit wider than a rolled hem or a narrow seam. For this stitch I prefer using a texturized thread in the loopers, like here, Mettler texturized thread.

Settings that worked for my thread-fabric combination are: LN 4, RN 3.8, UL 3, LL 3.8, SL 3, Diff 0.7, CW 7.5.


4-Thread Rolled Hem
A 4-thread rolled hem works in a similar way. 4-thread overlock is the base. In addition, the left needle is inserted and threaded. The stitch finger is set to rolled hem for the fabric edge to roll in. For this stitch embroidery thread is ideal, for example Poly Sheen from Mettler. Also here I have been sewing on a knitted lining fabric.

Settings that worked for my thread-fabric combination are: LN 4, RN 4, UL 3.5, LL 5.5, SL 0.8, Diff 0.8, CW 6.

This edge finish is also suitable for the not so ordinary ruffles.
So, these are some thread tension gimmicks. What is missing? May be a 3-thread rolled hem based on a superstretch stitch? Any combination of chainstitch and rolled hem or narrow seam or flatlock? Maybe you come up with something new?
And if you are looking for project ideas, here a few suggestions that fit the season. These projects include some of the above mentioned stitches and are combined with standard stitches and of course fringe, coverstitches, chainstitches and thread combinations.


Inspiration can be found everywhere, not only in the BERNINA blog. For something different, also visit the US-blog WeAllSew.

With this I wish you happy sewing!
Doris


Wow, great fun ideas for the L890! I appreciate the “research/time” involved, so others like me can have fun success.