 BERNINA Corporate Blog -
Dear reader, let’s learn a new technique with your overlocker: An “invisible” zipper! You can use this kind of closure with any pillowcase. However, below details and measurements are referring to the Bargello style pillowcase, started in a separate article. If you wish to learn how to make that pillowcase front, please read Part 1: Patchwork Pillow in Bargello quilt style, overlock stitched of course.

“Invisible” zipper with overlock
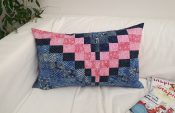
For the back I need 2 pieces of fabric, each 27 x 9″, because I want to sew an “invisible” zipper with the overlock. I can barely see it! How about you?

The procedure is as follows:
On one piece of fabric, press one long edge under by 1″. Then iron this hem back the same amount, folded like a blind hem.

Then pin the zipper onto the hem with a little distance from the edge, right sides together. At the beginning and end of the seam, place the two spare pieces of fabric folded in half, right side out, between zip and fabric. This will prevent the zipper from being pulled all the way open.

Thread the machine with 3-thread overlock RN, right needle. Attach the piping foot L16L. Adjust the cutting width, sot that the zipper is not cut, for my zipper it worked with a cutting width of 8. Open the zipper, then stitch the seam with 3-thread overlock.

Tip: if you sew on an L 860/850/890/460/450, use the piping foot. Alternatively on the L 890, you could use the chainstitch to sew in the zipper – if you do so, I recommend to first neaten the edge with 3-thread overlock.

Press the seam.

Pin the zipper end fabric pieces onto the other side of the zipper.

Pin the zipper onto the other piece of back fabric. Take the zipper pull away again if you used it to pin precisely.

Stitch the zipper into place.


As usual, press the seam.
Thread the zipper pull.

Hidden? Or did I promise too much?
Pillowcase completion
Thread the machine with 4-thread overlock. Attach the standard foot. To finish, I have set the cutting width to 9, to have a seam allowance as wide as possible, so that the strips and zipper seams are well secured.
Pin the back piece with the “invisible” zipper side to the top edge of the Bargello piece.

Although I can still see the holes of stitches at 6 mm in the unraveled Bargello seam allowances, I have stitched this seam with a 9 mm seam allowance and cut off 2 mm. I have enough fabric and the top strip goes on the back of the pillowcase, so I used it generously.

I pressed the seam allowance towards the Bargello to get the impression that the strip was overlapping towards the back.

Now measure and determine the finished length, respectively width of the back. The fabric combination should have a finished width of 32″. With the Bargello there is a 9 mm seam and a 3 mm cut-off, i.e. 1/2″. The same applies to the back, so my fabric combinations is cut back to 33″. If your pillow has a different measurement, take it into account accordingly.

Now pin the bottom edge of the Bargello piece together with the back piece.

Sew with the wide 4-thread overlock.

Press the seam allowance towards the Bargello.

Now it’s time to “center” the Bargello on the front, respectively, I want the top and bottom to equally overlap to the back. This gives me flexibility in how I place the pillow – with an arrow up or down.


Pin the side seams together as the design suits your needs. Make sure the zipper is at least two-thirds open!

Then sew the side seams with the wide 4-thread overlock, whereas I recommend forming a long thread chain at the beginning and end of the seam. You can pull it into the seam allowance with a tapestry needle and the seam is secured and the corners are reinforced.


Iron the seams. Turn the pillowcase and shape the corners out nicely. Press the side seams one last time.

And then enjoy it!


With this I wish you lots of fun with all your sewing projects, although of course I hope you execute many with the overlocker!
Doris


What a unique technique for a zipper with serger. Thanks for sharing.