 BERNINA Corporate Blog -
Have you ever tried threading several threads at the same time through the same looper on your overlock to sew decorative stitches with a thread combination? Wonder how to do that? Here you can read how to sew with thread combinations on the overlocker.
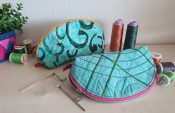
You probably have a variety of thread in your stock too. Here I will introduce different types of thread that you can combine, mix or blend for great effects in overlock stitches, coverstitches or chain stitches. As you can see, I can’t decide on a name. Important is the result! In the article you will find tips on the different threads, thread tensions, stitch settings and helpful accessories for sewing with thread combinations.


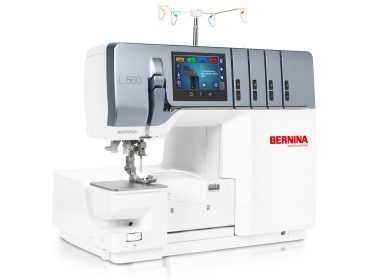
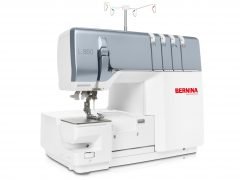
Using an BERNINA L 890 or BERNINA L 860, which I prefer for this, it works as described below. On the L 890 you have more possibilities, thanks to the choice of overlock and cover or chain stitches. However, the pure overlockers, L 850/860, L 450/460 or bernette 64/68/62 or 48/44/42 can also master these techniques.
Here an example with overlock, coverstitch and chainstitch:

Here an example with overlock and chainstitch, whereas the overlock was used for the fringe, but also by neatening the fabric edge, see the clear blue stitches:

Here an example with overlock, respectively flatlock:

But let me get straight to the point, I’m not using the L8 because of the preset thread tensions. I use the L8 primarily because it sews nice and smooth and offers me the desired ease of use. As we are combining threads, we are going to adjust the tensions so that it fits the thread needs and we achieve the stitch we aim for. The best example of this is the fringe, which has already been published in a blog.

Which types of thread can be combined on the overlocker?
There are so many threads, not only at the thread supplier, but unfortunately also in my closets. Can I assume that it is the same with you? But not all of them are suitable for combining, or rather, not everything can be combined with everything. By that I mean, what does not go “smoothly” through the looper eye is too thick!
I recommend using threads or yarns of medium weight. These include Mettler Silk Finish Cotton 28, 40, 50. Mettler also has other medium-weight threads, for example “Extra Strong” and Seralon 30. Madeira Lana 12 or Decora 12 are also suitable for blending.


Of course, I love Madeira Decora 12, who doesn’t? It is suitable for the loopers, for combining – and individually it can also be threaded into a size 90 needle. Madeira offers numerous decorative threads that can be even more decorative with your imagination.

Gunold Sulky 12 brings me the matte shine for natural effects.

These are just a few examples of medium-weight threads. But if I take these as the basis, I can use them either two or three together.
And I can combine them very well with each other:

You can also pimp them up with fine metallic yarns. With the metallic embroidery threads from Mettler and Madeira, I achieved beautiful stitches very quickly and easily:

When it comes to combining with texturized threads, I am more on the careful side. Although the not too stretchy texturized thread produces very nice results. Here you see Madeira Aerolock combined with Mettler Metallic embroidery thread. The project was sewn on the bernette 62 AIRLOCK.


Sewing samples are essential to evaluate the best settings. As you can imagine, I collect them and label them for repeated use (but I collect almost everything).

Again, it is easier with the L 890/860, because I can save the personalized stitch settings on the machine. The Personal Memory holds up to 100 stitches, all under a name that suits me or the stitch.

And as with everything – try my tips, but bring in your own creativity and play with your thread supplies.

No, I don’t assume that you all have a color-coded collection, but some of you certainly 😉

Combining threads on the overlock – useful tips
So that brings me to the tips for good success, because what should be considered is: One spool only per spool holder pin and one guide on the extractable thread guide for each thread.

The threads should only meet at the pre-tension guide.

Threading several threads at the same time on the overlock
The air threader will only work in very few cases for threading several threads at the same time. What worked with my L8 are 3 x Mettler Poly Sheen embroidery threads in the upper looper.

I like this for decorative rolled hems.

What also worked very well are 2 x Mettler Silk Finish Cotton 28 with 1 x SFC 50 together in the upper looper, or in the lower looper, on the L8. This example shows them in the lower looper for a 2-thread wrapped overlock.

What does not work with the air threader is 2 x Madeira Lana 12, let alone 3 x Madeira Lana 12. But just try it out for yourself.

So, what is the alternative that I can use 3 x Madeira Lana together? For example, for fringe or chainstitch or coverstitch? The solution is an alternative threading method, namely a thread craddle for the looper threads. You can see in detail how to do this in our video tutorial about “alternative threading methods”.
The thread craddle can also be helpful for the open thread guides of an L 460/450. Using a craddle, the threads can be threaded together through the open guides easily.

And threading the looper eye itself is also done with the auxiliary thread craddle. By the way, this also applies to all slightly heavier threads, for example texturized thread, not only for thread combinations.

Can you see the three threads coming out of the upper looper? There are 2 x Gunold Sulky 12wt combined with Mettler Saby 30 Multicolor. Saba 30 is not as commonly used, but there are various comparable qualities. Mettler Silk Finis Cotton 28, 40 or 50, which is available in multicolor.
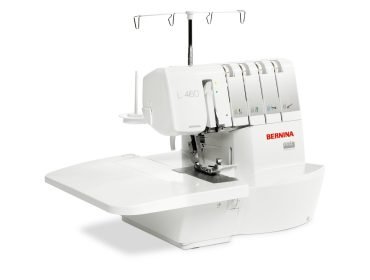
The sewing result of the BERNINA L 460 is also impressive, a 9 mm wide 4-thread overlock:

And if you are wondering, where do all the threads come from, the overlocks have only 4 spool holder pins and 4 antenna guides? Well – my “old L 220” is standing right back to back with the L 460.

What I’m trying to say is, somehow it works, but on the L8, with 5 spool holder pins, it is easier. For my L 860 I got a retractable thread guide from an L 890, so there is a guide above each pin (would be available at the BERNINA dealer as a “spare part”). If you have a sewing machine with a Multiple-spool Holder for embroidery, you can also use it, it has a high, extendable thread guide. Some of you may already be using a separate cone and spool stand for large spools (e.g. from Prym or so). So much for my home office, my sewing as a hobby or my dream sewing studio.

Sewing with thread combinations – tips on thread tensions
Sewing test and fine-tuning – those who overlock know this well enough. Basically, first loosen the thread tension, namely the one with the decorative threads. If that is not enough, then tighten a different thread tension to pull the thread into position. This must be used with caution – I prefer and recommend using the decorative thread guide if loosening is not enough. This guide bypasses the pre-tension guide. In most cases, the “correct” thread tension can then by slightly increased again, which allows good control over the thread amount.
In the case of the L8, this is the Decorative Thread Guide #L25 (optional accessory) and there is a video tutorial for using it.

Of course, there is also a Decorative Threads Guide L 450/460, also as an optional accessory. It bypasses pre-tension guide and tension, as it is equipped with its own thread tension dial.

You can see its handling and advantages in our video tutorial.
The bernette 60 has also a decorative thread guide for the looper threads, it is even a standard accessory. Its handling is detailed in the video tutorial.
Don’t get me wrong, you don’t always need a decorative thread guide. It is needed for long and/or wide stitches. And that is what we can sew on the L8 and L4: stitches up to 9 mm wide and up to 4.5 mm long. These are especially suitable for the decorative threads you combine yourself.

And if the thread tension cannot be loosened sufficiently despite the decorative thread guide, there is only one thing that helps: to make the stitch narrower, i.e. to forget about cutting width 9 and to be satisfied with 6, 7 or 8 mm wide stitches. If you are not satisfied with this, you can stitch two rows next to each other. For example, as a tape, here consisting of two times 8 mm wide 3-thread overlock:

Or, for example, you do what is called “knitting with an overlock”, i.e. putting row after stitched row.


Tips on stitch settings
For decorative threads use long, wide stitches. So set the cutting width up to 9 and the stitch length between 3 and 4.5, depending on the design. This applies equally to combining threads yourself or using heavy threads individually. Here an example of YLI Pearl Crown Rayon used in upper looper (pink) and lower looper (silver). It was sewn on an L 850 with cutting width 9 and stitch length 4.5:

Differential feed, in most cases I leave it at 1, but of course that depends on the fabric used. I pay attention to whether the fabric is sewn in length, cross, or bias grain and what design shape I want to stitch.

mtc, for me depending on the fabric thickness. Sometimes mtc helps me to pull on the thread, but when the machine gets too loud, the tension is just too high, and I have to reduce the cutting width. If nothing helps, there is then just a narrower decorative stitch.
Presser foot pressure – if you are familiar with it, raise your hand. I have had the best experience with the basic setting. But when I had to adjust, it usually was towards less pressure, so that the feed dog transports the thick stitch better under the presser foot.
Knife up or down – lower it of course while sewing along a fold. And to make it accurate and easy to guide the fabric, use the seam guide. The L8 and L4 include the seam guide as a standard accessory. Sure, in the picture you can see that I’m cutting, so that gadget is also suitable for cutting a regular excess seam allowance.

For more on accessories, standard or optional, see below.
Tips for sewing with thread combinations
Sew slowly… not stitch by stitch, but with a maximum of 700 stitches per minute. On the L 890 and L 860, this can be easily adjusted, directly via the icon on the sewing screen.


On the BERNINA L 850, you can reduce the maximum sewing speed via the switch under the threader cover.

Bit it’s also easy with your other BERNINA overlockers, the sewing speed can be easily adjusted by means of the foot control. And don’t forget the back-kick to lower the needle(s) when it comes to reposition the project under the presser foot.
At bernette, the b60 has an advantage, because the minimum speed can be controlled from 350 stitches per minute by means of the foot control. But it’s like with other techniques, practice makes perfect.
Tips for stitches
Yes, if you liked the tips, but you don’t know where to start, here are a few tips:
4-thread overlock with two threads in the upper looper – looks always great! I love it for tapes that I can topstitch on readymade garments, just pimp it up.

3-thread overlock narrow, here is my example with 3 x Mettler Poly Sheen in the upper looper. I find it suits the “denim jacket in pink” – it is a bit finer, matching the embroidery design.

3-thread rolled hem, I already mentioned that. I recommend the beautiful, protruding rolled hems for children’s clothing or decorative napkins and scarves. Or for a bow, I have a project pending where I go colorful, not just tone-on-tone, which means that someone will surely get a colorfully wrapped gift soon.
2-thread wrapped overlock, the classic stitch for reversible edge stitches that are looking alike from the right and wrong stitch side. Or just the first part of sewing a fringe stitch.

3-thread coverstitch wide, with two or three threads in the chain looper, simply an eye-catcher. Here you can see 2 x Mettler Silk Finish Cotton 50 Multicolor at the same time.

3-thread coverstitch narrow – also this with two (or three finer) threads in the chain looper – because there is not enough glitter in our world. This sample was stitched like the b62 sample above, Madeira Aerolock combined with Mettler Metallic embroidery thread.

And if you like it a little more discreet, here is just a 2-thread chainstitch with red and red-white thread, both Silk Finish Cotton.

Another 2-thread chainstitch, here I combined not only 3 threads, but as you see 3 x Mettler Silk Finish Cotton 50 multicolor. Depending on how the thread comes from the cone, one color dominates the looks.

As you can see in the picture, not only the chainstitch is colorful, but also the other stitches used in this project.

Here I stitched the 4-thread coverstitch first, then turned the fabric wrong side up and set the narrow 3-thread coverstitch next to it.

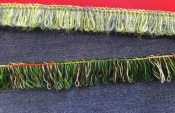
For my colorful fringe look I used a pattern by the Swiss designer Raffael Kouto. You can see my interpretation of the skirt “Solar Wave” from the autumn campaign of BERNINA Switzerland This denim was previously an upholstery cover. The picture shows the garment before the washing machine did the fraying job for me:

And here is another eye-catcher – this decoration is not mixed with threads, but stacked with stitches. What you see here is what we call a stacked stitch, a wide coverstitch that has been topstitched with a chainstitch.

Of course, this technique lives of different colors, or contrasting colors in the chain looper. Here you see its topstitching:

The result is three-dimensionality with threads that are not necessarily very heavy/thick off the spool. Here a design where the stacked stitches would come into their own (but I have also only combined threads here):

With this technique, individual fabric designs, such as this, are stitched in no time.

Tips for accessories
You have already read about the decorative thread guides.
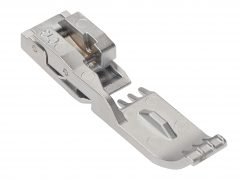
The Chainstitch Foot #C13, the all-rounder for decorative chain stitches and coverstitches – also a must for the fringe.
Rolled hems with decorative thread, for me this includes the cording foot. It makes it easier to transport away the voluminous stitch so the stitch pattern remains nice ans regular. This also applies to rolled hems with texturized thread. For the L 850/860 is it the Cording Foot #L17. But the L 890 and the L4 also have cording feet, look out for them.

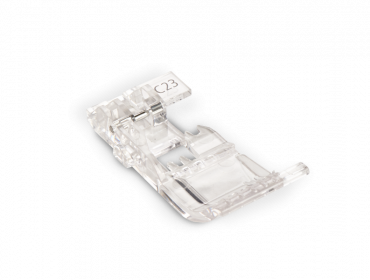
Decorative stitches in curves – of course I use the curve foot, Curve Foot #C23 for the L 890, Curve Foot #L23 for the L 850/860.


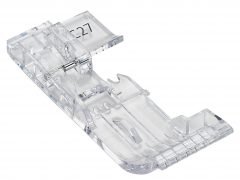
Clear Overlock/Combostitch Foot #C27 and Clear Overlock Foot #L27, for a better view onto pre-drawn lines, stripes or a design template.


The bernette 62/68 and b42/48 also have transparent feet, which give you a good view while sewing such projects.

I hope that you will find it easy to make decorative overlock stitches and that you will be bursting with ideas!
Doris


Super spannend, leider habe ich keine Berninaoverlock. Meine hat eine Fadenspannautomatik, So kann ich wahrscheinlich nicht diese wundervollen kreativen Stiche nachmachen!
Hallo Fiala. Danke für Deine Rückmeldung. Ja, der Vorteil bei Fadenspannungsautomatik ist, Du musst nicht einstellen – oder, der Nachteil bei Fasenpannsungsautomatik ist, Du kannst nicht einstellen. Da Du einen Teil der einzelnen Stiche mittels unterschiedlicher Einfädelwege erzielst, könntest Du eventuall damit spielen… aber da möchte ich mich nicht auf Experimente einlassen. Ich bin aber sicher, Du hast auch so viel Freude am Overlocken! Gruss, Doris
Thank you so much for a wonderful, well-illustrated article
Love how serger stitches can spruce up a project. That’s my goal this year to use the serger to enhance items I’m sewing.
Oh, wow, this is a FANTASTIC how-to article! The descriptions, especially with the supporting pictures, make this something I will try. I had wondered a little about combining different threads, but haven’t had a chance to try before. This goes way beyond my imaginings. lol. Thank you, Doris!
This article includes so much information about combining threads in the overlocker, thank you! I teach serger classes for my local dealer and can hardly wait to develop a class based on this information.