 BERNINA Corporate Blog -
Dear reader, are you new to overlocking? Or is patchwork on the overlock machine a new idea for you? Or are you just interested in Bargello? Do you need another patchwork pillow? If you answered yes to at least one of these questions, then I think this project, which is relatively quick and easy to execute, is for you!

When I started thinking about how to combine the L 8 overlockers and quilting or patchwork, at first, I mainly thought of jelly rolls, or bali pop, or whatever you call strips of fabric of 2 1/2″ width. Long strips match the long foot and feed dog of the overlocker, right?


Strips for which kind of patchwork? A Bargello design, the play with colors, was always fascinating for me. What about you? And what is easier than using the sampler for a pillowcase?

When in doubt, then remember, you can always use pillowcases – at last as a give-away.

Sewing patchwork with the overlocker – fabrics and colors
This article will cover piecing the Bargello. Sewing the pillowcase will be covered in a separate article, because I would like to introduce to you the technique of sewing a covered zipper on the overlock machine. However, now it is playing with colors. Which of the color packs, some of which have already been torn apart, should it be?


One thing is certain: I need 12 strips of 1 1/2 x 44″ as well as more or less matching color for the back of the pillowcase. So, it is time to play with the inventory.

And I recommend that you do that too – take a few strips and play with them until you like the combination of colors and prints.

When it comes to Bargello, it is important to remember, that the “last and first strips” should also match somehow. At least for me, but decide spontaneously what you personally like! Here you see my play with sequences.


As already mentioned, Bargello quilt designs appealed to me because of the colors. When it came to realizing my idea, I thought, sh… so many small pieces, how am I supposed to do that?

Fortunately, either google, a blog (Wiebke) or a specialist in my circle of friends is here to be asked. For me it is a call to Aggy. Thanks Aggy for guiding me in the right direction.

In this case, Aggy’s expert tip means: tube, sew first, then cut, then unravel a little bit, then sew again! And when I look at the time spent for unraveling, it was clearly time saving compared to partially unraveling and reassembling, or especially time saving when it comes to cutting small squares and sewing them together. But more on that later.

Patchwork pillowcase – material requirements
But let’s just start by putting together the material. Since this is about quilting, the measurements are mainly given in inches.
You need for a pillowcase of 25 x 16″ (64 x 40 cm):
- 12 strips of 2 1/2 x 44″ (6.5 x 110 cm).
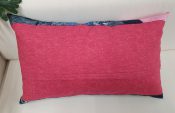
- Cotton fabric for the back side: 18 x 26″ (45 x 66 cm). Cut this at two pieces of 9 x 26″.
- Zipper by the meter, 30″ (76 cm) with one zipper pull.
- 2 spare pieces of cotton 1 1/2 x 3″ (4 x 8 cm) for the zipper end. These can be taken from the cut-offs of the bargello quilt.
- Overlock universal thread, I recommend Mettler Seracor 120.
- Piping foot (optional accessory) for sewing in the zipper, L16L for L850/860, C16L for L 890.

My Bargello was sewn on the BERNINA L 860, you can see that in the photos, this is what the settings refer to. Of course, you can use any other overlock machine, you need 4-thread overlock and 3-thread overlock.

Assemble the Bargello strips
Sort your strips so that you like the pattern because whatever you like is allowed. At some point I decided, now I must start.
Number your strips 1 to 12.

Sewing the Bargello strips together
Set your machine for 4-thread overlock and thread with Seracor 120. Set cutting width to 6 or 6.25, meaning 1/4″. Attache the seam guide and set it approx. 3 mm to the right of the cutting width. We assume 1/8″ as cut-off. The CS Lock Tool helps to do so. Once you set that, do not change during that process of sewing the strips.


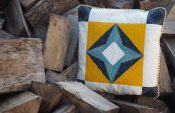
Why all these details? This was important for the calculation of the material requirements. Or if you are sewing a different pillow size, then calculate to deduct 3/8″ seam allowance twice from your strips. The strip you bought has a defined width. Why I cut while sewing? Because the machine gest less dusty when it can cut a strip instead of only trimming loose fray. An alternative would be to deactivate the knife and place the seam guide precisely at the knife position of 6.25. Another alternative would be to use the chainstitch and a precise 1/4″ seam allowance. Here the picture of another piecing project done with chainstitch:

Can that be something for your next project. Patchwork is always a matter of precision.

Back to the Bargello. The strips are sewn together in pairs, from top to bottom. Sew strip 1 to strip 2.

Sew strip 3 to strip 4. Place this composition in the same sewing direction next to the first composition.

Sew strip 5 to strip 6. Place this composition in the same sewing direction next to the other strips.

Sew strip 7 to strip 8.

Sew strip 9 to strip 10.

Sew strip 11 to strip 12.

All strips are now sewn together in pairs.
No press, first flatten the seam, then the seam allowance in the same direction, nice stitch side up. Yes, it is possible that there will be a seam allowance in the lighter fabric, this depends on the stripe composition and numbering and is almost unavoidable.

Now the pairs are sewn together, but from the bottom to the top. This is a tip I learned from one of Wiebke’s blogs. But more on that later.

Sew strip 2 to strip 3.

Sew strip 4 to strip 5.

Sew strip 6 to strip 7.
Sew strip 8 to strip 9.
Sew strip 10 to strip 11.

Now you have sewn all strips together. Do you like it?

More ironing, first all seams flat, then all seam allowances with the nice stitch side up again. This means that the seam allowances look at each other.


Now we come to the Aggy special tip for making a Bargello easier: first sew (nearly done) then cut (next) then separate, then sew. For you this means: Sew strip 1 to strip 12, the sewing direction is “from the bottom to the top”. For this you place the composition nicely flat on the table, strips 1 and 12 together. I recommend stabilizing the strips with a few pins.

Then you sew them together from bottom to top, so that you get a tube.

Press this seam, you know how.

By the way, my stripes are almost exactly 1 5/8″ finished width. Checking this helps me to adjust the seam allowance, respectively the cut-off for the rectangles, so that I can cut-off a very little bit more if I stick to the calculated seam allowances. This means that I now move the seam guide slightly, approx. 1 mm to the right, so to speak, at a greater distance from the knife.

Horizontal strips become longitudinal strips
Now we can continue with cutting up the strip sequences. To do this, I turned the tube, right side out. Ruler and rotary cutter simplify the process.

My design looks as follows:

I have planned the following rectangles for the finished pillow size of 25″:

This means for the cuts, plus 2 x 1/4″ seam width and 2 x 1/8″ cut-off. However, I decided to round up the outer two rows, so that I would have more flexibility when sewing the pillowcase later in case my calculations were misleading… can happen. This means I can also be a little more tolerant about the stitch width and the cut-off. Since these parameters influence the cutting, I recommend the following measurements:

And if you are interested in the calculation for chainstitch, respectively for sewing with deactivated knife, the measurements are:

If you like to print this page to place it on your cutting table, find the .pdf here:
bargello patchwork pillow cutting strips along
I recommend that you cut the strips from right to left / or left to right in order and leave them there. This will make the unraveling process easier afterwards.

When cutting, make sure that the ruler is exactly at right angle to the strip seams.

These are mine, and maybe your strips too.

Design preparations
Now it’s time to adapt your design, or try my design, which, as shown above, has the following focus: you can also find a .pdf for this here.
bargello patchwork pillow cutting strips along v-shape.
To adapt, I will move the focal points in pink as far as I can match it with the template.

Unraveling
Then below the tip in pink I want three blue rectangles. This means that I have to unpick the seam below the third blue rectangle. The easiest way to unravel a 4-thread overlock is: pull out the right needle thread first, for example with a blunt tapestry needle. Then pull out the left needle thread. That will allow you to just remove the looper threads from the edge.

The remaining seams that need to be unraveled can be easily verified. To the left and right of the tip in pink there are 4 blue rectangles.

You continue like this, using the offset rectangles to determine the seam to be unraveled, until all the longitudinal strips are prepared.

Sewing the lengthwise strips
I like how that worked because it’s already time to continue with assembling.

Your machine is still threaded, and you have adjusted the cut-off. You are ready to sew all strips together. Thanks to the pressed seams you should get more or less precise cross seams.
I recommend that you proceed step by step. I prepared by pinning strip 1 to strip two, at alternate cross seams.

Sew slow, remove the pins before the knife and make sure that all seam allowances are looking to the designated direction.

Then sew strip 3 to strip 4, and so on, until you have sewn it all together.


You know what comes next? Pressing nicely. I decided to press all seam allowances from the middle pink tip away, towards the side seams.

And now the exciting question, did my calculations and seam allowance settings result in at least 25″ width???

It turns out that I cut off a bit too generously. But thanks to the allowances on both sides, I can sew the pillowcase in the required size of 25″ width. How about you?
Tip: If it is not big enough, sew a frame on the left and right side, as usual with a quilt – or on all for sides. That could for example look like this:

Well, a frame won’t be necessary for me, so I can sew the patchwork pillow straight away. My patch is 27 x 20 1/2″. The pillow is 26 x 16″. I intentionally added two more strips in height so that the front stretches nicely over the edge of the pillow. It will look like that:

Before I close (remember, sewing the pillowcase will be covered in a separate article), let me come back to the previously mentioned Blog article by Wiebke.
Her instructions, available in German, not only differ from Aggy’s tip about sewing a tube. Wiebke describes in detail how to cut strips, sew with the sewing machine, iron and quilt, and finish the bargello into a table runner. Take a look and get some more tips and ideas.

Questions so far? If not, here’s another tip: Of course, it would be an option to quilt the Bargello before sewing it into a pillowcase. Your decision!
This is part 1 of the Bargello patchwork pillowcase. I will show you how to sew the pillowcase with an “invisible” zipper in the second part.
Have fun stitching
Doris


Dit is só ontspannend om kwilt of enige naaldwerk te doen! Bernina is werklik deel van my lewe!!!
Dear Alta, thanks for your comment – it is always great to hear of someone who shares their passion for needlework and/with BERNINA! Kind regards, Doris