 BERNINA Corporate Blog -
Good morning and welcome to the third post in the BERNINA Blog Advent Calendar 2023. Today I’m opening the door to little embroidered gift tags that look fantastic on Christmas presents. These gift tags can subsequently have a second life as key rings for the lucky person who gets them. I really like these 2-in-1 gifts.
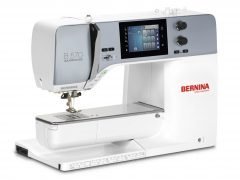
You can program the gift tags directly on your BERNINA embroidery machine with designs already available on the machine. In today’s post, I will show you how to do this on my BERNINA 570 QE which is not only great for quilting, but can also embroider beautifully.

Embroidering gift tags – Material supplies
Wondering what you need for the embroidered gift tags?
- Imitation leather in silver or your desired color 15 x 20 cm in size
- Felt 2mm thick, 15cm x 20cm
- Stabilizer
- Embroidery thread – I like using the embroidery thread Poly Sheen by Mettler
- Spray adhesive – I prefer to use the temporary spray adhesive by Mettler which you can find here
and of course your embroidery machine and an embroidery hoop. Preferably not the smallest, unless you only need a single tag.

Preparations
First, hoop the stabilizer in the embroidery hoop and get the imitation leather ready.

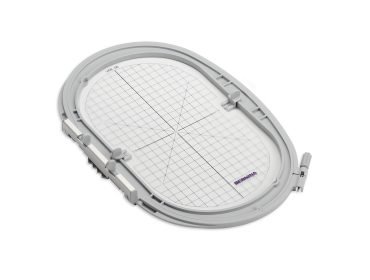
I used the Large Oval Embroidery Hoop for my gift tags. Please don’t be surprised that the photos on the display sometimes show a different embroidery hoop… I wasn’t paying attention when I created the embroidery file. You will do yourself a favor if you determine the correct size of the embroidery hoop in the machine as early as possible.

After hooping the stabilizer, apply the spray adhesive on the wrong side of the imitation leather and position the piece of imitation leather on the stabilizer while pressing the imitation leather firmly onto the stabilizer.

Arranging the embroidery designs
While the embroidery hoop is now waiting, we turn our attention to the display of the embroidery machine. First of all, choose a font that you would like to use on the gift tags. I have used font number 4 for my tags.

Now add your letters one after the other. Each letter is given a new level. To do this, click on the plus for a new level, and then you can insert the next letter into the new level.
First, spread the stacked letters roughly within the embroidery hoop. This works brilliantly with the pen supplied with your machine. I initially decided on 8 letters, but later had a collision with the size of the embroidery hoop, which is why I ended up with only 7 tags. So choose the right size of your embroidery hoop now if possible.

Use another new level to add the frames to your embroidery. My selected frame is hidden in menu folder 9.

But not only number 7, which I used, but also number 8 is suitable for gift tags.

After inserting the individual frames, place them one after the other over your letters.

If you zoom in, you can fine-tune the frames and letters and align them with each other. There should always be a square of space between the frames so that you can cut out the tags afterwards.

My final embroidery now looks like this on the display. However, this embroidery is not optimized specifically to embroider without many pauses. But I can cope with that. It only took me about 10 minutes to put everything together, which means the time required isn’t really that long, so I’m happy to accept that the embroidery process isn’t perfect.

Embroidering the gift tags
Now it’s time to embroider. The embroidery hoop is attached, and the start button is pressed – I always find that moment very exciting. For the upper thread I used Poly Sheen in red by Mettler Threads and the classic white bobbin thread.
My 7 letters will be finished in just a few minutes.

As soon as the letters are finished, we take the embroidery hoop out of the machine, and the spray adhesive is used again.

We now stick the felt onto the embroidery hoop from behind so that the embroidered letters are covered properly.

Then the hoop is attached again. For all further steps, it is worth considering using the Poly Sheen embroidery thread as a bobbin thread, as you will also be able to see the back of the gift tags. Poly Sheen can also be used as a bobbin thread – I haven’t had any problems with it yet.

And so it continues. One by one, the machine now embroiders the gift tags.

I was actually curious after embroidering the first tag and took a look at the back.

I really like the result, so we can move on.

Finishing the gift tags
After a little while, all the gift tags are finished.

Carefully tear away the stabilizer. You can actually remove the stabilizer between the felt and the imitation leather down to the seam. After that, cut out each gift tag. I personally prefer a small edge of 2 mm around the gift tags.

The smallest punching tool on my punch pliers fits perfectly to punch the hole in the gift tag, so the gift tags have their hole in no time at all.

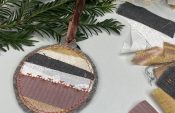
Finally, I have attached a satin ribbon and threaded on a bead.

And the gift tags are ready :-).

After Christmas, the satin ribbon can be replaced with a key ring. 😉
I wish everyone a happy and peaceful Advent season! Have fun while creating the gift tags.
Kind regards Dominique


I can see using this technique for numerous projects. Thanks.
Love the tag, but how does one get the designs? Your projects are not eazy to download.
Dear Brenda,
You cannot download the design, she explains step by step how you can use the files on your machine to create these tags. However, the machines have a different variety of embroidery designs, or it could be that yours does not have the frames. But it for sure has an alphabet. So if you do not have the frame designs on your machine, I would suggest to just embroider the letters, draw a tag template to trace on the back of the fabric, and then cut out the tags. Or you could sew a zigzag with your machine to make the frames, or look for some frame embroidery designs in the internet, or program some if you have an embroidery software.