 BERNINA Corporate Blog -
 I am working on making a new wallet after mine broke.
By making my own I am able to tailor it to my needs and be creative with the style. I decided to create my own embroidered textile for the exterior of the wallet.
Even though this piece of the wallet is larger than my biggest hoop, I can still embroider it with the Multi-Hooping technique.
The first steps to a successful Multi-Hoop project are in digitizing the design. Multi-Hoop embroidery designs include registration marks and are digitized for specific Hoops.
Here is what I have in mind for the design:

It will be a Tri-fold wallet so this is what it would look like folded up and closed

This is the plan for the exterior of wallet when open

And the interior will be plain.
In my blog post DIY Embroidered wallet with free patterns & designs I share the free pattern I used to make the wallet as well as how I embroidered the fabric.
What will be needed:
- Bernina Embroidery Software 9
- Artwork/image
Artwork
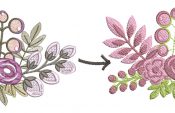
I found an image of a floral design that I liked by Rawpixel.com on Freepik.
I edited the artwork in CorelDraw so that it would be the correct shape and size for my pattern.
You can follow the steps I took to edit it here: How to crop and reshape an artwork in CorelDraw
Creating the Multi-Hoop Embroidery Design
Auto Digitize
 Insert the artwork.
 Select the artwork and click on the Auto-digitize tool.
 Choose what colours to omit.
I didn’t want the light grey background to be converted to embroidery so I omitted it.
 Delete the floral artwork.
Edit the embroidery
 Select the design and change the fill type if necessary.
I changed my design to the Fill Stitch.
 Select and delete any parts of the design you don’t want.
 Change the thread colours. Right click on a colour in the bottom Toolbar to open the Thread chart on the right.
Multi-Hooping
 Select the Multi-Hooping Tool and wait a few moments well it loads.
 Click on Multi Hooping Options and tick the box to add registration marks.
“The larger the margin, the greater the distance between the registration mark and the maximum embroidery area of the hoop. This makes it easier to align but there may be some trade-off in precision.” – BERNINA Embroidery Software 9 Help
 Select Automatically Add Hoops and click OK on the pop up message.
 Click on Preview Hoopings to see how the design will be split between the hoops and move the hoops if necessary.
Finishing Off
 While still in the Multi-Hooping mode, click on File and Save or Export Machine File.
 I exported the machine file to my chosen destination and renamed the file.
 If you receive this prompt, click No.
 Then edit the placement of the hoop so that all parts of the design are in green. Click on the hoop line, hold the mouse down and move it.
If there are parts that are black, it means they won’t be included in the hoop and therefore not embroidered.
Try exporting the machine file again.
 Click Save All then Close.
 When you go to the folder where you exported the machine files, you’ll see that the embroidery design is split in to two files.
 Check back soon to see how I embroider this design for the wallet I make and how to embroider using the Multi-Hoop method.
Please keep in mind that as this embroidery design is relatively simple for multi-hooping, I was able to easily make use of the Auto Hoop tool when digitizing. It is also relatively straight forward to embroider with the multi-hooping technique. Of course the more awkward the shape and larger the size of the embroidery design, the more challenging multi-hooping may be. This blog post is merely an introduction Multi-Hooping.
I would love to see what you make, please feel free to share with me!
Instagram
Facebook
-Hannah-Rose


0 Responses