 BERNINA Corporate Blog -
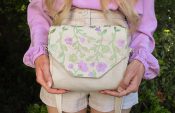
 My wallet recently broke and I haven’t found one that suits my needs or style.
I decided to make my own and came across a great free pattern.
I also chose to create my own unique textile print with embroidery and created the embroidery design in the Bernina software. You can learn how I created the design in my previous blog post: Create your own embroidered textile
What will be needed:
- Sewing machine 735
- Embroidery Module
Large Oval Hoop
Embroidery Foot #26 - Wallet pattern (see below for free pattern)
- Embroidery Design (see below for tutorial and free designs)
- 35cm x 50cm Fusing/Iron-on Vilene
- Cotton Fabric:
50cm for the entire wallet
Or
15cm x 40cm Fabric for Exterior
40cm Fabric for Interior
Or refer to the pattern for other suggestions - 1 Press Stud/Snap Fastener/Popper (I used the metal type that are secured by hand stitching)
- Optional: 10cm zip
- Optional: Zipper Foot #4
- Regular Foot #1
Free Wallet Pattern
I used the Small Trifold Wallet pattern by Yoan Zivkovic.
It has many great features that I want in a wallet. However, I did make a few amendments to the pattern:
-I omitted Panel 4 as I did not need a second compartment for notes.
-I drafted a new pattern piece for the Wallet Exterior by merging Panel 7, 9 and the Button Tab.
This meant that I needed to a draft a Lining for the Flap too.
-I ended up including the zip compartment in the exterior but I made it an inset zip.
You can download the pattern pieces and the steps for sewing the variations here:
Wallet Exterior Variation
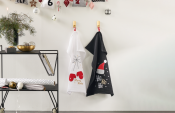
Free Wallet Embroidery Designs


I created some free Multi-Hoop Embroidery designs based on the Exterior Wallet variation I drafted.
There are 2 designs available and each have a variation for a Inset Zip.
One design is a row of Proteas and the other is an all over Daisy design.
You can download the designs here:
Wallet embroidery designs by Hannah-Rose Smith.
The original artworks were generated by AI.
Steps
The pattern comes with instructions and a video tutorial, so I am not going to repeat the steps.
Instead, I am going to share how I created my own unique embroidered textile.
As my embroidery design is larger than my biggest hoop (the Large Oval Hoop) I needed to create a Multi-Hoop Embroidery Design. You can learn more over on this blog post: Create your own embroidered textile
Below are the steps on how to embroider a Multi-Hoop Embroidery Design.
Embroidery designs that are digitized for Multi-Hooping include registration marks and are digitized for specific Hoops. This is a great example of how the Bernina Embroidery Software 9 and Bernina Embroidery Machines with Pinpoint Placement work hand in hand.
Multi-Hooping
I would recommend not cutting the fabric prior to embroidering it. This way we can avoid any additional challenges that may come with floating the fabric.
Keep in mind that the finished shape of the embroidery design when hooping the fabric.
As the designs for this wallet are rectangular, the two multi hoop placements will be linear (overlapping, directly one above the other). This is a very straight forward shape and hoop placement to embroider with this technique.
Take note of which part of the design will be the first hoop and factor that in when hooping the fabric. For the free designs I have provided, the first hoop will be the top of the design.
Print Templates
The print out templates of your design will help with placement.
I have provided the printable templates for the free designs so print them as you normally print a pdf document. The templates are to scale for A4 paper.
If you are using your own design, here are the steps to print the templates:
How to print templates of an embroidery design
Embroider
 Hoop your fabric with stabilizer beneath it.
I cut my stabilizer twice the length of the hoop so that when I rehoop for the second part of the design, the stabilizer will be continuous.
 If needs be, use the printed template and your Hoop template for help with Hoop placement.
- Activate Off-centre positioning if possible.
Some of the newer machines have the ability for Off-centre positioning.
When this is activated and you load an embroidery design, the machine will not automatically centre the design in the hoop. Instead it will keep the positioning that it was digitized in.
Go to the Settings on your machine and click on the Hoop icon.
Click on the Off-centre Positioning icon.
Click on the slider to activate it.
If your machine does not have this capability, when you load the design you may need to manually move the placement of the design with the machine’s Multi-function knobs. Use the printed templates to help you figure out the placement.
 Load the first part of your embroidery design to your machine.
Select the Embroidery Menu Tab (the needle icon on the bottom right of the screen), follow the prompts and load the hoop when prompted.
Press the green button to start the embroidery.
 Once the embroidery is complete, the machine will request that you change the thread colour for stitching the placement x’s.
You don’t have to change the thread but a contrasting colour to your fabric may help.
Proceed to embroider the x’s when ready.
 Once complete, remove the hoop from the machine and unhoop the fabric.
 Place the template over your embroidery and match up the markers.
 Using the hoop template as well, hoop your fabric.
 Load the second part of your embroidery design to your machine.
Select the Embroidery Menu Tab (the needle icon on the bottom right of the screen), follow the prompts and load the hoop when prompted.
- Confirm the placement of the embroidery design with Pin-point Placement.
 Go back to the Edit menu.
 Open the Information Box.
 Choose the Pinpoint Placement icon.
 Select the Free Pinpoint positioning icon.
 On the screen, touch one of the placement markers.
 Zoom in to better see.
 Touch the centre of the x.
 Use the machine’s Multifunction Knobs to move the needle to the centre of the respective stitched marker.
 Turn the hand wheel to bring the needle down to check the placement and adjust as necessary.
 Select the Set button when you are happy with the placement.
 Zoom out.
 Repeat the steps for the other placement marker.
 Return to the Embroidery menu.
 I received this message which meant that part of my design is not within the embroidery area of the hoop. I had a closer look and realized that it was only one of the placement markers.
If part of the actual design was not within the embroidery area I would have rehooped and redone the pin-point placement. Instead I decided to dismiss the message and proceed to embroider as the stitching of the second set of markers isn’t too important seeing as I had confirmed the placement with the pin-point placement technique. This is also why on the screen there is a red line around the hoop while I embroider. The machine will want to stitch the second set of placement markers before the design as another way for you to confirm the placement.
If the placement is correct, the x will be stitched directly on top of the previous placement marker.
 Once the markers have stitched, proceed to embroider the design.
 Remove the fabric from the hoop and give it a press. Unpick the placement markers and the embroidered textile is ready to be used in your project.
 I placed my Exterior Wallet pattern piece on top and used it as a template to cut it out.
The embroidered design doesn’t extend into the seam allowance so as to reduce bulk. This was an intentional feature that I did when creating the design in Bernina’s Embroidery Software 9.


Tips
- Recommended fabric for the Exterior: Quilting Cotton, Linen, Canvas, Light Denim, Light Pleather/Vinyl
- Recommended fabric for the Interior: a thin but sturdy fabric such as Quilting Cotton or Cotton Lawn
- These are all the downloads again:
Free Wallet Pattern
Wallet Exterior Variation Pattern & Tutorial: Wallet Exterior Variation
Create your own Wallet Embroidery Design Tutorial: Create your own embroidered textile
Free Embroidery Designs: Wallet embroidery designs by Hannah-Rose Smith.
How to print templates of an embroidery design - Please keep in mind that as the provided embroidery designs are relatively simple for multi-hooping, I was able to easily make use of the Auto Hoop tool when digitizing. They are also relatively straight forward to embroider with the multi-hooping technique. Of course the more awkward the shape and larger the size of the embroidery design, the more challenging multi-hooping may be. This blog post is merely an introduction Multi-Hooping.
I would love to see what you make, please feel free to share with me!
Instagram
Facebook
-Hannah-Rose


Thank you very much for the lovely project. I am going to give this a go. I have downloaded your embroidery designs, but they dont appear to be as they are in your pictures. Is this intentional, of have mine corrupted in some way during my download/unzip? Mine are called ‘All over daisies’ and ‘Protea rows’, and they don’t look like the illustrations. Thank you .
Hi Jan
Oh that’s exciting, I hope your wallet turns out great!
I created the embroidery design in my previous blog post: Create your own embroidered textile where I digitized an image by Rawpixel.com on Freepik.
As I don’t have the commercial rights to the original image, I don’t believe that I could share the digitized embroidery version. Therefore I created other embroidery designs that may be freely shared, the All over daisies and Protea rows.
Apologies for the confusion 🙂 I’ll add illustrations for these designs to the article.
Happy sewing!