 BERNINA Corporate Blog -
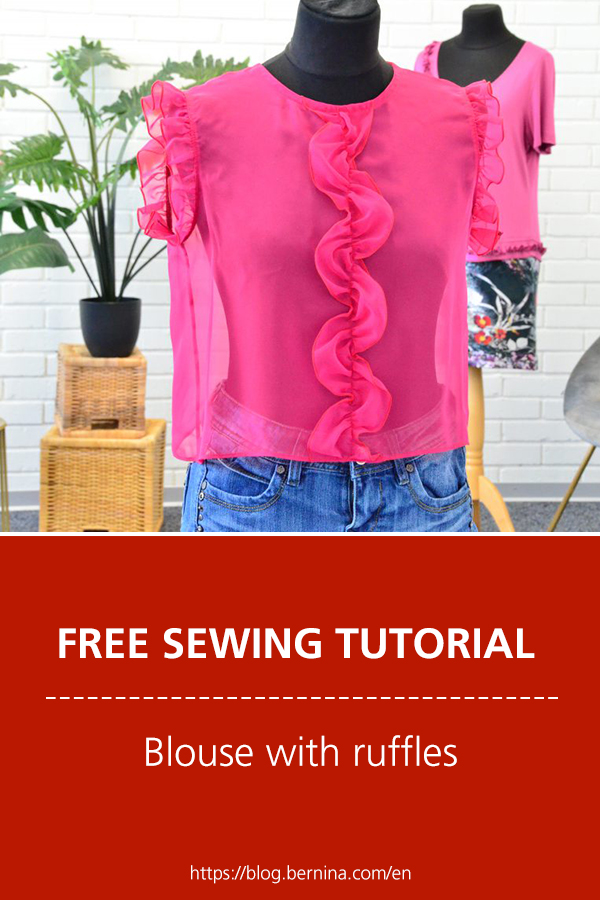
Did you notice on our website or other social media channels, for the L 850/860 and L 890 there are shirring feet available now. In this blog you will see how you can sew a blouse with ruffles with these feet on the overlocker.

First, a look at the new presser feet. Have you already sewn ruffles with the new Shirring Foot #L24 and Shirring Foot #C24? These presser feet call for fine, soft fabrics, which then are often used for blouses, especially in summer, but not only of course. You may want to prepare for Christmas, New Year and other celebrations. Or you may want to sew something for a children’s garment for any occasion.


The basic use and some creative ideas are shown in our video tutorial for the Shirring Feet.
Sewing a blouse with ruffles
But now, let us talk about the blouse. All you need is a front part and a back part and may be a closure solution that can easily be done on the overlocker.

I use the pattern of the blouse Clementine from our magazine “inspiration”, issue 02/2021. It is actually an ideal project to be executed on the overlocker!


Maybe you have another pattern in your collection that you want to use, you really only need a front part and a back part.

Using Clementine, I have amended the pattern slightly by moving the shoulder seam back to the shoulder.

And my ruffles are not decorating the seam but the armholes.

And for the front center I thought about something special, a zig-zag ruffle. For that you need the L 890 and the C24.

If you want to copy my project, please proceed as per following description. The procedure when using the L24/C24 and an L850/860/890 is slightly different than when using a sewing machine.
Materials
- 0.9 – 1.2 m / 36 – 44″ fine, soft fabric, such as voile, georgette or batiste
- L 850/860 or L 890
- Shirring foot L24 or C24
- Sewing Machine (straight stitch)
- Overlock thread
- Sewing thread
- Embroidery thread (or other fine, shiny thread for the rolled hem)
- Pattern 221-13 or as per your preference
Cutting
- 1 x front part on the fold, add 1 cm seam allowance
- 2 x back part, add 1 cm / 1/2″ seam allowance
- 2 x ruffles for armhole: fabric width x 6 cm / 2 1/2″
- 1 x ruffle front center: fabric width x 10 cm/ 4″ (L 890 only)
- 2 x strap for the closure bows: fabric width x 5 cm / 2″
- 1 x bias strip for neckline binding: approx. 50 x 4 cm / 20 x 1 1/2″ (can be pieced together if required)
First step
If you are using a pattern with a dart, close that first with the sewing machine. Since my model was sewn in size 36, I ignored the dart, the ruffle at the armhole did compensate for surplus width.

Ruffles preparation
Thread the machine for 3-thread rolled hem, embroidery thread in the upper looper. Presser foot L10/C11. Test sew on spare fabric. Hem the armhole ruffles along one side.

Hem the ruffle for the front center along both sides.
As for all sewing, also for overlock projects I recommend: Iron after every seam. This stabilizes the seam and simplifies further processing. For me it is a standard procedure, so I will not mention it after each seam.

Shoulder seam
Set the machine for 3-thread narrow seam. Test sew and fine-tune if required.
Pin the front and the back together at the shoulder. Sew the shoulder seams. Press the seam allowances towards the front.

Using the fine 3-thread narrow seam to sew transparent fabrics together results in a narrow, neat and tidy, nearly invisible seams.

Gathering the front center ruffle
I think, the eyecatcher of this ruffle is, that the fabric strip is gathered in a zig-zag line.

This technique will only work on the L 890, since we now gather with chainstitch.

Mark a zig-zag on the front center strip, approx. 10 cm / 4″ long pips, from rolled hem to rolled hem.

Thread the L 890 for chainstitch. Attach the Shirring Foot C24. For optimal gathering, set the differential feed to 2 and the stitch length to 4.5.

Stitch along the zig-zag.

For how this works, please watch our video tutorial on the Shirring Feet L24/C24 which is already linked earlier in this blog. If you did not watch it up to minute 2:33, here the link to the player again.
https://youtu.be/XoeI-BTDD5E&t=2m33s
And ok, I admit, you can also produce a zig-zag ruffle on your sewing machine, using a long straight stitch and gather the fabric manually. You sure understand that I have no picture of that.
Place the zig-zag ruffle in the front center, straightening the stitching. Pin into place. Stitch the ruffle onto the front center.

Armhole ruffles, gathering
Thread the machine with 4-thread overlock. Set differential feed to 2 and stitch length to 4.5 for maximal gathering. Attach presser foot L24/C24.
Gather the armhole ruffles along the unneatened side. My tip: if your gathered strip is much longer then the armhole opening, stitch over the first gathering again to increase the effect if you like.

The curve of the armhole is one of the reasons for using the L24/C24 for gathering and not the Gathering foot L18/C18.

Ruffles for curves and different pattern shapes can be prepared quickly and easily with the L24/C24 and can then be processed further depending on the cutting line or design. But more on that later in this blog.
Armhole ruffles, stitching
The machine is already set with 4-thread overlock. If you want, set the cutting width to 7, to avoid cutting the gathering stitches. Attach the presser foot L10/C11.
Pin the ruffle to the armhole, right sides facing. Stitch in place with 4-thread overlock.

Easy-turning strap ties
Straps can be stitched on the overlocker in no time.

Tip: Soft knit fabrics are ideal and easy to turn. The fabric strip should be wide enough that the tunnel is wider than the overlock stitch (4-thread overlock 6 mm wide). If you use a woven fabric, I recommend to cut it bias and use a narrow 3-thread overlock stitch (3 to 4 mm). Stiff fabrics are not suitable for this method.

But as this example will show, fine soft fabrics can also be cut across the grain and turned easily. Just a side note, this method is not suitable for thicker or stiff fabrics.

Tip: If you like to see in a video, how such so-called “spaghetti straps” are sewn, please refer to our video tutorial filmed on the BERNINA L 450/460.
Cut the two such turned straps into three equally long pieces.
To secure the ends of the straps, you can simply push them back into the tunnel by approx. 2 cm using a tool with a rounded tip, such as a tapestry needle or alike.

Neckline
Iron the bias strip lengthwise along the fold. Pin the open edges right side facing onto the neckline seam allowance. It is ok to have spare bias in the back center. Sew the bias in place with 4-thread overlock.
Side seams
The machine is already set for 4-thread overlock. As an alternative I practiced here a 4-thread narrow seam. That is a 4-thread overlock with stitch tongue on rolled hem setting. The result is a slightly wider seam with rolled in edge.

Pin the front and the back together at the side seams incl. ruffle. Sew the side seams. On the rolled hem end of the ruffle, secure the thread chain.

Closure
Thread the machine for 3-thread overlock.
Place strap ties in center back, three on each side, evenly spaced. Pin into place.

Neaten the whole seam allowance, center back and hem, including neckline bias, with 3-thread overlock, thus basting the strap ties into place.
Hem and topstitch
Set the machine for 2-thread chainstitch. If you have no L 890, use your sewing machine and a straight stitch.

Now you can topstitch the whole seam. I recommend starting at the bias and sew once around.

Then fold the bias at the neckline inwards and topstitch. Secure both ends.


Last I folded the seam allowance of the ruffle around the armhole towards the blouse and topstitched that in place.

Tip: for topstitching these seams, you could also use the Curve Food C23. Its transparency allows best view onto the stitching area. Find out more in our video tutorial.
Nearly done, one last time, press it all.

Some BERNINA insight wanted?
Have you wondered, why I used the Shirring Feet L24/C24 for this project and not the gathering Feet L18/C18?

The Shirring Feet L24/C24 were developed to optimally gather fine single layers of fabric, using differential feed. Whereas the fabric quality defines the gathering result.

With C24 you can gather along an edge, but also within the fabric using chainstitch or coverstitch. As you have seen in the video tutorial, they are ideal to gather, but also to “gather to fit”, for example sleeves or hems in a circle. Gathering a single layer fabric allows you to stitch it to any shape or pattern in your project.

The L24 on the L 850/860 of course is most often used with 4-thread overlock, differential feed 2 and max stitch length, for optimal gathering.

The C24 on the L 890 is used together with either 4-thread overlock or it can be used with 2-thread chainstitch to gather within the fabric.

You can also use it with a narrow coverstitch to gather within fabric, adding a decorative touch, by showing the chain looper and decorative thread.

The Gathering Feet L18/C18 were developed to gather fine single layers of fabric, while simultaneously sewing that gather to a flat piece of fabric, also using differential feed.

That works perfect, as long as the flat pieces are cut relatively straight. But don’t hesitate and use the different feet to find out yourself!

Of course, you find more information about the Gathering Feet 18 in our video tutorial.
Are you ready to use some of these suggestions to personalize your projects? The L 850/860/890 and the shirring feet L24/C24 also call for decorating your knitwear projects.


Wish you happy overlock and coverstitch, respectively chainstitch sewing!

Doris


0 Responses