 BERNINA Corporate Blog -
Have you stumbled across the videos on Youtube for the new overlock accessories, the #C23 and #L23 curve feet? In them you can see two turtle pads, one in green, the other one in blue. I already showed you how to sew the blue turtle with foot L23 some days ago – here’s the article. Today follows the tutorial for the green turtle. You will also find in the post the free pattern, adapted to the green turtle.

Sewing a pillow in the shape of a turtle – Instructions
The green turtle is sewn with foot #C23. Cover stitches, chain stitches and overlock stitches are used. The turtle can therefore only be realized on the L 890 overlock/coverstitch combo machine.

It differes from the blue turtle. The blue one is sewn with foot #L23. As a sewing project it is adapted to the BERNINA models L 850/L 860 and can be realized with a pure overlock machine without cover or chain stitch.

Download pattern for free
The pattern for both projects is almost the same. The one for the green turtle can be downloaded here for free.
Free download for the green turtle PDF A4
After printing, glue the body together at A/B.
Sewing notes
Since the green turtle differs only slightly from the blue turtle, you will find in this article again the photos of the blue turtle, referring to what both projects have in commen.

The Cover- or chainstitch pictures are from the green project.

However, you will notice that the instructions also differ in:
- decorating the upper body
- variations of sewing in the zipper
- sequence of stitching, relating to the timing of decorating and stitching the zipper into place.
So for the sake of simplicity, here the procedure complete and detailed.
This project is, same as the blue turtle project, ideal to use up fabric pieces. In my cupboard I find enough boxes of green or green printed materials.

For the body I found a Softshell fabric piece large enough. For the head and the tail I used some knitted but stable double face. The feet are made from knit toweling. These are only remnants from my stash, you will find for sure something in a medium weight quality with little or no elasticity.

List of material:
- L 890
- C23
- Sewing machine (I use the B 790 PLUS mostly)
- Fabric for body, 40 x 90 cm / 16 x 35″
- Fabric for head and tail, 20 x 40 cm / 8 x 16″
- Fabric for Feet, 20 x 80 cm / 8 x 32″ (or 20 x 40 cm / 8 x 16″ in two different qualities)
- zipper (by the yard) 32 cm / 12 1/2″
- Stuffing
- Fabric color pen or buttons for the eyes (optional).
- Overlocker/Serger thread
- Decorative thread, for example Madeira Cotona or Mettler Silk Finish Cotton 28 or 40. Sulky 12wt is another option.
If you only have fine threads, you can use two or three threads in upper/lower looper and chain looper to build up body by mixing your own thread. That was my procedure with the feet and dots, combining Lana with Silk Finish Cotton 50. A texturized thread can also be used. Try with the threads you have!

Cutting
- Body, twice at the fold.
- Head and Tail, Fabric right sides together, once the Head and once the tail.
- Feet, fabric wrong sides together, twice the front feet, twice the rear feet (= 4 pieces each).
- Zipper end parts. 4 x 10 cm / 1 1/2 x 4″, cut 4 pieces from the reminder of the body or head.
- Cut the lower body at the fold into two pieces, that is where the zipper will be added. The width of the zipper defines the seam allowance at this seam line.
Zipper preparations
On the zipper, add two pieces of fabric on each end, one on the right, one on the wrong side. Stitch across (with the sewing machine).

If you do not have a sewing machine, just lay the pieces on top and bottom of the zipper and clip them on, they will be secured in place by sewing the zipper in.

For this procedure of adding a zipper tab, there are numerous articles available. A detailed description for example is in the blog of Jen Belnap.
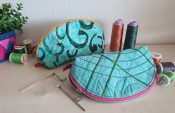
Body decoration
Attach the curve foot C23.
Thread the combo machine with 2-thread chainstitch (stitch 16). Thread the chain looper with decorative thread. Set the stitch length between 3.5 Testsew on some spare fabric of the body, fine-tune where necessary.

Mark the circles and curves on the wrong side of the upper body.
Sew along the curves with 2-thread chainstitch.

For tips on how to do this, please refer to our video tutorial on the curve feet L23 and C23. We also show how to end the stitch in a circle. In this tutorial video you will also find more tips on the use of the curve feet.
Don’t forget to press each seam. For me it is a standard procedure, so I will not mention it after each seam.
Thread the combo machine with 3-thread coverstitch narrrow (stitch 24 RC, CC). Thread the chain looper with decorative thread. Set the stitch length between 3.5 and 4. Testsew on some spare fabric of the body, fine-tune where necessary.

Sew the dots/circles with 3-thread coverstitch.
The procedure of sewing the circles is the same as sewing the curves.
Sewing zipper, variants / suggestions
Next step is sewing in the zipper.
Using softshell fabric did not require neatening the seam allowance below the zipper, that is why I have stitched the zipper in now (before changing to overlock stitching). If this differs due to your material selection, then neaten the seam allowance with a 3-thread overlock narrow (stitch 4) and foot C11 first, before stitching the zipper into place with chainstitch (stitch 16) but LC (left coverstitch needle) and foot C13.

Place the zipper right on right onto the cut of the lower body and stitch together.

And by the way, the curve foot C23 can also be used with LC.

An alternative would be, using foot C11, and threading the machine for one of the combo stitches. You see, the L 890 offers endless possibilities!

Sewing the feet
Thread the combo machine with 3-thread overlock wide (stitch 3). Thread the upper looper and the lower looper with decorative thread. Set the stitch length between 2 and 2.5. Testsew on some spare fabric of the feet, fine-tune where necessary.

Having the feet wrong sides facing, stitch around the curves, leaving the joint to the body open for stuffing.
Stuff the feet softly.
Sewing head and tail
Next is stitching the head. In case you want eyes, buttons or other decoration, now is the moment to add that.

Stitch the head right sides facing, leaving the joint to the body open (deactivate the knife, there is no seam allowance to be cut).

Turn the head, right side out, stuff softly.
Stitch the tail, right sides facing, leaving the joint to the body open (follow the same procedure as with the head).

Turn the tail, right side out, stuff softly.
Piecing the turtle together
Attach the Overlock-Combostitch foot C11.Select and thread the machine with 3-thread overlock narrow, stitch 4.
Place the head right on right at the front (1) of the lower body.

Place the tail right on right at the rear (6) of the lower body.

Pin/clip the rear legs (4/5) right sides facing on the lower body.

Pin/clip the front legs (2/3) right sides facing on the lower body.

Thread the machine with 3-thread overlock narrow (stitch 4).
Stitch once around the lower body to baste the parts in place.

Open the zipper.
Thread the machine with 4-thread overlock (stitch 1).
Place the upper body right sides facing onto the lower body and pin/clip. Cut back any size difference caused by the zipper. Make sure the zipper is open.

Stitch around the body.

Tip: the OL/CS Height Compensating Tools may be helpful stitching over the thick parts. Find here the video tutorial for the Height Compensating Tools:
Turn the turtle, right side out.


Stuff the turtle and close the zipper.

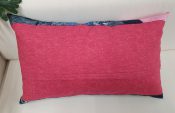
Tip: if you use the turtle as a toy and it needs washing, I recommend using the body pattern to sew a stuffing pillow for inside. I recommend using a soft cotton fabric.

Yes, this was it once more – at my place two turtles are waiting for cuddles. I hope you have fun sewing this project. Please do not hesitate to share your project pictures with us!

And just as a teaser, one more the picture of the project from Mary Beck, Educator and Serger Specialist at BoA:
 The instructions for this tic-tac-toe game, in which our curved feet can show their full strength, will be published later this year on the US blog Weallsew.
Have fun using the new curve feet for the BERNINA L8 series!
Doris


0 Responses