 BERNINA Corporate Blog -
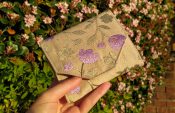
 I love my custom embroidered wallet that I made in a previous blog post and wanted to make a bag to match.
The free Sweet Pea Saddle Bag Pattern by Blue Calla is the perfect size and shape to make myself a handbag. By embroidering the flap in the same design and making it in the same fabrics, it will be a matching set with my wallet.
I also like the idea of a detachable strap for versatility. I could make another strap which is narrower or a chain for more formal functions.
What will be needed:
- Sewing machine (735)
- Embroidery Module
-Cut-away stabilizer
-Embroidery Thread
–Large Oval Hoop
– Foot #26
- Embroidery design (see below)
- Sweet Pea Saddle Bag Pattern (see below)
- 0.5m Exterior Fabric
- 0.5m Lining Fabric
- 0.5m Fusible Fleece
- 1m Fusing
- 1 x 2.5cm wide Rectangle Slider
- 2 x 2.5 cm D-rings
- 2 x 2.5 cm Lobster Clasps
- 1.5m Webbing 2.5cm wide
- 1.8mm Magnetic Snap
- For zip closure:
20cm zip (can be longer and cut down) - For zip pocket:
16.5cm zip (can be longer and cut down)
Refer to the pattern’s instructions for the original list.
Free Bag Pattern
These are the alterations I made for my Sweet Pea Saddle Bag:
-Webbing instead of Fabric Strap
-No Tassle, Piping or internal Zip/pocket
-I Reshaped the Flap so that it would match my wallet & I added a Zip Closure
If you would like to make these alterations, you’ll need these pattern pieces and a 20cm zip.
Flap & Zip Closure variation
Free Bag Flap Embroidery Designs
As the Flap is bigger than my largest Hoop, I need to use the Multi-Hoop technique.
Please refer here to learn how to Multi-Hoop
I created embroidery designs to match the ones I provided in my blog post Create your own embroidered textile so that you too can make a bag to match your wallet.


You can download the designs here: Bag Flap Embroidery Designs by Hannah-Rose Smith
The designs are for the amended Flap and the original artworks were generated by AI.
Sew
 Refer to the Sweet Pea Saddle Bag pattern’s instructions. My steps for adding a zip would take place of the Final Assembly steps in the instructions.
 Leave an opening in the base of the Lining.
If you made the zip pocket, you can sew the bottom of the pocket bag closed.
Zip Closure
 Sandwich the Zip Tape between the Interior and Exterior Zip Side pieces.
Lay flat the Zip Side Interior piece right-side up.
Place the zip right-side up on top and line up the edges.
Place the Zip Side Exterior piece right-side down on top and line up the edges. Sew with a 1cm seam allowance.
 Repeat for the other side of the Zip.
 Topstitch.
 Trim the edges so that the total width is 6.5cm and length is 21.5cm
 This is a step I only thought about after completing the bag so my zip piece will look a bit different from yours for the next few steps. It will help make attaching the zip piece to the bag a bit easier.
At each corner, draw 1cm by 1cm squares. Cut off these squares.
 Turn the Exterior Bag wrong-side out, with the Flap on the inside.
 Pin the Zip Closure piece to the opening of the Bag with the wrong side facing up.
Open the Zip so that the Zip head doesn’t get in the way and so that you can turn the bag right-side out later on. Baste with a 0.5cm seam allowance.
I recommend sewing the short edges first.
If your zip was shortened, be careful to not sew through the zipper teeth.- Turn the Interior Bag wrong-side out.
 Pin the opening to the Zip Closure piece. Pin all the way around again.
Sew through all layers to secure the Zip Closure using 1cm seam allowance.
If your zip was shortened, be careful to not sew through the zipper teeth. Trim the top of the bags side seams to reduce bulk. Do not cut through any stitches.
 Place your hand through the opening in the base of the Interior Bag.
Pull the Exterior Bag through the opening and turn the Bag right side out. Pull the Interior Bag out and stitch the base closed.


Tips
- Recommended fabric for the Exterior: Quilting Cotton, Linen, Canvas, Light Denim, Light Pleather/Vinyl.
- Recommended fabric for the Interior: a thin fabric such as Quilting Cotton or Cotton Lawn or even Acetate Lining.
- Keep in mind that the stiffer or thicker the fabric, the trickier it will be to make the bag, especially with the zip closure.
- These are all the downloads again:
Free Sweet Pea Saddle Bag Pattern
Flap & Zip Closure variation
Bag Flap Embroidery Designs by Hannah-Rose Smith
How to Multi-Hoop: DIY Embroidered wallet with free patterns & designs
I would love to see what you make, please feel free to share with me!
Instagram
Facebook
-Hannah-Rose


0 Responses