 BERNINA Corporate Blog -
Today we are opening the seventh door of the Blog Advent Calendar 2023 together. For me, the Christmas holidays are associated with good food and a beautifully laid table. These things often fall short in everyday life: Cook something quickly, lay the table quickly, eat quickly. At weekends and especially on festive days, we try to slow things down. It may sound somewhat ironic that we end to decelerate at Christmas, but if the planner isn’t too full, it works well. The days are meant to be for enjoying each other’s company in a cozy atmosphere and spending time together. As we are all fond of eating, we can sit together comfortably at the table for a long time.

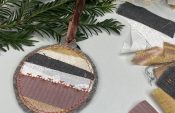
For this year’s Advent calendar, which is themed around embroidery, I have therefore prepared placemats for a beautifully laid Christmas table. If you leave out the “Merry Christmas” lettering, you can use the placemats all year round without any fuss. But these days, it’s all about Christmas.

Embroidering placemats – Material supplies
- Wool felt in 3 mm thickness (I opted for neutral gray); my placemats each measure 30 x 40 cm
- Embroidery thread (I used anthracite and blue, as this matches best with our dishes). I also did a test with golden embroidery thread – great for Christmas, but I only have silver cutlery ;-))
- Stabilizer
- If available: Magnetic embroidery hoop (this is very convenient with wool felt this thick); mine measures 13 x 18 cm.
- If I use the conventional embroidery hoop instead of the magnetic hoop, I just hoop the stabilizer, place the wool felt on top and fix it lightly with spray adhesive if necessary. I then sit next to the machine to monitor that nothing slips out of place. My hoop size for the files comes up to 14 x 20 cm.
Embroidery files for the seventh door
I have prepared the embroidery files for you to download:
- Fork: Fork
- Knife and spoon: Knife, spoon
- “Merry Christmas” lettering: Merry Christmas (for the international embroidery fans among you: “Merry Christmas”: Merry Christmas)
- Stars: Stars
Click on the download link to download a ZIP file to your computer. As a rule, you will find then find the file in the download folder; the exact location depends on your local settings.
Please unzip the ZIP file first, before you transfer the data to your sewing machine or open them in the embroidery software.
Embroidering the placemats
Hoop the wool felt in the embroidery hoop. I use the bernette Magnetic Embroidery Hoop M (130 x 180 mm). With this hoop, I can simply clamp the delicate fabric between the magnetic top and bottom rings of the hoop and remove it again after embroidering. There is NO pressure mark visible.
The magnetic embroidery hoop is compatible with the bernette 70 DECO, bernette 79 and bernette 79 Yaya Han Edition models. It is available in three sizes (S, M and L). The new Clamp Embroidery Hoops are available for BERNINA machines.

The following video by bernette shows how to use the magnetic embroidery hoop. Click on the CC icon in the video player to show the subtitles.
I start embroidering at the bottom right. First I embroider the stars. I stitch the embroidery design of the stars twice, slightly offset. If there are too many stars for you, embroider them only once.

I place the “knife and spoon” embroidery at the bottom right above the stars. I enjoy seeing the stars in the background. As I created the file for the L frame (14 x 26 cm) and then embroidered it afterwards with the M magnetic frame (13 x 18 cm), I have therefore downsized the file to 90% on the embroidery machine .

Now we embroider the left side. Either you are thinking “upside down” or you have to be aware that the right side of the fabric lies properly and moves with it so that there won’t be any mistake in the embroidery design. I have decided to go for the “watch out” option. This made it much easier for me to place the fork and knife/spoon at the same height. You can alternatively measure, hoop accordingly and then embroider upside down, so to speak.

It is important that you remember the height at which you clamped the wool felt with the knife/spoon so that you can repeat it exactly the same on the left.

Lay the table and enjoy
Your placemats are ready to use. Depending on the number of family members and/or guests, you can embroider the appropriate number of placemats and lay a beautiful Christmas table. Have a great time and wonderful moments with your loved ones !


So cute! Love the idea of using felt. No backing or binding needed. Thanks.