 BERNINA Corporate Blog -
I shared a post on Instagram recently of a project I was working on – a foundational corset for my fantasy ballgown – and the most popular question in the comments was – “What foot are you using to stitch down the channelling?”
It was the Edgestitch Foot #10 of course! It’s one of my favourites, and that question (and the number of people who asked it) really got me thinking about how many uses this foot has, and how many people might not know about it! I thought I’d share a little rundown today of the recent projects I’ve used the edgestitch foot on, and why I love it so much. Is it weird to have a favourite sewing machine foot?? I hope not!


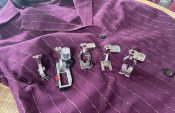
Before we begin – a quick foot anatomy lesson. The edgestitch foot looks largely like any all-purpose sewing machine foot, but it as an additional metal guide at the front, which runs down the centre of the foot and is connected to the side of the shank. This guide is set on a spring, and its job is to nestle down into a seam so that you can use it as a guide to stitch along any sort of edge. Simple, right? I find that the guide allows me to stitch much faster, and still maintain the same level of precision I would if I were stitching slower, without the guide.
Stitching in the Ditch
My most commonly used application for the edgestitch foot is when I’m stitching in the ditch to apply a waistband to a pair of pants.

At this stage, I’ve attached the waistband to the rest of the pants, and I’m stitching in the ditch from the right side to secure the waistband facing along its bottom edge. I pin liberally at this stage, but you never want to sew over a pin, especially with the edgestitch foot as the guide won’t be able to nestle into the seam as nicely when there’s a pin in the way.

Here, you can see how accurately my stitching in the ditch turns out with the help of the guide!
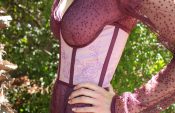
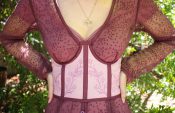
Applying Corset Channelling
This is the corset I told you about earlier (here’s the Instagram post– come say hi!) – the only difference in the settings from the stitching in the ditch above, is that I want to stitch right along the edge of the piece of channelling, so I moved my needle position slightly to the left. This way, instead of the needle stitching directly behind the guide, you can use the guide to align the edge of the fabric and topstitch to the side.

In corsetry, it’s important to stitch all your channelling down from one direction – for example, starting at the top edge of the corset and stitching towards the bottom. This prevents warping and tunnelling in the fabric. The edgestitch foot’s guide can be used on either side, so when I need to stitch the other side of the channelling, I can simply move my needle over to the right and I’m off to the races! Here, you can see how consistent the result is:

Topstitching is a lot of work when you have this many bones to stitch down!

Shirtmaking Plackets and Cuffs
Here’s another recent project – a visible shirt cuff on a shirt I made a few months ago and am now wearing all the time. I shared a blog post here on the BERNINA blog when I made it if you’d like to learn more about the project, as well as the other feet I used! In this project, I used the edgestitch foot in much the same way as the corset – I set the needle position to the right and used the guide to topstitch my shirt cuff down. This is also useful for button-up shirt plackets, sleeve plackets, cuffs, and even collars!

Topstitching Pants; Two Ways
These next two examples are very similar, but the results look quite different! Again, I’m using the edgestitch foot combined with an off-centred needle position to topstitch a seam. First, this pair of linen pants that was part of my “Christmas Pants-A-Thon” this year (I made six pairs of pants over my holiday break and shared them on social media!) – This pair of linen wide-legged trousers needed topstitching along the center back seam, both for stability and appearances sake – a perfect opportunity for the edgestitch foot!

I used regular weight thread to topstitch, so it blends into the fabric but that neat line is all thanks to the edgestitch foot!

Next, jeans, of course! These were also part of my Pants-A-Thon, and they’re not actually quite finished – here’s a hint at a future project I’ll tell you about here on the blog, I’m planning to machine embroider all up the legs of these jeans! Topstitching is quite critical in jeans – it’s often done using contrasting thread, so it’s very obvious if lines are uneven! Here, I topstitched two separate rows – the first offsetting the needle by two ticks, and the next offsetting it as far as it would go. I combined this with a triple straight stitch on my B 570, which has the added benefit of providing a beautiful thick topstitching line, without having to swap out your regular sewing thread!

Narrow Hems
My last tip is perhaps the most obvious if you think about it (an actual edge!) but also the one I see folks using the least – the edgestitch foot is perfect for narrow hems. Use the guide for the folded edge of the fabric to provide a nice, even edge to help you feed the fabric as you sew. The trick here is that it only works with a very narrow hem – in most cases I go for about 1/4″, and move the needle over to the left as far as it will go. It’s a perfect system though!

What do you think? Have I covered everything you use your edgestitch foot for? I know some folks pair it with decorative stitches – I have yet to try this, but I’ll let you know if I do. I use this foot on nearly every project – of course, it helps that the feet are so easy to switch out on BERNINA machines.
As always, you can catch me on Instagram, TikTok, and YouTube to see what I’m currently sewing!

Hi, is this foot compatible with the Bernette B77?Thanks
Hello! The #10 foot has a longer shank to fit the BERNINAS specifically but this is the bernette equivalent: https://www.bernette.com/en/accessories/edgestitch-foot – I hope that helps!
Funny this came up today. I picked up the #10 foot only last weekend and wondered about its uses. I’ll use it now.
I hope you love it! I end up using mine all the time, I suspect you’ll find it really useful!