 BERNINA Corporate Blog -
Have you ever come across a piece of fabric in a shop that practically begged to be made into a specific item? I was on the hunt for something completely different when I stumbled upon this wonderful, mid-weight linen that was practically shouting at me to turn it into a shirt. This, in turn, gave me an opportunity to explore some presser feet for shirtmaking with my B 570 QE!

This shirt pattern is one of my own self drafts – I call it my “Vacation Dad” shirt because the style is reminiscent of a tropical shirt that you might find on someone enjoying a tropical vacation with his kids. I’ve made this particular shirt nine times now – I love them for the summer season!
Check out the Gilbert Shirt by Helen’s Closet if you’d like to make a similar pattern. I haven’t made this pattern specifically, but I’ve made several other Helen’s Closet patterns and they’ve always been well drafted with thoughtful, thorough instructions.
Despite having made my Vacation Dad shirt so many times, this was my first time sewing one up on my BERNINA 570 QE – which means it’s an excellent comparison project, and an excuse to try out some of the accessories I got with my machine – namely, all those amazing feet! Without further ado – here are the top 5 stand out shirtmaking presser feet in my arsenal!


Reverse Pattern Foot with Clear Sole
The foot that the B570 arrives wearing – the Reverse Pattern Foot #1 is a great all-rounder, but the clear sole version of this foot- the Reverse Pattern Foot with Clear Sole #34 has the benefit of added visibility, which I’ve found particularly handy in the move up to a 9mm stitch width from my bernette 79’s 5.5mm width. It lets me see more clearly what’s happening under the needle, and the red guides in the foot are helpful for turning perfect corners and points, which is critical on collars and cuffs!
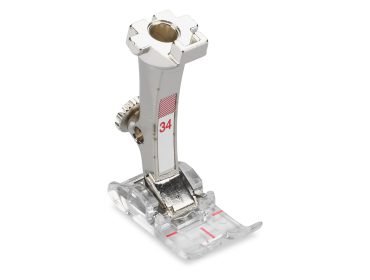
I started my shirt off by sewing all my construction seams with this foot, and the upper feed system engaged.

Open Embroidery Foot
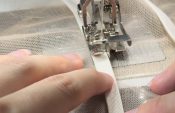
I’m not even remotely using this foot for its intended purpose, but it’s so perfect for this job! The Open Embroidery Foot #20 is designed to accommodate large decorative stitches – especially the ones with areas of satin stitch that might become bulky when stitched out. In addition to the open toe area of this foot, it also has a channel under the foot to help these bulky stitches pass under the foot without catching.

I always bind the arms of my shirts with a 1” wide strip of bias binding turned over the raw edge. As usual, I stitched the first pass of bias binding on to my armscye with 34D as above, but when it came time to do the final pass of bias binding, I found that the #20 gave me two advantages. This foot allowed me to make tiny adjustments to the alignment of the binding right before stitching so that my edge was perfectly even, and second, since the toe of the foot isn’t closed, it kept the bias binding from being squished and distorted out of place before being stitched.

I used this foot on this project for the first time after doing a few tests, and I think it’s safe to say I’m completely obsessed with the possibilities here! It does mean you’re taking some of the machine’s ability to feed the fabric on its own away (I wouldn’t use it to sew regular construction seams) but it’s perfect for applications like this!
Edgestitch Foot
It should come as no surprise that the Edgestitch Foot #10 is a clear winner in the shirtmaking presser feet category – and we’re back to using feet for their intended purposes with this foot! The Edgestitch foot has a spring loaded metal piece running down the centre which creates a guide that makes it very easy to stitch along any kind of border. I used it for topstitching the decorative cuff on my shirt’s sleeves, and for topstitching the hem and facing as well.


Buttonhole Foot with Slide
This should go without saying – there are often quite a lot of buttonholes in shirtmaking! This shirt got off fairly lightly – only three buttons with the Buttonhole Foot with Slide #3B though I think the maximum I’ve ever added to a shirt was nineteen! That was back when my main machine was my BERNINA 830 Record, with its manual five step buttonhole – what a task!
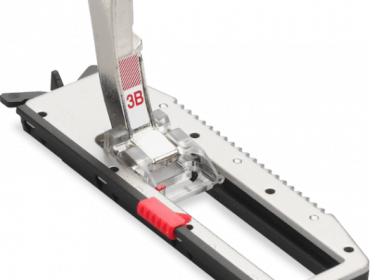

I used the B 570’s buttonhole sizing program to ensure my buttonholes were the correct size – to do this, you just hold your button up to the screen and turn the dial until the yellow circle matches the button size. The machine will automatically add an extra 1mm either side to accommodate for button width. From there, I stitched each buttonhole by aligning the foot at the chalk mark I’d made to indicate the top of each buttonhole and pressing and holding the green button. I also chose a decorative buttonhole option because I liked the way it looked.

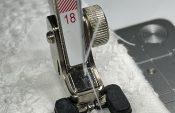
Button Sew-On Foot
Now we have just the buttons to add. I do find that sitting down and hand stitching buttons can be a really lovely, cathartic end to a project but I really like having the option to choose how I attach them. The Button Sew-On Foot #18 has two features I’ve found really handy in comparison to the version I have for my old Bernina Record. It has a little grippy rubber “shoe” on the foot which is incredibly handy for holding buttons in place while sewing. It also has an adjustable pin in the centre which allows you to loosen the stitches to create a thread shank for your button. The shank a bit of distance for the buttonhole, making those buttons sit nicely down the front of a shirt!
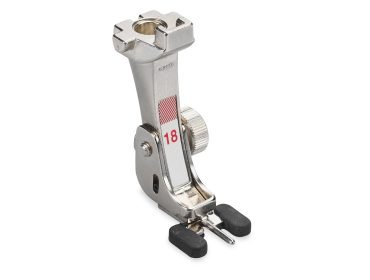
As I was stitching this shirt up and sharing the progress in my stories on Instagram, I had a few folks ask if I thought the shank made things too loose – my answer is no, and here’s why! The pin height is adjustable – you’d want more height in a button shank for a thick winter coat or waistband than you would on a lightweight shirt. For example, in this project, I used the pin on its lowest setting.

Sometimes, though, you really don’t want to add any shank at all. You might be sewing something extremely lightweight, or adding a hook and eye. In this case, you can actually flip the pin out of the way entirely – just remove the screw that adjusts the pin height, rotate the pin so it’s pointing up towards the top of the machine, and replace the screw to hold it in place in the upright position.
Done!
There we have it! I have another vacation dad shirt to add to my rotation, and a handy set of feet for future shirts! What do you think – what are your favourite feet? Have I missed any of your favourites?

As always, you can catch me on Instagram, TikTok, and YouTube to see what I’m currently sewing!

0 Responses