 BERNINA Corporate Blog -
I have two pieces of exciting news to share with you! The first, is that as part of my BERNINA ambassadorship, there’s a new machine in my sewing space! It’s the B 570 QE, which I’ve had for about a week and a half now, and have thoroughly enjoyed getting to know. The second is that I’m going to be an auntie! My sister’s having a baby, and of course, that means we have a lot of baby sewing to do!

I love sewing baby clothes, but since she’s my sister, she has the added privilege of being able to submit requests, which so far she has taken advantage of! I like this system because it means I’m sewing something that she definitely wants, and I can still add a personalised touch to the items I make for her little nugget.. and include a few surprises too!
I’m really excited to sew some big kid projects (read: things for me!) on the B 570 QE, but what better way to introduce myself to both the embroidery and sewing functions of my new machine than with machine appliqué in the form of a quick, satisfying set of dribble bibs? I couldn’t resist.

Although I don’t have kids myself, and my sister’s kiddo isn’t here to try them out for himself just yet, I’ve heard very favourable things about this shape and style of dribble bib – if you have a recommendation for another style of bib I should add to my sewing list, please let me know in the comments!
You will need
- Dribble bib pattern (I used this free one from Create Whimsy)
- Bib fabric, preferably cotton: Mine are a mix of cotton flannel, knit, and terrycloth for fronts and backs so that there are multiple options for absorption!
- Fabric scraps for appliqué
- Embroidery thread
- Tearaway stabiliser of your choice
- Washaway spray adhesive
- Snaps or closures – Velcro or KAM snaps would work, but I used sew-in magnets for an adaptive option
- Appliqué patterns – I used the Dinosaur and Dino Hatchling designs from Planet Appliqué.
I have previously used the bernette 79 for machine embroidery, and the following would work for any embroidery-capable machine.
Embroidering the Bibs
The bibs have a front and back, so embroidery’s underside can be neatly hidden so long as the pieces are constructed after embroidery is complete. I cut my bib top piece out first and used a disappearing pen to mark the centre front for hooping, but you could just as easily embroidery on uncut fabric and cut the bib pattern piece out after embroidering.
I prefer to float knit fabrics in the hoop rather than hooping them traditionally – to do this, you’ll hoop a piece of tearaway stabiliser as normal, and then spray the back of your piece of fabric lightly with spray-baste and adhere it to the stabiliser. Be careful not to get any spray-baste on your hoop or on anything else that is difficult to clean!


Import the embroidery design on to your machine, and add it to the hoop. From here, you can modify the placement if needed, and select the hoop size required for your design (I’m using the medium hoop).
I’m using a 60wt machine embroidery bobbin thread combined with the yellow high-tension bobbin case for perfect stitching. This means I don’t need to adjust the tension for my embroidery.

When stitching an appliqué, the design should be formatted to stitch in the following order:
- A placement guide, showing you how to place the fabric so that it covers the appliqué area

2. A tack-down – this is a simple straight stitch that holds the appliqué fabric in place, and it will be hidden by the final pass

3. A satin or other border to cover the raw edge of the fabric. This step generally includes an underlay to keep the raw edge of the fabric from peeking through.

Appliqués are quite easy, and as an added benefit they have comparatively low stitch counts so they’re not as dense and stiff as a full embroidery design – perfect for these little bibs! The only tricky part is trimming it out after the tack-down step. I love using my duckbill appliqué scissors for this, as well as a pair of ophthalmic scissors for the smaller areas. The duckbill scissors protect the lower fabric so you don’t accidentally cut into anything you don’t mean to cut.

The ophthalmic scissors are actually surgical equipment – their needle-sharp, curved blade is perfect not only for trimming threads close to an embroidery surface, but also for detailed appliqués. In this case, the area between the dinosaur’s tail and paw, and between the paws!

You can remove the embroidery hoop from the machine in order to get a better angle for trimming, but I prefer to leave it whenever possible so that it’s held in place while I trim whenever possible. Once the designs are stitched out, the bibs are ready to construct!
Constructing the Bibs

Switch back to sewing mode (ensuring any feline quality control assistants have had a chance to inspect your work!) and stitch a bib front and back, right sides together using a ¼” seam allowance. Leave a gap of about 3” between the start and stop of your stitching, and use this gap to turn the bib right side out. Press well – press from the back to avoid marring the appliqué design if you’ve used polyester threads, as they may melt!
Switch to the Edgestitch Foot #10 and move the needle position to the left by 2-3 ticks. Topstitch around the outer edge of the bib, carefully aligning the folded edges of the fabric when you get to the turning hole.


To finish the bib, add the closure of your choice – I’m using sew-in magnets. Magnets are dangerous if swallowed, so make sure you’re only using sew-in magnets designed for this purpose (they’re encased in a layer of plastic that you sew through to secure) and that you backstitch extra at the start and stop of each seam. If you’re uncomfortable with using magnets, KAM snaps and velcro are both great alternatives. Any clothing a kiddo wears should also be inspected before each wear to make sure no buttons, snap components, or decorations are starting to come loose, as these can all be choking hazards.

I don’t want the plastic to be exposed for these bibs (It’s ugly!) so I’m encasing each one in a small square of quilting cotton before sewing. I’ve found that anything thicker than a plain quilting cotton decreases the strength of the magnet, so if you’d like to use a thicker fabric, you may wish to choose a larger magnet size.

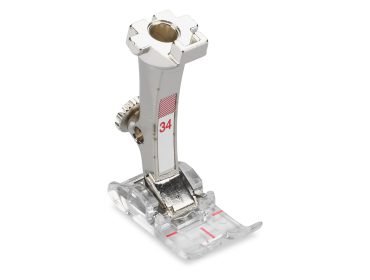
To install, simply fold the fabric around the magnet and stitch around the edge, making sure to stitch through the plastic. Reverse at the start and end of each seam. The magnet will try to run around a bit as it’s attracted to the metal parts of your machine. I found that the clear sole of the Reverse Pattern Foot with Clear Sole #34 was uniquely suited to sewing on magnets as the magnet isn’t attracted to the plastic! I also found it helpful to move my needle to the far left and sew the magnet to the left of the foot so the fabric could feed more evenly.

That’s it! I’ve made a small stack of these to give to my sister, I hope they work as well as I’m imagining they will – and bonus points for being cute either way! I have plans to make my sister a stack of other baby items, and the next on my list is a mitred corner blanket like this one, which I make for every new arrival I sew for!
If you’d like to keep up with my projects and see what else I’m currently working on, I’d love for you to come say hi on Instagram, TikTok, or YouTube – and, as always, let me know in the comments if you have any questions!


Thanks for the tip about using a small magnet fastener.
These are adorable! Thanks for sharing the link to Create Whimsy!
Thanks Lynn! It’s a perfect little pattern, I’m excited to see it actually on my nephew!